background image

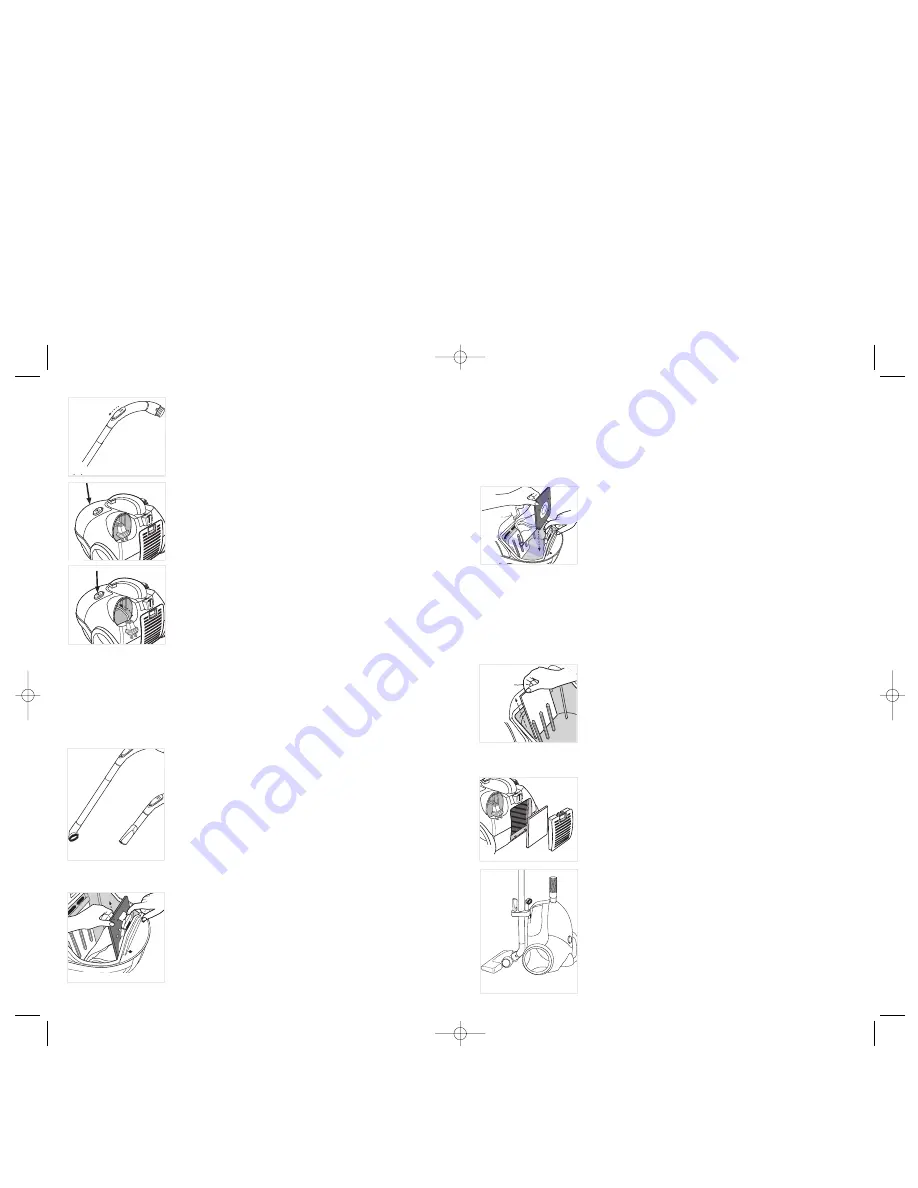
3. Adjust the suction power by sliding the vacuum suction

control (H).

4. As you vacuum, check frequently the bag "full" indicator

on the canister (J). It will change to red when the bag is
full. To empty the permanent bag, see Emptying
Permanent Bag in the Care and Cleaning section.

5. When finished vacuuming, press the On/Off push button

to turn off the unit.

6. Unplug unit.
7. Press the retractable cord button  with your foot or hand.

The cord winds back into the unit (K).

Caution: 

• The cord moves fast when retracting. Stand clear of the 

cord as it rewinds so it does not whip into you. 

• To prevent cord from whipping when rewinding, hold

plug when rewinding onto cord reel.

USING CLEANING TOOLS

Dusting Brush and Crevice Tool

• Use dusting brush to dust furniture, draperies, lamps and shelves. 
• Use crevice tool for tight narrow spaces. 

Tip:

You can keep the crevice tool and the dusting brush in the storage clip for easy

access. 

Both cleaning tools can be attached to either the end of the
extension tube or the flexible hose (L).

Care and Cleaning

Important: 

Always turn off and unplug the unit before

cleaning.

CLEANING

Note: To maintain maximum cleaning performance, empty

the permanent dust bag and clean or replace the dust filter often and replace
exhaust filter as needed.

Emptying Permanent Dust Bag

1. Press lid release to open dust bag compartment.
2. Press and hold bag latch.
3. Grasp dust bag collar and lift it up and out of canister

(M).

4. Slide clip off and empty dust bag into trash.

8

Cleaning Permanent Dust Bag

1. Hand wash the dust bag with soap and water.
2. Hang it up to air dry thoroughly before replacing in the vacuum.

To Reinstall Permanent Dust Bag

1. Slide clip onto the dust bag.
2. Press and hold the bag latch open.

3. Insert the bag collar with arrow in the down position into

the dust bag compartment. Place collar all the way down
into the guides (N). 

Note: Be sure collar is correctly placed into the guides 
in the bottom of the dust bag compartment. Fit the hole 
in the collar of the bag over the opening on the inside 
of the vacuum canister.

4. Release the bag latch.
5. Latch locks on top of collar to secure dust bag in place.
6. Close the canister lid.

Dust Filter

The dust filter is located in the back of the dust bag compartment.

To clean or replace dust filter:

1. Open the canister lid.
2. Grasp dust filter and pull up and out (P).
3. Shake over a trash can.
4. Wash the filter in soap and water.
5. Allow to dry completely before replacing in the vacuum.
6. Insert cleaned dust filter or replace with a new one.

7. Close the canister lid.

Exhaust Filter

The exhaust filter is located at the back of the canister. Clean
or replace it as needed. For cleaning follow instructions 
3,4 and 5 under "Dust Filter."
1. Push down the locking clip on the exhaust filter cover

and pull out.

2. Grasp the filter and pull out (Q).
3. Insert a new filter or cleaned filter and snap cover back 

in place.

STORAGE

Unit stores vertically for compact storage. Insert storage clip
into the slot located on the bottom of the unit. Crevice tool
and dusting brush store on the storage clip (R).


N


P

7

H

J

K


M


Q

R

L

V3000Pub1000001167  7/27/04  5:00 PM  Page 8

Содержание V3000

Страница 1: ...O Model Modelo V3000 Consumer Assistance Information in the US only Información y asistencia para el consumidor solamente en los Estados Unidos 1 800 557 9463 Accessories Parts USA Canada Accesorios Partes EE UU Canadá 1 800 738 0245 Vacuum Cleaner Aspiradora V3000Pub1000001167 7 27 04 5 00 PM Page 1 ...

Страница 2: ...nds Do not put any object into openings Do not use with any opening blocked keep free of dust lint hair and anything that may reduce air flow Keep hair loose clothing fingers and all parts of body away from openings and moving parts Turn off all controls before unplugging Use extra care when cleaning on stairs Do not use to pick up flammable or combustible liquids such as gasoline or use in areas ...

Страница 3: ...WITH YOUR UNIT A B 1 Extension tubes Chrome tube Part V3000 01 Chrome tube with storage clip Part V3000 02 2 Vacuum suction control 3 Flexible swivel hose Part V3000 03 4 Flexible swivel hose release switch 5 Dust bag full indicator 6 Carry handle Part V3000 04 7 On Off I push button 8 Exhaust filter cover Part V3000 05 9 Exhaust filter inside Part V3000 06 10 Retractable cord 11 Large wheels 1 ea...

Страница 4: ...ube slightly for a firm fit 3 To remove extension tubes just pull out the ends of each tube How to Use This appliance is intended for household use It is for indoor use only Important The power cord has a yellow marking and a red marking to help you determine the maximum length to use Up to the yellow mark is the recommended length Never pull cord beyond the red marking 1 Holding the power cord by...

Страница 5: ...t bag into trash 8 Cleaning Permanent Dust Bag 1 Hand wash the dust bag with soap and water 2 Hang it up to air dry thoroughly before replacing in the vacuum To Reinstall Permanent Dust Bag 1 Slide clip onto the dust bag 2 Press and hold the bag latch open 3 Insert the bag collar with arrow in the down position into the dust bag compartment Place collar all the way down into the guides N Note Be s...

Страница 6: ...rficies calientes No tire del cable para desconectar el aparato Para desconectar sujete por el enchufe No maneje el aparato ni el enchufe con las manos mojadas No introduzca objetos adentro de las aberturas No utilice la aspiradora si ésta tiene obstruida cualquiera de las aberturas mantenga las aberturas libres de polvo pelusa cabello y de todo aquello que pudiese disminuir el flujo de aire Mante...

Страница 7: ...esempolvar 6 Dos tubos de extensión metálicos 12 11 ENCHUFE POLARIZADO Solamente para los modelos de 120V Este artefacto posee un enchufe polarizado un contacto es más ancho que el otro Para reducir los riesgos de choque eléctrico este enchufe entra en un contacto polarizado de una sola manera Si el enchufe no entra en su contacto inviértalo Si aun así no entra busque la ayuda de un electricista c...

Страница 8: ...randes Part V3000 07 12 Motor 120V no ilustrado Part V3000 08 120V Motor 220V no ilustrado Part V3000 08 120V 13 Botón de presión del cable retráctil 14 Cepillo para desempolvar Part V3000 09 15 Aspiradora Part V3000 10 16 Esquinero Part V3000 11 17 Aletas de limpiar 18 Bandas para la pelusa 19 Ruedas Reemplazable por el consumidor 1 Desenganche de la tapa 2 Filtro de polvo Part V3000 12 3 Aldaba ...

Страница 9: ...o 1 Presione el desenganche de la tapa a fin de abrir el compartimiento de la bolsa para el polvo 2 Presione y sostenga la aldaba de la bolsa 3 Sujete la bolsa por el cuello alce y retire del tanque M 4 Deslice y retire el clip Vacíe el contenido de la bolsa en la basura 16 15 MONTAJE Y DESMONTAJE DE LA ASPIRADORA Manguera giratoria flexible 1 Para conectar la manguera empuje el conector giratorio...

Страница 10: ...abertura que se encuentra en el interior del tanque de la aspiradora 4 Suelte la aldaba de la bolsa 5 La aldaba cierra por encima del collar a fin de asegurar la bolsa de polvo en su lugar 6 Cierre la tapa del tanque Filtro de polvo El filtro de polvo se encuentra en la parte trasera del compartimiento de la bolsa para polvo Para limpiar o reemplazar el filtro 1 Abra la tapa del tanque 2 Sujete el...

Страница 11: ...ished How do you get service Save your receipt as proof of the date of sale Check our on line service site at www prodprotect com applica or call our toll free number 1 800 557 9463 for general warranty service If you need parts or accessories please call 1 800 738 0245 What does your warranty not cover Damage from commercial use Damage from misuse abuse or neglect Products that have been modified...

Страница 12: ...nte Ruiz Huidobro 3860 Buenos Aires Argentina Tel 54 11 4546 1212 Chile Servicio Máquinas y Herramientas Ltda Av Apoquindo No 4867 Las Condes Santiago Chile Tel 562 263 2490 Colombia PLINARES Avenida Ciudad de Quito 88 09 Bogotá Colombia Tel 57 1 610 1604 533 4680 Costa Rica Aplicaciones Electromecanicas S A Calle 26 Bis y Ave 3 San Jose Costa Rica Tel 506 257 5716 223 0136 Ecuador Castelcorp Km 2...

Страница 13: ...0001167 00 RV00 Made in People s Republic of China Printed in People s Republic of China Fabricado en la República Popular de China Impreso en la República Popular de China 1200 W 120 V 60 Hz 1400 W 220 V 50 Hz 1400 W 220 V 60 Hz V3000Pub1000001167 7 27 04 5 00 PM Page 24 ...

Отзывы: