background image


15


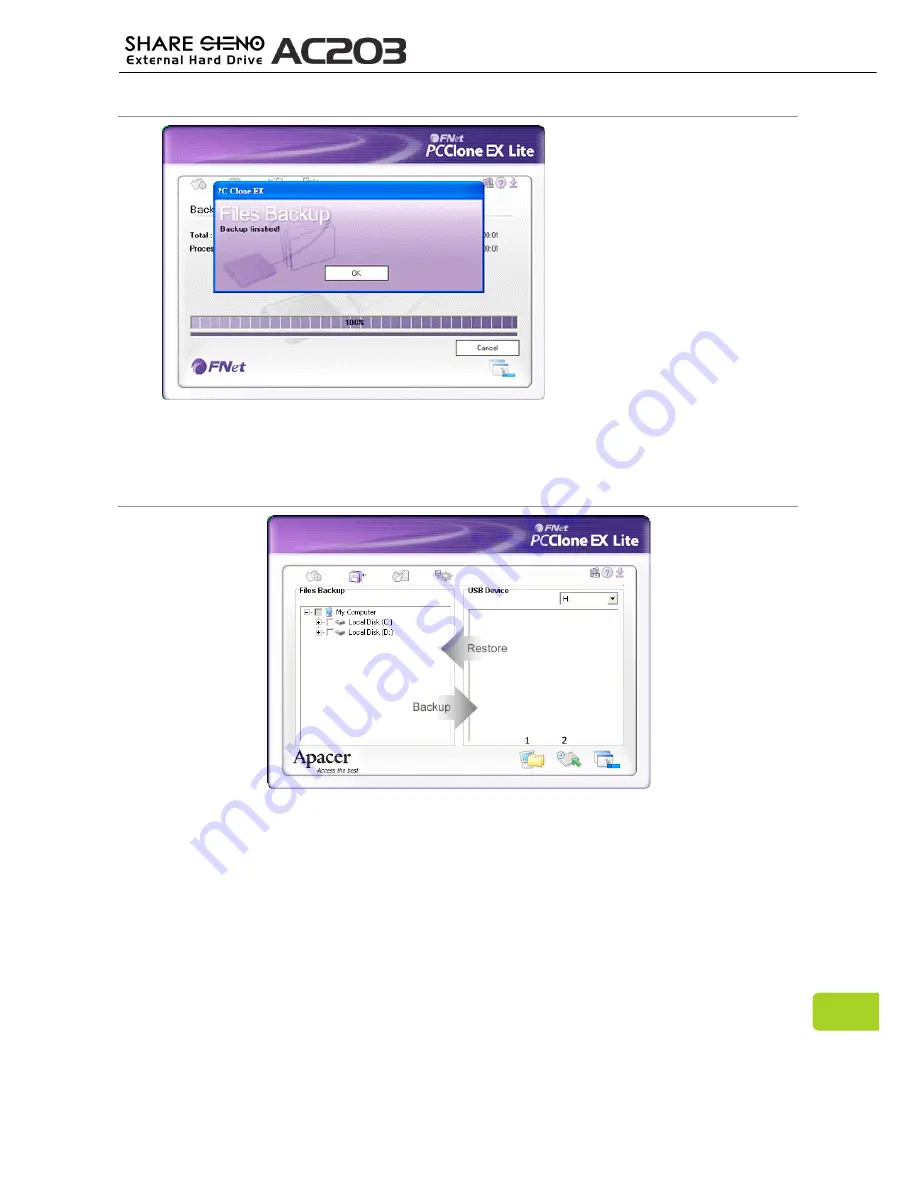
6.  When backup is in progress, 

the widow shows progress 
and proceed time) 

7.  When backup is done, click 

“OK” for backup finish! (The 
file backup has been 
successfully through PCClone 
EX Lite into USB HDD.) 

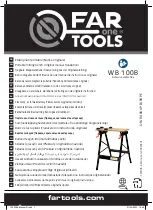
File Backup 


1. File Backup. 
2. File Restore. 


Содержание Share Steno AC203

Страница 1: ...User Manual...

Страница 2: ......

Страница 3: ...avy objects on the top of the product or use excessive force on it Avoid squeezing the product to prevent damage of the internal HDD Notice Carefully unpack the contents of the product package Apacer...

Страница 4: ...03 4 Chapter 4 Package Contents 4 Chapter 5 System Requirements 4 Chapter 6 Connect to Computer and Data File Transmission 4 Chapter 7 Formatting the Hard Drive 5 Chapter 8 PCCloneEX Lite software Bac...

Страница 5: ...ur purchase of the Apacer Share Steno 2 5 SATA Hard Drive Before operating the unit please read this manual thoroughly and keep it for future reference This manual will help you learn to use many of t...

Страница 6: ...ta XP 2000 ME Mac OS X 10 3 and above For Backup Function Windows XP 2000 Vista 7 Chapter 6 Connect to Computer and Data File Transmission 1 Connect the USB cable to your AC203 Then connect the other...

Страница 7: ...S Chapter 7 Formatting the Hard Drive AC203 with Hard Drive is preformatted as a single FAT32 partion for compatibility with all updated Windows and Mac OS The FAT32 files system has a maximum individ...

Страница 8: ...Select Disk Management under Storage 4 Please go to Unallocated disk and right click the New Partition item On the first page of New Partition Wizard click Next New Partition Disk New Partition Disk S...

Страница 9: ...7 5 Choose Primary Partition and then press Next Choice of partition type 6 You can choose the formatted capacity and then press Next Assign partition capacity...

Страница 10: ...e For Windows ME 2000 XP please choose the FAT32 format For Window XP Professional 2000 Professional 2003 please choose the NTFS format FAT32 is also workable If your format is FAT32 there is a limita...

Страница 11: ...ou want 4 Enter the drive s name and then press Erase 5 Press Erase again to confirm Note 1 The following formatting steps will erase everything on the hard drive If you have data or files that you wa...

Страница 12: ...Backup Function Software installation 1 Please find the backup software from inside of Hard Disk and choose PCClone EX Lite folder 2 Please read the license agreement in detail 3 If users accept the a...

Страница 13: ...ext 5 The installation is completed please click OK to exit 6 PCClone EX icon will displays in the notification area after setup users can double click the icon or press the right key of the mouse to...

Страница 14: ...X Lite must be staying at the notification area For first time using please refer to the context of File backup and Setup The USB driver of Win 98SE ME to the button trigger support has not unified th...

Страница 15: ...ea There is a dialog box will be displayed the progress every single 10 percentages 6 After the backup is completed PCClone EX Lite diagram at notification area will appears the backup finished Quick...

Страница 16: ...d up easily For the first time using please refer to the subject of File Backup or setup your own hot key in Setup 1 Please plug AC203 into PC 2 Execute PCClone EX Lite 3 Go on PCClone EX Lite Quick L...

Страница 17: ...in progress the widow shows progress and proceed time 7 When backup is done click OK for backup finish The file backup has been successfully through PCClone EX Lite into USB HDD File Backup 1 File Ba...

Страница 18: ...n on the power 2 Execute PCClone EX Lite 3 Click File backup 4 Select folders drives from the fix device 5 Set one of USB devices for backup Please refer to Setup and then set some options for the fir...

Страница 19: ...ss OK 8 The selected folders have been moved from the fixed device to the USB device successfully 9 There is a hidden root directory F FNet in the USB device all the file backups are kept in there Be...

Страница 20: ...e 1 Please plug the USB HDD 2 Execute PCClone EX Lite 3 Go on the PCClone EX Lite screen 4 Click File Backup 5 Select folders files of USB device you would like to restore 6 Click Restore then press S...

Страница 21: ...B HDD 2 Execute PCClone EX Lite 3 Go on PCClone EX Lite screen 4 Select the File backup of USB Device then right click the mouse to click Delete select Files all select files in the USB device will be...

Страница 22: ...DD It is convenient for users who can review manage move access their folders files directly without clicking the My computer or Windows Explorer File Backup setting The options of File Backup setting...

Страница 23: ...matically on Windows startup Enable USB button Concerning PCClone EX Lite spec please click the icon of PCClone EX Lite on the right side of upper corner of the screen or right click the icon of PCClo...

Страница 24: ...22 Please click the icon of PCClone EX Lite on the right side of upper corner of screen Help PCClone EX dialog will display and assist to recognize PCClone EX Lite...

Страница 25: ...puter Try connecting the USB power sharing cable or the spare large end of the USB Y cable to a secord USB port in your computer or the 5V power adapter Avoid connecting the product through an USB Hub...

Страница 26: ...nsfer Rate Up to 480 Mbps LED Display Light for power on Blinking for data access Power Supply USB powered Software Backup Software for Windows 2000 XP Vista 7 only Certification CE FCC BSMI Dimension...

Страница 27: ...n this user manual remains with out company No part of this user manual may be transmitted reproduced or changed The product specifications design and this user manual s content are subject to change...

Отзывы: