background image

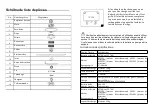
Part list Part Diagram


No.

  1

  2

  3

  4

  5

  6

  7

  8

  9

  10

  11

  12

  13

  14

  15

  16


Diagram

 Part Name


Wheel cover

Moto


Windshield


Seat

  Mirror

 Front wheel

Rear wheel

 Steering wheel

 Rear axle

 Gasket

Steering rod

Nut

 Screw

Tapping screw

Charger

  Remote control 


Please read the operating instrucitons carefully before using.

Once using the battery car, couldnot make the battery depleted.

      For your first time using the vehicle, must be sure charge the

 product about 12 hours, otherwise maybe damge the battery.

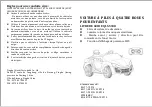
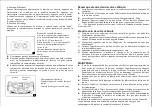
Specifications Introduction:

AAA1.5V 

Input: 220V    

Output: 6V500MAor 12V1000MA

37-96 Months
Under 25KG
118*70*50CM
3-4KM/H
Charging 8-12 Hours, Using 1-2 Hours

6V35W(driving motor) 6V9W(steering motor) 

12V35W(driving motor) 12W9W(steering motor)

6V7AH or12V7AH 

Specifications

Item Name

Battery and Fuse

Motor

Suitable Age

Load Capacity

Size of Car

Speed

Using Time

Charge

Battery of RC

The data here are only for reference and the samples of each 

type shall apply.    

10/15A

10/15A

When the vehicle won't work 

or can not be charged, please 

check the fuse first and see 

whether it is burnt out If the 

fuse is broken, please change 

with a new one, there is a spare 

fuse in the fuse package. The 

fuse is under the seat

Содержание QLS-5188

Страница 1: ...cations Introduction AAA1 5V Input 220V Output 6V500MAor 12V1000MA 37 96 Months Under 25KG 118 70 50CM 3 4KM H Charging 8 12 Hours Using 1 2 Hours 6V35W driving motor 6V9W steering motor 12V35W driving motor 12W9W steering motor 6V7AH or12V7AH Specifications Item Name Battery and Fuse Motor Suitable Age Load Capacity Size of Car Speed Using Time Charge Battery of RC The data here are only for refe...

Страница 2: ...cles and have an accident Operate the vehicle only in the daytime or a well lit area It is not recommended to drive the vehicle on wet surfaces or on lopes of greater than 15 degrees Do not use this vehicle outdoors when it is raining or snowing Make sure you come to a complete stop before changing directions from forward to back Please follow the correct weight and age limits allowed to drive thi...

Страница 3: ... lubricate moving parts such as wheels Park the vehicle indoors or cover it with a tarp to protect it from wet weather Keep the vehicle away from sources of heat such as stoves and heaters Plastic parts may melt Recharge the battery after each use Only an adult can handle the battery Recharge the battery at least once a month when the vehicle Raider is not being used Do not wash the vehicle with a...

Страница 4: ... washer on to the rear axle secure them to use a split pin Insert the break into the wheel Fit the wheel cover into the wheel Repeat for the other side 2 Rear Wheel Assembly 3 Steering wheel Insert the steering wheel into the end of the steering shaft connector the music connector and power connector insert the screw and tighten it 5 Seat Assembly Remove two screws fit the seat cover into the vehi...

Страница 5: ...iquement sur des surfaces planes telles que l intérieur de votre maison votre jardin ou votre terrain de jeux Ne jamais utiliser dans le noir Un enfant peut rencontrer des obstacles inattendus et avoir un accident Utilisez le véhicule uniquement pendant la journée ou dans une zone bien éclairée Il n est pas recommandé de conduire le véhicule sur des surfaces mouillées ou des pentes de plus de 15 d...

Страница 6: ...oteur 6V35W moteur d entraînement 6V9W moteur de direction 12V35W moteur d entraînement 12W9W moteur de direction Âge approprié 37 96 mois capacité de charge Moins de 25 kg Taille de voiture 118 70 50CM vitesse 3 4KM H Durée d utilisation Charger pour 8 12 heures pour utiliser pour 1 2 heures Charge Entrée 220V Sortie 6V500MA ou 12V1000MA Batterie de RC AAA1 5V Nom de l article Spécifications Batt...

Страница 7: ...rdites Charge maximale 35kg Éteignez l appareil lorsqu il n est pas utilisé S il est inutilisé pendant une longue période veuillez débrancher les câbles de connexion électrique Les photos du produit les fonctions les détails d introduction sont donnés à titre indicatif Prendre soin de votre véhicule 1 Toujours vérifier et entretenir votre véhicule afin de garder votre bébé loin des blessures accid...

Страница 8: ...érez l enjoliveur dans la roue Répétez pour l autre côté 3 Volant Insérez le volant dans l extrémité de la colonne de direction connectez le connecteur de musique et le connecteur d alimentation insérez la vis et serrez le 4 Pare brise et miroir Mettez le cadre de vent à la position appropriée Lorsque vous entendez un déclic il signifie que le connecteur et connecteur d alimentation sont bien fixé...

Отзывы: