Aopos T220III Скачать руководство пользователя страница 11

5. Safety and Maintenance

5.1) Safety Information

1.  Do not touch the HEAD of printer with anything.
2.  Do not touch the cutter blade.
3.  Only use the power supply that is come along with the printer.
4.  Do not bend the power cord excessively or place any heavy objects onto it.
5.  When connecting or disconnecting the plug, always hold the plug-not the cord.
6.  Keep the desiccant out of children s reach.
7.  Use only approved accessories and do not try to disassemble, repair or
     remodel it for yourself.
8.  Do not let water or other foreigh objects in the printer.
9.   Install the printer on the stable surface, choose a firm.level surface where
      the printer will not be exposed to vibration.
10. Do not use the printer when it is out of order. This can cause a fire or an
      electrocution.
11. Do not connect a telephone line into the peripheral drive connector.
12. We recommend that you uplug the printer from the power outlet whenever
      you do not plan to use it for long periods.


5.2) Periodical Cleaning

Printed characters may become partially unclear due to accumulated paper dust
and dirt. To prevent such a problem, paper dust collected in the paper holder and
paper transport section and on the surface of the thermal head must be removed
periodically. Such cleaning is recommended to be carried out once six month or 
one million lines.

a. Cleaning the Thermal Head

To remove blackish dust collected on the surface of the thermal head, wipe it with
Isopropyl alcohol(IPA)

Note

: The thermal head is easy to damage, so clean it gently with a soft cloth.

          Take sufficient care not to scratch it when cleaning it.

b. Cleaning the Paper Holder

Use a soft cloth to remove paper dust from the paper holder and paper transport 
section.

5.3) Preventing Paper Jams

The paper should not be touched during printing. Shift the paper during paper ejection
may cause a feed failure or paper jam.

5.4) Fixing Paper Jam

The Status LED(Red) on the printer control panel will flash with beeps if paper is jammed.
Please follow below instruction to remove paper jam.

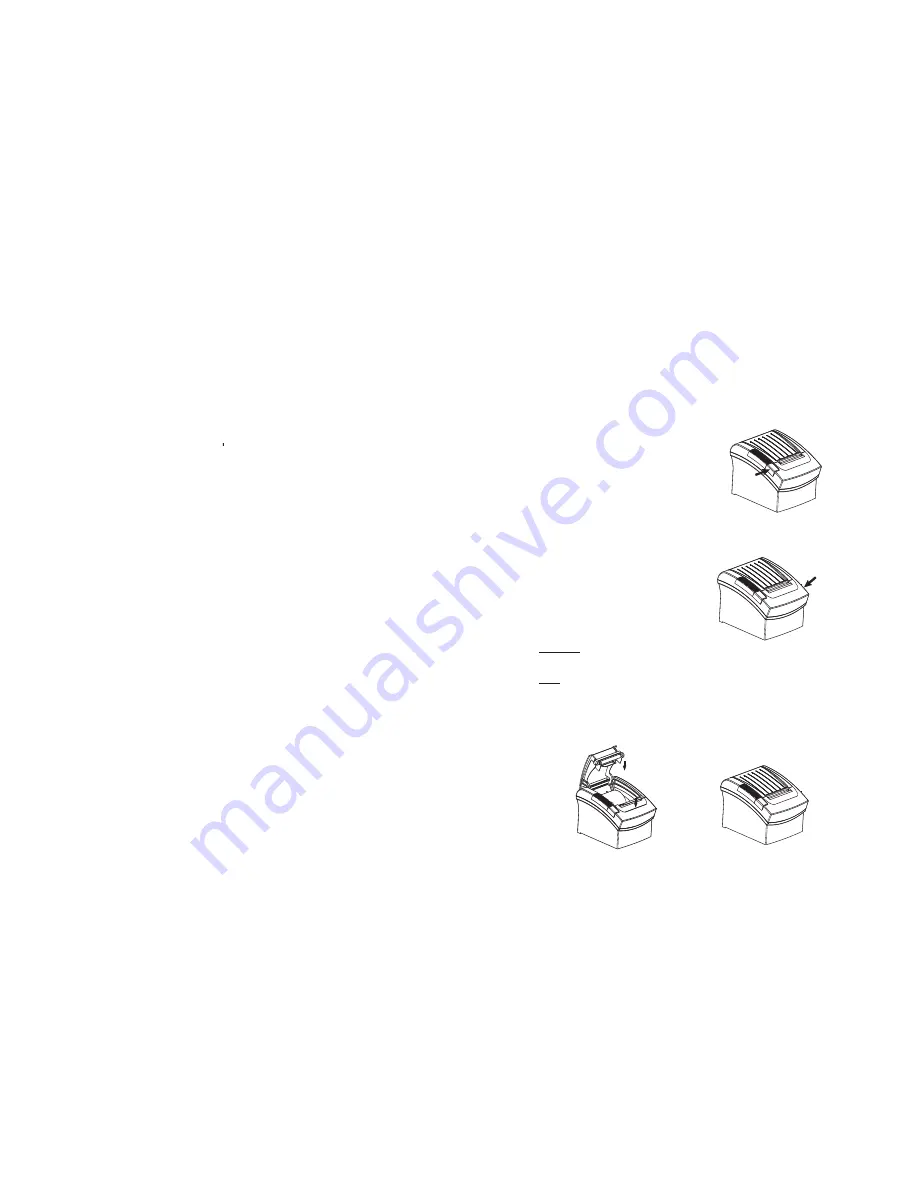
a. Switch the printer power off.

b. Open the printer cover by pushing the Cover-
    open button.

c. If the printer cover opens, remove the jammed
    paper gently (take care not to touch the printer 
    head.) And reinstall the paper roll.

d. If the printer cover will not open, please restart the printer by switching power 
   off/on, and try again, if the cover is still unable to open please follow  the below
   instruction.

1. Set the printer power OFF
2. Slide off the side lid  to reveal 
    the auto cutter.
3. Roll the little gear as shown until 
   the warning beeps is stopped.

CAUTION:

Since  working on the cutter may be dangerous, be sure to turn off the printer first.

Note: 

Do not apply extreme force to open the front cover to prevent damage to the cutter.
If the front cover will not open properly, please contact your dealer.

e. Return the cutter to its home-position and release or clean our the jammed
    paper in inside the front cover. Open the top cover, and then reinstall paper
    roll.

(Reinstall Paper Roll)

(Tear off the paper as shown)

-18-

-19-

Содержание T220III

Страница 1: ...transmitted in any form or by any means electronic mechanical photocopying recording or otherwise without the prior written permission of AOPOS SYSTEMS S A The company reverses the rights of modificat...

Страница 2: ...necting to a Cash Drawer 8 3 3 Connecting the AC Adapter 9 4 Configuration 4 1 Panel LED Indicators 10 4 2 DIP Switch Settings 11 4 3 Printer Self Test 12 4 4 Driver Installation 13 5 Safety and Maint...

Страница 3: ...DIP switches The built in interface provides control capability for one cash drawer 1 2 Function List AOPOS T220III 1 Maximum printing speed 220mm sec 576 dots 2 Fully compatible with EPSON ESC POS c...

Страница 4: ...printer cannot detect the paper end correctly Important The printing quality and lifespan of the thermal head cannot be guaranteed if any paper other than that recommended is used Thus the warranty w...

Страница 5: ...aper roll into the hollow and pull on the leading edge of the paper toward you as shown d Close the cover When closing the cover press the center of the printer cover firmly to prevent paper miss load...

Страница 6: ...Drawer Important Make sure that the printer is turned off and unplugged from the AC outlet and that the computer is turned off before making connections Do not connect a telephone line into the periph...

Страница 7: ...e error state Off Normal condition 3 Paper roll end PAPER OUT LED Red On The paper roll near end is detected Off Paper is loaded Normal condition 10 4 2 DIP Switch Settings The DIP switch panel is loc...

Страница 8: ...the button after around 1 second 2 If the printer is working properly it should then automatically print the self testing result that indicating the firmware version number printer connection type Eng...

Страница 9: ...14 15...

Страница 10: ...16 17...

Страница 11: ...ad wipe it with Isopropyl alcohol IPA Note The thermal head is easy to damage so clean it gently with a soft cloth Take sufficient care not to scratch it when cleaning it b Cleaning the Paper Holder U...

Страница 12: ...point left uncut Note To prevent dot displacement after cutting paper must be fed approximately 1mm 14 360 inches or more before printing 1 3 Paper Roll Supply Device 1 Supply method Drop in paper ro...

Страница 13: ...er position 1 9 Installation The printer must be installed horizontally Vibration during papercutting and using a drawer should be considered Take measures to prevent the printer from moving Affixing...

Страница 14: ...pecifications b 1 Parallel Specifications 1 Data transmission 2 Synchronization 3 Handshaking 4 Signal levels 5 Data word length 6 Connector printer side Parallel Externally supplied nStrobe signals n...

Страница 15: ...specified by ESC p or DLE DC4 is output to this connector The host can confirm the status of the input signal by using the DLE EOT GS a or GS r commands 1 Pin assignments Refer to Table 2 Connector mo...

Страница 16: ...29 28 General Printer Commands Command Lists...

Страница 17: ...for International Fonts ESC R n ASCII Select an International Character Set Format ESC R n Hex 1B 52 n Decimal 27 82 n 0 n 13 Range Description Selects an international character set n from the follo...

Страница 18: ...the multilingual character code use following commands FS Select Multilingual Character Mode ON Format ASCII FS Hex 1C 26 Decimal 28 38 Description Enable multilingual character mode FS Select Multil...

Отзывы: