background image


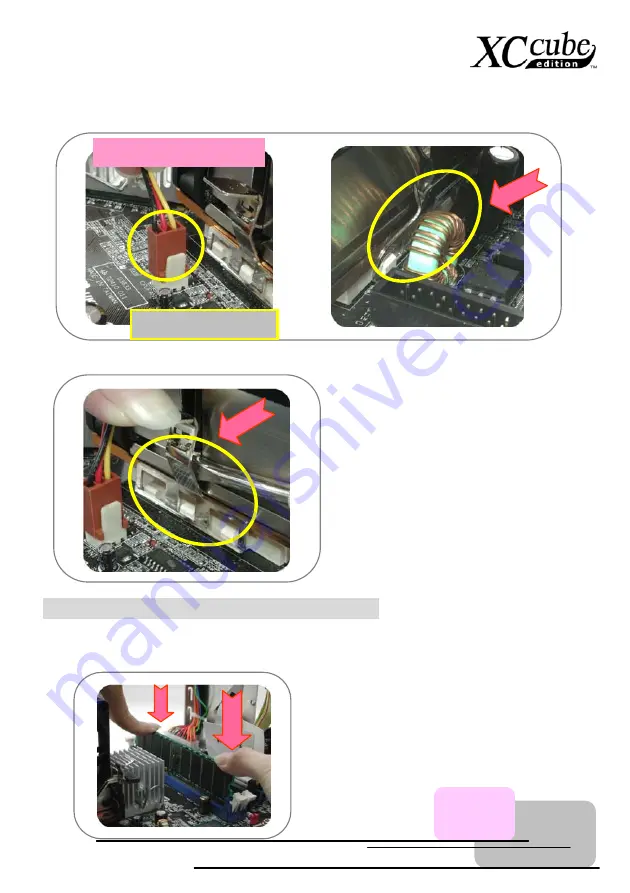
Connect the fan cable onto the fan connector onboard. Lock the right iron plate of cooler to the 

socket as shown.   


Use screwdriver to press the iron plate downward till the iron plate is firmly hooked to socket.


UK79G-1394 motherboard

CPU Fan connector 

3.6 Connecting DRAM to DIMM Sockets 

1. 

DIMM socket is designed in Sky Blue color, which is very easy to recognize. Install memory 

module evenly into DIMM.   


19 


Содержание XC Cube

Страница 1: ...le 10 3 1 Features of XC Cube 10 3 2 Starting installing 11 3 3 Cooler Hard Disk Floppy Drives and DVD RW devices 11 3 3 1 Taking Cooler out 11 3 3 2 Install Hard disk 14 3 3 3 Install Floppy Drive 14 3 3 4 Install DVD RW Drive 14 3 4 Cables and Connectors 15 3 5 Install CPU CPU Cooler and CPU Fan Connector 17 3 6 Connecting DRAM to DIMM Sockets 19 3 7 Insert AGP card or PCI card to motherboard 20...

Страница 2: ...2 Chapter 4 Turn On The Power 27 Postscripts 31 Appendix A 1 ...

Страница 3: ... Devices Inc The logos of Intel Intel Celeron and Pentium II III are the registered trademarks of Intel Corporation The logos of nVidia are the registered trademarks of nVidia Corporation The logos of Microsoft Windows are the registered trademarks of Microsoft Corporation in America and other countries All the titles of the products and the trademarks mentioned in this manual are for the purpose ...

Страница 4: ...ndard that are hard to comprehend lengthy fanciful article or vague theories Instead this manual explains profound theories in simple language by colorful illustrations Therefore you will see the icons below frequently Note mark Contains knowledge you should know in process of assembling or some helpful tips Warning mark Please be careful when you see this mark It highlights mistakes that occur of...

Страница 5: ...lps attracting the fallen screws that are hard to reach by hands Some screw holes are placed where hands can hardly reach At this time we need a magnetic screwdriver too In addition the size of our tool also matters Generally the domestic 107 cross screwdriver is the most appropriate one I can get it done When putting things together it is necessary to adjust Jumper In most cases things can be don...

Страница 6: ...the XC Cube box you will find components as follow XC Cube chassis Drives Cage Motherboard Power Supply CPU cooler Drives Cage CPU cooler For EZ65 Motherboard UX4SG 1394 EZ65 UK79G 1394 EZ18 All in One Power Supply XC Cube chassis Chapter 2 What s In The Box ...

Страница 7: ...O 1 screw are wide and it has a hexagonal head As shown in the picture threads on NO 2 screw are narrow and there is a ring on its head As shown in the picture the NO 3 screw s threads are wide as well but it has a round head As shown in the picture the NO 4 screw s threads are wide as well but it has a flat head IDE Cable a 80 pin connector to connect the DVD RW IDE interface 80 wire hard disk Co...

Страница 8: ...t Audio SYSFAN3 CPUFAN1 478 pin CPU supports Intel Pentium 4 CPU Intel 865 Chipset ICH5 SYSFAN2 DDR400 333 266 DIMM x 2 Max 2 GB ATX Power PCI slot AGP 8X JP14 CMOS Jumper Serial ATA Ports X 2 IDE Connector x 2 ATA33 66 100 nnector FDD Connector Front Panel Co AC 97 CODEC U U UX X X4 4 4S S SG G G 1 1 13 3 39 9 94 4 4 Note Intel 865G chipset don t support Willamette or Celeron 0 18u processors Nor...

Страница 9: ...r IDE Connector Back Panel Front Audio IEEE1394 x 2 USB connectors x 2 ATX Power 462 pin CPU Socket that supports AMD Athlon Duron and AthlonXP with CPU Overheat Protection circuit to AthlonXP CPU only DDR400 VGA Disabled 333 266 DIMM x 2 Max 2 GB Dr Voice II JP15 J JP2 P16 Front Panel FDD Connector AGP 8X nForce2 GT CP T IGP M SYSFAN2 SYSFAN3 PCI slot AC 97 CODEC ...

Страница 10: ...or Panel changing that change with your mood Space flexibility allows you to move it from living room or to your bedroom 10 Silent Technology PC that is quiet even in the middle of the night Easy Installation for any new hand assembling their first PC Mini housing which saves you almost 60 of housing space Hand harmlessness design ensures you 100 security during assembling Equipped with a highly e...

Страница 11: ...chassis backward to you 2 Lift the chassis up Here you may see the internal of the chassis 3 3 Cooler Hard Disk Floppy Drives and DVD RW devices 3 3 1 Taking Cooler out Before installing hard disk floppy drives and DVD RW into the XC Cube chassis let s take the cooler out from chassis first ...

Страница 12: ... of the chassis Put it aside for later use then 12 Why AOpen Fan Cooler After thermal testing and confirmation we have chosen this model of AOpen cooler for fitting with XC Cube It has been tested with optimized air flow and excellent heat dissipation function for our XC Cube system It is highly recommended not to use other branded cooler to go with XC Cube Pull the iron plate up and relieve it fr...

Страница 13: ...nstalled the devices in the incorrect direction Therefore please kindly pay attention to the FRONT mark shown in the picture 3 For EZ18 XC Cube Before taking AOpen made Cooler out please disconnect its connector first After that unfasten AOpen made Cooler Use a screwdriver to push the iron lock down to relieve it from the socket Take the cooler out of the chassis Put it aside for later use then 13...

Страница 14: ...w it firmly to the cage Front mark Front mark Heat dissipation side face up 3 3 3 Install Floppy Drive 1 Slide in the floppy drive as shown Use screw no 2 to screw the 3 rd and 6 th hole separately 3 3 4 Install DVD RW Drive 1 Slide in the DVD RW drive Use screw no 2 to screw the DVD RW firmly 14 Front Mark DVD RW must aim at the edge of Drives Cage ...

Страница 15: ... 2 screws See page 6 3 4 Cables and Connectors 1 Before connecting necessary cables and connector to motherboard you may found most of the I O panel connectors IEEE1394 USB Front Audio and S PDIF both at front panel and back panel on motherboard have had been connected properly as shown I O connectors have had been inserted previously 2 Connecting floppy cable hard disk and DVD RW cable on motherb...

Страница 16: ... the correct header You may kindly install the Serial ATA cables onto Serial ATA headers Serial ATA Cables 16 Power Connector Where is Pin1 When connecting IDE cables bear in mind to aim the red side of IDE cables at the first pin of the socket where there s an arrow mark on the motherboard If you are still not sure please refer to your motherboard manual As Serial ATA hard disk comes with differe...

Страница 17: ...an Connector 1 Erect sensor up a bit it might have been folded while shipped in with Cooler on top of it After that erect CPU socket lever up Sensor Lever 2 Install CPU onto the CPU bracket Press the lever back to CPU socket 3 And it s done ...

Страница 18: ...onboard Evenly press the iron plate downward till you hear a clip sound 18 5 For EZ18 XC Cube Put CPU cooler firmly onto the CPU retention module CPU Fan connector UX4SG 1394 motherboard The vertical side of the Cooler must be faced to this side as shown The vertical side of the Cooler must be faced to this side as shown ...

Страница 19: ...et as shown Use screwdriver to press the iron plate downward till the iron plate is firmly hooked to socket UK79G 1394 motherboard CPU Fan connector 3 6 Connecting DRAM to DIMM Sockets 1 DIMM socket is designed in Sky Blue color which is very easy to recognize Install memory module evenly into DIMM 19 ...

Страница 20: ...pen to have AGP card or PCI you may insert them onto the AGP slot as shown Screw the iron plate off the back panel and use the screwdriver to pry it out 2 After that please plug in the AGP card Screw the iron lock on top of the AGP slot will do 3 AGP card is done ...

Страница 21: ...side and assemble the Drives Cage back to the chassis from top of the chassis 2 Lift the Drive Cage up at 45 degree for better installing DVD RW and Floppy Drive Connecting Floppy drive and its power cord to Drive Cage Connecting DVD RW drive power cord to Drive Cage ...

Страница 22: ...Connecting hard disk power cord to Drive Cage Lock the Drives Cage with screw No 2 3 9 All Set 1 Assemble the housing back to the chassis Screw the chassis back 22 ...

Страница 23: ...1 Coaxial RCA Port Line In Jack Multimedia speaker jack USB2 0 connector S PDIF IN port Ethernet network connector RJ 45 Microphone jack Back Panel EZ18 XC Cube Multimedia speaker jack PS 2 keyboard connector PS 2 mouse connector VGA2 connector Line In Jack Microphone jack Ethernet network connector RJ 45 USB2 0 connector S PDIF IN Port S Video connector VGA1 connector Printer Port Coaxial RCA Por...

Страница 24: ...n Off button Optical Devices IEEE1394 port 6 pin IEEE1394 port 4 pin Floppy Drive Card Reader Speaker jack USB2 0 ports S PDIF Out port Microphone jack 2 Connect keyboard and mouse 3 Connect monitor and tighten screws ...

Страница 25: ...t power supply cable The voltage supplied by power outlet differs from countries or areas you dwell in If the outlet is supplied by 110V please set the switch to 115V If the outlet is supplied by 220V please set the switch to 230V Connect Power Cord Cable finally 25 For 110 115V For 220 230V ...

Страница 26: ... Note 26 ...

Страница 27: ...ssage saying Press DEL to enter SETUP at the bottom of the screen Please press Delete button Phoenix AwardBIOS BIOS v6 00PG An Energy Star Ally Copyright C 2003 Phoenix Technologies LTD L210 R0 05 July 16 2003 AOpen Inc Main Processor AMD Ahtlon tm XP 3000 Memory Testing 491520K OK 32M Shared Memory DDR Dual Channel Enabled Default Setting Default Setting CPU 100MHz 166MHz 1 650V 1 650V DRAM 333MH...

Страница 28: ...After pressing Delete you ll see the following BIOS setup Now you can move the cursor by using direction keys on the keyboard Move the cursor to the option item Load Setup defaults and press Enter 28 ...

Страница 29: ...ng dialogue screen will pop up to confirm the default BIOS values Please press Y to confirm and then press Enter Finally move the cursor to Save Exit Setup and press Enter to save the parameters and exit BIOS setup 29 ...

Страница 30: ...At the same time type Y in the dialogue box and press Enter to exit Now everything is perfectly finished 30 ...

Страница 31: ...tion part you can find all varieties of books with comprehensive introduction in bookstores Having a computer of your own is a beginning to the era of information If this computer is assembled yourself it is uniquely meaningful to you Through our introduction you have learned the key components a computer needs and what details you need to pay attention to when assembling We sincerely hope every c...

Страница 32: ...MHz 100MHz 400MHz 18x Pentium 4 2 0G 2000MHz 100MHz 400MHz 20x Pentium 4 2 2G 2200MHz 100MHz 400MHz 22x Pentium 4 2 2G 2200MHz 133MHz 533MHz 16x Pentium 4 2 26G 2260MHz 133MHz 533MHz 17x Pentium 4 2 4G 2400MHz 100MHz 400MHz 24x Pentium 4 2 4G 2400MHz 133MHz 533MHz 18x Pentium 4 2 53G 2530MHz 133MHz 533MHz 19x Pentium 4 2 6G 2600MHz 200MHz 800MHz 13x Pentium 4 2 66G 2660MHz 133MHz 533MHz 20x Pentiu...

Страница 33: ...ult setting To clear the CMOS follow the procedure below 1 Turn off the system and unplug the AC power 2 Remove ATX power cable from connector PWR2 3 Locate JP14 and short pins 2 3 for a few seconds 4 Return JP14 to its normal setting by shorting pin 1 pin 2 5 Connect ATX power cable back to connector PWR2 JP28 Keyboard Mouse Wakeup Jumpers You can use JP28 to enable or disable this function which...

Страница 34: ...f the serial ATA cable to the serial ATA header on the main board and the disk Like every other traditional disk you also have to connect a power cable Please note that it is a jumper free implement you don t need to set jumpers to define a master or slave disk When connecting two serial ATA disks the system will automatically take the one connected to Serial ATA 1 header as a master disk GND 12V ...

Страница 35: ...4G 1 4GHz 266MHz 10 5x AthlonXP 1500 1 3GHz 266MHz 10 0x AthlonXP 1600 1 4GHz 266MHz 10 5x AthlonXP 1700 1 46GHz 266MHz 11 0x AthlonXP 1800 1 53GHz 266MHz 11 5x AthlonXP 1900 1 6GHz 266MHz 12 0x AthlonXP 2000 1 667GHz 266MHz 12 5x AthlonXP 2100 1 73GHz 266MHz 13x AthlonXP 2200 1 80GHz 266MHz 13 5x AthlonXP 2400 2 0GHz 266MHz 15x AthlonXP 2600 2 13GHz 266MHz 16x AthlonXP 2700 2 16GHz 333MHz 13x Ath...

Страница 36: ...re system default setting To clear the CMOS follow the procedure below 1 Turn off the system and unplug the AC power 2 Remove ATX power cable from connector PWR2 3 Locate JP14 and short pins 2 3 for a few seconds 4 Return JP14 to its normal setting by shorting pin 1 pin 2 5 Connect ATX power cable back to connector PWR2 CPU and System Fan Connector Plug in the CPU fan cable to the 3 pin CPUFAN1 co...

Страница 37: ...lect your preferred language by JP15 JP16 jumpers However you may also set JP2 to choose making out voices from buzzer or speaker Pin1 Pin1 German Chinese Japanese English Default JP16 JP15 JP16 jumper JP15 jumper JP2 jumper JP2 Speaker Output Jumper This motherboard comes with another considerate option that allows you to turn off the voice from buzzer and speaker You can choose not to be bothere...

Отзывы: