background image


22 

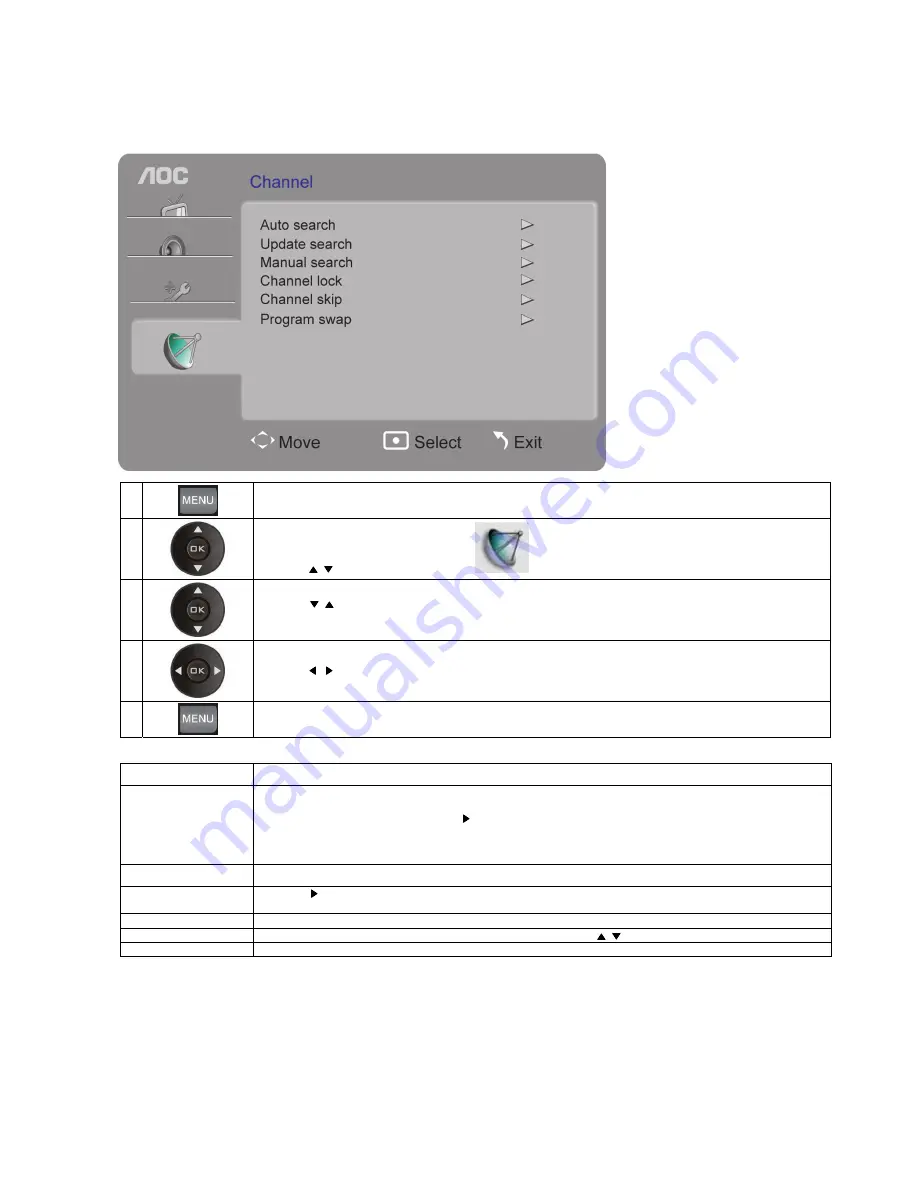
Channel Settings 

 
The channel settings are available only in the TV mode.   


Press the 

Menu button 

to open the menu

.


Press the 

/     buttons to select [

Channel

  and press the 

OK

 button. 


Press the 

/   buttons to select an item: Auto Search, Add Channel , Manual Search, Lock Channel , Skip Channel 

or


Channel Exchange and press the 

OK

 button to enter. 


Press the 

/   buttons to adjust

.


Press the 

Menu button 

to exit. 


Item Description


Auto Search 

Automatically sets up the channel list on the TV for all receivable channels.   
1.


Select Auto Search. 

2.


Press the OK (confirm) button or the 

  button to start auto channel search. After the auto search is completed, the 

channels found will be stored . 

3.


Press the OK (confirm) button or the Menu button to end auto search. 

4.


If you run Auto Search again, the previously found channels will be overwritten with the newly searched channels. 

Add Channel   

Adds a new channel to the channel list. 

Manual Search 

Press the 

  for 3 seconds to enter the manual search mode. 

The channel searched for will be stored by its default channel number and exit the manual search mode. 

Lock Channel   

Locks a channel so that it cannot be modified. 

Skip Channel 

When it is enabled, the current channel will be skipped with pressing the 

/  button. 

Channel Exchange 

Exchanges from one designated channel to another designated channel. 


Содержание T2242we

Страница 1: ......

Страница 2: ...d this manual thoroughly and retain it for future reference Note This product is subject to continuing improvement and changes may be made without prior notice The illustrations in the manual may not be exactly the same as those displayed on the screen In this case please operate according to the version you have purchased ...

Страница 3: ...NSTALLATION 11 Installing the table top stand 11 Wall mounting 11 CONNECTING THE TV 12 Cable System or VHF UHF Antenna System 12 HD Cable Box HD Satellite Box 12 Connection with HDMI 12 Connection with Component Video 13 Connection with Composite Video 13 Connection with PC 13 PC INPUT SIGNAL REFERENCE TABLE 14 HDMI INPUT SIGNAL REFERENCE TABLE 14 VIDEO INPUT SIGNAL REFERENCE TABLE 14 VIDEO COMPON...

Страница 4: ...y to the appropriate power source 5 Do not install the TV in places with high temperatures or humidity or places with excessive dust or mechanical vibration 6 Do not block any ventilation vents to protect the TV from overheating Install in accordance with the manufacturer s instructions 7 Do not install near any heat sources such as radiators heat registers stoves or other apparatus including ampl...

Страница 5: ...he installation instructions that come with the wall mount bracket exactly when installing the TV on the bracket y Make sure to install the brackets that come with the Wall mount Bracket y Do not hang the TV from the ceiling It may fall and cause serious injury AC outlet y Use the AC power cord specified by AOC and suitable for the voltage of the local area y If you are unable to insert the plug f...

Страница 6: ...ing water immediately and consult your physician Wiring Unplug the power cord from the outlet before connecting cables to ensure personal safety Avoid stepping on the cables to prevent damaging the TV Electric shock Do not touch the AC power cord or the TV with wet hands Plugging in or unplugging the AC power cord in or from the outlet with wet hands may cause electric shock Lightning storms Unplu...

Страница 7: ...ean the plug regularly If too much dust is deposited on the plug it will absorb moisture which reduces insulation performance and may lead to a fire Clean the TV screen and enclosure y Unplug the AC power cord from the outlet to prevent electric shock during the cleaning process y Clean the TV enclosure with a soft dry cloth Wipe off the dust on the screen gently with a soft cloth Remove stubborn ...

Страница 8: ...l for service by qualified service personnel y Keep flammable objects or open flames e g candles away from the TV to prevent a fire Volume Adjustment Adjust the volume so as not to disturb your neighbors Sound carries especially at night Users are recommended to close the window or use headphones when watching TV at night When using headphones adjust the volume appropriately to prevent hearing dam...

Страница 9: ...heck if the TV and all accessories are in good condition and free from damage Not all signal cables Analog USB DVI and HDMI cables will be provided for all countries and regions Please check with the local dealer or AOC branch office for confirmation ...

Страница 10: ...nt is equipped with the DVI Digital Video Interface rather than the HDMI connect the equipment to this TV with a DVI HDMI cable or DVI HDMI adaptor In this case you will need to connect the audio of the equipment to the PC Audio Input of this TV If you want to view a program in 480im 480p 720p 1080i and 1080p modes you will need to connect the equipment to this TV with the HDMI Make sure to use HD...

Страница 11: ...can channels Press to quickly change from one channel to another Press the arrow buttons to select an item or adjust the settings in the OSD function menu OK Press this button to select or confirm an item or setting Zoom Press this button repeatedly to toggle from one display mode to another In general there are Wide 4 3 Zoom in 1 Zoom in 2 Movie 1 and Movie 2 modes In the HDMI mode no display mod...

Страница 12: ...rately Before mounting the TV on a wall remove the table top stand from the TV according to the following simple steps 1 Disconnect all cables from the TV 2 Gently lay the TV screen downward on a firm table covered with a thick and soft cloth Make sure that the table top stand is hanging over the edge 3 Remove the screws as shown in the illustration for your model pull the table top stand out and ...

Страница 13: ... or HD satellite service you can enjoy HD programs Make sure to connect the HD cable or HD satellite box to this TV via the HDMI I or component video with audio input for the best picture quality Connection with HDMI If the HD cable or HD satellite box is equipped with DVI rather than HDMI connect the HD cable or HD satellite box to this TV from the DVI out on the HD cable or HD satellite box to t...

Страница 14: ...e TV will automatically enter standby mode L R L R L R Audio Component Video Input P HDMI CV IN AV OUT VGA AUDIO Service Y b Pr L Tuner L R Video R P HDMI CV IN AV OUT VGA AUDIO Service Y b Pr L Tuner L R Video R L Video R Audio AV IN L Video R L Video R P HDMI CV IN AV OUT VGA AUDIO Service Y b Pr L Tuner L R Video R AV IN S VIDEO R L Video L Video R Audio AV OUT L Video R L Video R P HDMI CV IN ...

Страница 15: ... x 900 59 887 55 935 WSXGA 1680 x 1050 59 884 64 674 HD 1920 x 1080 60 67 5 Video Input Signal Reference Table 1 After connecting video equipment to this TV with component video or HDMI set the output signals of the video equipment according to the table below 2 If the graphic card of the PC supports video out you can also set the PC output signals according to the table below Default Component Vi...

Страница 16: ...15 Using AOC TV Turning the TV on and off Press the Power button on the TV or remote control to turn on the TV ...

Страница 17: ...open the menu 2 Press the buttons to select Function and press the OK button 3 Press the buttons to select Menu Language 4 Press the button to select a language 简体中文 English Français Español Português Русский ﺔ اﻟﻌﺮﺑﻴ 5 Press the Menu button to exit ...

Страница 18: ...ress the Menu button to open the menu 2 Press the buttons to select Channel and press the OK button 3 Press the buttons to select Auto Search and press the OK button 4 Press the buttons to select Yes and press the OK button ...

Страница 19: ......

Страница 20: ...mber buttons to switch to another channel 2 Press the Program button to switch to another channel 3 Press the Return button to return to the previous channel Volume adjustment and muting 1 Press the Volume button to adjust the TV volume 2 Press the Mute button to mute the TV Press the Sound button to select a sound mode Standard Music Voice Custom Refer to Sound Settings on p 21 for more details ...

Страница 21: ...g Mode Saves energy by reducing backlight strength Custom User defined mode Brightness Adjusts screen brightness Contrast Adjust screen contrast Color Adjust screen color Sharpness Adjust screen sharpness Noise Reduction Reduces the noise level of connected equipment and VHF UHF CABLE input Color Temperature Neutral Gives the white colors a neutral tint Cool Gives the white colors a bluish tint Wa...

Страница 22: ... Description Sound Mode Voice Enhances treble and maintains bass at a medium level Custom Enhances bass and maintains treble at a medium level Standard Suitable for spoken dialog Music Enhanced treble and bass Sound Mode is also accessible from the Sound button on the remote control Bass Increases or decreases bass Treble Increases or decreases treble Balance Emphasizes left or right speaker balan...

Страница 23: ...or the button to start auto channel search After the auto search is completed the channels found will be stored 3 Press the OK confirm button or the Menu button to end auto search 4 If you run Auto Search again the previously found channels will be overwritten with the newly searched channels Add Channel Adds a new channel to the channel list Manual Search Press the for 3 seconds to enter the manu...

Страница 24: ...ons to adjust 5 Press the Menu button to exit Item Description Auto Adjustment Automatically adjusts the resolution for full screen display of an input signal the TV receives from the connected PC Please refer to the PC Input Signal Reference Table for more about the resolutions supported by this TV H Sync Adjusts the horizontal position of the picture V Sync Adjusts the vertical position of the p...

Страница 25: ... in the PC mode Users can also set the timer from the Sleep button on the remote control Advanced Contrast Sets contrast to the maximum value Dynamic Contrast Allows the TV to automatically adjust the contrast according to the brightness of screen Backlight Control Adjusts the brightness of the backlight when the brightness of backlight is too low the white screen may flicker when turning on the T...

Страница 26: ... inputs support PCM 32 44 1 and 48 kHz Audio Noise Make sure that the antenna is connected with a 75Ω coaxial cable Keep the antenna cable away from other connecting cords To avoid TV interference make sure to use an undamaged antenna cable Condition Explanation Solution PC Input No picture No signal Confirm the PC is correctly connected to the TV from either the PC OUT with an HD15 cable or HDMI ...

Страница 27: ... PAL DK BG I Audio System DK BG I DK BG I Antenna impedance 75Ω 75Ω Input Voltage 220V 50 60Hz 220V 50 60Hz Power consumption 45W 45W Standby power consumption 1W 1W Dimensions WxHxD with stand and support mm 521x401 5x179 4 581 4x435 6x194 4 Wall mounting Accessories Optional Optional Wall mounting bracket dimensions 75 x75mm M4x4 pcs screws 100 x100mm M4x4 pcs screws Equipment Operating temperat...

Отзывы: