background image

11

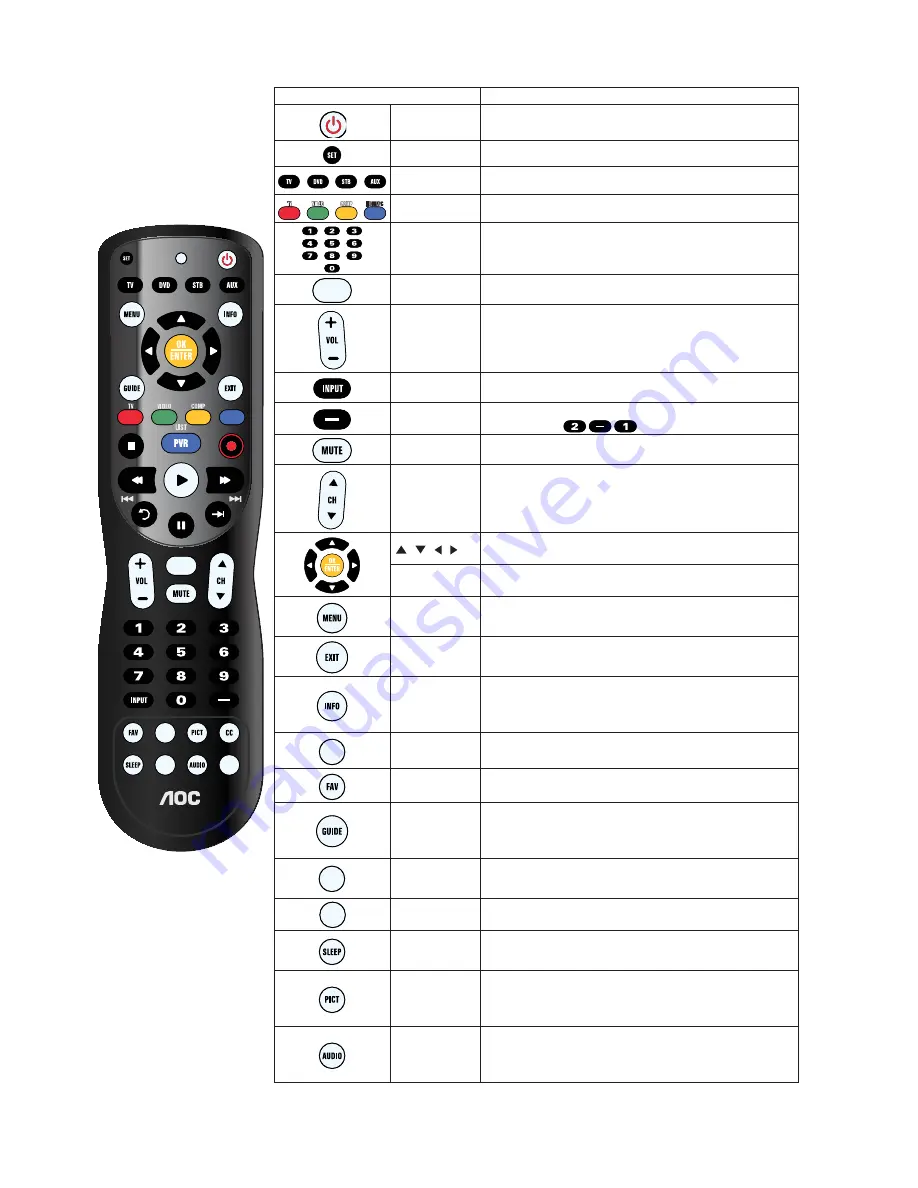
Buttons located at the right side of the TV will operate the same as these buttons on the remote control. 

Button

Description

POWER

Press to turn on and off the TV or target controlled device.

SET

Set device code for the device which you want to control. 

TV/DVD/STB/
AUX

Press TV, DVD, STB, or AUX to switch the device which you 
want to control.

HDMI/PC

HDMI/PC

TV/ AV/ COMP/ 
HDMI/PC

Press TV, AV, COMP or HDMI/PC separately to select the input 
directly. 

0-9 

Press 0-9 to select a channel; the channel changes after two 
seconds. 

LAST

LAST

Press to go back to the previous TV channel or exit from the 
OSD when displaying menu items and settings.

VOL +/-

Press to adjust the volume.

INPUT

Press to display the list of External Inputs and TV mode. Press 
repeatedly to toggle through the inputs. 

Use with 0-9 buttons to select digital channels. For example, to 
enter 2-1, press 


MUTE

Press to mute the sound. Press again or press VOL to restore 
the sound.

CH +/-

Press to scan through channels. To scan quickly through 
channels, press and hold down or -.

 / 

 /   / 

Move left, up, down or right to select the available option or 
adjust the setting in OSD menu. 

OK/ENTER

Press to confirm the selected item or setting.

MENU

Press to display or close a list of convenient functions and menu 
shortcuts. The OSD (On Screen Display) menu items vary based 
on input and content. 

EXIT

Press to close a list of convenient functions and menu shortcuts. 
The OSD (On Screen Display) menu items vary based on input 
and content.

INFO

Press once to display the information pertaining to the channel 
and/or program when available. The OSD (On Screen Display) 
will time out in a few seconds or press again to immediately turn 
off the display. 

ADD

FAV

ADD FAV

Press to add channel to Favorite List. 

FAV

Press to display the Favorite Channel List.

GUIDE

Press to display digital program guide in TV mode. It may 
show current channel name, program name, time, rating, and 
summaries, depending on the information provided by the 
broadcaster.

WIDE

WIDE

Press repeatedly to step through the Wide Mode settings: 
Normal Mode, Wide mode, Zoom 1 Mode, Zoom 2 Mode, and 
HDMI PC mode (Only available in HDMI Input).

PHOTO

PHOTO

Switch the JPEG Viewer Function.

SLEEP*

Press repeatedly to cycle through the available sleep timer, 
5, 10, 15, 30, 60, 90, 120 180 and 240 minutes to turn off TV 
automatically.

PICT

Press repeatedly to cycle through the available picture modes: 
Vivid, Standard, Eco, Movie and Personal. The picture modes 
can also be accessed in the Picture settings. For details, see 
section- Adjust Picture Setting.

AUDIO

Press repeatedly to cycle through the available sound modes: 
Music, Speech and Personal. The sound modes can also be 
accessed in the Sound settings. For details, see section- Adjust 
Audio Setting.

ADD

FAV

PHOTO

WIDE

LAST

HDMI/PC

Содержание Envision LC42H063D

Страница 1: ...1 T L VISION HAUTE D FINITION INTERFACE MULTIM DIA HAUTE D FINITION LCD TV User Manual LC32H063D LC42H063D www aoc com 2010 AOC All Rights Reserved...

Страница 2: ...ecommendations in this manual and in any guides or related documents are believed reliable but the accuracy and completeness thereof are not guaranteed or warranted and they are not intended to be nor...

Страница 3: ...es into the Remote control 13 Attaching the Base 13 Wall Mounting 13 CONNECTING TV 14 Cable System or VHF UHF Antenna System 14 High Definition Interface 14 HDMI Connection 14 Component Signal Connect...

Страница 4: ...DISPOSED OF ACCORDING TO LOCAL STATE OR FEDERAL LAWS FOR MORE INFORMATION CONTACT THE ELECTRONIC INDUSTRIES ALLIANCE AT WWW EIAE ORG Energy Star Please keep the factory default settings as shipped in...

Страница 5: ...turer as they may cause hazards Wall Mount Wall Mount installation requires the use of a Wall Mount Bracket When installing or removing the TV using a Wall Mount Bracket be sure to use qualified contr...

Страница 6: ...acks do not touch it until you have unplugged the AC power cord Otherwise electric shock may result Handling of broken glass and liquid crystal leakage If the LCD panel gets damaged crystalline liquid...

Страница 7: ...to the National Electrical Code ANSI NFPA 70 Antenna lead in wire Antenna lead in wire Antenna discharge unit Grounding conductors Ground clamps Electric service equipment Ground clamps Power service...

Страница 8: ...on a bed sofa rug or other similar surface Never place the TV in a confined space such as a bookcase or built in cabinet unless proper ventilation is provided Leave some space around the TV set as sho...

Страница 9: ...f the signal it receives To experience the stunning detail of your new AOC TV you need access to HD programming Your AOC TV can receive and display HD programming from Over the air broadcasting via HD...

Страница 10: ...TV and all accessories are well presented and undamaged User Manual User Manual QSG Warranty Card Quick Start Guide Warranty Card AOC LCD TV Base Screw x 4 To fix stand to base Power Cable Remote Cont...

Страница 11: ...2 3 4 HDMI High Definition Multimedia Interface provides an uncompressed all digital audio video interface between this TV and any HDMI equipped audio video equipment such as a set top box DVD player...

Страница 12: ...n Display menu items vary based on input and content EXIT Press to close a list of convenient functions and menu shortcuts The OSD On Screen Display menu items vary based on input and content INFO Pre...

Страница 13: ...nction on DVD or other devices When your controlled device is TV there is no function Rewind Execute Rewind function on DVD or other devices When your controlled device is TV there is no function Fast...

Страница 14: ...ace covered with a thick and soft cloth Make sure the Stand is hanging over the 2 edge Remove the screws as shown in the illustration for your model and pull the Stand out 3 Do not remove any other sc...

Страница 15: ...able or VHF UHF or VHF only 75 ohm coaxial cable supplled Rear of TV VHF UHF input TUNER High Definition Interface You can enjoy high definition programming by subscribing to a high definition cable s...

Страница 16: ...nalog RGB and audio cable If the PC is connected to the TV and no signal has been input from the PC for more than 30 seconds the TV enters the standby mode automatically External sound Connection Turn...

Страница 17: ...29 59 954 VESA 1920 x 1080 67 5 60 Video Input Signal Reference Chart After connecting the video input to the TV set the output signal from the video input according to the chart below Presetting Vid...

Страница 18: ...nguage Next Cancel Initial Setting When you first start up this AOC LCD TV set please follow the Initial Wizard to your AOC LCD TV 1 Selecting Language Select your preferred language English Spanish o...

Страница 19: ...18 A Selecting Time Zone Inital Wizard 3 8 Please select Time Zone NST MST AST PST EST AKST CST HST Navigate Select OK Previous Cancel 1 Press to select Time Zone which you located then press OK ENTER...

Страница 20: ...then press OK ENTER 2 Press to adjust then press OK ENTER Month 1 Press to select Month then press OK ENTER 2 Press to adjust then press OK ENTER Day 1 Press to select Day then press OK ENTER 2 Press...

Страница 21: ...ntrast and sharpness ENTER Vivid Eco Initial Wizard 4 8 Please select Eco Vivid mode Previous Cancel Navigate Select 1 Press to select Eco or Vivid for display setting 4 Select TV RF tuning band Cable...

Страница 22: ...ENTER will execute channel searching CH 100 Initial Wizard 7 8 Searching Please wait Searching Analog CH 66 Analog Channels Found 55 Digital Channels Found 100 Cancel Navigate Select OK 1 Press to sel...

Страница 23: ...ct modes to zoom in and to reduce the black bars For TV input with HD programs Normal Mode Suitable for viewing conventional 4 3 programs in their normal format Zoom1 Mode Use these aspect modes to zo...

Страница 24: ...ectly Press the following keys to switch input source ADD FAV PHOTO WIDE LAST HDMI PC HDMI PC HDMI PC When using 2 INPUT key to choose signal source OK ENTER EXIT 0 TV 1 AV 2 Component 3 VGA 4 HDMI 1...

Страница 25: ...m the Air antenna or Cable CATV 2 Channel Strength Show the intensity of the received DTV signal 3 Auto CH Search Automatically scan all NTSC ATSC TV channels and then store in the channel table In ch...

Страница 26: ...can change channel on the remote control directly or press CH on the side of the TV to choose the channel Press the number keys directly to change the channel 1 Press the 2 CH to change channel Press...

Страница 27: ...ng Volume Mute and Sound Mode Press 1 VOL to change the volume Press 2 MUTE to mute the TV Press 3 AUDIO to change surround mode Music Speech and Personal For more details please refer to Adjust Audio...

Страница 28: ...Preset for all inputs can also be accessed by pressing PICT on the remote control to directly toggle the modes Brightness Brightens or darkens the picture Contrast Increases or decreases picture cont...

Страница 29: ...Mono Stereo or SAP This function works in ATV only Audio Language Change the audio language setting on ATSC TV programs The number of the supported audio languages English Fran ais Espa ol SPDIF Digi...

Страница 30: ...Clock Phase Auto Adjust Preset and press OK ENTER to enter 4 Press to adjust 5 Press EXIT to exit PC Setting Description H Position Adjusts the Horizontal positioning V Position Adjusts the Vertical...

Страница 31: ...ess to adjust 5 Press EXIT again to exit The submenu of FEATURE mode in TV mode shows as below Menu Language 1 Adjust the language setting for this TV unit English Fran ais Espa ol 1 Press to select E...

Страница 32: ...ng Before entering the Parental Control sub menu user has to key in the password first Enter the Parental Lock item then the user can modify the restricted table about MPAA or TV Rating respectively W...

Страница 33: ...to ON and this feature will enable the HDMI CEC function and your AOC LCD TV will discover and communicate automatically with other compatible HDMI interfaced devices Select Off to disable this option...

Страница 34: ...u 1 Press MENU to call out MENU 2 Press to select Feature and press OK 3 Press to select Setting item MultiMedia Menu and press OK to enter 4 Press to select Setting item Time Shift and press OK to en...

Страница 35: ...d JPEG format c JPEG sizes are limited up to 10928x6144 for WXGA and 15360x8640 for FULL HD panel Time Shift Main menu setting Select item MultiMedia in Feature menu this item will be disabled in non...

Страница 36: ...E Format Move Select Return Exit Do not Plug out USB or Switch off Power During the Formatting process Continue Yes No 1 Press to select Yes or No to format the USB Disk Note Format process will take...

Страница 37: ...eplaced Limitation 1 When Time Shift feature take action only play pause fast forward rewind volume mute hot key and some basic operation key OK Exit Move can work Any unavailable key pressed the foll...

Страница 38: ...cable Keep the antenna cable away from other connecting cords To avoid TV interference make sure to use an undamaged antenna cable PC Input No Picture No Signal Confirm the PC is correctly connected...

Страница 39: ...ID compliant VGA Terminals VGA INPUT Rear VGA D SUB 15 Pin Input x1 E EDID compliant Audio Input Mini jack for stereo 3 5 Headphone Audio Output Mini jack for stereo 3 5 SPDIF Output Optical Digital A...

Страница 40: ...A 31 Multi Language 28 Music 26 MUTE 11 26 N Noise Reduction 27 P Panel size 38 PC Connection 15 PC Setting 29 Personal 26 Phase 10 29 37 PICTURE 11 Picture Mode 37 Picture Setting 27 Power 4 5 37 38...

Страница 41: ...hing for your code Turn the device you wish to control on 1 Press the desired device key once 2 Press and hold SET until the red LED blinks twice and then release 3 Enter 9 9 1 The LED blinks twice 4...

Страница 42: ...arning all keys press and hold SET until 6 the LED blinks twice to save all data learned Deleting a Single Learning Key This process returns the key to its original programming for the mode you select...

Страница 43: ...Repeat steps 1 5 to move additional keys 6 Moving Keys to a Different Device Mode This lets you for example control DVD functions while in TV mode You would move the transport key functions Play Stop...

Страница 44: ...ou could program the macro key to turn on both your TV and cable box and select a particular channel but only if you are in TV mode If you are in DVD mode this key does not execute the macro you set u...

Страница 45: ...essories Accurian 31106 Altec Lansing 30607 31056 Apple 31115 Creative 30872 DLO 31155 GPX 32113 Griffin 31891 iDeck 31106 iHome 32152 iLive 32113 Imerge 31491 iPort 31917 Klipsch 31339 Marantz 31491...

Страница 46: ...1320 31531 31805 31905 Optimus 31023 30074 30014 30121 30186 30531 31074 Oritron 31366 31497 Outlaw 30391 Panasonic 31308 31518 30367 31275 31288 31316 31548 31633 31763 31764 Philips 31189 31269 3018...

Страница 47: ...Memorex 00000 Mitsubishi 00003 Motorola 01376 00476 00810 00276 01187 01106 01982 Multitech 00883 Myrio 01602 01822 Nova Vision 00008 Novaplex 00008 Pace 01877 00877 00237 00008 01982 Panasonic 00000...

Страница 48: ...undig 30157 Hafler 30173 Harman Kardon 30100 30157 30173 Hitachi 30032 Inkel 30157 30180 Integra 30101 JVC 30032 30072 Kenwood 30626 30000 30029 30028 30190 KLH 31318 31711 Krell 30157 Linn 30157 Magn...

Страница 49: ...20 21056 21061 21100 Arrgo 21023 Aspire Digital 21168 21407 Astar 21489 Audiovox 20717 20790 21041 21071 21072 21121 21122 Axion 21071 21072 B K 20655 20662 BBK 21224 Bel Canto Design 21571 Blaupunkt...

Страница 50: ...20533 Koss 20651 21061 Lasonic 20627 20798 Lecson 21533 Lenoxx 21127 LG 20591 20741 20869 LiteOn 21058 21158 21416 21440 21656 21738 Loewe 20511 20741 Logix 20783 Magnasonic 20651 20675 Magnavox 20503...

Страница 51: ...033 21070 21431 21516 Sova 21122 Superscan 20821 SVA 20717 Sylvania 20675 20821 21268 Symphonic 20675 20821 21268 21334 Tatung 20770 Teac 20571 20717 20790 Technics 20490 20703 Technika 20770 Terapin...

Страница 52: ...0167 Universal X10 30167 Whirlpool 31332 Windmere 31215 X10 30167 Satellite Receivers and DVR PVR Systems Setup Codes for Satellite Receivers AlphaStar 00772 Bell ExpressVu 00775 01170 Chaparral 00216...

Страница 53: ...Network Systems 20739 Humax 20739 Hush 21972 iBUYPOWER 21972 Linksys 21972 Media Center PC 21972 Microsoft 21972 Mind 21972 Niveus Media 21972 Northgate 21972 Panasonic 20614 20616 Philips 20618 2073...

Страница 54: ...mmediately Use and store the unit only in normal temperature environments Handle the remote gently and carefully Don t drop it Wipe the remote with a damp cloth to keep it looking like new Modifying o...

Отзывы: