background image

-48-


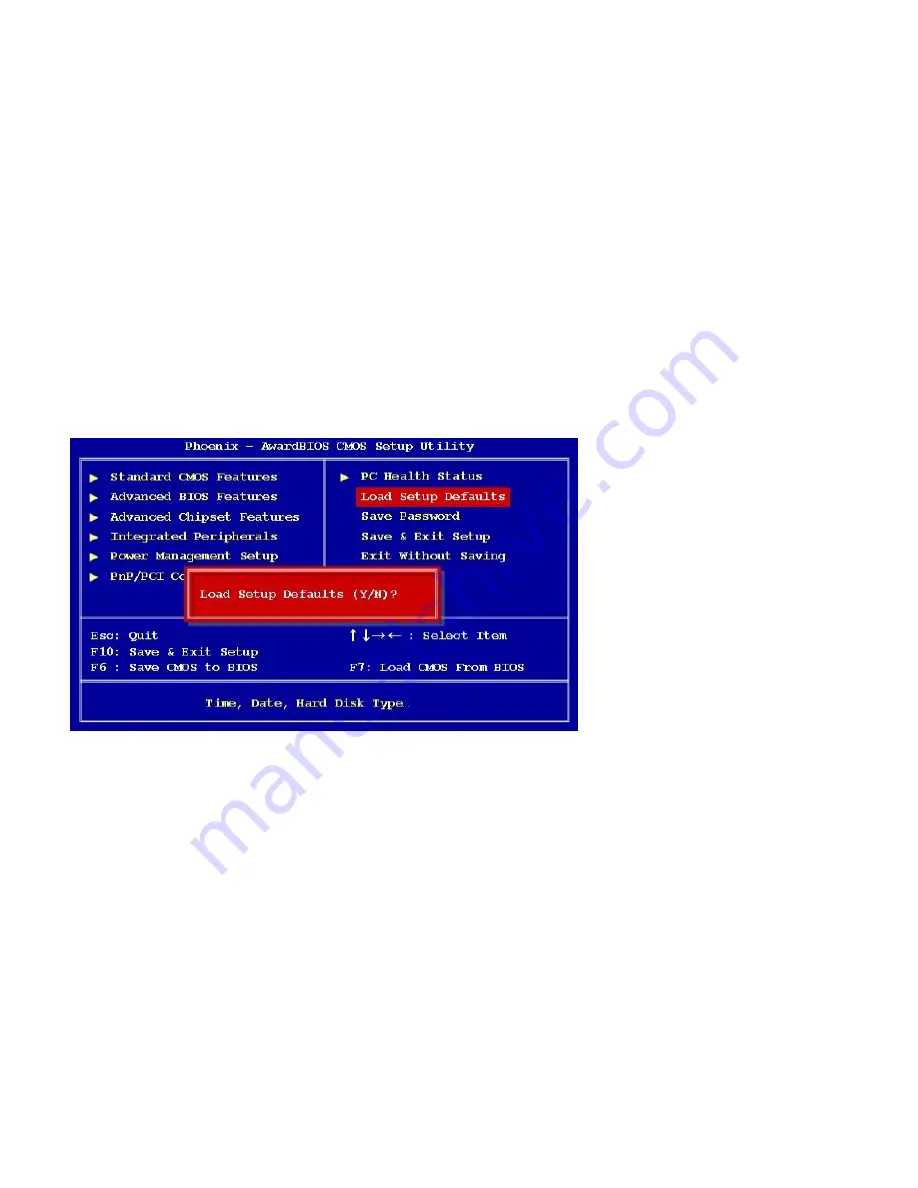
3-8. Load setup defaults 

Use this menu to load the BIOS default values that are factory settings for optimal performance system operations. While Award has designed the custom 
BIOS to maximize performance, the factory has the right to change these defaults to meet their needs.


Press <Y> to load the default values setting for optimal performance system operations.


Содержание POS610

Страница 1: ......

Страница 2: ...2 2 Preparing before installation 11 3 9 Load set up defaults 48 MSR change 65 2 3 Product consist 11 3 10 Set password 49 HDD change 66 2 4 Installation of option device 15 3 11 Save Exit setup opti...

Страница 3: ...to the purchaser The 1st year is applied with free workmanship and new or refurbished replacement parts with one way freight cost born by seller and customer shall be responsible for return delivery...

Страница 4: ...h moistures It is caused of low reliability and operating disorder 3 Be aware of electro static on PCB of system with anti static appliance It is possible to be reason with low reliability and short l...

Страница 5: ...s product is qualified by FCC CE EMI and MIC compliance thus it is governed with the previous qualification regulation to the safety However it is affected by the other high frequency generated We don...

Страница 6: ...t 2 This is for professional business field only to shop not home appliance 3 This is consisted with hardware and software politically 4 It is guaranteed normal operating on stable power supply 1 5 In...

Страница 7: ...electronic wave range Audio and other high frequency generated equipment 8 Do not recommend to use next by air conditioner 9 Prohibit connecting cables under carpet and floor 11 Use another power cod...

Страница 8: ...Checking package 1 Confirm packing detail which is listed on user manual in package 2 We provide POS terminal main unit power cord user manual and driver CD basically It is possible to download user...

Страница 9: ...9 Packing details AnyShop main unit Driver CD User manual Power code...

Страница 10: ...10 Options 12 inch LCD Monitor Front Rear Customer display Front Rear...

Страница 11: ...ormal operating when masking tape is not removed 2 Install option product customer display rear LCD monitor etc first when it need to set up with POS main unit 2 3 Product consist Detail indication ca...

Страница 12: ...12 Front view CAMERA MAGNETIC STRIPE READER LCD TOUCH PANNEL DISPLAY POWER POWER SWITCH DUAL SPEAKER HDD LAN SMART CARD READER...

Страница 13: ...13 Rear view CUSTOMER DISPLAY HDD I O PORT STAND USB PORT...

Страница 14: ...t Description Description 1 AC IN POWER connector 5 Monitor connector Option 2 PS 2 MOUSE connector 6 Parallel connector 3 PS 2 KEYBOARD connector 7 USB connector 4 COM1 COM2 COM3 port 8 LAN connector...

Страница 15: ...f POS main unit 2 Connect cable from POS main unit to customer display CDP part and place the display in customer display space 3 Testing It is successfully connected for CDP installation to POS unit...

Страница 16: ...16 2nd display installation 12 inch LCD monitor 1 Disjoin 2 screws from the marked and pull out the cover 2 Put on the option cover and drive 2 screws up...

Страница 17: ...17 3 Connect with 2nd Display cable 4 Settle LCD monitor down the frame and screw down 4pcs 4 Put down the cover finally Drive 2 screws up...

Страница 18: ...llation to POS unit when initial booting is on going after power off and on CDP and 12 inch LCD Monitor uses only COM4 port on board Notice Remove AC power cord completely in installation or dissectio...

Страница 19: ...19 Installation of Keyboard and mouse 1 Keyboard installation Connection of PS 2 type keyboard 2 Mouse installation Connection of PS 2 type mouse...

Страница 20: ...0 Some USB device optional device is operated only with specific driver software installed It may cause abnormal working if it is connected with multiple USB devices together We recommend you to use...

Страница 21: ...21 Ethernet port connection LAN cable Ethernet port support 10 100 1000Mbps located with rear I O Connector type is RJ45 LAN LED is light on in proper connected case...

Страница 22: ...22 Speaker and MIC connection 1 Speaker connection 2 MIC connection...

Страница 23: ...23 Printer connection Connect printer cable among Serial Parallel and USB port you required...

Страница 24: ...connector 2 Press power button in POS main unit This POS terminal support 110V 220V power consumption and is adjusted required power voltage with dip switch setting We recommend you to use grounded p...

Страница 25: ...25 Dip switch setting Select proper voltage supported dip switching setting 115V 100V 120V 230V 200V 240V...

Страница 26: ...26 POS operating Power on POS accessory and peripherals first before POS power on 1 Press power button in POS unit It will be lighted on POWER LED 2 Confirm Windows booting if it is fine...

Страница 27: ...uct stability Please close all application programs before Windows termination We recommend you to use grounded power connection in AC adaptor connection with power code 1 Select Turn off Computer on...

Страница 28: ...agnetic Card Reader and Printer OPOS driver installation Installation method Component is registered automatically with clicking SETUP EXE in driver CD We recommend you to have guide service to use ou...

Страница 29: ...y to run this program Press Del during the Power On Self Test POST to enter the Setup utility otherwise POST continues with its test routines If you wish to enter Setup after POST restart the system b...

Страница 30: ...escription F1 General help only for Status Page Setup Menu and Option Page Setup Menu Esc Return to the main menu from a sub menu or prompts you to quit the setup program Move to the item in the left...

Страница 31: ...appears The BIOS menu screen displays the items that allow you to make changes to the system configuration To access the menu items press the up down right left arrow key on the keyboard until the de...

Страница 32: ...32 3 2 Standard CMOS features The Standard CMOS Features screen gives you an overview of the basic system...

Страница 33: ...el 0 1 Master Slave IDE HDD Auto Detection Press Enter to select this option for automatic device detection IDE Primary Master Auto Automatically detects IDE devices during POST None Select this when...

Страница 34: ...allows the user to configure the motherboard according to his particular requirements Below are some major items that are provided in the Advanced BIOS Features screen A quick booting function is prov...

Страница 35: ...p The system will boot but access to Setup will be denied if the correct Password is not entered at the prompt Quick Power On Self Test This allows the system to skip certain tests to speed up the boo...

Страница 36: ...36 3 4 Advanced chipset features...

Страница 37: ...d Disabled On Chip Frame Buffer Size The On Chip Frame Buffer Size can be set to 1 MB or 8 MB This memory is shared with the system memory Memory Hole at 15M 16M Enabling this feature reserves 15 MB t...

Страница 38: ...38 3 5 Integrated peripherals Use this menu to specify your settings for integrated peripherals...

Страница 39: ...ting Auto will allow auto detection to ensure optimal performance IDE DMA Transfer Access Use this field to enable or disable IDE DMA transfer access On Chip Primary Secondary PCI IDE The chipset cont...

Страница 40: ...40 On board device Azalia AC97 Audio Select This item allows you to Enabled Disabled Azalia AC97 chipset The options Auto AC97 Audio only Disabled...

Страница 41: ...ng any of the listed options The options Mouse Left Mouse Right Any KEY Button Only POWER After PWR fail The options are off on Onboard Serial Port Select an address and corresponding interrupt for th...

Страница 42: ...IRQ for the serial ports The options IRQ3 IRQ4 IRQ5 IRQ7 IRQ10 IRQ11 Watch Dog Timer Select This option will determine watch dog timer The choices Disabled 10 20 30 40 Sec 1 2 4 Min 4 9 Serial Port 4...

Страница 43: ...Function The choices Disabled Enabled USB Mouse Function The choices Disabled Enabled USB Operation Mode Allows you to configure the USB 2 0 controller in HiSpeed 480 Mbps or Full Speed 12 Mbps Config...

Страница 44: ...44 3 5 Power management setup The power management setup controls the single board computer s green features to save power The following screen shows the manufacturer s defaults...

Страница 45: ...for more than 4 seconds will turn off the system whereas pushing the button momentarily for less than 4 seconds will switch the system to suspend mode Video OFF Method Use this to select the method t...

Страница 46: ...ult Resource Controlled By The commands here are Auto ESCD or Manual Choosing Manual requires you to choose resources from the following sub menu Auto ESCD automatically configures all of the boot and...

Страница 47: ...re of system Chassis FAN Speed This shows the Chassis FAN Speed RPM CPU Temperature This shows the current CPU temperature VCore and Others Voltage This shows the voltage of VCORE 5V 12V VCC V AVCC V...

Страница 48: ...e factory settings for optimal performance system operations While Award has designed the custom BIOS to maximize performance the factory has the right to change these defaults to meet their needs Pre...

Страница 49: ...49 3 9 Set password You can set password It is able to enter change the options of setup menus...

Страница 50: ...he values entered in the setup utilities will be recorded in the CMOS memory of the chipset The processor will check this every time you turn your system on and compare this to what it finds as it che...

Страница 51: ...51 3 11 Exit without saving Selecting this option and pressing Enter lets you exit the setup program without recording any new values or changing old ones...

Страница 52: ...or switch is working correctly Check the RJ45 cable connection Check if the RJ 45 LEDs are on Reinstall LAN card Replace motherboard 4 2 MSR trouble Symptom Corrective Procedure MSR does not response...

Страница 53: ...driver Change USB device 4 4 LCD trouble Symptom Corrective Procedure LCD backlight doesn t work Confirm LCD cable connection Check inverter cable connection Replace inverter cable Change LCD panel 4...

Страница 54: ...ting status Check DRAM setting Check power button cable connection Change power supply unit 4 7 PS 2 Keyboard trouble Symptom Corrective Procedure PS 2 Keyboard is not work Check card reader cable In...

Страница 55: ...55 4 9 Printer trouble Symptom Corrective Procedure Printer is not operated Check printer power supply Replace printer paper roll Check printer cable...

Страница 56: ...56 Chapter 5 Motherboard jumper setting 5 1 Motherboard jumper setting...

Страница 57: ...57...

Страница 58: ...nnector3 5 X2 header pitch2 54mm COM4 Serialportconnector4 5 X2 header pitch2 54mm F_AUDIO1 Frontheadphoneconnector 5 X2 header pitch2 54mm F_PANEL1 Systempanelconnector 5 X2 header pitch2 54mm FRONT_...

Страница 59: ...2 COM port 3 4 RI 5V 12selection 5 X2 header pitch2 00mm VCC_SEL1 CPU VCC VoltageSelect 3 X1 header pitch2 54mm PCI1 PCISlot Rear Panel Connector Label Function Note J1 PS 2 keyboard and mouse 6 pinMi...

Страница 60: ...60 5 3 Serial port power setting 5 1 6 2 Pin 9 12V output 5 1 6 2 Pin 9 5V output 5 1 6 2 Pin 9 RI Ring Indicate COM3 COM2 COM1...

Страница 61: ...61 5 4 CMOS Clear 3 2 1 Protect CMOS 3 2 1 Clear CMOS...

Страница 62: ...er outlet 2 Remove all cables away from POS main unit before repairing 3 Keep all components in the static proof packaging on shipping until ready for installation 4 If it is not activated even on pow...

Страница 63: ...63 Main unit dissection 1 Drive 2 screws out like the above and take off hinge cover 2 Screw 8 pcs out from the frame under the hinge cover area...

Страница 64: ...64 3 Pull out main unit from the stand 4 Complete main unit dissection...

Страница 65: ...65 MSR 1 Remove dummy cover 2 Connect MSR cable 3 Fix MSR with 2 screws It is supported to PS2 USB and Serial port for cable connection...

Страница 66: ...66 HDD change 1 Take HDD cover out from the unit 2 When press PUSH guide HDD will be come out 3 Insert new HDD and put the cover on...

Страница 67: ...hange We recommend removing MSR HDD and CDP before motherboard replacement 1 Disjoin 8 screws from the above spot with driver on rear side of main unit and take off the rear cover of main unit Complet...

Страница 68: ...68 2 Drive 10 screws up from the frame after split of rear cover and pull out the frame Finish taking off frame...

Страница 69: ...69 3 Split FAN and DUCT after taking off the frame 4 Remove 4 screws in the marked spot and pull out FAN and DUCT DUCT FAN...

Страница 70: ...e 4 screws up from like the above after put out of FAN and DUCT 6 Separate cable from motherboard Finish isolating motherboard 7 Assembly in opposite procedure of the above after connecting cable to m...

Страница 71: ...ide frame and rear cover from the rear side of main unit It is the same of taking off rear cover and frame with motherboard change procedure Please refer to 67 page 2 Remove 4 screws from the marked s...

Страница 72: ...e to put out FAN and DUCT Only changing FAN and DUCT Separate part like 1 2 step put FAN and DUCT for replacement on the proper and assembly in opposite procedure 3 Screw 4 pcs out from the marked are...
Страница 73: ...otherboard Finish to pull out motherboard 5 Remove 2 screws from the marked and take off HEATSINK 6 Exclude cable from the HEATSINK Finish isolating HEATSINK 7 Assembly in opposite procedure after rep...

Страница 74: ...nd removing MSR HDD and CDP first before replacement of Power supply unit 1 Separate rear cover after 8 screws out from the marked spot with driver in rear side of main unit 2 Take off frame with 10 s...

Страница 75: ...75 3 Drive 2 screws up like the above after frame removal Complete to extract Power supply unit 4 Assembly in opposite steps after replacement of power supply unit...

Страница 76: ...up the CPU from motherboard 3 Insert new CPU in proper position 4 Complete CPU replacement in turning CPU fixture against clockwise with driver Pull out Insert It is easy to be damaged on CPU handling...

Страница 77: ...M change 1 Push left and right RAM fix guide to each side like the above 2 Pull RAM memory out 3 Insert new memory in the slot and press slightly Please refer to Motherboard jumper setting for RAM loc...

Страница 78: ...Mobile 1 5 GHz RAM DDR2 SODIMM 512MB up to 2GB HDD 2 5 SATA HDD 120GB above Power supply specification Power Type ATX Operating 0 60 C 32 140 F Temperature Operating Humidity 0 90 relative humidity n...

Страница 79: ...Display 15 inch TFT LCD 1024 768 5 lines pressure touch screen Internal I O USB 3 Port Reserved for Touch controller SCR EMV card Camera PS 2 1 Keyboard Reserved for MSR controller RS 232 COM 4 Reser...

Страница 80: ...tomer Display 20 x 2 2nd LCD 12inch LCD 800 x 600 Resolution DVR DVR Card 4channels support WiFi Mini PCI for wireless LAN VGA Mini PCI for VGA card Safety EMI CE FCC KCC Power Supply AC 110 or 220V M...

Отзывы: