background image


46

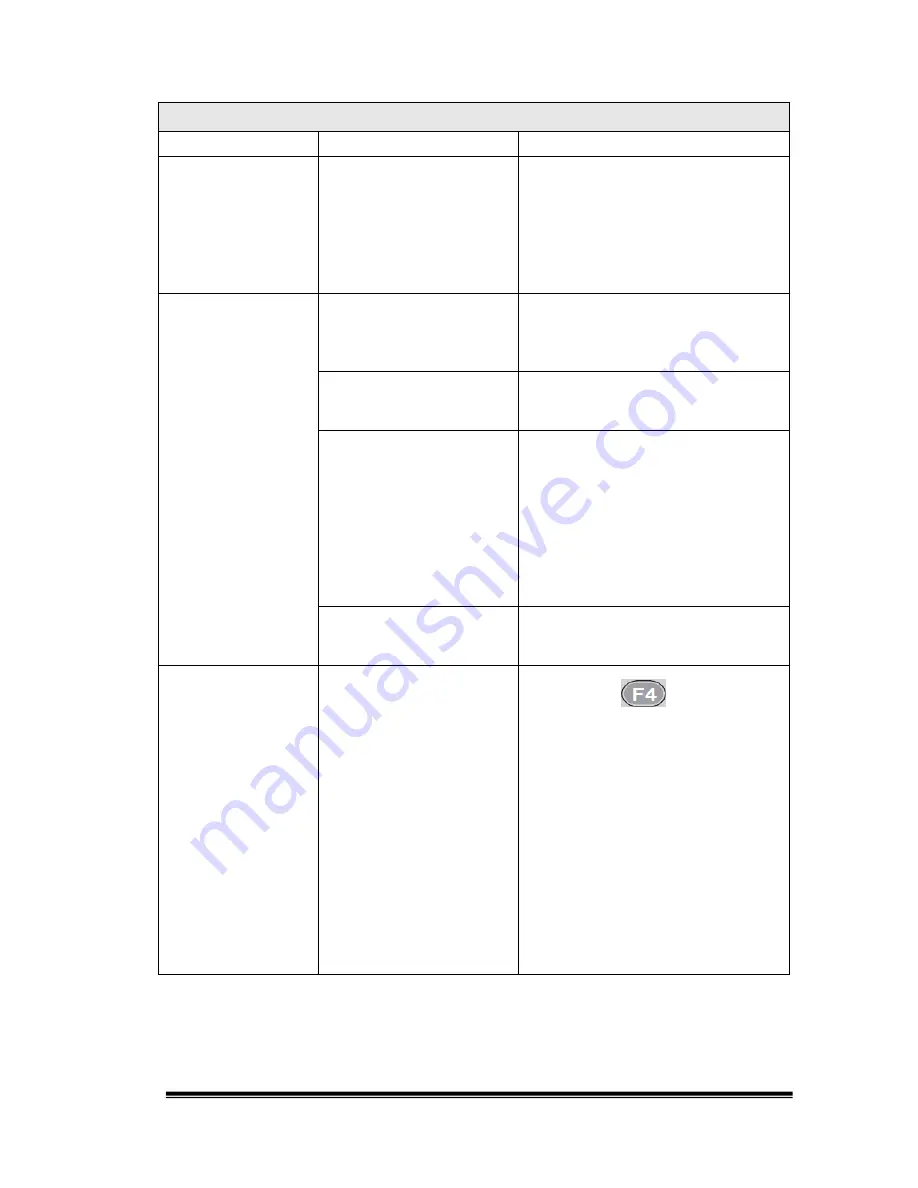
Trouble Shooting Checklist 

Scenario 

Possible Reason 

Solution 

  Unsupported 

video/audio format 
from the media 
source player 

 Refer to the user manual of 

media source player and make 
sure it is sending a video format 
supported by the system, such 
as 1920X1080@60i, PCM 
audio (see Appendix 2 for Video 
Specifications). 

Cannot record or 

playback 

  No USB storage 

device or the device 
is not detected by the 
system 

 Plug in the USB HDD or Pen 

drive and then power-down, 
power-on the system 

  The disk is full 

 Use the Information on OSD 

menu to check for free disk 
space 

  The disk format is not 

supported 

 Backup all the data on the USB 

HDD or Pen drive and then use 
the USB Utilities in the OSD 
Menu>>System Setup to 
reformat the USB storage 
device. Power-down, power-on 
the system or reconnect the 
USB device after formatting the 
storage device. 

  The speed of pen 

drive is too slow 

 Check if the speed of pen drive 

is quick enough for recordings 
or not. 

Lip sync issues 

  Recording frequency 

is not correct 

 Press the 

  button on 

remote controller to re-sync 
audio and video. 

 Adjust the REC LIPSYNC mode 

in OSD Menu>>System 
Setup>>Input Audio/video 
Setup. The default setting is 
mode 1. Adjust the lip-sync 
mode if you encounter lip-sync 
issues. In general, different 
video players or set-top boxes 
will output different video clocks 
and it will cause the lip-sync 
issues. 

Содержание HVR-6048L

Страница 1: ...AnyHD Recorder User Manual Version 1 8 Model HVR 6048L...

Страница 2: ...your dealer Do not place containers holding liquid e g flower vases coffee mugs etc or material soaked with moisture e g paper cloth etc on the top of or in the vicinity of this product Always leave 2...

Страница 3: ...ng over it If the power line is damaged replace it immediately to prevent electrical shock and fire ABOUT the HDMI CONNECTOR Improper use of the HDMI socket and connector will cause damage Before plug...

Страница 4: ...uct in these conditions it may cause a fire or damage the product irreparably Unauthorized repair by uncertified repair facilities is forbidden If the device is accidently exposed to water or the case...

Страница 5: ...up Input Audio Video Setup 28 4 3 8 System Setup Output Audio Video Setup 30 4 3 9 System Setup USB Utilities 32 4 3 10 System Setup Software Update 33 4 3 11 System Setup Restore Factory Settings 36...

Страница 6: ...ed video can be played back on any media player Blu Ray Disc player or PC NB that supports AVCHD M2TS file format AnyHD Recorder Kit Contents The AnyHD Recorder kit contains the components listed belo...

Страница 7: ...flashes when CVBS is selected but the CVBS video signal is unavailable from the source YPbPr Source LED Illuminates when the YPbPr Component input source is selected It flashes when no YPbPr is select...

Страница 8: ...daptor included in the package Power On Off switch CVBS input Composite video input L Audio R Stereo audio input for use with component or composite video input YPbPr input Component video input HDMI...

Страница 9: ...S cables for input You must choose from one of those three cabling options as shown below a HDMI The HDMI cable shown right uses a simple single connection Connect one end of the HDMI cable to the Inp...

Страница 10: ...ected with the earphone output of MP3 player smart phone or PC NB Step 2 Connect the HDTV set to the AnyHD Recorder Connect your AnyHD Recorder to the HDTV The AnyHD Recorder is capable of using HDMI...

Страница 11: ...s the FAT32 file system format only You must confirm that your USB storage device is FAT32 compliant If you are unsure about FAT32 simply use an empty or new USB storage device and format it ALL DATA...

Страница 12: ...REC button on the front panel again to stop recording The TV screen should display Recording Stopped A folder designated by date and a sequence number will be created on the USB storage device on the...

Страница 13: ...viewing and file management Information Display system status Navigation OK buttons Used in OSD menus Exit Escape Movie button Brings up playlist menu Brings up the OSD Menu Playback control buttons P...

Страница 14: ...he AnyHD Recorder is ON Power Saving mode is the normal state when the system is not in use In Power Saving mode the AnyHD Recorder stops sending video to the TV and then reverts to a low power state...

Страница 15: ...current status information File browser Opens the file browser for browsing all files on your USB storage device Scroll up Scroll up button for OSD Menus navigation Move right Move right button for O...

Страница 16: ...Stops video recording Pause recording Pauses video recording PLAY Brings up the playlist where you can select a file for playback STOP Stops playback and returns to video play from the input source N...

Страница 17: ...s with OSD menus and screen applications This button s usage will be indicated on the screen with a Green circle and a function label indicating usage e g Del YELLOW button Function varies with OSD me...

Страница 18: ...shot Repeat In playback mode the current video can repeat automatically by pressing this button Output Resolution Change output resolution Lip Sync While in live monitoring or recording mode you can u...

Страница 19: ...low OSD Menu Items File Viewer Recordings Timer Programming System Setup Information Navigating the OSD Menu You can navigate the OSD Menus using the following keys on the Remote Controller Press the...

Страница 20: ...s function displays a playback list of your previously recorded video files that currently reside on the USB storage device The files are listed by date and time You can playback delete rename or prot...

Страница 21: ...panel of the file viewer will display a file list of the disc or sub directory contents If the selected item has a video file that is known to the system e g jpg or bmp it will display the file s reso...

Страница 22: ...e copy is performed You can press the button to cancel the copy operation Move Similar to the Copy command but the original file folder will be deleted Rename Changes the name of the selected file or...

Страница 23: ...the input mode Press the button to save the modification or to discard any changes The maximum file folder name length is 8 characters Any name over 8 characters will not be saved with the file name D...

Страница 24: ...e toa recorded file and then press the button to play press to delete the file press to modify the file title max title length is 254 characters or press to lock unlock the file to protect from deleti...

Страница 25: ...next or previous recorded file in the list if there are no more files in the list you will be returned to the file list window Press the button to repeat playback for a file or press the button twice...

Страница 26: ...r day The Power Mode After Rec allows you to set the running standby mode of the device after the recording session ends Press the button to save the new session and exit the timer editing window Othe...

Страница 27: ...rnal USB storage device upgrade firmware and restore the factory default settings Press the button and then choose the System Setup item a system setup window will display as shown below 4 3 5 System...

Страница 28: ...te and time 4 3 7 System Setup Input Audio Video Setup In the Input Audio Video Setup menu you can modify the default settings for recording video quality lip sync mode loop recording mode screen capt...

Страница 29: ...efault setting is Mode1 REC Level Adjust the audio volume for recording Default is Auto mode If you would like to modify the audio volume please change the REC Level Adjustment mode from Auto to Manua...

Страница 30: ...hen there is available storage space for recording When set to ON the system will begin deleting the oldest recorded files automatically to maintain a minimum of free storage space 10 minutes of space...

Страница 31: ...s 55 Saturation adjust the video output color saturation level Default value is 26 ByPass HDMI model If there is no video or audio output on the Bypass HDMI port you could modify its output mode HDMI...

Страница 32: ...be apparent when the Free Disk Space line does not display on the screen Highlight USB Reconnect now and press on the remote to re establish connections to your USB device the system will reboot Note...

Страница 33: ...e ahx file distributed by the manufacturer or distributor 1 Copy the new firmware xxxxx ahx to the USB drive 2 Plug the USB drive into the AnyHD Recorder 3 Connect the AnyHD Recorder to your HDTV usin...

Страница 34: ...34 7 In the Software Update screen select the Update New Software item and press button 8 At the Choose New System Software screen press the button again to select the Disk Volume...

Страница 35: ...rade process may take a few minutes to complete The system will reboot automatically after the firmware is upgraded You have completed the upgrade firmware procedures Please power off and on the recor...

Страница 36: ...ption to reset the system settings back to the factory defaults Press the button to confirm the system reset operation 4 3 12 Information The Information window allows you to check free disk space amo...

Страница 37: ...ck function of storing on an external USB storage device a program video which is now being received and or recorded displaying the stored program video even if the program video storing is still unde...

Страница 38: ...over 4GB Therefore it is recommended not to execute time shifting function over 10 minutes Just use the one button recording function if you will leave for over 10 minutes 4 5 One Button Recording The...

Страница 39: ...pre scheduled session recording starts at the same time In both cases two separate files will be created If two sessions are actively recording at the same time and you press the button the session w...

Страница 40: ...ders If you are busy with other jobs while archiving your old video media please follow the procedures as follows 1 Put the tape or disc into the player 2 Find the scene you would like to start record...

Страница 41: ...at the designated time Note The AnyHD Recorder only records video that it receives through its video cables it does not have an internal TV tuner and cannot receive TV signals directly i e a TV Box o...

Страница 42: ...o an external USB HDD using the one button recording function or scheduled recording timer function 5 4 Recording for Surveillance The AnyHD Recorder supports extended recording for surveillance appli...

Страница 43: ...ws XP SP2 or later Hardware GPU MPEG decoding capability is prefer Not all software video players are able to adequately play high quality HD video recorded by the AnyHD Recorder The software media pl...

Страница 44: ...ce LED should be illuminated on the front panel If another Source LED light is illuminated simply press the Video Source Selector Button until the matching Source LED indicator illuminates If the vide...

Страница 45: ...ated The system may shut down after the sleep time is invoked or when the system is not receiving video while in playback mode or in live recording mode Press the button on the remote controller wait...

Страница 46: ...t is not supported Backup all the data on the USB HDD or Pen drive and then use the USB Utilities in the OSD Menu System Setup to reformat the USB storage device Power down power on the system or reco...

Страница 47: ...I Stereo RCA Format PCM 5 0Vpp Max Sampling rate and resolution 48 kHz 16 bits 48 kHz 16 bits Audio channel 2 channel 2 channel Connector HDMI RCA System Specifications Item Input Output Note HDMI Por...

Отзывы: