EN
14
SAFETY INSTRUCTIONS
Read the user instructions carefully before use.
Save them for future reference.
• Check that the power supply is disconnected before installation and servicing.
• When the lamp is switched on, the temperature in the bulb gradually
increases. Do not touch the bulb when it is on or has been switched off but not
cooled sufficiently.
• When the bulb needs to be replaced, turn off the lamp and wait until it has
cooled sufficiently (see below).
• The bulb output must never exceed the stated output (see Technical data).
• If the lamp shade is damaged, it must be replaced as soon as possible. Do not
use the lamp without a lamp shade.
• Do not look directly into a bulb when the lamp is switched on.
• Make sure the lamp is properly earthed.
• Use min. 1 mm² power supply cables of type H05RN-F.
• Connect the cables to the double pole switch.
Electrical safety
New installations and extensions to existing systems must always be performed by
a qualified electrician. If you have the necessary experience and knowledge, you
may replace switches and wall sockets, fit plugs, extension cords and lamp holders.
If not, you should contact an electrician. Improper installation may result in electric
shock or fire.
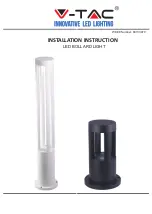
TECHNICAL DATA
Rated voltage
230 V/50 Hz
Safety class
I
Protection rating
IP44
Base E27
Output
Max. 3 x 100 W
Wymiary
Wys 2,3 m
Dimension H2,3m
User instructions for
lamp post
ENGLISH