background image

Network Camera User’s Guide 

 71/84 

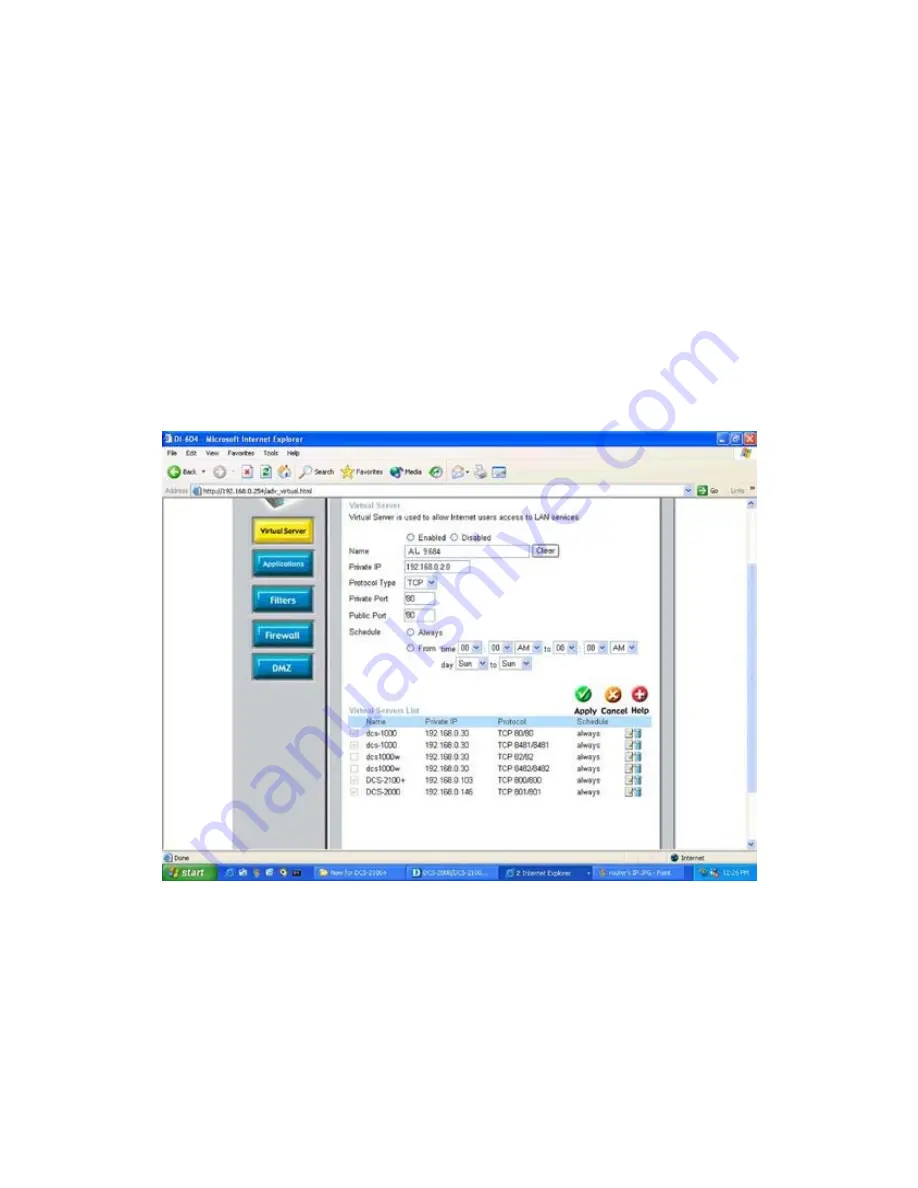
 If you are using the default camera port settings, enter 

80

 into the 

Public 

and 


Private


Port

 section, click 

Apply. 

 Scheduling

 should be set to 

Always 

so that the camera images can be accessed 

at any time.


A check mark appearing before the entry name will indicate that the ports are enabled.


Important:

    Some ISPs block access to port 80. Be sure to check with your ISP so that 

you can open the appropriate ports accordingly. If your ISP does not pass traffic on port 

80, you will need to change the port the camera uses from 80 to something else, such as 

8080. Not all routers are the same, so refer to your user manual for specific instructions 

on how to open ports. 


Enter valid ports in the 

Virtual Server

 section of your router. Please make sure to check 

the box on this line to enable settings. Then the device can be access from WAN by the 

router’s WAN IP Address.   
 
By now, you have finished your entire PC configuration for this device.


Содержание AW-111 Series

Страница 1: ...Multi Profile AW 111 Series CMOS Infra Red Network Camera User s Manual Firmware Version 3 0 2...

Страница 2: ...uipment generates uses and can radiate radio frequency energy and if not installed and used in accordance with the instructions may cause harmful interference to radio communications However there is...

Страница 3: ...ed herein in whole or in part may not be reproduced translated or reduced to any machine readable form without prior written approval WE PROVIDES NO WARRANTY WITH REGARD TO THIS MANUAL THE SOFTWARE OR...

Страница 4: ...xplorer for the first time 19 Logging in as an User 20 Logging in as an Administrator 20 Operating the Network Camera 21 Monitor Image Section 21 Video Profile 21 Streaming Protocol 21 Language 22 2 W...

Страница 5: ...56 Event Server Setup FTP TCP HTTP server configuration 57 FTP Server 57 TCP Server 58 HTTP Server 58 Event Schedule Configure the event schedule 60 Appendix A Restore Factory Default Settings 61 Appe...

Страница 6: ...reams Within minutes you can set up the device to capture a video sequence to a PC The live video can be uploaded to a website for the world to see Features z Easy installation with setup wizard z Dyn...

Страница 7: ...tware for surveillance application z On line firmware upgrade Minimum System Requirements z Microsoft Internet Explorer 6 0 or later z VGA Monitor resolution 1024 x 768 or higher z Pentium 4 2 0 GHz o...

Страница 8: ...C electric power output to Network Camera 5 User s Manual CD provides important information and instructions for operating the Network Camera 6 Quick Start Guide provides important information and ins...

Страница 9: ...ect the device to PC or notebook directly you should use cross over cable instead Audio Output Jack Audio out Jack allows this device to output audio or alerting sound DC Power Jack The DC Power Jack...

Страница 10: ...These LEDs are Infra Red type It s very useful for low lux environment to provide extra light source for image sensor Network Accessing Type LED This LED is used to indicate the network type of Networ...

Страница 11: ...or fix it onto ceiling or wall Use three screws to fix the Network Camera onto the ceiling or wall You could also put the Network Camera on the table directly 3 Plug an Ethernet cable into the Camera...

Страница 12: ...in the package and connect it to wall outlet for AC power Once you have installed the Network Camera well and powered it on the network accessing type LED will turn on It means the system is booting u...

Страница 13: ...very Here is the way to execute IPWizard to discover Camera s IP address and set up related parameter in a Camera Search When click Search button a searching window will pop up IPWizard is starting to...

Страница 14: ...mation Box The words on the Information Box will turn from white to yellow which means this device is selected Or you could double click the left button to connect to the network device Relative setti...

Страница 15: ...assword is approved Wizard page 1 Username and Password This page is about the change of the authorized name and password of the selected device If you don t want to change them for the time being ple...

Страница 16: ...he selected device to check if there is any mistake or not If it is correct please press Submit button and the setting information will be uploaded to the selected device Click on Exit button if you d...

Страница 17: ...device If the operating system Windows XP or Vista of your PC is UPnP enabled the Network Camera will be very easy to be found Please refer to Appendix J to enable UPnP settings only if your operatin...

Страница 18: ...the NAT traversal feature which will attempt to automatically configure the router to allow access to the camera Installing the device with an UPnP router on your network is an easy 3 step procedure...

Страница 19: ...Network Camera you want to monitor as below The Login Window of the Network Camera is prompted 2 Type in your login name and password under USERNAME and PASSWORD textbox For the first time use default...

Страница 20: ...r PC Otherwise the system will load the ActiveX silently 4 After the ActiveX control was installed and ran the first image will be displayed Logging in as an User If you log in the Network Camera as a...

Страница 21: ...ere The date and time are displayed at the top of the window Video Profile The device supports multi profile for both MEPG4 and JPEG simultaneously User can chose the proper and or preferred profile h...

Страница 22: ...oading function Enable audio uploading function ActiveX Control The plug in ActiveX control supports a lot of functions by clicking the left mouse button Note that this feature only supports on the Ac...

Страница 23: ...Network Camera User s Guide 23 84 Digital Zoom Click Digital Zoom to active this function as above User can drag or scale the box over the video to adjust zoom ratio and position Record...

Страница 24: ...files this file is named as Video_yyyymmddhhmmss asf The ASF files can be display by the standard Windows Media Player but it needs the DixectX 9 0 or later version to be installed Snapshot Click Sna...

Страница 25: ...84 Voice Click Volume to activate this function There are two control bars for speaker and microphone volume respectively Scroll these control bars to adjust the audio attribute Check the volume mute...

Страница 26: ...6 84 Statistics Click Statistics to activate this function A window will be popup to show the statistics information of the streaming status Note that this information is the statistics between the de...

Страница 27: ...Network Camera User s Guide 27 84 Click About to show this ActiveX information...

Страница 28: ...n date time maintenance and view system log file Video Configure bit rate and frame rate of video profiles Audio Configure audio parameters User Setup user name password and login privilege E Mail Set...

Страница 29: ...lt IP address 192 168 0 100 by itself as the default IP address IP address Subnet mask and Gateway If you do not select Obtain an IP address automatically then you need to enter these network paramete...

Страница 30: ...hile making these settings These settings should always be made in the camera first and secondly in the wireless access point This ensures that the device is always accessible when making changes Note...

Страница 31: ...P settings Authentication Select Open or Shared Key System Authentication depending on the method used by your access point Not all access points have this option in which case they probably use Open...

Страница 32: ...The address you get may be static meaning it never changes or dynamic meaning it s likely to change periodically Just how often it changes depends on your ISP A dynamic IP address complicates remote...

Страница 33: ...e domain name is applied of this device User name The user name is used to log into DDNS Password The password is used to log into DDNS PPPoE PPPoE PPPoE Stands for Point to Point Protocol over Ethern...

Страница 34: ...device will dial on to the ISP connect to the WAN through the xDSL modem The procedures are Connect to a LAN by DHCP or Fixed IP Access the device enter Setting Network PPPoE as below PPPoE To enable...

Страница 35: ...edia stream delivered by a media server RTSP servers typically use RTP as the protocol for the actual transport of audio video data RTSP Port Choose the RTSP port The RTSP protocol allows a connecting...

Страница 36: ...des UPnP IGD function for NAT traversal easily Use NAT traversal when your device is located on an intranet LAN and you wish to make it available from the other WAN side of a NAT router With NAT trave...

Страница 37: ...user s IP address which are allowing enter or denying by the device IP Filter To enable or disable the IP filter function here IP Filter Policy Choose the filter policy where is denying or allowing I...

Страница 38: ...ct Type the subject title of the E mail TCP Notification If enable this function then the TCP Server TCP Port and Message fields need to be filled TCP Server Type the server name or the IP address of...

Страница 39: ...HTTP server HTTP Login Password Type the password for the HTTP server Proxy Address Type the server name or the IP address of the HTTP Proxy Proxy Port Set port number of Proxy Proxy Login name Type t...

Страница 40: ...s Guide 40 84 Camera Adjust Camera parameters Use this menu to set the functions of the camera parameters of the device Picture Rotation Turn the Mirror and Vertical Flip On or OFF The image will be...

Страница 41: ...s flash you may need to choose correct frequency World wide frequency table is in Appendix H Brightness Large value will brighten camera Sharpness Large value will sharpen camera Contrast Large value...

Страница 42: ...escribes how to locate your device from Internet by DDNS service However we provide another easier way to do the same job called Dynamic IP Service DIPS To use this service just follow four steps belo...

Страница 43: ...on IPWizard once the device is found Software Version This information shows the software version of the device Log User can check the system log information of the device including the Main Info App...

Страница 44: ...s date and time with those of time server called NTP server Network Time Protocol NTP Server Type the host name or IP address or domain name of the NTP server NTP sync Interval Select an interval bet...

Страница 45: ...ill then be possible to return to the previous settings if settings are changed and there is unexpected behavior Restore Setting Click the Browse button to locate the saved backup file and then click...

Страница 46: ...zard to search the device again Warning The download firmware procedure can not be interrupted If the power and or network connection are broken during the download procedure it might possibly cause s...

Страница 47: ...st independently Common Text Overlay Setting There are some important information can be embedded into image including date time and or text MPEG4 VGA Video Type It s a MPEG4 mode in this profile Reso...

Страница 48: ...d as possible User need to set reasonable max frame rate versus video quality under the limited bandwidth MPEG4 QVGA Video Type It s a MPEG4 mode in this profile Resolution It s QVGA mode 320x240 in t...

Страница 49: ...od of this profile There are two options Constant Bit Rate CBR or Variable Bit Rate VBR For CBR the video bit rate is between 24kbps and 320kbps User can set the desired bit rate to match the limitati...

Страница 50: ...EG profile Rate Control The quality level is between 1 and 100 The higher value is the better quality Max Frame Rate Defines the targeted frame rate of this profile For example set the frame rate to 1...

Страница 51: ...Network Camera User s Guide 51 84...

Страница 52: ...Guide 52 84 Audio Audio parameters Audio To enable or disable audio function Audio Mode To select Simplex or Full duplex 2 way audio mode Input Gain To adjust gain of input audio Output Gain To adjust...

Страница 53: ...and viewer Viewer login Select Anonymous to allow any one viewing the video once connected Otherwise only users in database can view the video after login Access right Administrator can access every...

Страница 54: ...e IP address of the SMTP server Test Send a test mail to mail server to check this account is available or not SMTP Port Set port number of SMTP service SMTP Authentication Select the authentication r...

Страница 55: ...twork Camera User s Guide 55 84 Type the receiver s e mail address E mail From Type the sender s E mail address This address is used for reply e mails E mail Subject Type the subject title of the e ma...

Страница 56: ...d Window These windows can be specified as Included or Excluded type Included windows target specific areas within the whole video image Excluded windows define areas within an Include window that sho...

Страница 57: ...e and also add at least one event schedule to enable event triggering as SMTP Name User can specify multiple FTP paths as wish Therefore user needs to specify a name for each FTP setting FTP Server Ty...

Страница 58: ...ideo file to FTP server the device also can send event message to specified TCP server Name User can specify multiple TCP servers as wish Therefore user needs to specify a name for each TCP server set...

Страница 59: ...HTTP server Test Check the HTTP server whether it is available or not HTTP Login name Type the user name for the HTTP server HTTP Login Password Type the password for the HTTP server Proxy Address Ty...

Страница 60: ...le of Events and activate the some actions provided by this device Name Name of the Event or Schedule Enable Enable or disable this Event or Schedule Type Event trigger or Schedule trigger Enable Time...

Страница 61: ...user can restore the factory default settings and install it again Restore the device 1 Insert the paper clip or other suitable tool to press and hold the button down continuously 2 Hold it least 3 s...

Страница 62: ...ers are logged on The device can be used outdoors or not The device is not weatherproof It needs to be equipped with a weatherproof case for outdoors using However equipped with a weatherproof case mi...

Страница 63: ...e Cannot access the login page and other web pages of the device from Internet Explorer Maybe the IP Address of the device is already being used by another device or computer To confirm this possible...

Страница 64: ...the file is not listed make sure your Security Settings in Internet Explorer are configured properly and then try reloading the device s home page Most likely the ActiveX control did not download and...

Страница 65: ...FTP server Video quality of the device The focus on the Camera is bad The lens is dirty or dust is attached Fingerprints dust stain etc on the lens can degrade the image quality The color of the image...

Страница 66: ...or if the IP address conflicts with any other devices over the network If you want to make sure the IP address of the device utilize the PING command as follows z Start a DOS window z Type ping x x x...

Страница 67: ...Actual results generated by the device may be varying Image Resolution Average range of Data Sizes for JPEG mode Average bit rate for MPEG4 mode 160 x 120 QQVGA 3 6k byte per frame 64kbps 256kbps 30fp...

Страница 68: ...P SMTP FTP NTP DNS DDNS DHCP UPnP RTSP PPPoE 3GPP Browser Microsoft Internet Explorer 6 0 or later Operating System Windows 2000 XP Vista Security 2 Levels Administrator or Viewer Ethernet 10 100M aut...

Страница 69: ...d IP address for example 192 168 0 100 2 Access the Router with Your Web browser The following steps generally apply to any router that you have on your network The D Link DI 624 is used as an example...

Страница 70: ...he router and most routers prevent users from accessing the video from the device over the Internet The router connects to the Internet over a series of numbered ports The ports normally used by the d...

Страница 71: ...ck with your ISP so that you can open the appropriate ports accordingly If your ISP does not pass traffic on port 80 you will need to change the port the camera uses from 80 to something else such as...

Страница 72: ...ecessary for the users that could only obtain dynamic IP addresses As to the users that could obtain the static valid IP address they do not usually have to apply the DDNS service Before we decide if...

Страница 73: ...umns show up at the left side click Create Account 4 Fill the application agreement and necessary information a Username b E mail address and confirmation c Password and confirmation d Submit all the...

Страница 74: ...4 5 Check your e mail mailbox There will be an e mail with a title Your DynDNS Account Information Click the hyperlink address to confirm the DDNS service that you just applied Then DDNS you applied a...

Страница 75: ...mera User s Guide 75 84 6 Enter the web page http www dyndns org again Input your username and password that you just applied to login administration interface of DDNS server Click to confirm Input yo...

Страница 76: ...era User s Guide 76 84 7 If the correct username and password are input you can see the following picture at the top right of the login page 8 Click the Services 9 Click the Dynamic DNS 10 Click the C...

Страница 77: ...main name information Pink No 3 4 Setup the DDNS and PPPoE of Networked Device At last users have to enter the web page of Networked Device and setup the necessary information of DDNS and PPPoE after...

Страница 78: ...hotels Other areas are 220V only with the exception of Fortaleza 240V Canada 120V 60 Hz China People s Republic of 220V 50 Hz Finland 230V 50 Hz France 230V 50 Hz Germany 230V 50 Hz Hong Kong 220V 50...

Страница 79: ...thout any firewall protection RTSP Port Port 554 is the default for RTSP service However sometimes some service providers change this port number for some reasons If so user needs to change this port...

Страница 80: ...amera User s Guide 80 84 Appendix J Enable UPnP of Windows XP Use the following steps to enable UPnP settings only if your operating system of PC is running Windows XP Go to Start Settings Click Contr...

Страница 81: ...Network Camera User s Guide 81 84 Click Add or Remove Programs Click Add Remove Windows Components The following screen will appear...

Страница 82: ...Network Camera User s Guide 82 84 Select Networking Services Click Details Select Universal Plug and Play Click Ok...

Страница 83: ...Network Camera User s Guide 83 84 Click Next Please wait while Setup configures the components...

Страница 84: ...Network Camera User s Guide 84 84 Click Finish...

Отзывы: