background image

MU120131A/32A  PON  Quck  Start  Guide


15


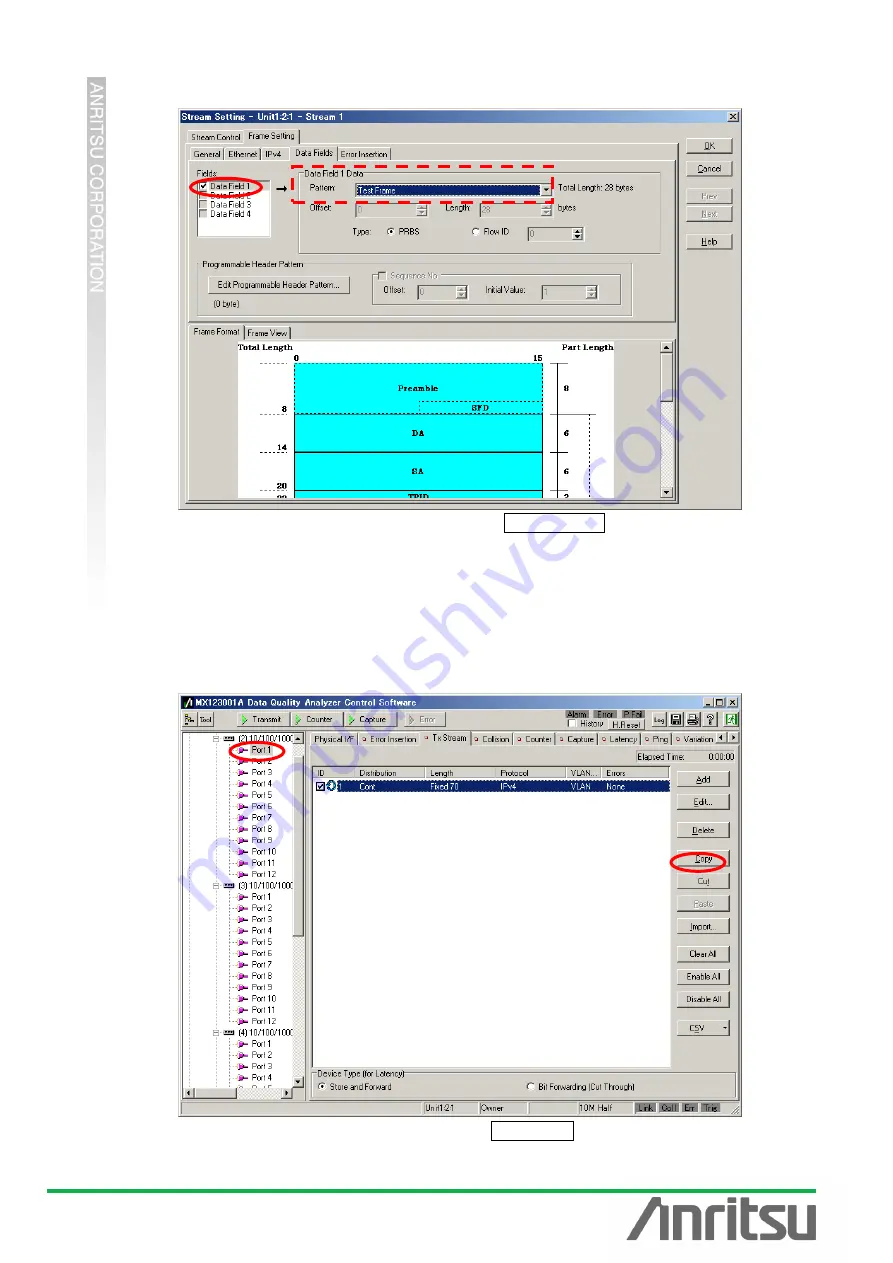
Insert the PRBS pattern at [Data Fields] of Frame Setting. 


Put a checkmark in 

“Data Field1” at “Fields:” and select “Test Frame” at “Pattern” of 

“Data Field1 Data”. 


Press 

“OK” to close the Setting screen. 


(2) Settings for ONU2~32 


Copy  the  Tx  Frames  (Tx  Stream)  for  Unit2  Port1  to  Unit2  Port2~12,  Unit3  Port1~12,  and 

Unit4 Port1~8. 


Select the created stream at Unit2 Port1 

□Tx Stream screen and press “Copy”. 

Содержание MD1230B

Страница 1: ...Quick Start Guide MU120131A 32A PON Quick Start Guide MD1230B Data Quality Analyzer ...

Страница 2: ... 4 2 Creating OLT side Tx Frames and Setting OLT ONU Stream Down Signal 8 4 3 Creating ONU side Tx Frames and Setting ONU OLT Stream Up Signal 12 4 4 Checking Flow from Each ONU Setting OLT ONU Tx Rx Counter 17 4 5 Checking OLT ONU Down SIgnal Flow Setting Custom Counter 26 4 6 Testing Load 29 5 Monitoring E PON Systems 32 5 1 Connecting DUT 32 5 2 Checking MPCP Control and OAM Function 33 5 3 App...

Страница 3: ...g E PON frames by capturing and decoding system frames especially E PON related 1 1 Structure of Guide Fig 1 Structure of Guide This document presumes use of the MU120131A 32A module Ver 7 0 and later For the procedure for installing or upgrading Ver 7 0 of the MD1230 software see the version upgrade procedure Upgrade the firmware according to the version upgrade procedure check the installation a...

Страница 4: ...cm from walls and obstructions to allow sufficient cooling air flows Supply power in the voltage ranges of 100 120 Vac or 200 240 Vac at a frequency of 50 60 Hz The power consumption is 600 Vac 10 cm 2 2 Installing Modules Install three MU120131A units in Slots 2 to 4 and one MU120132A in Slot 5 2 3 Power on off 1 At power on Plug the power cord into the power socket Set the power switch to ON 2 A...

Страница 5: ...A PON Quck Start Guide 4 2 4 Starting Main start up At power on the Selector screen shown above is displayed Click Main application The screen changes to the Measurement screen automatically after about 15 seconds ...

Страница 6: ...ng Ownership Before starting measurement the ports to be measured must be reserved Right click Unit1 and select Reservation The ports of usable modules that can be used are listed as shown below place checkmarks in the required ports and press the Check all button 3 2 Setting Ports After reserving the ports to be measured set the ports ...

Страница 7: ...s examples Put checkmarks in Reply to this port ARP request and in Reply to this port PING request when performing ARP and PING Set MAC Address Any value can be set but here 00 00 00 00 00 01 is used as an example Set Test Pattern to Cross PRBS 31 Set Port1 Port12 for Unit2 Unit3 and Unit4 in the same way Set IPv4 Address sequentially in the range of 192 168 0 1 to 36 and MAC Address in the sequen...

Страница 8: ...ounting Bit Rate and number of Frames In addition sequence errors are detected by imposing a load by varying the number of Frame and gaps and using the packet BER measurement function to confirm that packet loss does not occur 4 1 Connecting DUT Connect ONI1 32 to Unit1 Port1 Port12 of the MU120131A Unit2 Port1 Port12 and Unit3 Port1 Port8 Connect the OLT to Unit3 Port12 1 PON System 2 31 32 36 ON...

Страница 9: ...t payloads in each Frame Procedure Increment the MAC address for each ONU address and create a multiple address stream Input a PRBS pattern amd perform BER measurement Results Goal Create OLT side Tx Frames Create OLT ONU Stream Down signal Creating OLT side Tx Frames Tx Stream Select Port12 of Unit4 Press Add at the Tx Stream screen and create the stream Press Edit to edit the created stream ...

Страница 10: ...25 The setting is 6 5625 5 Mbps here because the data is the same as video traffic of several Mbps flowing on an actual network Set Frame Length at General of Frame Setting When Auto is selected 64 byte is set automatically With E PON Frames 64 bytes is common but set 70 bytes because we want a PRBS test frame of more than 28 bytes in the Data Field Leave Protocol unchanged as IPv4 This is the com...

Страница 11: ... 00 00 00 01 and Mask to FF FF FF FF FF FF Jump to Stream is performed for 32 streams data can be set for 32 ONU addresses 00 00 00 00 00 01 00 00 00 00 00 20 Set Source Address to This port to set the port setting value Set DA SA at IPv4 of Frame Setting Set Type at Source Address to This port to set the port setting value At Destination Address set Type to Increment Address to 192 168 0 1 and ...

Страница 12: ...sses are incremented according to each MAC address increment Insert the PRBS pattern at Data Fields of Frame Setting Put a checkmark in Data Field1 at Fields and select Test Frame at Pattern of Data Field1 Data This supports BER tests Press OK to close the Setting screen ...

Страница 13: ...4 2 create a test signal emulating an actual network in which the payload of each frame is different Procedure Create an OLT address stream from each ONU Input PRBS pattern and perform BER measurement Results Goal Create ONU side TX stream Create ONU OLT Stream Up Signal Creating ONU side Tx Frames Tx Stream 1 Settings for ONU1 Select Unit2 Port1 Press Add at Tx Stream and create the stream Press ...

Страница 14: ...ng Inter Frame Gap changes the send rate Here select Fixed at Inter Frame Gap and set Unit of Value to and set 3 125 This setting divides the full wire rate bandwidth into 32 equal parts for the 32 ONU units Set Frame Length at General of Frame Setting When Auto is selected 64 byte is set automatically Leave Protocol unchanged as IPv4 ...

Страница 15: ...as the default Set Destination Address to Static and Value to 00 00 00 00 00 24 Set Source Address to This port sets ONU port setting addresses at OLT address Set DA SA at IPv4 of Frame Setting Set Type at Source Address to This port At Destination Address set Type to Static and Address to 192 168 0 36 sets to OLT address ...

Страница 16: ...rk in Data Field1 at Fields and select Test Frame at Pattern of Data Field1 Data Press OK to close the Setting screen 2 Settings for ONU2 32 Copy the Tx Frames Tx Stream for Unit2 Port1 to Unit2 Port2 12 Unit3 Port1 12 and Unit4 Port1 8 Select the created stream at Unit2 Port1 Tx Stream screen and press Copy ...

Страница 17: ... Guide 16 Press Paste at the Unit2 Port2 Tx Stream screen Similarly paste the created stream to Unit2 Port3 12 Unit3 Port1 12 and Unit4 Port1 8 Copy Paste is possible because MAC SA and IPv4 SA both reference shared port settings ...

Страница 18: ...he multiflow counter to count the Bit Rate and number of Frames of each stream at the OLT side Results Goal Count of multiple flows at one port and clarify throughput ONU OLT stream Up signal Setting Multi Flow Counter for OLT Side 1 Opening Counter Setting Screen Select Unit4 Port12 Unit1 4 12 for the measured port Open the Counter screen and press the counter icon hammer symbol to open the Setti...

Страница 19: ...re we are performing settings for Rx Frames so set Tx Rx to Rx Open the Mode tab and select either Result displays Accumulate results when counter stops or Monitor displays results at every 1 s while counting Here Monitor is set for measuring Latency Ave and displaying graphical results Press the Add button to open the Field Setting screen ...

Страница 20: ...t When MAC DA is 00 00 00 00 00 24 looking at the last 16 bits of 00 24 when Format is Hexadecimal Offset becomes 32 and Length becomes 16 Press OK Put a checkmark in MAC DA 16bit and press OK to confirm The Field setting supports up to 16 bit 4 Block When Offset is divided by 8 and the sum of the remainder and Length exceeds 16 bits it becomes 1 Block The above setting is 2 Blocks Offset 32 8 rem...

Страница 21: ...31A 32A PON Quck Start Guide 20 4 Editing Field Conditions The following screen opens when the Edit button is pressed so set MAC DA 5 Adding Field Conditions Press the Add button and add the Field conditions ...

Страница 22: ...ional allocation conditions at the Field Setting screen Here allocation is performed using MAC SA so select MAC SA 48bit and press the Edit button Leave the defaults for Base Position Offset Length and Format unchanged and press OK Set a checkmark at MAC SA 48bit and press OK to confirm ...

Страница 23: ...of ONU1 When counting several flows set the number of flows to be counted at Number of Flow ID Here 32 there are flows from 32 ONUs so set Number of Flow ID to 32 and press Edit With one MD1230B unit the Flow number can be set to 256 minus the number of ports selected at Mode Monitor For example when the monitored port number is 1 up to 255 flows can be set ...

Страница 24: ...No 2 No 32 and paste the copied value to set by right clicking Select MAC SA for No 1 No 32 and the value incremented from 1 is input when Increment is chosen by right clicking at No 1 This divides the signal using each address of ONU1 to 32 Record all the items as shown above and press the OK to complete the settings ...

Страница 25: ... checkmarks Here select Flow at Category and place checkmarks at Received Bit Rate Mbit s Flow Received Rate Flow and Sequence Error at Counters Select Both at Counter This permits monitoring of each flow in 1 second intervals using the multiflow counter When a checkmark is placed in the Latency item it is possible to confirm each Latency measured value at the same time Press OK to close the scree...

Страница 26: ...ONU1 32 Check that the Current value for each Rx Frame of each flow is 3 125 and the same as the set value As a result clarify that the Throughput is 100 If a Sequence Error is counted Frame loss has occurred and if Frame loss occurs the Throughput cannot be 100 If the PLT Tx count and Rx count for each ONU are the same value the Throughput is 100 ...

Страница 27: ...ame Loss using Custom counter Results Goal Count of total flow at multipe ports OLT ONU Down signal Setting Group Entry Right click Group Entry and select New Group Place a checkmark in Partially Meshed at Traffic Distribution and select the OLT side port Unit4 Port12 press Add at Group A Top Select all ports Unit2 3 Port1 12 Unit4 Port1 8 at the ONU side and press Add at Group B Bottom This perfo...

Страница 28: ...OK to close the screen Setting Custom Counter Select Group1 and press the Custom counter display setting button blue hammer icon at the Counter screen to open the screen At the Custom Counter Setting screen place checkmarks in all items and press ...

Страница 29: ...t Results The Counter Log starts At the Counter screen start Counter and Transmit If there is a difference between the counts of the OLT Tx Frames and total of Rx Frame counts for each of the ONUs Frame loss has occurred and Frame Loss and Frame Loss Rate are counted It is also possible to simultaneously confirm the service stoppage time ...

Страница 30: ...luate the PON system performance Procedure Vary the ONU1 Tx rate Results Goal Generate network load and measure BER Increasing load of OLT side Tx Frames Select Unit3 Port1 Stop Transmit Select the stream and press Edit to edit the stream Select Random at Inter Frame Gap and set 1 at Unit of Min and 10 at ...

Страница 31: ...t The data transmission priority can be increased by increasing User Priority Here set the priority to 7 so as to secure the band maximum priority Doing this guarantees the band required by ONU1 and divides the remaining band into 31 equal parts for ONU2 to 32 Transmit is started Counting is performed at the Count screen ...

Страница 32: ...VLAN Tag at Unit4 Port12 The rates of ONU2 32 decreasing due to the increased load of ONU1 will be seen If there is any difference between the OLT and total counts for the ONU Tx Rx errors have occurred Monitor the Sequence Error counts and measure the BER at these times Finishing Measurement Stop Transmit and counting The logs are stored in the path C Program Files Anritsu MX123001A Main LOG ...

Страница 33: ...rtion Loss 3 70 dB Port2 Port1 ATT ATT Insert a 2 x 2 coupler between the OLT in the PON system and splitter Here the coupler is connected directly after the OLT Note When the distance between the OLT and ONU is short sometimes the equipment permissible optical power range may be exceeded In this case insert an optical attenuator ATT directly after the OLT Since light has directivity connect the c...

Страница 34: ... off condition Perform port setting for ports monitoring E PON signals with the ONU not connected 1 Setting Port Unit5 Port1 using EPON Signal from OLT Right click Port1 Unit1 5 1 and select Port Setting Set Mode to Monitor Place a checkmark in Preamble so that capture can be performed from preamble Moreover placing a checkmark in E PON supports capture of E PON Frame capture Remove the checkmark ...

Страница 35: ...o be monitored Unit5 Port1 Unit1 5 1 here Open the Capture screen and press the capture setting icon hammer mark to open the setting screen Place a checkmark in On at the Filter screen and change Pattern 1 of Condition to Match Press Edit at Filter Trigger Counter Conditions to perform setting ...

Страница 36: ...f Pattern 1 and select MPMC Press OK to close the screen Perform setting for Unit5 Port2 in the same manner With the ONU not connected start capture for the port to be monitored link port Unit5 Port1 2 Connect the ONU and capture one series of exchanged signals ...

Страница 37: ...e 36 Group Unit5 Port1 and 2 The results appear as below Checking OAM Function Select the port to be monitored Unit5 Port1 Unit1 5 1 here Open the Capture screen and press the capture setting icon hammer mark to open the setting screen ...

Страница 38: ...at the Filter screen and change Pattern 1 of Condition to Match Press Edit at Filter Trigger Counter Conditions to perform setting Open Preset Pattern of Pattern 1 and select 802 3 OAM Press OK to close the screen Perform setting for Unit5 Port2 in the same manner ...

Страница 39: ...N Quick Start Guide 38 Start capture of the port to be monitored Unit5 Port1 2 Perform the End to End load test described in section 4 6 and capture the fault notification signal at a fault The results appear as below ...

Страница 40: ...e changing the priority of the VLAN tag for End to End measurement and performing QoS measurement Results Goal Counting E PON Frames For verification perform monitoring with the PON system encoding set to off Setting Counter 1 Opening Counter Setting Screen Select the port to be measured Unit5 Port2 Unit1 5 2 here Open the Counter screen and press the counter setting icon hammer mark to open the s...

Страница 41: ...40 2 Opening Field Setting Screen Open the Other screen and choose VLAN Tag at Quality of Service Counter Press OK to close the screen Setting Counter Display Press the Display Option icon at the Counter screen to open the setting screen ...

Страница 42: ...In this example select QoS at Category and either put checkmarks in all items at Counters or press Check All Press OK to close the screen Counter and capture start Perform End to End QoS measurement as described in section 4 6 and check the network DNA function when varying priority at the VLAN tag ...

Страница 43: ...asuring Latency For verification perform monitoring with the PON system encoding set to off Measuring Latency Select the port to be monitored Unit5 Port2 Unit1 5 2 here Open the Variation screen and select Latency Press the Latency Variation setting icon red hammer mark to open the setting screen Select 1 ms at Resolution and press OK to close the screen This enables measurement of the Latency dis...

Страница 44: ...uide 43 Press the setting icon blue hammer symbol to open the setting screen Place a checkmark in On at the Filter screen and change Pattern 1 for Condition to Match Press Edit at Filter Trigger Counter Conditions and perform setting ...

Страница 45: ...MU120131A 32A PON Quick Start Guide 44 ...

Страница 46: ...20131A 32A PON Quick Start Guide 45 Open Preset Pattern of Pattern 1 and select MAC SA Press OK to close the screen Measurement starts The service providers guaranteed delay time 10 ms or less is verified ...

Страница 47: ...frames can be monitored simultaneously using the MU120132A quality evaluations are even more efficient By offering a total measurement solution for PON systems the MD1230 MP1590 family is perfect for building an application test environment Product Features The MD1230B provides all in one support for evaluating the functions of all ONUs and the OLT in a 32 branch PON system It supports capture and...

Страница 48: ...ia Tverskaya str 16 2 bld 1 7th floor Russia 125009 Moscow Phone 7 495 363 1694 Fax 7 495 935 8962 United Arab Emirates Anritsu EMEA Ltd Dubai Liaison Office P O Box 500413 Dubai Internet City Al Thuraya Building Tower 1 Suit 701 7th Floor Dubai United Arab Emirates Phone 971 4 3670352 Fax 971 4 3688460 India Anritsu India Private Limited 2nd 3rd Floor 837 1 Binnamangla 1st Stage Indiranagar 100ft...

Отзывы: