background image

16


"P.End" - 

a total number of the program steps (value 1-60).This value should be set 


before start programming (e.g. if you want to create program with 10 steps,set End=10).


"

rED1"

  - a red LED 1 saturation,value 0-55


"GrE1"

- a green LED 1 saturation,value 0-55


"bLu1"

- a blue LED1 saturation,value 0-55


:


:


"

rE16"

  - a red LED 16 saturation,value 0-55


"Gr16"

 - a green LED 16 saturation,value 0-55


"bL16"

- a blue LED16 saturation,value 0-55


"

Str."

  - a strobe,value 0-55


"dim."

  - a dimmer,value 0-55


"FA.t." 

-  fade time,value 0-55 *


"

S.tI." 

-  standing time,value 0-55 *


"COPY"

  - copying the current prog. step to the next prog. step.


Press  [ENTER]-button to confirm adjusted value .

5.Repeat steps 3 and 4 for next  prog.step.If you want to copy current prog. step to the next prog.step, select 

option "COPY"and  confirm it by pressing  [ENTER].

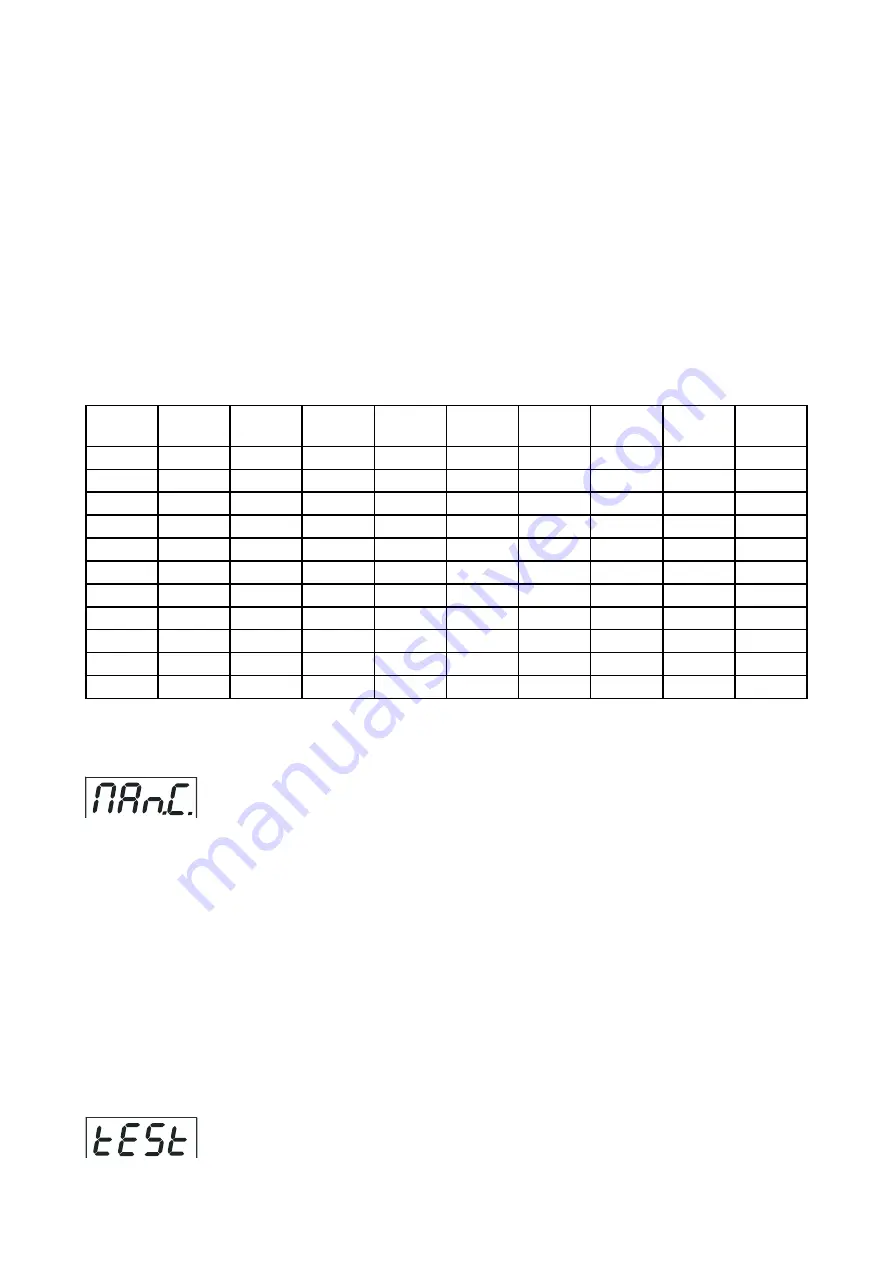
*Both Fade time and Standing time use the same conversion table in order to convert DMX value to the time 

value: 

DMX

Time

[sec.]

DMX

Time

[min.]

DMX

Time

[min.]

DMX

Time

[min.]

DMX

Time

[min.]

1

0.1

50

4.

105

18.4

160

4.7

215

77

2

0.4

55

5

110

0.

165

45.4

220

80.7

5

.5

60

6

115

170

48.

225

84.4

10

10

65

7

120

4

175

51

230

88.

15

.5

70

8.

125

6

180

54

235

20

40

75

.4

130

8.

185

57

240

6

25

6.5

80

10.7

135

30.4

190

60.

245

100

30

0

85

1

140

3.7

195

63.4

250

104

35

1.5

90

13.5

145

35

200

66.7

255

108

40

160

95

15

150

37.5

205

70

45

0.5

100

16.7

155

40

210

73.5

Exact expression of the time value follows the formula: time[sec.]=(DMX value)

/10. 

8.3 Manual mode


This menu gives access to the control of the fixture channels by means of the control board buttons.

Use [UP] and [DOWN] buttons until the display shows "

MAn.C.

" menu.Press [ENTER] button and by using [UP] 

and [DOWN] buttons select desired effect,press [ENTER] and and by using [UP] and [DOWN] buttons adjust 

desired DMX value for selected effect.Confirm by [ENTER].

"rEd1"

   a red LED1 saturation

"GrE1." 

a green LED1 saturation

"bLu1." 

a blue LED1 saturation

:

"rE.16" 

a red LED16 saturation

"Gr.16" 

a green LED16 saturation

"bL.16" 

a blue LED16 saturation

"Str."

   a strobe,value 0-55

"dimr.

   a dimmer,value 0-55

8.4 Test sequences

Use the item to run a  demo-test sequences without an external controller,which will show you some possibili-

ties of using the fixture.

Содержание ArcPower 16x6

Страница 1: ...Version 1 1...

Страница 2: ...DMX operation 6 5 1 Single ArcPower 16x6 installation 6 5 2 Multiple ArcPower 16x6 installation 7 6 ArcPower 16x6 Control menu map 8 7 ArcPower 16x6 DMX protocol version 1 1 9 8 Control board 15 8 1...

Страница 3: ...airs and servicing must be carried out by a qualified employee Do not connect this unit to a dimmer pack Use a source of AC power that complies with local building and electrical rules AC power has to...

Страница 4: ...C power source from 100 240 Volts Carefully prepare the end of the the supply cord and fit a suitable plug A 3 prong grounding type plug must be installed following the manufacturer s instructions The...

Страница 5: ...are four mounting holes of a diameter 5 mm in housing of the driver Ensure that instalation place is enough ventilated 4 3 Conection cables 1 The adapter cable RJ45 XLR connects the ArcPower 16x6 to...

Страница 6: ...see chapter Control board 6 Run internal calibration of the fixture menu path SPEC CALi COMP Warning Accidental connection DMX 512 Input Output to non DMX 512 device e g Ethernet network Hub can dama...

Страница 7: ...ArcPower 16x6 until all fixtures are connected In this way up to 32 fixtures can be chained together At the last ArcPower 16x6 the data link has to be terminated with a terminator A termination plug i...

Страница 8: ...F tim 0 255 S tim 0 255 COPY P End 1 60 MAn C rEd 1 0 255 GrE 1 0 255 bLu 1 0 255 Stro 0 255 dimr 0 255 tESt St AL Auto OFF tESt PrG 5 PLAY EPG 1 SPEC PrG 5 VErS tEmP CALi rEd 1 0 255 bL 16 0 255 Stor...

Страница 9: ...rtional 11 11 0 255 Green LED 4 Green LED saturation control 0 100 proportional 12 12 0 255 Blue LED 4 Blue LED saturation control 0 100 proportional ZONE 5 13 13 0 255 Red LED 5 Red LED saturation co...

Страница 10: ...reen LED 12 Green LED saturation control 0 100 proportional 36 36 0 255 Blue LED 12 Blue LED saturation control 0 100 proportional ZONE 13 37 37 0 255 Red LED 13 Red LED saturation control 0 100 propo...

Страница 11: ...9 160 255 Shutter Strobe Shutter closed Shutter open Strobe effect from slow to fast Shutter open Opening pulses in sequences slow fast Closing pulses in sequences fast slow Shutter open step step pro...

Страница 12: ...255 Blue LED 4 Blue LED saturation control 0 100 proportional 1 1 0 255 White LED 4 Blue LED saturation control 0 100 proportional ZONE 6 16 16 0 255 Red LED 6 Red LED saturation control 0 100 proport...

Страница 13: ...5 Blue LED 12 Blue LED saturation control 0 100 proportional 12 12 0 255 White LED 12 Blue LED saturation control 0 100 proportional ZONE 14 40 40 0 255 Red LED 14 Red LED saturation control 0 100 pro...

Страница 14: ...9 160 255 Shutter Strobe Shutter closed Shutter open Strobe effect from slow to fast Shutter open Opening pulses in sequences slow fast Closing pulses in sequences fast slow Shutter open step step pro...

Страница 15: ...ll start to flash frequently 3 Use the UP and Down buttons to select the desired address 4 Confirm by pressing ENTER After having addressed ArcPower 16x6 you may now start operating ArcPower 16x6 via...

Страница 16: ...5 77 2 0 4 55 5 110 20 2 165 45 4 220 80 7 5 2 5 60 6 115 22 170 48 2 225 84 4 10 10 65 7 120 24 175 51 230 88 2 15 22 5 70 8 2 125 26 180 54 235 92 20 40 75 9 4 130 28 2 185 57 240 96 25 62 5 80 10 7...

Страница 17: ...FF ArcPower 16x6 will use maximum value 255 of satura tion for red green and blue channels CALi LED intensity calibration The menu allows you to adjust the max light intensity of individual LEDs colou...

Страница 18: ...der on your hard disk and download the software to it 3 Unpack the program from the archives Program file has name DSU_name of corresponding fixture_SoftwareID SoftwareID describes the versions of fix...

Страница 19: ...s RGBW operation LED zones 12 Max load per zone 8 x 1W LED Total max load 12x8 LEDs Maximum total cable length between one zone of the Arcpower 16x6 and connected LED modules 80 metres at max load DMX...

Страница 20: ...e fuse unplug mains lead 2 Unscrew the fuse holder on the rear side of the ArcPower 16x6 with a fitting screwdriver from the housing anti clockwise 3 Remove the old fuse from the fuse holder 4 Install...

Страница 21: ...21...

Отзывы: