background image


 26 

3283430_GB 


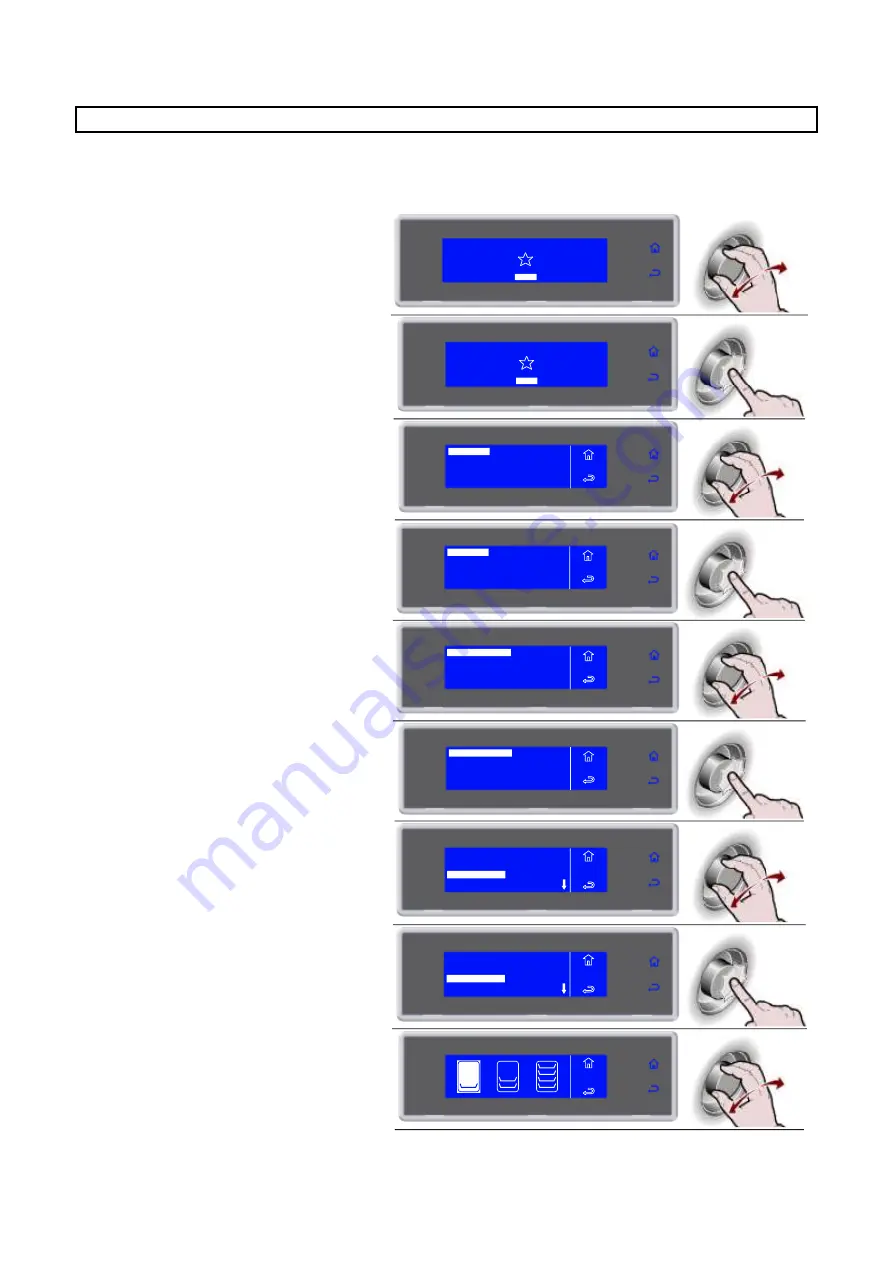
AUTOMATIC PROGRAMS 


These programs are manufacturer recommended work cycles. During the cycle the parameters can be 
viewed, but not modified. 


1. 

Select MENU by rotating the knob 

SOFT 0°F

HARD 0°F

IFR

INFINITY

SOFT  +37°F

HARD +37°F

MENU


2. 

Press the knob to enter section MENU 

SOFT 0°F

HARD 0°F

IFR

INFINITY

SOFT  +37°F

HARD +37°F

MENU


3. 

Select AUTOMATIC by rotating the 
knob 


4. 

Press the knob to enter section 
AUTOMATIC 


5. 

Select the type of desired cycle by 
rotating the knob 

AUTOMATIC  +37°F

BANQUETING
VACUUM

AUTOMATIC  0°F

MENU
AUTO


6. 

Press the knob to enter into the 
selected type of cycle 

MENU
AUTO

AUTOMATIC  +37°F

BANQUETING
VACUUM

AUTOMATIC  0°F


7. 

Select the desired cycle by rotating the 
knob 

LASAGNE

RICE AND PASTA

MEAT

SOUPS AND SAUCES

MENU

AUTO

AUTO  +37°F


8. 

Press the knob to activate the selected 
cycle 

LASAGNE

RICE AND PASTA

MEAT

SOUPS AND SAUCES

MENU

AUTO

AUTO  +37°F


9. 

Select the quantity of load to be treated, 
minimum, medium, maximum 


AUTOMATIC

MULTY
COOLING

STORED

SETTING
SERVICE

HACCP

FUNCTIONS

MENU

AUTOMATIC

MULTY
COOLING

STORED

SETTING
SERVICE

HACCP

FUNCTIONS

MENU

RICE AND

PASTA

Содержание BC101LU

Страница 1: ...3283430 BLAST CHILLERS FREEZERS CELLULES DE REFROIDISSEMENT RAPIDE CELLULES MIXTES USE AND INSTALLATION MANUAL MANUEL D UTILISATION ET D INSTALLATION Rev 4 02 2018 ...

Страница 2: ...o this handbook which may be altered without prior notice Lire avec attention les instructions contenues dans ce livret car elles fournissent d importants renseignements pour ce qui concerne la sécurité l emploi et l entretien Garder avec soin ce livret pour des consultations ultérieures de différents opérateurs Le constructeur se réserve le droit d apporter des modifications à ce manuel sans préa...

Страница 3: ...ETY DATA SHEET 13 DISPOSAL 14 STERILIZATION LAMP INSTALLATION 14 PRINTER INSTALLATION 14 OPERATION 15 GENERAL DESCRIPTION 15 SETTING UP 15 MACHINE LOADING 16 POSITION OF TRAYS 16 CORE PROBE 16 TEMPERATURES 17 LENGTH 17 CONTROL PANEL 18 FIRST START UP 19 PROGRAM 20 PROGRAM DESCRIPTIONS 20 STANDARD PROGRAMS 22 PROGRAM I F R 23 PROGRAM INFINITY 24 FAVORITE PROGRAMS 25 AUTOMATIC PROGRAMS 26 STORED PRO...

Страница 4: ...ENANCE AND CLEANING 62 CLEANING THE CABINET 62 CLEANING THE AIR CONDENSER 63 STAINLESS STEEL MAINTENANCE 63 DISCONTINUED USE 64 EXTRAORDINARY MAINTENANCE 64 VIDEO BOARD AND ENCODER MAINTENANCE CHECKLIST 64 MAINTENANCE OF PANEL BOARD 65 CONDENSING SYSTEM MAINTENANCE 66 REPLACEMENT CORE PROBE 66 WIRING DIAGRAM PLATE 67 Annotate the emergency assistance number of specialised maintenance personnel Nam...

Страница 5: ...this handbook are allowed Due to our constant technological updating and research the features described in this handbook may be altered without prior notice LIST OF RULES The cooling cabinet we manufacture fully complies with the following regulations UL Listed for electrical safety UL471 CSA C22 2 120 NSF standard 7 for sanitation TRANSPORT AND HANDLING For transportation and handling all precau...

Страница 6: ...nt with moist or wet hands or feet do not insert screwdrivers or kitchen tools or anything else between the guards and the parts in motion before any cleaning or maintenance operation disconnect the equipment from the electrical mains do not pull on the power cord to disconnect the machine from the electrical mains during loading unloading of product in the equipment use kitchen gloves use the nee...

Страница 7: ...voltage B Electric current intensity C Frequency D Phase E Compressor F Compressor RLA G Compressor LRA H Defrost heater I Power defrost heater L Condenser fan M Condenser fan FLA N Expanding fluid O Refrigerant name P Refrigerant quantity Q Climatic class R Fuse S MCA T Evaporator fan U Evaporator fan FLA V Design pressure W High side pressure Z Low side pressure MAX ROOM TEMPERATURE Air condense...

Страница 8: ...ance onto the required working site Avoid locations with exposure to direct sunlight Do not place the appliance in hot poorly ventilated rooms Do not place the refrigerated compartment near heat sources Leave a min 4 clearance around the appliance on the sides where air inlet and outlet are located Level the appliance by means of adjustable feet WARNING If the appliance is not properly levelled th...

Страница 9: ...2 56 5 2 22 632 24 88 60 2 36 60 2 36 625 24 6 150 5 9 721 28 38 145 5 7 535 21 06 61 7 2 43 600 23 62 1407 55 39 1710 67 3 150 5 9 680 26 77 60 2 36 60 2 36 1860 73 23 75 2 95 75 2 95 650 25 59 105 5 4 15 125 3 4 93 600 23 62 BF52MU 945 37 20 871 34 29 770 30 32 25 0 98 66 5 2 62 66 5 2 62 737 29 02 62 5 2 46 62 5 2 46 675 26 58 150 5 9 902 35 51 150 5 9 710 27 95 61 6 2 42 775 30 51 1713 67 44 ...

Страница 10: ...26 77 60 2 36 60 2 36 1860 73 23 75 2 95 75 2 95 650 25 59 105 5 4 15 125 3 4 93 600 23 62 415 16 34 235 9 25 BC72SU BF72SU BF102SU 1980 78 1023 5 40 3 875 34 45 1040 40 9 1831 72 1 150 5 9 920 36 22 60 2 36 60 2 36 1981 78 75 2 95 75 2 95 890 35 62 7 2 47 125 3 4 93 818 32 2 270 10 6 620 24 4 ...

Страница 11: ...SU BF102SU Gross weight lb 311 353 496 496 752 816 Net weight lb 265 298 441 441 705 772 Dimensions 29 38 x29 19 x38 19 34 29 x36 27 x37 20 31 49 x33 39 x73 23 31 49 x33 39 x73 23 40 9 x40 3 x78 40 9 x40 3 x78 Capacity Mass cycle lb 194 F 37 F 48 55 100 100 160 222 Mass cycle lb 194 F 0 F 28 33 60 60 80 122 Net internal volume cuft 2 55 3 5 5 52 5 52 13 4 13 4 Grids 3 3 3 6 10 Power supply Voltage...

Страница 12: ...ll cease and the Manufacturer will not be liable for any damage to appliances or operators arising from the non compliance with the and tamperings to any part of the appliance electric thermodynamic or hydraulic plant CONDENSATE DRAIN The equipment has a condensation collection tray The tray is extractable from the lower part of the equipment TESTING Should the appliance have been transported hori...

Страница 13: ...away from exposure warm and relaxed Use oxygen if necessary Give artificial respiration if respiration has stopped or is about to stop In case of cardiac arrest give external cardiac massage Seek immediate medical attention Skin use water to remove ice from affected areas Remove contaminated clothes CAUTION clothes may adhere to skin in case of ice burns In case of contact with skin wash with copi...

Страница 14: ... which may be recycled The refrigerator components are considered special waste which can be assimilated with domestic waste Make the appliance totally unusable by removing the power cable and any door locking mechanisms in order to avoid the risk of anyone being trapped inside DISMANTLING OPERATIONS SHOULD BE CARRIED OUT BY QUALIFIED PERSONNEL The improper disposal of Waste Electrical and Electro...

Страница 15: ...hamber temperature management the fan speed and the chilling time in any case never exceed 7lb of load for 12 x20 pans or 15lb of load for 18 x26 pans and a thickness of 2 in negative chilling phase and 3 in positive chilling phase table 2 Check that the positive chilling program up to 37 F at the product core does not take more than 90 minutes and that the negative chilling program up to 0 F at t...

Страница 16: ...e trolleys is to be located at the centre of the cabinet POSITION OF TRAYS Place the trays as close to the evaporator as possible If the cabinet is not full place the trays at equal distance from one another CORE PROBE For proper position of the probe refer to the following pictures S O N D A A S IN G O LO R IL E VA M E N TO CU O R E PR O D O T TO SONDA A M ULTIPL O RIL EVAMENTO S U P ER FIC IE PR...

Страница 17: ...f 194 F in positive chilling from 194 F to 37 F and in negative chilling from 194 F to 0 F LENGTH Cooled or frozen processed foodstuffs may be stored in a refrigerator for 5 days of processing with no quality alterations For best results we recommend keeping temperature constant throughout the storing 32 F to 39 F according to the various commodities Storing time may be increased to approx two wee...

Страница 18: ...ure while when any cycle is in progress it allows the user to modify the control parameters of the process in progress temporarily saving the modified values D Knob The clockwise and anticlockwise turning of the knob allows the user to navigate through the various menus on the display while pressing it allows access to the selected item The RGB LED bar built into the door handle takes on a differe...

Страница 19: ... DUTCH SVENSKA DANSK NORSK 2 Press the knob to confirm the selected language The language can also be changed later see page 51 ITALIANO FRANCAIS ENGLISH DEUTSCH ESPANOL DUTCH SVENSKA DANSK NORSK SECTOR SETTING 1 Select the SECTOR by rotating the knob CATERING BAKERY PASTRY ICE CREAM 2 Press the knob to confirm the selected sector The sector can also be changed later see page 53 CATERING BAKERY PA...

Страница 20: ...dedicated to chilling of meat FISH Cycle dedicated to chilling of fish COOKED VEGETABLES Cycle dedicated to chilling of cooked vegetables HOT PASTRY Cycle dedicated to chilling of hot pastry products DRY PASTRY Cycle dedicated to chilling of dry pastry products WALNUTS VEAL Cycle dedicated to chilling of walnuts veal AUTOMATIC PROGRAMS 0 F CATERING LASAGNE Cycle dedicated to freezing of lasagne SO...

Страница 21: ...Cycle dedicated to freezing of unbaked tarts BAKED BREAD Cycle dedicated to freezing of baked bread UNCOOKED BREAD Cycle dedicated to freezing of unbaked bread AUTOMATIC PROGRAMS 37 F ICE CREAM PARLOUR PANNA COTTA Cycle dedicated to chilling of panna cotta YOGURT BOX Cycle dedicated to preparing of yogurt AUTOMATIC PROGRAMS 0 F ICE CREAM PARLOUR ICE CREAM 7 F Cycle dedicated to freezing of ice cre...

Страница 22: ...cle During the cycle it is possible to view and modify the default parameters by selecting SET see page 41 to stop the cycle by selecting STOP Note the modified parameters will be saved only for the cycle in progress SOFT 0 F HARD 0 F IFR MENU INFINITY SOFT 37 F HARD 37 F 90 HARD 37 F 100 80 F 75 F SET STOP 3 Cycle ended automatic conservation phase During conservation it is possible to view and m...

Страница 23: ...ess the knob to activate the selected cycle During the cycle it is possible select SET to change the fan speed to stop the cycle by selecting STOP Note the modified value will only be saved for the cycle in progress SOFT 0 F HARD 0 F MENU INFINITY SOFT 37 F HARD 37 F IFR IFR 100 80 F 75 F SET STOP 3 Cycle ended automatic conservation phase During conservation it is possible to view and modify the ...

Страница 24: ... cycle by rotating the knob SOFT 0 F HARD 0 F IFR MENU SOFT 37 F HARD 37 F INFINITY 4 Cycle ended automatic conservation phase During conservation it is possible select SET to view and modify the chamber temperature and fan speed to stop the cycle by selecting STOP Note the modified values will be saved SOFT 0 F HARD 0 F IFR MENU SOFT 37 F HARD 37 F INFINITY INFINITY 100 80 F 75 F SET STOP ...

Страница 25: ...ult parameters by selecting SET see page 36 to stop the cycle by selecting STOP Note the modified parameters will be saved only for the cycle in progress 90 CICLO 3 100 80 F 75 F SET STOP MEMO 37 F 5 Cycle ended automatic conservation phase During conservation it is possible to view and modify the default parameters by selecting SET see page 41 to activate a manual defrost by selecting to stop the...

Страница 26: ...ired cycle by rotating the knob AUTOMATIC 37 F BANQUETING VACUUM AUTOMATIC 0 F MENU AUTO 6 Press the knob to enter into the selected type of cycle MENU AUTO AUTOMATIC 37 F BANQUETING VACUUM AUTOMATIC 0 F 7 Select the desired cycle by rotating the knob LASAGNE RICE ANDPASTA MEAT SOUPS ANDSAUCES MENU AUTO AUTO 37 F 8 Press the knob to activate the selected cycle LASAGNE RICE ANDPASTA MEAT SOUPS ANDS...

Страница 27: ...modified 45 RICE AND PASTA 90 80 F 75 F INFO STOP AUTO 37 F 12 Cycle ended automatic conservation phase During conservation it is possible to view the default parameters by selecting INFO to activate a manual defrost by selecting to stop the cycle by selecting STOP Note the parameters cannot be modified If not required manual defrosting is not performed END CYCLE CONSERVE 100 80 F 75 F SET STOP RI...

Страница 28: ... knob to enter section STORED 5 Select the type of desired cycle by rotating the knob STORED 37 F STORED 0 F MENU STORED 6 Press the knob to enter into the selected type of cycle MENU STORED STORED 37 F STORED 0 F 7 Select the desired cycle by rotating the knob 3 2 CICLO 2 CICLO 3 4 CICLO 4 1 CICLO 1 MENU STORED STOR 37 F 8 Press the knob to activate the selected cycle During the cycle it is possi...

Страница 29: ...AVORITE _ 9 Cycle ended automatic conservation phase During conservation it is possible View modify the default parameters and make it a favorite by selecting SET to activate a manual defrost by selecting to stop the cycle by selecting STOP Note the modified parameters can be saved once the new value is inserted by selecting otherwise by selecting the modifications will be active only for the cycl...

Страница 30: ...the default parameters by selecting SET see page 41 to stop the cycle by selecting Note the modified parameters will be saved At the expiry of the set value for each individual level the buzzer and the flashing value alert the user that the product can be withdrawn Once all the set times have expired automatic conservation phase During conservation it is possible to view and modify the default par...

Страница 31: ...default parameters by selecting SET see page 41 to stop the cycle by selecting STOP Note the modified parameters will be saved only for the cycle in progress COOLING 100 80 F 75 F SET STOP 5 Cycle ended automatic conservation phase During conservation it is possible to view and modify the default parameters by selecting SET see page 41 to stop the cycle by selecting STOP Note the modified paramete...

Страница 32: ... to enter section FUNCTIONS 5 Select DEFROST by rotating the knob DEFROST STORAGE THAWING SANITATION MENU FUNCTIONS PROBE HEATING PROVING 6 Press the knob to activate the selected cycle During the cycle it is possible to view and modify the default parameters by selecting SET see page 41 to stop the cycle by selecting STOP Note the modified parameters will be saved only for the cycle in progress M...

Страница 33: ...on FUNCTIONS 5 Select SANITATION by rotating the knob DEFROST STORAGE THAWING SANITATION MENU FUNCTIONS PROBE HEATING PROVING 6 Press the knob to activate the selected cycle During the cycle it is possible to view and modify the time of sanitation by selecting SET see page 41 to stop the cycle by selecting STOP Note the modified parameters will be saved only for the cycle in progress MENU FUNCTION...

Страница 34: ...FUNCTIONS DEFROST STORAGE THAWING SANITATION PROBE HEATING PROVING 7 Select the type of conservation by rotating the knob 8 Press the knob to activate the selected cycle During the cycle it is possible to view and modify the default parameters by selecting SET see page 41 to activate a manual defrost by selecting to stop the cycle by selecting STOP Note the modified parameters will be saved only f...

Страница 35: ...ction FUNCTIONS 5 Select THAWING by rotating the knob DEFROST STORAGE THAWING SANITATION MENU FUNCTIONS PROBE HEATING PROVING 6 Press the knob to enter into the THAWING MENU FUNCTIONS DEFROST STORAGE THAWING SANITATION PROBE HEATING PROVING 7 Rotate the knob to select the type most suited for the product to be treated ICE CREAM TIME TIME ICE CREAM PROBE THAWING PROBE 8 Press the knob to activate t...

Страница 36: ...ime defrost if the times are changed the cycle end will automatically be recalculated 02 10 2013 17 28 12 56 SET STOP 100 80 F 75 F 02 10 2013 17 28 12 56 SET STOP 100 80 F 75 F 02 OTT 2013 17 28 SCONG 02 OTT 2013 17 28 SCONG 20 28 SCONG 02 OTT 2013 02 10 2013 20 28 12 56 SET STOP 100 80 F 75 F 9 Cycle ended automatic conservation phase During conservation it is possible to view and modify the def...

Страница 37: ...by rotating the knob 4 Press the knob to enter section FUNCTIONS 5 Select PROVING by rotating the knob DEFROST STORAGE THAWING SANITATION MENU FUNCTIONS PROBE HEATING PROVING 6 Press the knob to enter into the PROVING MENU FUNCTIONS DEFROST STORAGE THAWING SANITATION PROBE HEATING PROVING 7 Select by rotating the knob PROVING for a direct leavening cycle RETARDER PROVING for a scheduled leavening ...

Страница 38: ...ed the cycle end will automatically be recalculated 05 59 SET STOP 100 80 F 75 F 02 10 2013 17 28 05 59 SET STOP 100 80 F 75 F 02 10 2013 17 28 05 59 100 80 F 75 F SET STOP 02 10 2013 17 28 02 OTT 2013 17 28 PROVING 02 OTT 2013 17 28 PROVING 20 28 PROVING 02 OTT 2013 05 59 SET STOP 100 80 F 75 F 02 10 2013 20 28 9 Cycle ended automatic conservation phase During conservation it is possible to view ...

Страница 39: ...37 F HARD 37 F MENU 2 Press the knob to enter section MENU SOFT0 F HARD0 F IFR INFINITY SOFT 37 F HARD 37 F MENU 3 Select FUNCTIONS by rotating the knob 4 Press the knob to enter section FUNCTIONS 5 Select PROBE HEATING by rotating the knob DEFROST STORAGE THAWING SANITATION MENU FUNCTIONS PROBE HEATING PROVING 6 Press the knob to activate the selected function MENU FUNCTIONS DEFROST STORAGE THAWI...

Страница 40: ... 7 Please wait 8 Remove the probe In the event that the temperature read by the needle core sensor is not negative the function will not be activated 1 Not needed PROBE HEATING PLEASE WAIT REMOVE THE PROBE NOTNEEDED ...

Страница 41: ...IME 37 F 5 F 86 F 45 4 Press the knob to modify the value 45 HARD 37 F 37 F 5 F 86 F ENDCYCLE NEEDLE HARDPHASE AIR HARDPHASE NEEDLE HARD PHASE TIME 5 Select the new value by rotating the knob 40 HARD 37 F 37 F 5 F 86 F ENDCYCLE NEEDLE HARDPHASE AIR HARDPHASE NEEDLE HARD PHASE TIME 6 Press the knob to confirm the new value 40 ENDCYCLE NEEDLE HARDPHASE AIR HARDPHASE NEEDLE HARD PHASE TIME HARD 37 F ...

Страница 42: ...F HARD 37 F MENU 2 Press the knob to enter section MENU SOFT0 F HARD0 F IFR INFINITY SOFT 37 F HARD 37 F MENU 3 Select HACCP by rotating the knob 4 Press the knob to enter section HACCP 5 Select the chosen function by rotating the knob VIEW BY DATE 6 Press the knob to enter the selected function 7 Select the chosen function by rotating the knob 8 Press the knob to enter the selected function AUTOM...

Страница 43: ... HACCP VIEW FREEZER1 13 The parameters list is displayed PASTA 37 F 01 03 2010 19 00 NEEDLE 70 F AIR 70 F MENU HACCP VIEW VIEW BY CYCLE 6 Press the knob to enter the selected function 7 Select the chosen function by rotating the knob 8 Press the knob to enter the selected function 9 Select the cycle to be viewed 01 03 2010 14 00 LASAGUE 0 F 01 03 2010 19 00 PASTA 37 F MENU HACCP VIEW FREEZER1 ENTE...

Страница 44: ...hosen function by rotating the knob 8 Press the knob to enter the selected function 9 Enter the data by turning the knob and press to confirm the value and move to the next one until ENTER is selected 10 Press the knob to start printing 11 Printing in progress PRINT BY CYCLE NOTE the printer is not supplied as standard equipment It is an optional item Connect the printer from the rear of the unit ...

Страница 45: ...g PASTA 37 F 01 03 2010 19 00 NEEDLE 70 F AIR 70 F MENU HACCP VIEW ENTER 12 Printing in progress PRINT ALL NOTE the printer is not supplied as standard equipment It is an optional item Connect the printer from the rear of the unit using the MATE N LOK connectors on the electrical panel identified with the letters R power and S signal 6 Press the knob to enter the selected function 7 Select the cho...

Страница 46: ...ob to enter the selected function USB memory presence is checked 7 Select the chosen function by rotating the knob 8 Press the knob to enter the selected function 9 Enter the date by rotating the knob and select ENTER 10 Press the knob to start downloading data 11 Data download in progress BY DATE BY CYCLE ALL MENU HACCP PRINT IN PROGRESS MENU HACCP PRINT VIEW USB PRINT MENU HACCP DELETE BY DATE B...

Страница 47: ...10 Press the knob to confirm the selected cycle 01 03 2010 14 00 LASAGUE 0 F 01 03 2010 19 00 PASTA 37 F MENU HACCP USB FREEZER1 11 Press the knob to start downloading data PASTA 37 F 01 03 2010 19 00 NEEDLE 70 F AIR 70 F ENTER MENU HACCP USB 12 Data download in progress DOWNLOAD ALL Insert a USB flash drive not supplied into the USB port Type A on the dashboard 6 Press the knob to enter the selec...

Страница 48: ...ob 8 Press the knob to enter the selected function 9 Enter the data by turning the knob and press to confirm the value and move to the next one until ENTER is selected 10 Press the knob to start the procedure BY DATE BY CYCLE ALL MENU HACCP USB BY DATE BY CYCLE ALL MENU HACCP USB IN PROGRESS MENU HACCP USB VIEW USB PRINT MENU HACCP DELETE BY DATE BY CYCLE ALL MENU HACCP DELETE BY DATE BY CYCLE ALL...

Страница 49: ...ess the knob to confirm the selected cycle 01 03 2010 14 00 LASAGUE 0 F 01 03 2010 19 00 PASTA 37 F MENU HACCP DELETE FREEZER1 11 Press the knob to start the procedure PASTA 37 F 01 03 2010 19 00 NEEDLE 70 F AIR 70 F ENTER MENU HACCP DELETE 12 Data deletion in progress DELETE ALL 6 Press the knob to enter the selected function IN PROGRESS MENU HACCP DELETE VIEW USB PRINT MENU HACCP DELETE BY DATE ...

Страница 50: ...e knob 8 Press the knob to enter the selected function 9 Press the knob to start the procedure ENTER ALL MENU HACCP DELETE 10 Data deletion in progress BY DATE BY CYCLE ALL MENU HACCP DELETE BY DATE BY CYCLE ALL MENU HACCP DELETE IN PROGRESS MENU HACCP DELETE ...

Страница 51: ... 6 Press the knob to enter section LANGUAGE 7 Select LANGUAGE by rotating the knob ITALIANO FRANCAIS ENGLISH MENU SETS LANGUAGE DEUTSCH ESPANOL SVENSKA DANSK DUTCH NORSK 8 Press the knob to confirm the selected language ITALIANO FRANCAIS ENGLISH MENU SETS LANGUAGE DEUTSCH ESPANOL SVENSKA DANSK DUTCH NORSK AUTOMATIC MULTY COOLING STORED SETTING SERVICE HACCP FUNCTIONS MENU AUTOMATIC MULTY COOLING S...

Страница 52: ...enter section DATA CLOCK 7 Select the new value by rotating the knob 8 Press the knob to confirm the new value and move to the next one 9 Select to confirm and exit from the function AUTOMATIC MULTY COOLING STORED SETTING SERVICE HACCP FUNCTIONS MENU AUTOMATIC MULTY COOLING STORED SETTING SERVICE HACCP FUNCTIONS MENU LANGUAGE SECTOR SETDATE CLOCK MULTY MENU SETS CYCLE CONTROL MENU SETS LANGUAGE SE...

Страница 53: ...TOR by rotating the knob 6 Press the knob to enter section SECTOR 7 Press the knob to confirm the selected sector CATERING BAKERY PASTRY ICE CREAM MENU SETS SECTOR 8 Press the knob to confirm MENU SETS SECTOR CATERING BAKERY PASTRY ICE CREAM AUTOMATIC MULTY COOLING STORED SETTING SERVICE HACCP FUNCTIONS MENU AUTOMATIC MULTY COOLING STORED SETTING SERVICE HACCP FUNCTIONS MENU LANGUAGE SECTOR SETDAT...

Страница 54: ... SETTING 5 Select MULTY by rotating the knob 6 Press the knob to enter section MULTY 7 Use the knob to select the number of levels corresponding to the equipment used 8 Press the knob to confirm AUTOMATIC MULTY COOLING STORED SETTING SERVICE HACCP FUNCTIONS MENU AUTOMATIC MULTY COOLING STORED SETTING SERVICE HACCP FUNCTIONS MENU LANGUAGE SECTOR SETDATE CLOCK MULTY MENU SETS CYCLE CONTROL MENU SETS...

Страница 55: ...TY SOFT 37 F HARD 37 F MENU 3 Select SETTING by rotating the knob 4 Press the knob to enter section SETTING 5 Select CYCLE CONTROL by rotating the knob LANGUAGE SETDATE CLOCK MENU SETS SECTOR MULTY CYCLE CONTROL 6 Press the knob to enter section CYCLE CONTROL LANGUAGE SETDATE CLOCK MENU SETS SECTOR MULTY CYCLE CONTROL 7 Select the desired type of cycle control MENU SETS AUTO MANU MANUAL AUTO 8 Pre...

Страница 56: ...ss the knob to enter section MENU SOFT0 F HARD0 F IFR INFINITY SOFT 37 F HARD 37 F MENU 3 Select SERVICE by rotating the knob 4 Press the knob to enter section SERVICE 5 Select ALARMS by rotating the knob 6 Press the knob to view the list ALARMS 7 View the alarms list by rotating the knob MENU SERVICE ALARMS A04 OPEN DOOR ALARM START 10 34 28 03 2012 END 10 35 28 03 2012 MAXIMUM TEMPERATURE 62 F A...

Страница 57: ...oom Temp below set value If the temperature is not within the specified range apply to a qualified technician Limit temperature alarm in chilling freezing Cell or core temperature higher than the set value If the temperature is not within the specified range apply to a qualified technician Room probe alarm Room Probe interrupted Qualified technician required Evaporator probe alarm Evap Probe inter...

Страница 58: ... Press the knob to enter section SERVICE 5 Select ALARMS RESET by rotating the knob 6 Press the knob to enter section ALARMS RESET 7 Wait AUTOMATIC MULTY COOLING STORED SETTING SERVICE HACCP FUNCTIONS MENU AUTOMATIC MULTY COOLING STORED SETTING SERVICE HACCP FUNCTIONS MENU MENU SERVICE RESTORE MULTY PARAMETERS INPUTS OUTPUTS ALARMS FIRMWARE ALARMS RESET MENU SERVICE RESTORE MULTY PARAMETERS INPUTS...

Страница 59: ...OUTPUTS by rotating the knob 6 Press the knob to view the list INPUTS OUTPUTS 7 Select to exit from the view MENU SERVICE IN OUT NEEDLE UNDERSKIN EXTERNAL AIR EVAPORATOR CONDENSER 80 F 78 F 84 F 82 F 78 F 77 F AUTOMATIC MULTY COOLING STORED SETTING SERVICE HACCP FUNCTIONS MENU AUTOMATIC MULTY COOLING STORED SETTING SERVICE HACCP FUNCTIONS MENU MENU SERVICE RESTORE MULTY PARAMETERS ALARMS FIRMWARE ...

Страница 60: ...CE 5 Select RESTORE by rotating the knob 6 Press the knob to enter section RESTORE 7 Enter the password by turning the knob and press to confirm the value and move to the next one until ENTER is selected Request the password from SERVICE 8 Press the knob to confirm and enter section RESTORE AUTOMATIC MULTY COOLING STORED SETTING SERVICE HACCP FUNCTIONS MENU AUTOMATIC MULTY COOLING STORED SETTING S...

Страница 61: ...e knob to enter section PARAMETERS 7 Enter the password by turning the knob and press to confirm the value and move to the next one until ENTER is selected Request the password from SERVICE 8 Press the knob to confirm and enter section PARAMETERS AUTOMATIC MULTY COOLING STORED SETTING SERVICE HACCP FUNCTIONS MENU AUTOMATIC MULTY COOLING STORED SETTING SERVICE HACCP FUNCTIONS MENU MENU SERVICE MULT...

Страница 62: ...onents stainless stell plastic or painted parts with lukewarm water and detergent Then rinse and dry without using abrasives or chermical solvents Do not wash the appliance by spraying high pressure water on the machine Do not rinse with sharp or abrasive tools especially the evaporator You may clean inside the evaporator after loosening the knobs and rotating the protection component Wash the doo...

Страница 63: ...ainless steel we mean INOX AISI 304 steel We recommend following the instructions below for the maintenance and cleaning of stainless steel parts This is of the utmost importance to ensure the non toxicity and complete hygiene of the processed foodstuffs Stainless steel is provided with a thin oxide layer which prevents it from rusting However some detergents may destroy or affect this layer there...

Страница 64: ...In case of appliances with remote control if you decide to turn it off remember to put the switch off also in the remote control EXTRAORDINARY MAINTENANCE The information and instructions in this section are reserved for personnel authorized to operate on the equipment components VIDEO BOARD AND ENCODER MAINTENANCE CHECKLIST Turn the mains switch OFF Disconnect the plug To access the video board a...

Страница 65: ...shboard pulling it forward Undo the guard screws and remove the cover to access to the video card and to the encoder MAINTENANCE OF PANEL BOARD Turn the mains switch OFF Disconnect the plug To be able to access the electric picture Mod 51MU 52MU Unhook the front guard pulling it towards you Remove the closing panel screws Remove the closing panel Remove the electrical panel locking screw Move the ...

Страница 66: ... the appliance CONDENSING SYSTEM MAINTENANCE To access the condensing system remove the rear protective grille undoing the screws REPLACEMENT CORE PROBE Turn left completely unscrewing the connector to disconnect the cable of the core probe Replace the core probe by screwing the connector fully ...

Страница 67: ...MPARTMENT PROBE 9 EVAPORATOR FUN 78 EVAP DEFROST PROBE 20 DOOR ANTICONDENSING RESISTOR 79A MULTIPOINT NEEDLE CORE PROBE 21 DEFROST RESISTANCE 79B MULTIPOINT PROBE RESISTANCE 21A DEFROST RESISTANCE 80 PTC RESISTANCE FOR COMPRESSOR CASING 25 TRANSFORMER 86 CONDENSER PROBE 44 RELAY COMPRESSOR 87 LCD QUICK COOLER CARD 56 FILTER 97A EVAP FAN CHOKE MODULE 65 CONTACTOR 102 BIMETALLIC SAFETY THERMOSTAT 66...

Страница 68: ......

Страница 69: ...TALLATION DU KIT LAMPE GERMICIDE 14 INSTALLATION DE L IMPRIMANTE 14 FONCTIONNEMENT 15 DESCRIPTION GÉNÉRALE 15 COMMENT SE PRÉPARER AU DÉMARRAGE 15 CHARGEMENT DE LA CELLULE 16 PLACEMENT DES RÉCIPIENTS 16 SONDE A COEUR 16 TEMPÉRATURES 17 DURÉE DE CONSERVATION 17 PANNEAU DE COMMANDE 18 PREMIER DÉMARRAGE 19 PROGRAMMES 20 DESCRIPTION DES PROGRAMMES 20 PROGRAMMES STRANDARDS 22 PROGRAMME I F R 23 PROGRAMM...

Страница 70: ...ETIEN 62 NETTOYAGE ENCEINTE 62 NETTOYAGE DU CONDENSEUR A AIR A 63 ENTRETIEN ACIER INOX 63 INTERRUPTION D UTILISATION 64 ENTRETIEN EXTRAORDINAIRE 64 ENTRETIEN DE LA CARTE VIDÉO ET DE L ENCODEUR 64 ENTRETIEN DU TABLEAU ÉLECTRIQUE 65 ENTRETIEN DE L INSTALLATION DE CONDENSATION 66 ENTRETIEN DE LA SONDE À COEUR 66 PLAQUETTE SCHÉMA ÉLECTRIQUE 67 Prendre note du numéro du service d urgence du personnel s...

Страница 71: ...fonction d une constante recherche d innovation et de qualité technique les caractéristiques indiquées peuvent être modifiées sans préavis LISTE DES RÉFÉRENCES NORMATIVES Nos cellules mixtes sont conformes aux directives suivantes UL Listed pour sureté électrique UL471 CSA C22 2 120 NSF standard 7 pour le Hygiène alimentaire TRANSPORT ET DÉPLACEMENT Pour le transport et le déplacement il faut adop...

Страница 72: ... ou les pieds mouillées ou humides ne pas insérer de tournevis ou ustensile de cuisine ou autre entre les protections et les pièces en mouvement avant toute opération de nettoyage ou d entretien débrancher l appareil du réseau d alimentation électrique ne pas tirer sur le câble d alimentation pour débrancher la machine du réseau électrique au cours du chargement déchargement du produit dans l appa...

Страница 73: ...on d alimentation électrique B Intensité de courant électrique C Fréquence D Phase E Compresseur F Compresseur RLA G Compresseur LRA H Chauffage du dégivrage I Puissance dégivrage chauffe L Ventilateur du condenseur M Ventilateur du condenseur FLA N fluide expansion O Type de fluide réfrigérant P Quantité de fluide réfrigérant Q Classe climatique R Fusible S MCA T Ventilateur de l évaporateur U Ve...

Страница 74: ...cer l appareil où il pourrait être exposé aux rayons du soleil Evitez de placer l appareil à des endroits peu aérés N installez pas l appareil en proximité de sources de chaleur Il faut garder une distance min de 4 entre l appareil et le mur du local Mettez l appareil à niveau en règlant la hauteur des pieds Attention Si l appareil n est pas mis à niveau correctememt son fonctionnement peut être p...

Страница 75: ...2 22 56 5 2 22 632 24 88 60 2 36 60 2 36 625 24 6 150 5 9 721 28 38 145 5 7 535 21 06 61 7 2 43 600 23 62 1407 55 39 1710 67 3 150 5 9 680 26 77 60 2 36 60 2 36 1860 73 23 75 2 95 75 2 95 650 25 59 105 5 4 15 125 3 4 93 600 23 62 BF52MU 945 37 20 871 34 29 770 30 32 25 0 98 66 5 2 62 66 5 2 62 737 29 02 62 5 2 46 62 5 2 46 675 26 58 150 5 9 902 35 51 150 5 9 710 27 95 61 6 2 42 775 30 51 1713 67 4...

Страница 76: ...26 77 60 2 36 60 2 36 1860 73 23 75 2 95 75 2 95 650 25 59 105 5 4 15 125 3 4 93 600 23 62 415 16 34 235 9 25 BC72SU BF72SU BF102SU 1980 78 1023 5 40 3 875 34 45 1040 40 9 1831 72 1 150 5 9 920 36 22 60 2 36 60 2 36 1981 78 75 2 95 75 2 95 890 35 62 7 2 47 125 3 4 93 818 32 2 270 10 6 620 24 4 ...

Страница 77: ... Poids brut lb 311 353 496 496 752 816 Poids net lb 265 298 441 441 705 772 Dimensions 29 38 x29 19 x38 19 34 29 x36 27 x37 20 31 49 x33 39 x73 23 31 49 x33 39 x73 23 40 9 x40 3 x78 40 9 x40 3 x 78 Capacité Masse cycle lb 194 F 37 F 48 55 100 100 160 222 Masse cycle lb 194 F 0 F 28 33 60 60 80 122 Volume net intérieur cuft 2 55 3 5 5 52 5 52 13 4 13 4 Grades 3 3 3 6 10 Electricité Tension V 220 22...

Страница 78: ...e toutes ces dispositions le constructeur décline toute responsabilité et toute obligation de garantie en cas de dommages aux appareils aux personnes et aux choses et à l altération de toute partie de l appareil installation éllectrique thermodynamique hydraulique EVACUATION DE CONDENSATION Les appareils sont équipés d une bassine pour la récupération de la condensation La bassine est amovible dep...

Страница 79: ... ou sous forme de jets peut provoquer des brûlures de gel aux yeux et à la peau 3 Premiers secours Inhalation Eloigner le blessé du lieu de l exposition le couvrir pour le réchauffer et le garder au repos Si nécessaire lui donner de l oxygène Pratiquer la respiration artificielle si la respiration s est arrêtée ou risque de s arrêter en cas d arrêt cardiaque pratiquer un massage cardiaque externe ...

Страница 80: ...la ferraille démolition Démonter l armoire frigorifique en regroupant les composants en fonction de leur nature chimique Se rappeler que le compresseur contient de l huile lubrifiante et du fluide frigorigéne qui peuvent être récupérés et rèutilisés et que les composants de l armoire frigorifiques sont des déchets spéciaux pouvant toutefois être éliminés comme les ordures ménagéres Rendre l appare...

Страница 81: ...dissement et dans tous les cas il ne faut pas excéder 7lb de charge pour des plats 12 x20 ou 15lb de charge pour les plats 18 x26 et une épaisseur de 2 en phase de réfrigération négative et de 3 en phase de réfrigération positive tab 2 Vérifier que le programme de réfrigération positive jusqu à 37 F au cœur du produit ne prenne pas plus de 90 minutes et que le programme de réfrigération négative j...

Страница 82: ...acer la structure porte clayettes au centre de l enceinte PLACEMENT DES RÉCIPIENTS Il faut placer les contenants près de l évaporateur Si l appareil n est pas totalememt rempli il faut placer les contenants à une distance égale les uns de l autre SONDE A COEUR Pour garantir un bon fonctionnement de la sonde se référer aux figures suivantes S O N D A A S IN G O LO R IL E VA M E N TO CU O R E PR O D...

Страница 83: ...ATION Un produit cuit et ensuite refrigeré ou congélé peut être conservé dans le réfrigérateur sans perdre ses proprietés essentielles jusqu à 5 jours après le traitement Il est très important de respecter la chaîne du froid c est à dire de maintenir pendant la conservation une température constante entre 32 F et 39 F selon le type d aliment traité Le temps de conservation peut être prolongé jusqu...

Страница 84: ...en cours elle permet de sortir de la modification des paramètres de contrôle du processus en cours et d enregistrer temporairement les valeurs modifiées D Molette La rotation horaire et antihoraire de la molette permet de naviguer à travers les menus visibles sur l écran alors que si l on appuie dessus elle permet d accéder à l entrée sélectionnée La barre LED RGB intégrée à l intérieur de la poig...

Страница 85: ...pour confirmer la langue sélectionnée Il est également possible de modifier la langue successivement voir pag 51 ITALIANO FRANCAIS ENGLISH DEUTSCH ESPANOL DUTCH SVENSKA DANSK NORSK RÉGLAGE SECTEUR 1 Sélectionner le SECTEUR en tournant la molette RESTAURATION BOULANGERIE PATISSERIE GLACIER 2 Appuyer sur la molette pour confirmer le secteur sélectionné Il est également possible de modifier le secteu...

Страница 86: ...tion de riz et de pâtes VIANDE Cycle pour la réfrigération de viande POISSON Cycle pour la réfrigération de poisson LEGUMES CRUITS Cycle pour la réfrigération de légumes cuits PATISSERIE CHAUDE Cycle pour la réfrigération de produits de pâtisserie chaude PATISSERIE SECHER Cycle pour la réfrigération de produits de pâtisserie sèche VEAU NOIX Cycle pour la réfrigération de produits de veau noix PROG...

Страница 87: ...le pour la congélation de tartes crues PAIN CUIT Cycle pour la congélation de pain cuit PAIN CRU Cycle pour la congélation de pain cru PROGRAMMES AUTOMATIQUES 37 F GLACIER CREME SURPLUS Cycle pour la réfrigération de creme surplus YOGURT BOX Cycle pour la préparation de yogurt PROGRAMMES AUTOMATIQUES 0 F GLACIER GLACE 7 F Cycle pour la congélation de glaces 7 F GLACE Cycle pour la congélation de g...

Страница 88: ...cle il est possible de visualiser et modifier les paramètres par défaut en sélectionnant SET voir pag 41 d arrêter le cycle en sélectionnant STOP Remarque les paramètres modifiés seront enregistrés uniquement pour le cycle en cours SOFT 0 F HARD 0 F IFR MENU INFINITY SOFT 37 F HARD 37 F 90 HARD 37 F 100 80 F 75 F SET STOP 3 Une fois le cycle terminé une phase de conservation démarre automatiquemen...

Страница 89: ...ur la molette pour activer le cycle sélectionné Pendant le cycle il est possible de Modifier la vitesse des ventilateurs en sélectionnant SET d arrêter le cycle en sélectionnant STOP Remarque la valeur modifiée sera enregistrée uniquement pour le cycle en cours SOFT 0 F HARD 0 F MENU INFINITY SOFT 37 F HARD 37 F IFR IFR 100 80 F 75 F SET STOP 4 Une fois le cycle terminé une phase de conservation d...

Страница 90: ...n tournant la molette SOFT 0 F HARD 0 F IFR MENU SOFT 37 F HARD 37 F INFINITY 2 Appuyer sur la molette pour activer le cycle sélectionné Pendant le cycle il est possible de afficher et modifier la température de la chambre et la vitesse des ventilateurs en sélectionnant SET d arrêter le cycle en sélectionnant STOP Remarque les valeurs modifiées seront enregistrées SOFT 0 F HARD 0 F IFR MENU SOFT 3...

Страница 91: ...r les paramètres par défaut en sélectionnant SET voir pag 41 d arrêter le cycle en sélectionnant STOP Remarque les paramètres modifiés seront enregistrés uniquement pour le cycle en cours 3 2 CICLO 2 CICLO 3 4 CICLO 4 1 CICLO 1 90 CICLO 3 100 80 F 75 F SET STOP MEMO 37 F 6 Une fois le cycle terminé une phase de conservation démarre automatiquement Pendant la conservation il est possible de visuali...

Страница 92: ...Appuyer sur la molette pour entrer dans la section AUTOMATIQUES AUTOMATIQUES MULTY REFROIDISS STOCKEES POSITIONS SERVICE HACCP FUNCTIONS MENU 5 Sélectionner la typologie de cycle désiré en tournant la molette AUTOMATIQUES 37 F BANQUETING VACUUM AUTOMATIQUES 0 F MENU AUTO 6 Appuyer sur la molette pour entrer dans la typologie de cycle sélectionné MENU AUTO AUTOMATIQUES 37 F BANQUETING VACUUM AUTOMA...

Страница 93: ... ET PATES 90 80 F 75 F INFO STOP AUTO 37 F 11 Une fois le cycle terminé une phase de conservation démarre automatiquement Pendant la conservation il est possible de visualiser les paramètres en sélectionnant INFO activer le dégivrage manuel en sélectionnant d arrêter le cycle en sélectionnant STOP Remarque les paramètres ne sont pas modifiables Si cela n est pas nécessaire le dégivrage manuel n es...

Страница 94: ...RD0 F IFR INFINITY SOFT 37 F HARD 37 F MENU 2 Appuyer sur la molette pour entrer dans la section MENU SOFT0 F HARD0 F IFR INFINITY SOFT 37 F HARD 37 F MENU 3 Sélectionner STOCKEES en tournant la molette AUTOMATIQUES MULTY REFROIDISS STOCKEES POSITIONS SERVICE HACCP FUNCTIONS MENU 4 Appuyer sur la molette pour entrer dans la section STOCKEES AUTOMATIQUES MULTY REFROIDISS STOCKEES POSITIONS SERVICE ...

Страница 95: ...position Enregistrer en sélectionnant 3 2 CICLO 2 CICLO 3 4 CICLO 4 1 CICLO 1 MENU STOCK STOCK 37 F 90 CICLO 3 100 80 F 75 F SET STOP STOCK 37 F TEMPS STADE SOFT VENTILATEURS STADE SOFT CONSERVATION 60 70 39 F RENDRE PREFERE _ 9 Une fois le cycle terminé une phase de conservation démarre automatiquement Pendant la conservation il est possible de Visualiser modifier les paramètres par défaut et fai...

Страница 96: ...NS SERVICE HACCP FUNCTIONS 5 Insérer le temps pour chaque niveau et le confirmer avec la molette Pendant le cycle il est possible de visualiser et modifier les paramètres par défaut en sélectionnant SET voir pag 41 d arrêter le cycle en sélectionnant Remarque les paramètres modifiés seront enregistrés À la fin de la valeur réglée pour chaque niveau le bip et la valeur clignotante avertissent l uti...

Страница 97: ...lectionné Pendant le cycle il est possible de visualiser et modifier les paramètres par défaut en sélectionnant SET voir pag 41 d arrêter le cycle en sélectionnant STOP Remarque les paramètres modifiés seront enregistrés uniquement pour le cycle en cours AUTOMATIQUES MULTY REFROIDISS STOCKEES POSITIONS SERVICE HACCP FUNCTIONS MENU REFROIDISS 100 80 F 75 F SET STOP 5 Une fois le cycle terminé une p...

Страница 98: ...HACCP FUNCTIONS MENU 4 Appuyer sur la molette pour entrer dans la section FUNCTIONS MENU AUTOMATIQUES MULTY REFROIDISS STOCKEES POSITIONS SERVICE HACCP FUNCTIONS 5 Sélectionner DEGIVRAGE en tournant la molette DEGIVRAGE CONSERVATION DECONGELATION STERILISATION MENU FONCTIONS CHAUFFAGE DE SONDE 6 Appuyer sur la molette pour activer le cycle sélectionné Pendant le cycle il est possible de visualiser...

Страница 99: ...HACCP FUNCTIONS MENU 4 Appuyer sur la molette pour entrer dans la section FUNCTIONS MENU AUTOMATIQUES MULTY REFROIDISS STOCKEES POSITIONS SERVICE HACCP FUNCTIONS 5 Sélectionner STERILISATION en tournant la molette MENU FONCTIONS DEGIVRAGE CONSERVATION DECONGELATION STERILISATION CHAUFFAGE DE SONDE FERMENTATION 6 Appuyer sur la molette pour activer le cycle sélectionné Pendant le cycle il est possi...

Страница 100: ...ette MENU FONCTIONS DEGIVRAGE CONSERVATION DECONGELATION STERILISATION CHAUFFAGE DE SONDE FERMENTATION 6 Appuyer sur la molette pour entrer dans la CONSERVATION MENU FONCTIONS DEGIVRAGE CONSERVATION DECONGELATION STERILISATION CHAUFFAGE DE SONDE FERMENTATION 7 Sélectionner le type de conservation en tournant la molette CONSERVATION POSITIVE NEGATIVE MENU FONCTIONS 8 Appuyer sur la molette pour act...

Страница 101: ...ur entrer dans la section FUNCTIONS 5 Sélectionner DECONGELATION en tournant la molette DEGIVRAGE CONSERVATION DECONGELATION STERILISATION MENU FONCTIONS CHAUFFAGE DE SONDE FERMENTATION 6 Appuyer sur la molette pour entrer dans la DECONGELATION DEGIVRAGE CONSERVATION DECONGELATION STERILISATION MENU FONCTIONS CHAUFFAGE DE SONDE FERMENTATION 7 Sélectionnez en tournant le bouton la typologie la plus...

Страница 102: ... cours En cas de modification des temps durant la décongélation par temps la fin du cycle sera automatiquement recalculée 02 10 2013 17 28 12 56 SET STOP 100 80 F 75 F 02 10 2013 17 28 12 56 SET STOP 100 80 F 75 F 02 OTT 2013 17 28 DECONG 02 OTT 2013 17 28 DECONG 20 28 02 OTT 2013 DECONG 02 10 2013 20 28 12 56 SET STOP 100 80 F 75 F 9 Une fois le cycle terminé une phase de conservation démarre aut...

Страница 103: ... molette pour entrer dans la section FUNCTIONS 5 Sélectionner FERMENTATION en tournant la molette DEGIVRAGE CONSERVATION DECONGELATION STERILISATION MENU FONCTIONS CHAUFFAGE DE SONDE FERMENTATION 6 Appuyer sur la molette pour entrer dans la FERMENTATION DEGIVRAGE CONSERVATION DECONGELATION STERILISATION MENU FONCTIONS CHAUFFAGE DE SONDE FERMENTATION 7 Sélectionner en tournant la molette FERMENTATI...

Страница 104: ...ifiés la fin du cycle sera automatiquement recalculée 05 59 SET STOP 100 80 F 75 F 02 10 2013 17 28 05 59 SET STOP 100 80 F 75 F 02 10 2013 17 28 05 59 100 80 F 75 F SET STOP 02 10 2013 17 28 02 OTT 2013 17 28 FERMENT 02 OTT 2013 17 28 FERMENT 20 28 FERMENT 02 OTT 2013 05 59 SET STOP 100 80 F 75 F 02 10 2013 20 28 9 Une fois le cycle terminé une phase de conservation démarre automatiquement Pendan...

Страница 105: ... HARD 37 F MENU 2 Appuyer sur la molette pour entrer dans la section MENU SOFT0 F HARD0 F IFR INFINITY SOFT 37 F HARD 37 F MENU 3 Sélectionner FUNCTIONS en tournant la molette AUTOMATIQUES MULTY REFROIDISS STOCKEES POSITIONS SERVICE HACCP FUNCTIONS MENU 4 Appuyer sur la molette pour entrer dans la section FUNCTIONS MENU AUTOMATIQUES MULTY REFROIDISS STOCKEES POSITIONS SERVICE HACCP FUNCTIONS 5 Sél...

Страница 106: ...dre CHAUFFAGE DE SONDE ATTENDRE S IL VOUS PLAIT 8 Extraire la sonde EXTRAIRE LA SONDE Si la température lue par le capteur cœur de la sonde n est pas négative la fonction ne sera pas activée 1 Pas necessaire PAS NECESSAIRE ...

Страница 107: ...RD 37 F 5 F 86 F 45 4 Appuyer sur la molette pour modifier la valeur 45 HARD 37 F 37 F 5 F 86 F COEURFINCYCLE AIRSTADE HARD COEURSTADE HARD TEMPS STADE HARD 5 Sélectionner la nouvelle valeur en tournant la molette 40 HARD 37 F 37 F 5 F 86 F COEURFINCYCLE AIRSTADE HARD COEURSTADE HARD TEMPS STADE HARD 6 Appuyer sur la molette pour confirmer la nouvelle valeu 40 HARD 37 F 37 F 5 F 86 F COEURFINCYCLE...

Страница 108: ...our entrer dans la section MENU SOFT0 F HARD0 F IFR INFINITY SOFT 37 F HARD 37 F MENU 3 Sélectionner HACCP en tournant la molette AUTOMATIQUES MULTY REFROIDISS STOCKEES POSITIONS SERVICE HACCP FUNCTIONS MENU 4 Appuyer sur la molette pour entrer dans la section HACCP AUTOMATIQUES MULTY REFROIDISS STOCKEES POSITIONS SERVICE HACCP FUNCTIONS MENU 5 Sélectionner la fonction choisie en tournant la molet...

Страница 109: ...lette pour afficher le cycle sélectionné 01 03 2010 14 00 LASAGNE 0 F 01 03 2010 19 00 PASTA 37 F MENU HACCP AFFICHAGE CELLULE DE REFR 1 13 La liste des paramètres s affiche PASTA 37 F 01 03 2010 19 00 COEUR 70 F AIR 70 F MENU HACCP AFFICHAGE AFFICHAGE PAR CYCLE 6 Appuyer sur la molette pour entrer dans la fonction choisie AFFICHAGE USB IMPRIME MENU HACCP SUPPRIME 7 Sélectionner la fonction choisi...

Страница 110: ...tifiés par les lettres R alimentation et S signal 6 Appuyer sur la molette pour entrer dans la fonction choisie AFFICHAGE USB IMPRIME MENU HACCP SUPPRIME 7 Sélectionner la fonction choisie en tournant la molette PARDATE PARCYCLE MENU HACCP IMPRIME TOUT 8 Appuyer sur la molette pour entrer dans la fonction choisie PARDATE PARCYCLE MENU HACCP IMPRIME TOUT 9 Insérer la date en tournant la molette et ...

Страница 111: ...cle à afficher 01 03 2010 14 00 LASAGNE 0 F 01 03 2010 19 00 PASTA 37 F MENU HACCP IMPRIME CELLULE DE REFR 1 10 Appuyer sur la molette pour confirmer le cycle sélectionné 01 03 2010 14 00 LASAGNE 0 F 01 03 2010 19 00 PASTA 37 F MENU HACCP IMPRIME CELLULE DE REFR 1 11 Appuyer sur la molette pour démarrer l imprimante PASTA 37 F 01 03 2010 19 00 COEUR 70 F AIR 70 F MENU HACCP IMPRIME EXECUTER 12 Imp...

Страница 112: ...bleau de bord 6 Appuyer sur la molette pour entrer dans la fonction choisie La présence de la mémoire USB est contrôlée AFFICHAGE USB IMPRIME MENU HACCP SUPPRIME 7 Sélectionner la fonction choisie en tournant la molette PARDATE PARCYCLE MENU HACCP USB TOUT 8 Appuyer sur la molette pour entrer dans la fonction choisie PARDATE PARCYCLE MENU HACCP USB TOUT 9 Insérer la date en tournant la molette et ...

Страница 113: ...te PARDATE PARCYCLE MENU HACCP USB TOUT 8 Appuyer sur la molette pour entrer dans la fonction choisie PARDATE PARCYCLE MENU HACCP USB TOUT 9 Sélectionner le cycle à afficher 01 03 2010 14 00 LASAGNE 0 F 01 03 2010 19 00 PASTA 37 F MENU HACCP USB CELLULE DE REFR 1 10 Appuyer sur la molette pour confirmer le cycle sélectionné 01 03 2010 14 00 LASAGNE 0 F 01 03 2010 19 00 PASTA 37 F MENU HACCP USB CE...

Страница 114: ...uyer sur la molette pour télécharger les données MENU HACCP USB TOUT EXÉCUTER 10 Téléchargement des données en cours EN COURS MENU HACCP USB SUPPRESSION DES DONNÉES PAR DATE 6 Appuyer sur la molette pour entrer dans la fonction choisie AFFICHAGE USB IMPRIME MENU HACCP SUPPRIME 7 Sélectionner la fonction choisie en tournant la molette PARDATE PARCYCLE MENU HACCP SUPPRIME TOUT 8 Appuyer sur la molet...

Страница 115: ...RIME TOUT 8 Appuyer sur la molette pour entrer dans la fonction choisie PARDATE PARCYCLE MENU HACCP SUPPRIME TOUT 9 Sélectionner la fonction choisie en tournant la molette 01 03 2010 14 00 LASAGNE 0 F 01 03 2010 19 00 PASTA 37 F MENU HACCP SUPPRIME CELLULE DE REFR 1 10 Appuyer sur la molette pour confirmer le cycle sélectionné 01 03 2010 14 00 LASAGNE 0 F 01 03 2010 19 00 PASTA 37 F MENU HACCP SUP...

Страница 116: ...7 Sélectionner la fonction choisie en tournant la molette PARDATE PARCYCLE MENU HACCP SUPPRIME TOUT 8 Appuyer sur la molette pour entrer dans la fonction choisie PARDATE PARCYCLE MENU HACCP SUPPRIME TOUT 9 Appuyer sur la molette pour démarrer la procédure MENU HACCP SUPPRIME TOUT EXÉCUTER 10 Suppression des données en cours EN COURS MENU HACCP SUPPRIME ...

Страница 117: ...sur la molette pour entrer dans la section LANGUE 7 Sélectionner la langue en tournant la molette ITALIANO FRANCAIS ENGLISH MENU IMPOT LANGUE DEUTSCH ESPANOL SVENSKA DANSK DUTCH NORSK 8 Appuyer sur la molette pour confirmer la langue sélectionnée ITALIANO FRANCAIS ENGLISH MENU IMPOT LANGUE DEUTSCH ESPANOL SVENSKA DANSK DUTCH NORSK AUTOMATIQUES MULTY REFROIDISS STOCKEES POSITIONS SERVICE HACCP FUNC...

Страница 118: ... pour entrer dans la section SET DATA MONTRE 7 Sélectionner la nouvelle valeur en tournant la molette 8 Appuyer sur le bouton pour confirmer la nouvelle valeur et passer à la suivante 9 Sélectionner pour confirmer et sortir de la fonction AUTOMATIQUES MULTY REFROIDISS STOCKEES POSITIONS SERVICE HACCP FUNCTIONS MENU AUTOMATIQUES MULTY REFROIDISS STOCKEES POSITIONS SERVICE HACCP FUNCTIONS LANGUE SET...

Страница 119: ...nant la molette 6 Appuyer sur la molette pour entrer dans la section SECTEUR 7 Sélectionner le secteur desire en tournant la molette RESTAURATION BOULANGERIE PATISSERIE MENU IMPOT SECTEUR GLACIER 8 Appuyer sur la molette pour confirmer RESTAURATION BOULANGERIE PATISSERIE MENU IMPOT SECTEUR GLACIER AUTOMATIQUES MULTY REFROIDISS STOCKEES POSITIONS SERVICE HACCP FUNCTIONS MENU AUTOMATIQUES MULTY REFR...

Страница 120: ... Sélectionner MULTY en tournant la molette 6 Appuyer sur la molette pour entrer dans la section MULTY 7 Sélectionner en tournant la molette le nombre de niveaux correspondant à l appareil utilisé 8 Appuyer sur la molette pour confirmer AUTOMATIQUES MULTY REFROIDISS STOCKEES POSITIONS SERVICE HACCP FUNCTIONS MENU AUTOMATIQUES MULTY REFROIDISS STOCKEES POSITIONS SERVICE HACCP FUNCTIONS LANGUE SECTEU...

Страница 121: ...7 F HARD 37 F MENU 3 Sélectionner POSITIONS en tournant la molette 4 Appuyer sur la molette pour entrer dans la section POSITIONS 5 Sélectionner CONTROLE CYCLE en tournant la molette 6 Appuyer sur la molette pour entrer dans la section CONTROLE CYCLE 7 Sélectionner la typologie de gestion du cycle souhaité 8 Appuyer sur la molette pour confirmer le choix AUTOMATIQUES MULTY REFROIDISS STOCKEES POSI...

Страница 122: ...NU SOFT0 F HARD0 F IFR INFINITY SOFT 37 F HARD 37 F MENU 3 Sélectionner SERVICE en tournant la molette AUTOMATIQUES MULTY REFROIDISS STOCKEES POSITIONS SERVICE HACCP FUNCTIONS MENU 4 Appuyer sur la molette pour entrer dans la section SERVICE AUTOMATIQUES MULTY REFROIDISS STOCKEES POSITIONS SERVICE HACCP FUNCTIONS MENU 5 Sélectionner ALARMES en tournant la molette MENU SERVICE RESETALARMES RETABLIS...

Страница 123: ...aleur réglée Si la température ne rentre pas dans la normalité intervention d un technicien qualifié Alarme de temperature limite pendant la réfrigération congélation Température cellule ou cœur supérieur à la valeur réglée Si la température ne rentre pas dans la normalité intervention d un technicien qualifié Alarme sonde chambre Sonde cellule interrompue Appeler le service technique spécialisé A...

Страница 124: ...TOCKEES POSITIONS SERVICE HACCP FUNCTIONS MENU 4 Appuyer sur la molette pour entrer dans la section SERVICE AUTOMATIQUES MULTY REFROIDISS STOCKEES POSITIONS SERVICE HACCP FUNCTIONS MENU 5 Sélectionner RESET ALARMES con la manopola MENU SERVICE RETABLISSEMENT MULTY PARAMETRES ENTREES SORTIES ALARMES MULTY FIRMWARE RESETALARMES 6 Appuyer sur la molette pour entrer dans la section RESET ALARMES MENU ...

Страница 125: ...lette pour entrer dans la section SERVICE AUTOMATIQUES MULTY REFROIDISS STOCKEES POSITIONS SERVICE HACCP FUNCTIONS MENU 5 Sélectionner ENTREES SORTIES en tournant la molette MENU SERVICE RETABLISSEMENT MULTY PARAMETRES ALARMES MULTY FIRMWARE RESETALARMES ENTREES SORTIES 6 Appuyer sur la molette pour afficher la liste ENTREES SORTIES MENU SERVICE RETABLISSEMENT MULTY PARAMETRES ALARMES MULTY FIRMWA...

Страница 126: ...sur la molette pour entrer dans la section SERVICE AUTOMATIQUES MULTY REFROIDISS STOCKEES POSITIONS SERVICE HACCP FUNCTIONS MENU 5 Sélectionner RETABLISSEMENT en tournant la molette MENU SERVICE MULTY PARAMETRES ALARMES MULTY FIRMWARE RESETALARMES ENTREES SORTIES RETABLISSEMENT 6 Appuyer sur la molette pour entrer dans la section RETABLISSEMENT MENU SERVICE MULTY PARAMETRES ALARMES MULTY FIRMWARE ...

Страница 127: ...VICE AUTOMATIQUES MULTY REFROIDISS STOCKEES POSITIONS SERVICE HACCP FUNCTIONS MENU 5 Sélectionner PARAMETRES en tournant la molette MENU SERVICE ALARMES FIRMWARE RESETALARMES ENTREES SORTIES RETABLISSEMENT PARAMETRES 6 Appuyer sur la molette pour entrer dans la section PARAMETRES MENU SERVICE ALARMES FIRMWARE RESETALARMES ENTREES SORTIES RETABLISSEMENT PARAMETRES 7 Insérer de passe en tournant la ...

Страница 128: ...nox chromés en plastique ou vernis avec de l eau tiéde et du détergent Ensuite rincez et essuyez soingneusement N utilisez pas de substances abrasives ou de solvants chimiques Ne pas laver l appareil au jet d eau à haute pression Ne pas utiliser des objets pointus ou des substances abrasives On peut nettoyer l évaporateur à l intérieur en desserrant les mopettes et tournant le panneau de protectio...

Страница 129: ...onstruit en acier INOX AISI 304 Pour le nettoyage et l entretien des parties en acier inox tenez vous à ce qui est spécifié ci dessous en tenant compte que la règle fondamentale est de garantir la non toxicité et le maximum d hygiène des produits traités Ne pas utiliser d eau de Javel Avant d utiliser n importe quel produit détergent informez vous toujours chez votre fournisseur habituel sur le pr...

Страница 130: ... les appareils à unité séparée au cas où l on décidait d enlever la tension n oubliez pas de porter l interrupteur sur OFF également sur l unité séparée ENTRETIEN EXTRAORDINAIRE Les informations et les instructions de cette section sont réservées au personnel spécialisé à intervenir sur les composants de l appareil ENTRETIEN DE LA CARTE VIDÉO ET DE L ENCODEUR Portez l interrupteur du courant en po...

Страница 131: ... à soi Desserrer les vis de la protection et la retirer le couvercle pour accéder la carte vidéo et le encodeur ENTRETIEN DU TABLEAU ÉLECTRIQUE Portez l interrupteur du courant en position OFF Enlevez la fiche de la prise Pour accéder au tableau électrique Mod 51MU 52MU Décrocher la protection frontale en la tirant vers soi Retirer les vis du panneau de fermeture Retirer le panneau de fermeture Re...

Страница 132: ...E L INSTALLATION DE CONDENSATION Pour accede à l installation de condensation retirer la grille de protection postérieure en desserrant les vis ENTRETIEN DE LA SONDE À COEUR Tourner à gauche dévissant complètement le connecteur à débrancher le câble de la sonde à cœur Remplacer la sonde à cœur en vissant le connecteur à fond ...

Страница 133: ... SONDE EVPAPORATEUR DEGIVRAGE 20 RESISTANCE ANTICONDENSATION PORTE 79A SONDE A COEUR POINTEAU MULTIPOINT 21 RESISTANCE DEGIVRAGE 79B RESISTANCE SONDE MULTIPOINT 21A RESISTANCE DEGIVRAGE 80 RESISTANCE PTC POUR CARTER COMPRESSEUR 25 TRANSFORMATEUR 86 SONDE CONDENSATEUR 44 RELAIS COMPRESSEUR 87 CONDENS DE MARCHE POUR VENT COND 56 FILTRE 97A MODULE PARTIEL VENT EVAP 65 CONTACTEUR 102 THERMOSTAT BIMÉTA...

Отзывы: