QUICK START GUIDE - QUATTRO D
ANALOG WAY
EDITION : 10/06
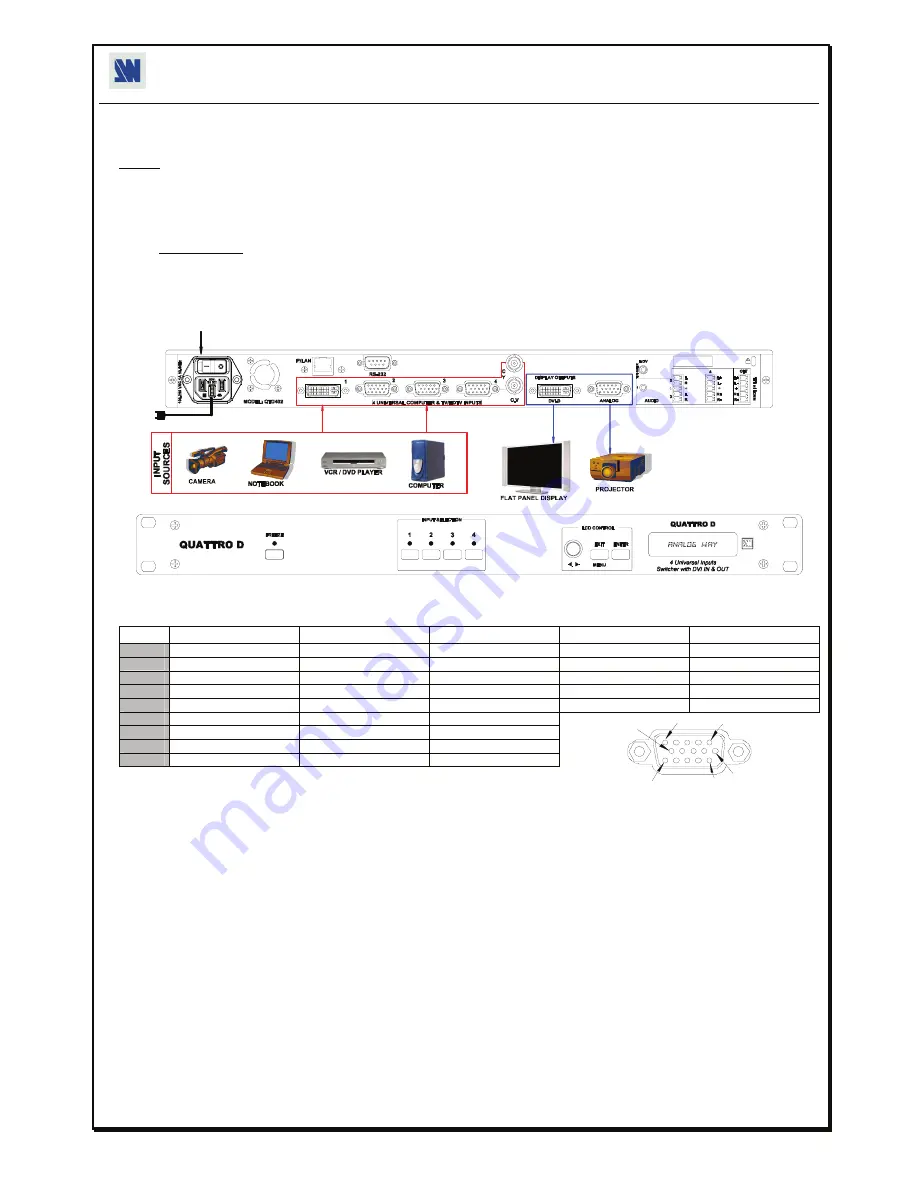
CONNECTIONS:
NOTE:
Turn OFF all of your equipment before connecting.
c
Connect the AC power supply cord to the QTD402 and to an AC power outlet.
d
Connect your computer & video sources to the 4 universal inputs of the QTD402.
•
If you need to connect a digital computer source, use the input #1 (DVI-I IN connector).
•
Connect your others sources to the unused inputs.
IMPORTANT:
Connect only one source by input.
e
Connect your display device (projector, plasma screen...) to the HD15 or DVI-D connectors.
f
Turn ON the QTD402 (rear panel switch). Then turn ON all your input sources and then your display device.
•
Connection diagram:
2
ANALOG WAY
4
1
2
3
3
•
HD15 connector pin assignment (inputs #2 to #4 - input #1 with a DVI/HD15 adaptor)
:
SIGNAL COMPUTER (analog)
RGB/S VIDEO
YUV & HDTV (analog)
S.VIDEO (Y/C)
COMPOSITE VIDEO
PIN 1
RED.
RED.
Cr / Pr.
C (chrominance).
PIN 2
GREEN.
GREEN.
Y.
Y (luminance).
VIDEO (NTSC, PAL...)
PIN 3
BLUE.
BLUE.
Cb / Pb.
PIN 6
RED return.
RED return.
Cr / Pr return.
C return.
PIN 7
GREEN return.
GREEN return.
Y return.
Y return.
return.
PIN 8
BLUE return.
BLUE return.
Cb / Pb return.
PIN 10
GND.
GND.
PIN 13
H sync or C sync (S).
C sync (S).
PIN 14
V sync.
SETTINGS:
c
We recommend resetting the QTD402 device to all of its
default values
, with the front panel LCD menu (
CONTROL > default
value > yes
) before proceeding.
d
Select the
Auto settings
function with the LCD menu (
INPUT > Auto settings
). This function will detect automatically the source
type connected to the inputs of the device. Sometimes, the auto setting may not detect the source type: in this case select manually
the source type with the LCD menu (
INPUT > Input type
).
e
Select one of the
output formats
with the LCD menu (
OUTPUT > output format
). Then select the output rate with the LCD menu
(
OUTPUT > output rate
).
f
Display the
centering pattern
with the LCD menu (
OUTPUT > test pattern > centering
). Display a black output. Adjust directly
the display device itself, using its position and size controls, to fill the centering pattern in full screen.
g
For each input source connected to the device, make the following adjustments:
-Select the source you want to adjust (with the front panel "INPUT SELECTION" buttons).
-Select the aspect ratio of your input source with the LCD menu (
IMAGE > aspect ratio
).
-Use the
Centering
function (
IMAGE > centering
) to automatically position the image in the
Centering
pattern
.
-As required, make the others adjustments, available in the LCD
IMAGE
menu (color, brightness…).
5
6
1
15
10
11
Содержание QTA401
Страница 1: ...ANALOG WAY QUATTRO EDITION 10 06 MODEL QTD402 MODEL QTA401 User s Manual Manuel Utilisateur...
Страница 34: ......


