background image

UG-232 

Evaluation Board User Guide


Rev. 0 | Page 6 of 32 

EVALUATION BOARD SOFTWARE QUICK START PROCEDURES 

This section provides quick start procedures for using the 

AD6642

/

AD6657

 evaluation board. Both the default and 

optional settings are described. 

CONFIGURING THE BOARD 

Before using the software for testing, configure the evaluation 
board as follows:  

1.


Connect the evaluation board to the data capture board, as 
shown in Figure 1 and Figure 2

2.


Connect one 6 V, 2.5 A switching power supply (such as 
the CUI EPS060250UH-PHP-SZ supplied) to the AD6642/ 
AD6657


board. 

3.


Connect one 6 V, 2.5 A switching power supply (such  
as the CUI EPS060250UH-PHP-SZ supplied) to the  
HSC-ADC-EVALCZ board. 

4.


Connect the HSC-ADC-EVALCZ board (J6) to the PC 
with a USB cable.  

5.


On the ADC evaluation board, confirm that there are no 
jumpers installed on any of the header pins. 

6.


Connect a low jitter sample clock to the connector J702. 

7.


When using the AD6642 version of the ADC evaluation 
board, use a clean signal generator with low phase noise to 
provide an input signal to the desired A and/or B channel(s). 
If using the AD6657 version of the ADC evaluation board, 
use a clean signal generator with low phase noise to provide 
an input signal to the desired A, B, C, and/or D channel(s). 
Use a 1 m, shielded, RG-58, 50 Ω coaxial cable to connect 
the signal generator. For best results, use a narrow-band band-
pass filter with 50 Ω terminations and an appropriate center 
frequency. (Analog Devices uses TTE, Allen Avionics, and 
K&L band-pass filters.) 

USING THE SOFTWARE FOR TESTING 

Setting Up the ADC Data Capture 

After configuring the board, set up ADC data capture using the 
following steps: 

1.


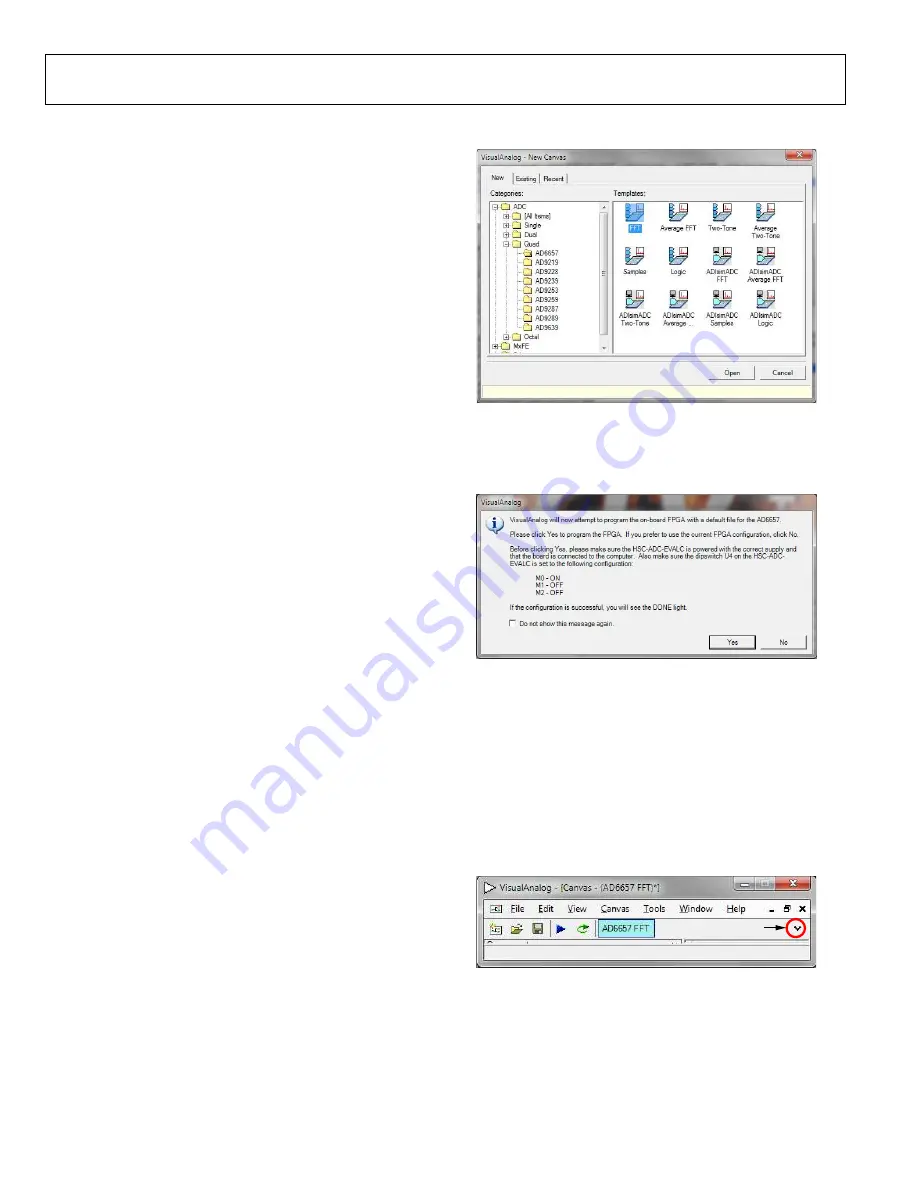
Open VisualAnalog on the connected PC. The appropriate 
part type should be listed in the status bar of the 

VisualAnalog – New Canvas

 window. Select the template 

that corresponds to the type of testing to be performed  
(see Figure 4 where the AD6657 is shown as an example). 

09

57

2-

00

4


Figure 4. VisualAnalog - New Canvas Window 

2.


After the template is selected, a message appears asking if 
the default configuration can be used to program the FPGA 
(see Figure 5). Click 

Yes

, and the window closes. 

09

57

2-

0

05


Figure 5. VisualAnalog Default Configuration Message 

3.


To change features to settings other than the default settings, 
click the 

Expand Display

 button, located on the bottom 

right corner of the window shown in Figure 6 to see what is 
shown in Figure 7.  
 
Detailed instructions for changing the features and capture 
settings can be found in th

AN-905

 Application Note, 

VisualAnalog Converter Evaluation Tool Version 1.0 User 
Manual

. After the changes are made to the capture settings, 

click 

Collapse Display

 (see Figure 7).  

09

57

2-

00

6

EXPAND DISPLAY


Figure 6. VisualAnalog – [Canvas – (AD6657 FFT)*] Window Toolbar, 

Collapsed Display 


Содержание AD6642

Страница 1: ...ss mainly focus on the distribution of electronic components Line cards we deal with include Microchip ALPS ROHM Xilinx Pulse ON Everlight and Freescale Main products comprise IC Modules Potentiometer...

Страница 2: ...rd HSC ADC EVALCZ FPGA based data capture kit SOFTWARE NEEDED VisualAnalog SPI controller DOCUMENTS NEEDED AD6642 or AD6657 data sheet HSC ADC EVALCZ data sheet AN 905 Application Note VisualAnalog Co...

Страница 3: ...vision History 2 Evaluation Board Hardware 3 Power Supplies 3 Input Signals 3 Output Signals 3 Default Operation and Jumper Selection Settings 5 Evaluation Board Software Quick Start Procedures 6 Conf...

Страница 4: ...ds can be removed to disconnect the outputs from the on board LDOs This enables the user to bias each section of the board individually Use P202 and P203 to connect a different supply for each section...

Страница 5: ...SUPPLY SWITCHING POWER SUPPLY PC RUNNING ADC ANALYZER OR VISUAL ANALOG USER SOFTWARE 6V DC 2A MAX 6V DC 2A MAX ANALOG FILTER SIGNAL SYNTHESIZER SIGNAL SYNTHESIZER ANALOG FILTER SIGNAL SYNTHESIZER ANAL...

Страница 6: ...components are not included The user should see the AD8376 data sheet for additional information on this part and for configuring the inputs and outputs The AD8376 channels are also normally held in...

Страница 7: ...8 50 coaxial cable to connect the signal generator For best results use a narrow band band pass filter with 50 terminations and an appropriate center frequency Analog Devices uses TTE Allen Avionics a...

Страница 8: ...y going to the Start menu or by double clicking the SPIController software desktop icon If prompted for a configuration file select the appropriate one If not check the title bar of the window to dete...

Страница 9: ...other settings can be changed on the ADCBase 0 page see Figure 10 and the ADC A and ADC B pages see Figure 11 to set up the part in the desired mode ADC C and ADC D can also be changed if using the AD...

Страница 10: ...80 100 120 10 0 20 30 40 50 60 70 80 90 FREQUENCY MHz AMPLITUDE dBFS SECOND HARMONIC THIRD HARMONIC fS 185MSPS fIN 30 3MHz 1dBFS SNR 65 7dB 66 7dBFS SFDR 89 7dBc 09572 014 Figure 14 Typical FFT AD665...

Страница 11: ...nabled is analogous to an amplitude of 1 0 dBFS with NSR disabled If the FFT window remains blank after clicking Run do the following 10 Click the disk icon within the Graph window to save the perform...

Страница 12: ...Evaluation Board User Guide UG 232 Rev 0 Page 11 of 32 EVALUATION BOARD SCHEMATICS AND ARTWORK 09572 020 Figure 20 DUT and Related Circuits...

Страница 13: ...UG 232 Evaluation Board User Guide Rev 0 Page 12 of 32 09572 021 Figure 21 Board Power Input and Supply...

Страница 14: ...Evaluation Board User Guide UG 232 Rev 0 Page 13 of 32 09572 022 Figure 22 Passive Analog Input Circuits Channel A and Channel B...

Страница 15: ...UG 232 Evaluation Board User Guide Rev 0 Page 14 of 32 09572 023 Figure 23 Passive Analog Input Circuits Channel C and Channel D...

Страница 16: ...Evaluation Board User Guide UG 232 Rev 0 Page 15 of 32 09572 024 Figure 24 Optional Active Input Circuits Channel A and Channel B...

Страница 17: ...UG 232 Evaluation Board User Guide Rev 0 Page 16 of 32 09572 025 Figure 25 Optional Active Input Circuits Channel C and Channel D...

Страница 18: ...Evaluation Board User Guide UG 232 Rev 0 Page 17 of 32 09572 026 Figure 26 Default Clock Input Circuit...

Страница 19: ...UG 232 Evaluation Board User Guide Rev 0 Page 18 of 32 09572 027 Figure 27 Optional Clock Input Circuit...

Страница 20: ...Evaluation Board User Guide UG 232 Rev 0 Page 19 of 32 09572 028 Figure 28 Optional AD9517 Clock Input Circuit...

Страница 21: ...UG 232 Evaluation Board User Guide Rev 0 Page 20 of 32 09572 029 Figure 29 SPI Configuration Circuit...

Страница 22: ...Evaluation Board User Guide UG 232 Rev 0 Page 21 of 32 09572 030 Figure 30 FIFO Board Connector Circuit...

Страница 23: ...UG 232 Evaluation Board User Guide Rev 0 Page 22 of 32 09572 031 Figure 31 AD6657 AD6642 Evaluation Board Top Side 09572 032 Figure 32 AD6657 AD6642 Evaluation Board Ground Plane Layer 2...

Страница 24: ...Evaluation Board User Guide UG 232 Rev 0 Page 23 of 32 09572 033 Figure 33 AD6657 AD6642 Evaluation Board Power Plane Layer 3 09572 034 Figure 34 AD6657 AD6642 Evaluation Board Power Plane Layer 4...

Страница 25: ...UG 232 Evaluation Board User Guide Rev 0 Page 24 of 32 09572 035 Figure 35 AD6657 AD6642 Evaluation Board Ground Plane Layer 5 09572 036 Figure 36 AD6657 AD6642 Evaluation Board Bottom Side...

Страница 26: ...408 Ceramic capacitor 50 V 8 2 pF NP0 0402 Yageo 0402CG829D9B200 9 2 C610 C612 Ceramic capacitor 6 3 V 10 F X5R 0805 Panasonic ECJ 2FB0J106M 10 1 CR201 Diode fast rec 50 V 1 A SMB Diode Inc RS1AB 13 F...

Отзывы: