


Getting The Most From Your Mio Modero R-4
63
Mio Modero R-4 Remote - Instruction Manual
Minimize the number of borders displayed on a single page. One border will always load faster than two or three. Consistent
use of borders will also make for a better look and feel.
Keep the number of fonts used on the Mio R-4 to a minimum, as each unnecessary font file takes space in the device's
memory that could be used for other files or functions.
Try to use no more than one or two animated images per page. Animations use considerable amounts of processing power
and slow the response time for the user.
Do not set timeouts for popups containing level/bar graph controls tied to external buttons to a short time limit. If the
popup times out before the button is released, the button release is missed by the control on the popup and the level will
continue to be adjusted in the last active direction. This can be a problem when the popup control is for volume, among
other possibilities.
Sending consecutive listbox update send_commands too closely together can adversely affect the performance of the data
transfer when sending a large number of update commands. Up to 20 listbox update commands probably could be sent
very quickly. However, if sending more than 20 updates, the master code should be set up to insert an approximate 1/2-
second delay between the commands. Otherwise, too many commands can be queued on the gateway in too short a time.
The end result is that messages could be lost. Because of this, dynamic listboxes should be kept somewhat limited in size.
Scrolling through a list of 20 or 30 items is also easier for the user than a list of 100 or 1000 items.
The amount of traffic generated for online events is connected to the number of ports and channels that are opened up.
Start at a low port number and increment port numbers by 1 when needed, and do the same for channels. This will ease the
load on the ZigBee network and the Mio R-4 and will consume fewer resources on the NetLinx master.
The bottom line is to understand what the remote is being designed to interface with, design the pages to limit the amount
of data required from any particular device, and write the NetLinx program to minimize data traffic and to maximize
efficient use of bandwidth. To accomplish this, the programmer must be aware of the amount of traffic the NetLinx
program will generate to the device.
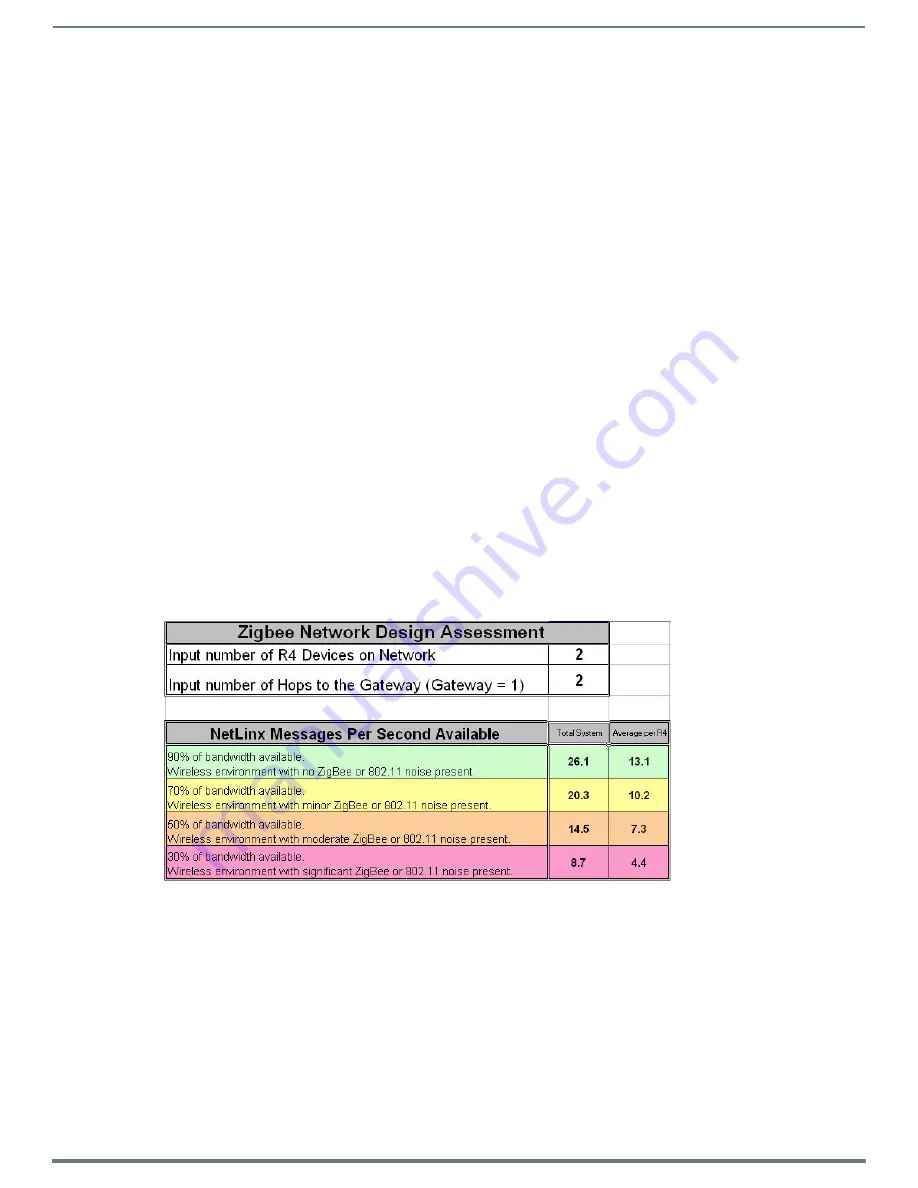
The ZigBee Network Calculator
The ZigBee Network Calculator, available at http://www.amx.com, is a Microsoft Excel® spreadsheet that gives a base guideline to
the number of NetLinx messages that can pass between a ZigBee remote and the gateway under given wireless environmental
conditions. By entering the number of Mio R-4 devices to be used on the network and the number of hops to the gateway, the
calculator can help assess the number of messages that respectively can be handled by the entire network and by each Mio R-4 on
the network.
NOTE:
Due to environmental issues, such as the composition of obstacles situated between the Mio R-4 and the access point or
interference from appliances, the ZigBee Network Calculator should be used as a guide in conjunction with proper testing for device
function at the network site. Factors other than ZigBee or 802.11 noise, including distance to the access point and materials used in
building construction, may influence connectivity.
To use the calculator:
1.
Enter the number of Mio R-4 devices to be used on the network.
2.
Enter the number of hops from the device(s) to the gateway access point.
3.
The Calculator will show an average number of NetLinx messages available to the total network and to each
Mio R-4, based on available bandwidth. The Calculator displays the network’s and devices’ potential messages in 30, 50, 70,
and 90 percent increments.
4.
Confirm the expected number of NetLinx messages to be run through the network to insure that they fall into acceptable
levels.
FIG. 26
ZigBee Network Calculator