

For full warranty information, refer to the AMX Instruction Manual(s) associated with your Product(s).
7/08
©2008 AMX. All rights reserved. AMX and the AMX logo are registered trademarks of AMX.
AMX reserves the right to alter specifications without notice at any time.
3000 RESEARCH DRIVE, RICHARDSON, TX 75082 • 800.222.0193 • fax 469.624.7153 • technical support 800.932.6993 • www.amx.com
93-2182-01
REV: D
Setting Up Your System
The CSG comes with a user interface framework which gives you the ability to
configure it through an easy to use interface. To access the interface, you will
need the IP address your CSG server is using. Once you have the IP address,
you can configure your CSG via a web browser.
The user interface included as part of the CSG implementation provided with
the CSG gives you the ability to set up a telephone system without the need to
use command line configuration. The user interface opens on the main menu,
which gives you the ability to add features or further modify an existing
configurations. The following sections provide information about procedures
you may want to perform when you are getting started.
Logging on to the Server for the First Time
Connect a computer to the LAN IP Phone port on the CSG with an Ethernet
cable. In the address field of a web browser, enter the default IP address of
http://192.168.69.1. To log on to the system, enter the following user name and
password:
•
Username:
admin
•
Password:
1988
Subsequent Logons to the CSG
The method described above will work to log onto the configuration tool of the
CSG. In addition, you can log onto the CSG using the CSG's Network port once
it has been enabled. In this case, open a web browser on a computer which is
located on the same network as the CSG. In the address field of the web
browser, enter the IP address of the CSG as defined during the initial
installation.
Changing Your Network Configuration
DHCP is automatically enabled for Wide-Area Networks (WAN) by default. If
you need to change your network configuration—like set a static IP address,
for example—the Networking Configuration page enables you to make any
necessary changes. Follow these steps to change your network configuration:
1.
Select
Network | Main
from the
System
tab.
2.
Enter the host name for your server.
3.
Click the
WAN Network
tab. You can use the options on this tab to
establish the settings that enable you to connect to the Internet, or to an
internal, private network.
4.
Ensure the
DHCP
check box is checked.
Note:
If you have difficulty obtaining an IP address dynamically, clear the
DHCP check box and specify the IP address, subnet, gateway, and DNS
settings. This information should be available from your network administrator
or Internet Service Provider (ISP).
5.
Click the
IP Phones
tab. You can use the options on this tab to establish
settings to access your CSG.
6.
Enter the IP address, subnet, or any other appropriate information
necessary to access your CSG.
7.
Click the
Timezones
tab.
8.
Select a time zone from the provided drop-down combo box.
9.
Click
Accept
.
Setting Up Your Touch Panel to Work with Your CSG
Follow these steps to configure your touch panel to work with the CSG:
1.
From the main Setup page on your touch panel, press
Protected Setup
.
The Protected Setup page opens.
2.
Press
Other Settings
. A slide out menu appears.
3.
Press
SIP
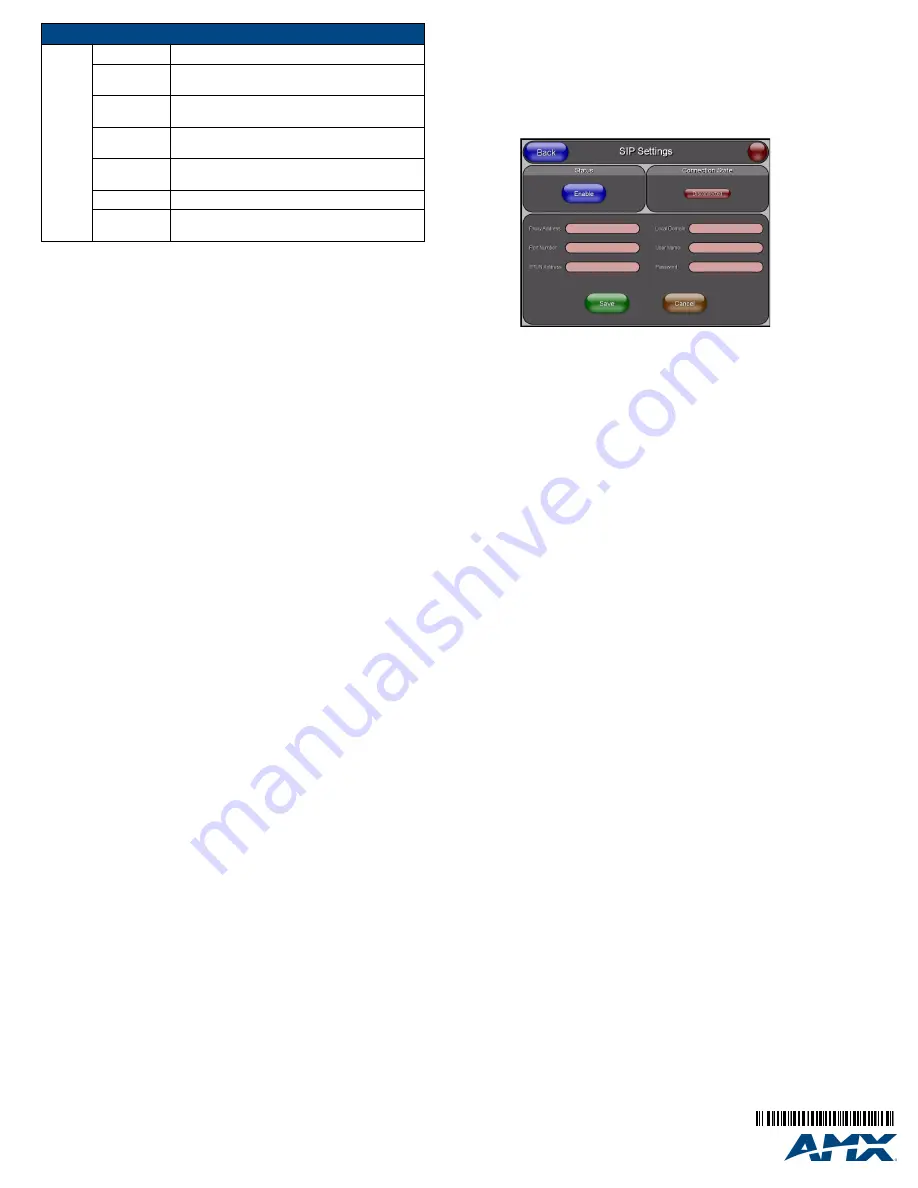
. The SIP Settings page opens (FIG. 2).
FIG. 2
SIP Settings page
4.
In the
Proxy Address
field, enter the IP address or DNS name of the
server you want to access. The IP address depends on whether you
connect the touch panel to one of the IP Phone ports or through the LAN
with the CSG.
5.
In the
Port Number
field, enter the port number of the server you want to
access. The default port number is 5060.
6.
In the
User Name
field, enter a user name you can use for authentication
to the server. Normally, the user name is the same as the phone number
assigned to the extension you are using.
7.
In the
Password
field, enter the password for the user name.
8.
Press
Enable
to have your panel read the configuration and attempt to
connect to the proxy server.
9.
Press
Save
.
10.
Press
Back
to return to the previous page.
Compatible Devices
The following list describes all SIP-enabled touch panels that are compatible
with the CSG.
The firmware for these panels must be up-to-date to use SIP.
LED Definitions (continued)
Analog
(8 ports)
Off
No analog port is installed in the corresponding port.
Green (solid)
Port is configured for FXS operation and is enabled.
An analog telephone may be connected to this port.
Green
(flashing)
Telephone is ringing.
Green (slow
blinking)
Telephone is in use.
Red (solid)
Port is configured for FXO operation and is enabled.
A telephone line may be connected to this port.
Red (flashing)
Telephone line is ringing.
Red (slow
blinking)
Telephone line is in use.
• MVP-8400i
• NXD-700Vi
• NXD-1000Vi


