background image

Installation

17

6" Color Video Touch Panels

Wiring guidelines

The touch panel requires 12 VDC power to operate properly. The touch panel can use either a 

PS(N)2.8 (if the power is being supplied only to the touch panel) or a PSN6.5 power supply (if the 

power is being routed through the touch panel to power another device). The Central Controller 

supplies power via the AXlink cable or external 12 VDC power supply. The maximum wiring 

distance between the Central Controller and touch panel is determined by power consumption, 

supplied voltage, and the wire gauge used for the cable. The table below lists wire sizes and the 

maximum lengths allowable between the touch panel and Central Controller. The maximum wiring 

lengths for using AXlink power are based on a minimum of 13.5 volts available at the Central 

Controller’s power supply. Refer to the

Specifications

section on page 1 for more information.   

If you install the touch panel farther away from the Central Controller than recommended in the 

Wiring Guidelines @ 610 mA table, connect an external 12 VDC power supply to the panel, as 

shown in FIG. 18 and FIG. 19.

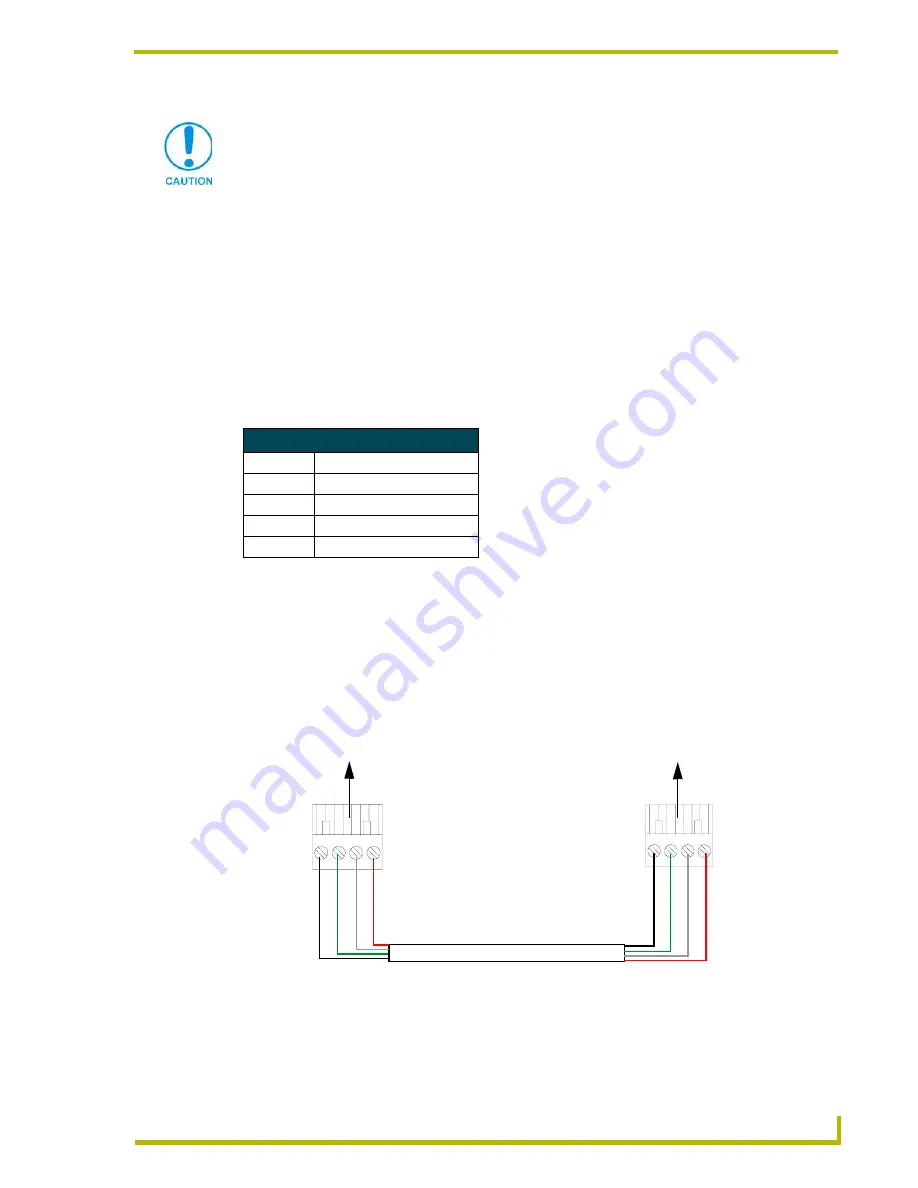
Using the 4-pin AXlink connector for data and power

Connect the Central Controller’s AXlink Phoenix connector to the AXlink connector on the touch 

panel for data and 12 VDC power, as shown in FIG. 18.    

Do not connect power to the touch panel until wiring is complete. If you are using a 
12 VDC power supply, apply power to the touch panel only after installation is 
complete.

Wiring Guidelines @ 610 mA

Wire Size

Maximum Wiring Length

18 AWG

192.41 feet (58.65 m)

20 AWG

121.73 feet (37.10 m)

22 AWG

75.90 feet (23.13 m)

24 AWG

47.84 feet (14.58 m)

FIG. 18  

AXlink connector wiring diagram (direct data and power)

To the Touch Panel’s

To the external Controller device

AXlink/PWR connector

PWR +

AXP

/TX

AX

M

/R

X

GND -

Top view

Top view

PWR +

AX

P/TX

AX

M/RX

GND -

Содержание AC-CV6T

Страница 1: ...instruction manual Touch Panels and Accessories 6 Color Video Touch Panels Firmware version G3 ...

Страница 2: ...e RMA is cancelled will be refused AMX is not responsible for products returned without a valid RMA number AMX Corporation is not liable for any damages caused by its products or for the failure of its products to perform This includes any lost profits lost savings incidental damages or consequential damages AMX Corporation is not liable for any claim made by a third party or by an AMX Dealer for ...

Страница 3: ...reparing captive wires 16 Wiring guidelines 17 Using the 4 pin AXlink connector for data and power 17 Using the 4 pin AXlink for data with external power supply 18 Using a BNC video cable to provide video input 19 Using the DB 9 RS 232 connector for mouse control or data 19 Designing Touch Panel Pages 21 Buttons 21 Activating Edit Mode 22 Setting the Device Base 24 Setting the Device Used 24 Addin...

Страница 4: ...the level code 28 Programming 29 Serial Commands 29 System Send_Commands 31 Video Send_Commands 37 Programming Numbers 39 Shorthand Send_Commands 40 Color Send_Commands 44 Variable Text Send_Commands 46 Shorthand Variable Text Commands 48 Button String Commands 51 Upgrading the Firmware 55 Configuration 55 Downloading the Firmware 55 Replacing the Battery 57 AC CV6T Enclosure Battery Replacement 5...

Страница 5: ...pecifications FIG 1 Wall Mount Color Video Wall Panel views AXD CV6 Specifications AXD CV6 Dimensions HWD AXT CV6 Faceplate 5 37 x 6 79 x 0 30 13 64 cm x 17 25 cm x 0 76 cm CB CV6 Conduit Wallbox with connectors 4 37 x 5 91 x 2 45 11 09 cm x 15 01 cm x 6 22 cm CB CV6 Conduit wallbox without connections 4 37 x 5 91 x 2 09 11 09 cm x 15 01 cm x 5 31 cm Without connections indicates the depth of the ...

Страница 6: ...6 512 kByte Partially user accessible Non volatile via the battery backup volatile when batteries are removed Note 256 kByte is used by firmware and is accessible only to the firmware during normal operation Note 256 kByte is used by the user program and is used by TPD3 designs for buttons pages and everything else not listed in the above Flash param eter This can be cleared using the external ZAP...

Страница 7: ... Environment Indoor operation at temperatures between 0º C 32º F to 50º C 122º F and a humidity range of 5 to 90 RH non condensing Installation Kit 4 pin AXlink data power connector 2 pin PWR connector Drywall clip set 2 drywall clamps and 2 8 2 long screws 4 4 40 machine screws and threaded inserts Enclosure Metal sub plate and bezel with black or white matte finish Detachable magnetic front pane...

Страница 8: ...1 cm x 11 30 cm Weight Enclosure with AXD CV6 Enclosure only 11 49 lbs 5 21 kg 3 75 lbs 1 70 kg Enclosure Metal enclosure and removable front panel bezel with matching colors Dark Grey matte finish FG5924 20 Platinum matte finish FG5924 21 Unfinished Aluminum FG5924 22 Aluminum version of enclosure is unpainted so as to provide easier preparation for custom painting options Rear Connectors All cab...

Страница 9: ...ockouts Leave enough slack in the wiring to accommodate any re positioning of the panel 4 Install the drywall sheetrock before inserting the main AXD unit into the CB CV6 If installing the CB CV6 into an pre existing wall or surface use the following cutout information FIG 4 found online at www amx com using drawing number SP5924 02 INSTALLER LEAVE A GAP BETWEEN THE STUD AND CONDUIT BOX TO ACCOMMO...

Страница 10: ...ceplate A in FIG 5 from the main AXD unit B in FIG 5 by gripping the faceplate and pulling with gentle force 2 Remove any necessary wiring cutouts from the pre installed optional conduit box C in FIG 5 CB CV6 where the AXlink cable is threaded through for connection to the touch panel FIG 5 The snaps located along the side of the conduit wallbox can be snapped off or used to mount the unit to a ha...

Страница 11: ...the magnetic faceplate A in FIG 5 on the main AXD touch panel unit Make sure the faceplate is flush against the housing and it is secure 10 Reconnect the terminal connectors wiring to their respective locations outside the conduit box 11 Reconnect the terminal power connector on the PS power supply and apply power The touch panel beeps when power is applied FIG 5 Wall Mount panel installation conf...

Страница 12: ...on by reconnecting the AXlink connector to the Central Controller Verify that the panel is receiving power and functioning properly to prevent repetition of the installation 7 Disconnect the AXlink connector from the Central Controller until installation is complete 8 Connect the data and power wiring to the rear of the touch panel 9 Insert the main unit into the flat surface mounting until firmly...

Страница 13: ...ON OF 4 40 THREADED INSERTS AT THESE 4 LOCATIONS FRONT BEZEL CUTOUT FRONT BEZEL 4 40 machine screw inserts 4 screws used for mounting to a flat surface provided by installer SECURE UNIT WITH 4 SCREWS SOLID SURFACE PODIUM DESK ETC THREADED INSERTS AT THESE 4 LOCATIONS ONLY WHEN MOUNTING UNIT TO A THESE 4 HOLES ARE REQUIRED SUGGEST INSTALLATION OF 4 40 ONLY IF UNIT IS INSTALLED USING DRYWALL EXPANSI...

Страница 14: ...n the housing and the drywall clip The most important thing to remember when mounting the AXD is that the outer frame Mounting Tabs must be installed flush against the mounting surface 1 Remove the magnetically attached Decor faceplate A in FIG 10 from the main AXD unit B in FIG 10 by gripping the faceplate and pulling with gentle force FIG 9 Screw locations for flat surface mounting of the main A...

Страница 15: ...faces A B Main AXD unit consists of Decor faceplate Install the 2 drywall clips and screws included into the holes Flat surface can include a the touch panel and housing wall podium or other level surface 2 notches are required if the unit is installed in drywall using the 2 provided clips The drywall clip set must be re ordered from AMX if the drywall clip is bent accidentally during an installat...

Страница 16: ... the wall cutout until firmly positioned and flush with the wall 10 Fasten the main AXD unit to the surface using the two 2 drywall clip sets consisting of screws and clips supplied with the enclosure FIG 12 11 Place the magnet faceplate A in FIG 10 onto the main AXD unit B in FIG 10 by gripping the faceplate and placing it on with gentle force 12 Reconnect the AXlink wiring to the Central Control...

Страница 17: ... within the enclosure 2 Confirm that all of the included accessories are present in the box Refer to the Specifications AC CV6T Enclosure table on page 4 for content information 3 Uncoil the cable and thread the non terminated end of the tabletop cable into the base enclosure and then out through the rear opening FIG 13 4 Continue to thread the cable through the strain relief opening until the hea...

Страница 18: ...dge of the heat shrink Heat shrink CLIP FACING UP VERIFY THE DIRECTION AND LOCATION OF THE STRAIN RELIEF The clip must be facing UP on top Once closed it is difficult to re open Grooves align against heat shrink and the flat circular opening faces away from the enclosure Refer to FIG 15 for more information FIG 15 Tabletop cable and strain relief installation 5 inches from tip to base Strain relie...

Страница 19: ...arefully slide in the connected CV6 unit C in FIG 17 into the base enclosure until the CV6 flanges lie flat against the base enclosure Take care in positioning the connector wires into the open space within the base under the CV6 unit FIG 16 Rear views of the CV6 touch panel BNC female video connector DB 9 RS 232 connector CV6 Rear view 2 pin PWR 4 pin AXlink connector connector Verify the connect...

Страница 20: ...s 2 Insert each wire into the appropriate opening on the connector according to the wiring diagrams and connector types described in this section 3 Tighten the screws to secure the wire in the connector Do not tighten the screws excessively doing so may strip the threads and damage the connector For the unpainted Aluminum configuration the AMX logo will be included in the package not attached Afte...

Страница 21: ...er supply Refer to the Specifications section on page 1 for more information If you install the touch panel farther away from the Central Controller than recommended in the Wiring Guidelines 610 mA table connect an external 12 VDC power supply to the panel as shown in FIG 18 and FIG 19 Using the 4 pin AXlink connector for data and power Connect the Central Controller s AXlink Phoenix connector to ...

Страница 22: ...wires 4 Place the PWR wire from the power supply into the open clamp position for PWR on the touch panel AXlink connector FIG 19 AXlink connector wiring diagram using external power source PWR GND Local 12 VDC coming from To the Touch Panel s To the external Controller device AXlink PWR connector power supply the power supply Top view Top view AXP TX AXM RX GND AXP TX AXM RX GND When you connect a...

Страница 23: ...nd For some applications you may need to strap pins 7 request to send and 8 clear to send together depending on the PC FIG 20 BNC cable connection from the AXD CV6 to the video source BNC female connector Rear panel view AXD CV6 BNC male connectors Female video GND Video wire source connector Some installations may require a 90 right angle BNC adapter to accommodate a sharp bend in the video cable...

Страница 24: ...els FIG 21 DB 9 RS 232 connector and power supply wiring diagram Power connector Mouse or PC DB 9 connector Female Male Touch panel DB 9 connector Optional 7 to 8 pin connector 2 RXD 3 TXD 5 GND 2 RXD 3 TXD 5 GND PWR GND 12 VDC power supply ...

Страница 25: ... pages and specify panel communication parameters Button examples include selection buttons information buttons adjustment buttons and operation bars The general button categories are described in the table below General Button Categories Selection buttons Selection buttons appear on touch panel pages and set communica tion parameters Information buttons Information buttons contain serial numbers ...

Страница 26: ...press ENTER after typing an incorrect password you are immediately returned to the previous page General Button Categories Cont Status buttons Status buttons always have a dark fill with light letters and have no functionality except to display information Operation bars Operation bars appear in the place of the Editor bar after selecting a button or page edit operation The operation bar indicates...

Страница 27: ...age and return to the Setup page now the Edit mode 6 Press EXIT again to return to the Main page The EDIT button appears at the top of the page indicating Edit mode is active 7 Press EDIT to open the Edit bar The BUTTON and PAGE options in the Edit bar FIG 25 are used to design and modify button and page settings FIG 23 Setup page FIG 24 Protected Setup page with the active EDITOR button FIG 25 Ma...

Страница 28: ...the number of devices being used by the touch panel 3 Press ENTER to save the value Adding a Page 1 Press PAGE on the Edit bar to open the PAGE menu 2 Press ADD to open the keyboard and enter a name for the new page Page names can be up to 20 characters 3 Press EXIT CHANGE to save close the keyboard and go to the new page Setting the page color 1 Press EDIT to open the Edit bar on the newly create...

Страница 29: ...ecific to the button 6 Press BORDER to open the BUTTON BORDER pages 7 Select a border to set for the button and return to the Button Properties page The BORDER button changes to show the selected border type Setting the channel code The channel button sets the device and button channel codes Channel codes and variable text codes work the same for all button types including joysticks and bargraphs ...

Страница 30: ...YPE menu the FLIP TO PAGE button appears 3 Press the FLIP TO PAGE button FIG 26 to open a list of all the saved touch panel pages If the desired page is not present in the menu check to verify the page has been saved 4 Select the target page for the page flip Setting the button colors for channel off conditions 1 Press any button to open the Button Properties page 2 Press BORDER under CHANNEL OFF ...

Страница 31: ...ther settings 5 Then click the Actions tab to set the communication mode and select which elements of the project file you want to download to the touch panel 6 In the What To Send area select one or more of the available options All Bitmaps All Icons All Fonts 7 Select the mode of communication with the touch panel RS 232 and AXlink Confirm that the correct panel is selected by verifying the ID v...

Страница 32: ...formation Refer to the Setting the button colors for channel off conditions section on page 26 for more information on colors for channel off conditions Setting the level code Level buttons set the device and number codes for the touch panel 1 Press DEV to open a keypad and set the device number 2 Enter 1 2 3 or 4 in the keypad The programming software uses device codes 1 4 to identify the touch p...

Страница 33: ...and contrast always 0 Syntax PAR Example PAR Requests the information SC Sends a serial port send_command within a panel as if sent from Axcess Syntax SC device offset send_command variable text data Variables device offset Device number variable text The variable text number value on the touch panel Example SC 1 TXT 2 TEXT The string is sends the command to put text on a button with a variable te...

Страница 34: ...w are you doing MOUSE Turns on serial mouse or other touch devices Syntax MOUSE mouse type Variables mouse type 00 Mouse cursor Off 01 Microsoft serial mouse cursor On Example MOUSE 01 Turns on Microsoft compatible serial mouse Refer to the MOU section on page 42 for the chart describing the BIT information and definitions RESET Cycles power on the touch panel Syntax RESET Example RESET Cycles the...

Страница 35: ...nd verifies serial communication The CV6 panel must have a page named Main Page for this command to work properly ZAP Clears all mem ory Syntax ZAP Example ZAP Clears all memory and erases all buttons pages drawings and symbols Only use the ZAP command to erase the saved data in the touch panel data cannot be recovered after it is erased System Send_Commands SP Sends data out the serial port with ...

Страница 36: ...red until power down Syntax AKEYP number string Variable number string 0 9999 Example SEND_COMMAND TP AKEYP 1988 Opens the touch panel keypad with 1988 in the display AKEYR Closes opens the touch panel key board pad Syntax AKEYR Example SEND_COMMAND TP AKEYR Closes the keyboard keypad opened using the AKEYB AKEYP or PKEYP commands BAUD Sets the program port baud rate The baud rate can also be set ...

Страница 37: ... s date to February 8 1998 and time to 7 16 p m CURSOR Turns the cursor display On or Off if the touch device has a cursor Syntax CURSOR OFF ON Variables Off 0 and On 1 Example SEND_COMMAND TP CURSOR 0 Turns the cursor display Off DBEEP Gives a double beep output This command only works if the Double Beep value in the Protected Setup page is set to On Syntax DBEEP Example SEND_COMMAND TP DBEEP Dou...

Страница 38: ...Example SEND_COMMAND TP PAGE MAIN PAGE Flips the touch panel to the page named MAIN PAGE PKEYP Displays aster isks for keypad entries Syntax PKEYP number string Variable number string 0 9999 Example SEND_COMMAND TP PKEYP 1988 Displays the touch panel keypad with instead of 1988 PPOF Closes a specific popup page Syntax PPOF page name Variable page name 1 50 ASCII characters Example SEND_COMMAND TP ...

Страница 39: ...vates page tracking Syntax TPAGEOFF Example SEND_COMMAND TP TPAGEOFF Deactivates the page tracking option TPAGEON Activates page tracking See page 36 for a more detailed explanation WAKE Deactivates screen saver mode and resets the sleep timer Syntax WAKE Example SEND_COMMAND TP WAKE Deactivates the touch panel screen saver mode and resets the sleep timer XMRT Sets the new net work communica tion ...

Страница 40: ...2 PAGE TP1_BUFFER CLEAR_BUFFER TP1_BUFFER IF FIND_STRING TP1_BUFFER PPON 1 OR FIND_STRING TP1_BUFFER PPOF 1 SEND_COMMAND TP2 TP1_BUFFER CLEAR_BUFFER TP1_BUFFER IF LENGTH_STRING TP2_BUFFER IF FIND_STRING TP2_BUFFER PAGE 1 TRASH REMOVE_STRING TP2_BUFFER PAGE 1 SEND_COMMAND TP1 PAGE TP2_BUFFER CLEAR_BUFFER TP2_BUFFER IF FIND_STRING TP1_BUFFER PPON 1 OR FIND_STRING TP1_BUFFER PPOF 1 SEND_COMMAND TP1 T...

Страница 41: ...overed after it is erased Video Send_Commands VBR Sets the video sig nal brightness Syntax VBR ASCII setting for Brightness Variables ASCII brightness setting 0 min 255 max Example SEND_COMMAND TP VBR 128 Sets the video brightness to 128 VBW Sets the video to black white or color Syntax VBW ASCII setting for Black White input Variables Black White input setting 0 Color 1 Black and White Example SE...

Страница 42: ...hus causing the video pictures to freeze on our digital hard ware Syntax VFF ASCII video fast forward settings Variables ASCII video settings 0 Normal 1 On 2 Off required for Tanberg s non interlacing equipment Example SEND_COMMAND TP VFF 2 Turns the algorithm Off VHU Sets video hue Syntax VHU ASCII setting for Hue Variables ASCII hue setting 0 min 255 max Example SEND_COMMAND TP VHU 128 Sets vide...

Страница 43: ...a 30 35 Dark Gray 84 86 Cyan 36 41 Black 87 Royal 42 47 Transparent 255 Blue 48 53 Font Styles and Programming Numbers No Font styles No Font styles 1 Extra small 5 Extra large 2 Small 6 Hollow medium 3 Medium 8 Hollow extra large 4 Large 32 255 Variable fonts You must import variable text fonts into a TPDesign3 project file and download the project file containing the fonts to the touch panel The...

Страница 44: ...ecified color This works only if the specified background color is not the same as the current color Syntax CBN variable text address color_number Variables variable text address 1 255 color number See the Colors and Programming Numbers table on page 39 Example SEND_COMMAND TP CBN 2 78 Sets the ON feedback border color to Gray for variable text button 2 CFF Sets the OFF feedback fill color to the ...

Страница 45: ... Sets the popup page title to Audio Page and the color to Purple CTF Sets the OFF feedback text color to the speci fied color This only works if the specified background color is not the same as the current color Syntax CTF variable text address color_number Variables variable text address 1 255 color number See the Colors and Programming Numbers table on page 39 Example SEND_COMMAND TP CTF 1 48 S...

Страница 46: ...ere were several popup pages on Main Page that are active sending the previous command would remove them all from that page PPF Deactivates a popup page on a touch panel page If a page name is empty the current page is used If a pop up page is part of a group the whole group is deactivated Syntax PPF popup page name page name Variables popup page name target popup page name page name target touch ...

Страница 47: ...es in the panel PWD Sets the password for the Page Flip on the touch panel Syntax PWD page flip password Variable page flip password 0 9999 Example SEND_COMMAND TP PWD 1988 Sets the page flip password to 1988 RDW Redraws the cur rent screen Syntax RDW Example SEND_COMMAND TP RDW Sends a message to the touch panel to redraw the screen SSL Changes the Sleep string sent to the Controller when the tou...

Страница 48: ...the Central Controller Color Send_Commands CALL Sets the colors for a variable text but ton You must use the variable text assignments to change button colors see the Colors and Programming Numbers table on page 39 Syntax CALL variable text address data Variables variable text address 1 255 data 6 color number series for FILL COLOR ON FILL COLOR OFF BORDER COLOR ON BORDER COLOR OFF TEXT COLOR ON T...

Страница 49: ...fill color to the specified color Syntax CFOFF variable text address color_number Variables variable text address 1 255 color number See the Colors and Programming Numbers table on page 39 Example SEND_COMMAND TP CFOFF1 72 Sets the OFF feedback fill color to White for variable text button 1 CFON Sets the ON feed back fill color to the specified color Syntax CFON variable text address color_number ...

Страница 50: ... Variables variable text address 1 255 color number See the Colors and Programming Numbers table on page 39 Example SEND_COMMAND TP CTON1 72 Sets the ON feedback text color to White for variable text button 1 Variable Text Send_Commands B Sets a specific button to On or Off Syntax B variable text address ON OFF Variables variable text address 1 255 ON 0 OFF 1 Example SEND_COMMAND TP B 128 1 Sets b...

Страница 51: ...ium FONT Changes the font size or style of the text in a spe cific button Syntax FONT variable text address font size Variables Variable text address the number of the variable text button 1 255 Font size style the size or style of the font 1 255 See the Font Styles and Programming Numbers table on page 39 for more information Example SEND_COMMAND TP FONT1 6 Changes the font on the variable text b...

Страница 52: ...s variable text address 1 255 new button text Enter button text to appear on button Example SEND_COMMAND TP TEXT2 VCR PLAY Sets the VCR and PLAY text on variable button 2 The character places VCR on a text line above PLAY on the button Shorthand Variable Text Commands BMP Adds a bitmap file to a button Bitmap files are imported into TPDesign3 the numbers are assigned by the touch panel during the ...

Страница 53: ... on state fill color C2 off state fill color C3 on state border color C4 off state border color C5 on state text color C6 off state text color Example SEND_COMMAND TP BMF 255 T POWER ON B 4 C1 72 Sets the text on button 255 to POWER ON appears on two lines adds a triple line bor der and sets the On state color to White ENA Enables disables buttons based on the variable text channel Syntax ENA vari...

Страница 54: ...iable text address 1 255 icon file number 1 255 Example SEND_COMMAND TP ICO 16 12 Adds icon 12 on button 16 Setting the icon value to 0 clears the appearance of the icon JUS Sets the text alignment on a button Syntax JUS variable text address text alignment Variables variable text address 1 255 text alignment 1 9 as shown in the following alignment chart Example SEND_COMMAND TP JUS 9 5 Centers the...

Страница 55: ...on the button Example SEND_COMMAND TP TXT 2 VCR PLAY Sets the VCR and PLAY text on variable button 2 The character places VCR on a text line above PLAY on the button UNI Adds Unicode text to a button Characters for Middle Eastern languages such as Arabic are not supported within the Unicode fonts because they are bi directional Buttons with Unicode fonts can only be cre ated and edited using TPDes...

Страница 56: ...t actually puts a wavepack to sleep Syntax SL Example SL Activates sleep mode on a wireless touch panel ViewPoint or other panel using a SmartPack WavePack SP Sends data out through the serial port of the source panel to a destina tion panel Syntax SP data Variables data Serial string command Examples SP CALIBRATE Sends the Calibrate command to another panel through the Serial Port SP SC 1 TXT 1 T...

Страница 57: ...ch panel to change its Main page to the color white Syntax WORKING Example CV6 panel serial port is connected to TPI program port CV6 panel wants to verify communication between the TPI and itself CV6 panel issues WORKING to its serial port It will be sent as SP WORKING TPI receives the command and responds to the CV6 panel by telling it to set the Main page background to white Thus communication ...

Страница 58: ...Programming 54 6 Color Video Touch Panels ...

Страница 59: ...BAUD RATE selections match the setting on the Controller 4 Press F10 to save the communication settings and exit the Configure screen Downloading the Firmware 1 Press F5 to acquire the list of online programmable devices 2 Using the up down arrow keys select your firmware version listed in the Firmware column of the screen and press ENTER 3 Using the Tab key switch to the ONLINE MASTERS list and s...

Страница 60: ...ch Panels Firmware can be downloaded to multiple device numbers automatically If multiple devices are selected the bottom half of the loading bar indicates the percentage complete for the selected devices 7 Press F10 to exit the SoftROM program ...

Страница 61: ...e the mounting blocks B in FIG 17 on page 15 from the opening below both sides of the faceplate 4 Remove the faceplate bezel from off the base enclosure 5 Grip the CV6 unit from within the enclosure and carefully pull outward until the internal connectors are exposed 6 While angling the front of the CV6 unit upwards disconnect the AXlink and BNC connectors 7 Place the touch panel LCD facedown onto...

Страница 62: ... located along the sides of the housing Refer to FIG 6 on page 8 for more information From a plasterboard drywall surface by carefully unscrewing the two screws from the drywall clips Once these drywall clips are separated from their screws the drywall clip set must be re order from AMX before the unit can be mounted to this type of surface again Refer to FIG 10 on page 11 for more information 3 P...

Страница 63: ...Replacing the Battery 59 6 Color Video Touch Panels ...

Страница 64: ...iness as Panja Inc ARGENTINA AUSTRALIA BELGIUM BRAZIL CANADA CHINA ENGLAND FRANCE GERMANY GREECE HONG KONG INDIA INDONESIA ITALY JAPAN LEBANON MALAYSIA MEXICO NETHERLANDS NEW ZEALAND PHILIPPINES PORTUGAL RUSSIA SINGAPORE SPAIN SWITZERLAND THAILAND TURKEY USA ATLANTA BOSTON CHICAGO CLEVELAND DALLAS DENVER INDIANAPOLIS LOS ANGELES MINNEAPOLIS PHILADELPHIA PHOENIX PORTLAND SPOKANE TAMPA 3000 RESEARCH...

Отзывы: