background image

16

EN

  Please ensure that there is sufficient corrosion protection for the boreholes. 
  Utilisez pour la fixation 4 vis M6 x 15 ou quatre vis à tôle 6 x 15 et 4 

  rondelles éventail M6. Veillez à une protection suffisante contre la corrosion,
  ébavurez les passages de câbles et utilisez des passe-fils.

  Deburr the cable breakthrough and use cable grommets.
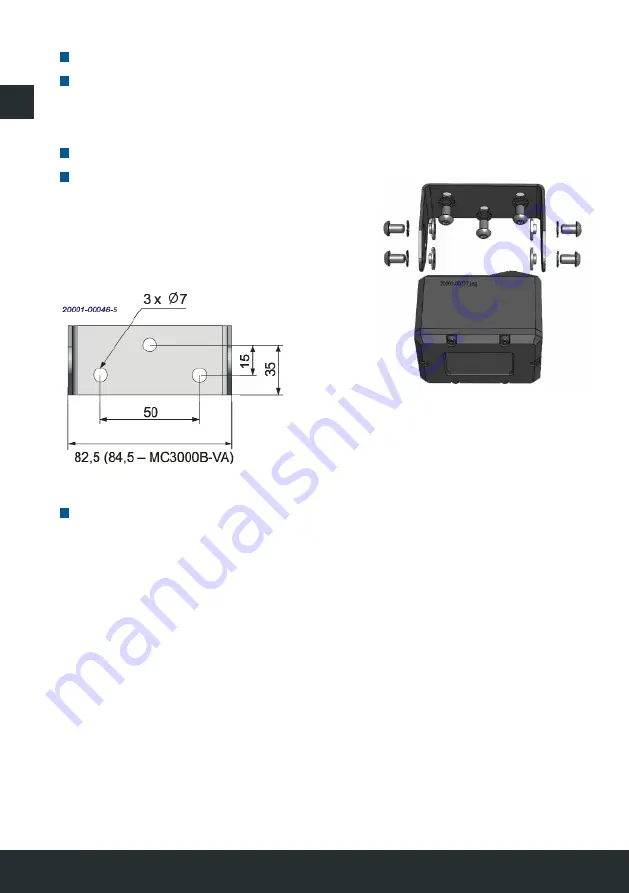
  Insert the camera into the bracket. 

Caution: 

The label is located on the bottom of the 
camera.

  Fasten the camera on the mounting bracket with 4 screws M6 x 10, tooth 

  washers M6 and insulating washers M6. Do not tighten the screws beyond 

  finger-tight. The camera will be adjusted later.

3.2  Electrical connection

Connect the MC3000B/-VA to a camera input of a Motec control unit or Motec 
monitor with the appropriate connection cables. Follow the instructions in the 
operating manual of the instrument. For screwed plug connections, tighten the 
thread tight enough to ensure the plug will not leak, but not enough to overtighten 
or even destroy the screwed plug connection. If you use a wrench or some other 
tool, exercise due caution. Seal the cable connections properly with the accom-

Содержание Motec MC3000B

Страница 1: ...00B VA Bedienungs und Montageanleitung Installation and operating instructions Notice de montage et d utilisation 75 82 5 58 5 55 35 61 72 5 89 8 82 5 50 25 15 3x 7 ZM MC3000B Heavy Duty Camera Soluti...

Страница 2: ...2...

Страница 3: ...e Produkte mit gr ter Sorgfalt Sollten Sie Fragen zum Produkt zur Inbetriebnahme oder Bedienung haben oder sollte das Produkt nicht Ihren Erwartungen entsprechen sprechen Sie uns jederzeit gerne an Bi...

Страница 4: ...itenden Pro duktdokumentation Eine EG Konformit tserkl rung stellen wir Ihnen gerne auf Anfrage separat zur Verf gung Bei Ver nderungen des Ger tes ist die Einhal tung der Konformit t nicht mehr siche...

Страница 5: ...nur von einer Fachkraft nach den Angaben dieser Bedienungsanleitung erfolgen Die Ger te d rfen nur in Betrieb gesetzt werden wenn sich der Anwender ber die aus der Benutzung resultierenden Risiken und...

Страница 6: ...lation und der Betrieb des Ger tes k nnen nicht berwacht werden Daher ist der Anwen der selbst f r die korrekte Benutzung des Produktes verantwortlich Die g ltigen Hersteller und Sicherheitsangaben de...

Страница 7: ...g erfolgen 3 1 Montage Befestigen sie den Montageb gel so am Fahrzeug dass der Fahrer Bedie ner des Fahrzeugs den gew nschten Arbeitsbereich einsehen kann Bei der berwachung des Fahrzeugr ckraums soll...

Страница 8: ...en Sie die Kamera am Montageb gel mit je 4 Schrauben M6 x 10 MC3000B VA M6 x15 Zahnscheiben M6 und Isolierscheiben M6 an Zie hen Sie die Schrauben nicht fest an die Kamera wird sp ter noch justiert 3...

Страница 9: ...tellung um siehe Bedienungsanleitung Monitor Anschlussbox Richten Sie die Kamera so aus dass das vorgeschriebene Sichtfeld auf dem Monitor angezeigt wird Ziehen Sie die Befestigungsschrauben an der Ka...

Страница 10: ...e teilweise gesetzlichen Vorgaben un terliegen In jedem Fall sind die Angaben zum Produkt mit genauer Bezeichnung und Seriennummer relevant f r die R ckverfolgbarkeit der Produkte sowie f r eventuelle...

Страница 11: ...ure our products with the greatest possible care If you have any questions with re gard to the product putting it into service or its operations or should the product not meet your expectations please...

Страница 12: ...to provide you with a separate EC Declaration of Con formity upon request If modifications are made to the device compliance with the requirements of conformity is no longer ensured and the warranty...

Страница 13: ...geable specialist in conformity with the instructions in these operating instructions The devices must only be placed in operation if the user is aware of the risks and dangers resulting from the use...

Страница 14: ...vice cannot be monitored The user is therefore responsible for ensuring correct use of the products Compliance with the applicable manufacturer s specifications and safety instructions for the machine...

Страница 15: ...quired working area To monitor the area at the rear of the vehicle an installation position in the upper part of the vehicle should be selected if possible Before beginning any mechanical tasks make c...

Страница 16: ...e mounting bracket with 4 screws M6 x 10 tooth washers M6 and insulating washers M6 Do not tighten the screws beyond finger tight The camera will be adjusted later 3 2 Electrical connection Connect th...

Страница 17: ...n the camera so that the mandatory field of view is displayed on the monitor Tighten the fastening screws on the camera completely Seal any cable breakthroughs and check cables that were laid to ensur...

Страница 18: ...the information identifying the product with a precise designation and serial number is relevant for tracking products and in the event of claims under the warranty 4 2 Scope of delivery Designation...

Страница 19: ...avec le plus grand soin Si vous avez des questions concernant le produit sa mise en service ou son utilisation ou si le produit ne r pond pas vos attentes n h sitez pas nous contacter Veuillez lire at...

Страница 20: ...ous ferons un plaisir de vous faire parvenir s par ment sur demande une d claration de conformit CE En cas de modifications de l appareil la conformit n est plus assur e la garantiedevient caduque En...

Страница 21: ...sonne qualifi e en respectant les indications de la pr sente notice d utilisation Les appareils ne doivent tre mis en service que si l utilisateur est conscient des risques et dangers r sultant de leu...

Страница 22: ...ntr l s et non homologu s ainsi qu l installation et au fonctionnement de l appareil C est pourquoi l utilisateur est seul responsable de l utilisation correcte du produit Il faut imp rativement obser...

Страница 23: ...tage au v hicule de fa on ce que le conducteur l utilisateur du v hicule puisse voir la zone souhait e En cas de surveillance de l espace arri re du v hicule il convient de choisir la position de mont...

Страница 24: ...0 MC3000B VA M6 x15 autant de rondelles ventail M6 et de rondelles isolantes M6 Ne serrez pas les vis il faudra encore ajuster la cam ra plus tard 3 2 Branchement lectrique Raccordez la MC3000B VA une...

Страница 25: ...iteur Bo tier de raccordement Orientez la cam ra de telle sorte que le champ de vision pr conis apparaisse sur le moniteur Serrez pr sent les vis de fixation sur la cam ra R alisez l tanch it des trav...

Страница 26: ...rfois prescrits par la loi Dans tous les cas les donn es concernant le produit d signation exacte et num ro de s rie sont n cessaires pour la tra abilit des produits et les ventuels recours la garanti...

Страница 27: ...131...

Страница 28: ...berweyerer Stra e 21 65589 Hadamar GERMANY Phone 49 6433 9145 0 motec info ametek com www motec cameras com Copyright 2020 by Motec GmbH Art No 103 0000 175 BA MC3000B VA 09 2020 Subject to change wit...

Отзывы: