background image

18

19

RANGEFINDER

Using the Smart Range 

Finder will allow you to es-

timate the distance to your 

target, as long as you have 

reasonable knowledge of 

the size of your target.

NOTE

To have this feature 

enabled you must acti-

vate Advance Mode set-

tings.

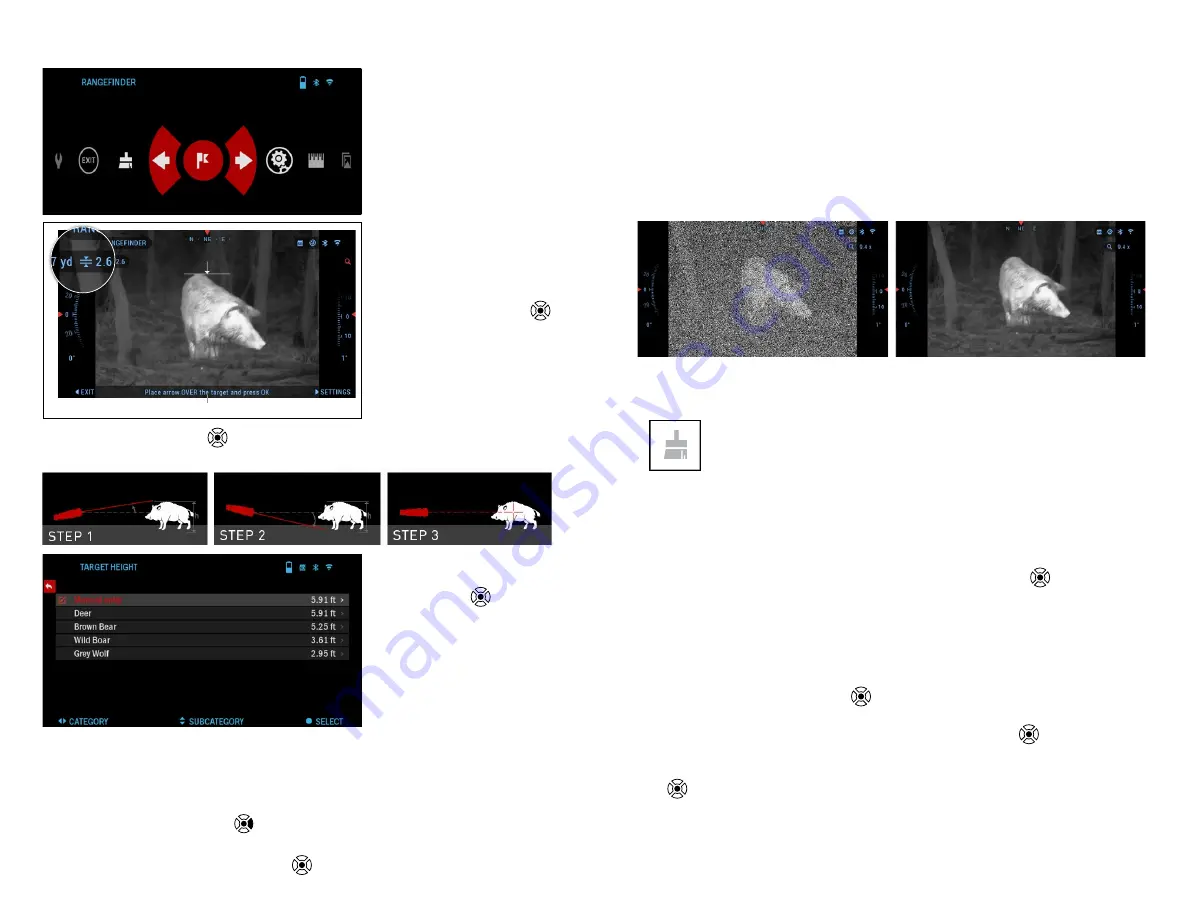
RANGEFINDER 

Select the Flag Icon from 

the Shortcut Carousel. 
Pressing the OK button 


will take you to the Main 

Screen of the Rangefinder 

feature.

To measure the distance, 

follow the next steps:

1.  Put the arrow-mark on 

the top of the target and 

press the OK button 

, wait for the monocular to take the readings (it will 

take a number of readings so try to keep your hand steady);

2.  Put the arrow-mark 

under the target and press 
the OK button 

;

3.  If satisfied with the 

value that was generated, 

press the Function button 

to go back to the Home-

screen or repeat steps 1 

and 2, if necessary.

NOTE

During the measurement process, you can zoom in and out using the 

Scroll Wheel.

If the Target Height is incorrect you can change it:
•  press the RIGHT button 

 to enter the Menu;

•  choose one of the presets or input the height manually;
•  accept the height with OK button 

 and go back to the Main Screen.

HOW TO PERFORM A NUC

NUC’ing helps to improve the image quality when the image is degraded 

by various environmental factors. There are multiple NUC tables that span 

the full operating temperature range, and the camera automatically selects 

the optimum table based on its temperature.

You can set the system to perform a NUC automatically at a predefined 

time interval. Or, you can turn the automatic NUC off and NUC the system 

manually, when required. Also, you can use the NUC shortcut from the Home 

Screen by pressing the Power button, provided that you activated this short-

cut in the system settings.

Example: 

Change of temperature, continuous viewing of a particular warm 

object, and movement from one environment to another all may cause image 

degradation.

To clean up the image you will need to select NUC from the 

Shortcut Carousel after you select to NUC the system. The mon-

ocular will perform the required calibration improving the visual 

quality of the image.

PIXEL CORRECTION PROCEDURE

Pixel Correction Procedure is intended to correct “neutral” pixels that are 

visible in the FOV, but are not responding to the changing environment or 

scenery. They may be white or black and remain static and or nonresponsive. 

1. Enter the Shortcut Carousel by pressing the OK button 

.

2. Select System Settings.

3. Select Thermal Category.

4. Select Pixel Correction Subcategory.

5. Select Manual Correction.

6. You should see a targeting reticle, use the key pad and Scroll Wheel to 

move the reticle over the neutral pixel. If it is hard to target the neutral 
pixel, press the OK button 

 and select Zoom. Use the Scroll Wheel 

to zoom in and out, on to the neutral pixel in order to isolate it. Once you 
have isolated the neutral pixel, press the OK button 

 to escape from 

the zoom function.

7. Once the reticle is positioned over the neutral pixel, press the OK button 

 and select Save. This should correct the pixel.

NOTE

If after you have done the procedure outlined above and the neutral 

pixel has not been corrected. Try the process on a pixel directly adjacent 

to the neutral pixel in order to make a uniformed correction in the FOV.

HELP INFORMATION

Содержание ATN OTS 4T Series

Страница 1: ...ATN OTS 4T Series THERMAL SMART HD MONOCULAR M A N UA L AMERICAN TECHNOLOGIES NETWORK CORP ...

Страница 2: ... SD and USB C ports 7 Firmware update 8 ON OFF 9 Using your Keypad and Scroll Wheel 9 Focusing 9 Mounting on a Tripod 10 Compass calibration 10 INTERFACE 11 Homescreen 11 Main operations 12 Modes 13 Shortcut Carousel 13 Using System Settings 14 FUNCTIONS 17 Photo Mode 17 Video Recording 17 Rangefinder 18 How to perform a NUC 19 Pixel Correction Procedure 19 SYSTEM SETTINGS 20 Thermal 20 Photo Vide...

Страница 3: ...ily or on social media This classic tool is also ergonomically designed and includes a hand strap The control keypad is simple to use and easily manipulated with one hand The ATN OTS 4T Smart thermal monoculars is the optic you wanted and have waited for Whether it is for search and rescue efforts or for game recov ery these thermal vision monoculars come with more features than you will know what...

Страница 4: ...equipped with a microSD Card and USB type C ports You can find them under the rubber caps on the right side of the device we marked the caps with appropriate icons To open the rubber port cover gently lift the rubber cover and move it out of the way NOTE Make sure that the device is turned off before inserting the formatted microSD Card into its assigned port 1 Always format a new microSD card bef...

Страница 5: ...mode 7 After completing it will automatically restart 8 Motion Sensing platform will be configured when first turned on 9 Once the Firmware update completes please do a factory reset before using the product 10 Please delete the Firmware file off of the microSD card after the process is complete Or the system will try to update the Firmware every time you turn the monocular on NOTE If the device d...

Страница 6: ...G ZOOM LEVEL DISTANCE ROLL SCALE DETAILED ROLL VALUE PITCH SCALE DETAILED PITCH VALUE E COMPASS STATUS BAR Battery SD Card Bluetooth Wi Fi SCALES The E Compass Scale shows yaw angle based on e Magnetometer data Roll Scale shows the monoculars cant based on internal 3D Gyroscope Pitch Scale shows monoculars inclination based on internal 3D Gyro scope STATUS BAR Displays information about the curren...

Страница 7: ...DEO RECORDING By pressing the RIGHT button you will be able to RECORD VIDEO Press the RIGHT button again to stop Video Recording NOTE Recording will automatically stop when the memory card is full or the battery is out of power SHORTCUT CAROUSEL Pressing down on the OK button opens and closes the Shortcut menu MODES The OTS 4T has 2 modes of ope ration basic and advanced Basic Mode has the followi...

Страница 8: ...icon with RIGHT or LEFT buttons Push the OK button to enter the menu The System Settings consists of a Tab Bar at the top of the screen list of subcategories in the center and Help Information at the bottom TAB BAR WITH CATEGORIES SUBCATEGORY VALUE SUB CATEGORIES HELP INFORMATION EXIT BUTTON On the left side of the Tab Bar you will find the Exit with arrow icon Select ing Exit and pressing the OK ...

Страница 9: ...les will be stored on the mi croSD card PHOTOS Allows you to take one photo at a time VIDEO RECORDING NOTE You must have a mic roSD card inserted in the device for these features to work All files will be stored on the microSD card Recorded videos can be found in the Gallery of the device While recording the Counter widget appears In order to Start record ing video While on the Homescreen Press th...

Страница 10: ... NUC off and NUC the system manually when required Also you can use the NUC shortcut from the Home Screen by pressing the Power button provided that you activated this short cut in the system settings Example Change of temperature continuous viewing of a particular warm object and movement from one environment to another all may cause image degradation To clean up the image you will need to select...

Страница 11: ...ed SLEEP MODE Sleep Mode allows you to switch the mode ON OFF Hibernation Time can be 1 60 min SETTINGS UNITS can be Metric or Standard system DATA AND TIME Clock Source allows you to choose differ ent types of source to improve the accuracy Manual WiFi Date Format can be YYYY MM DD MM DD YYYY DD MM YYYY Time Format form of stating the time 24 hour or 12 hour Date enter the date Time enter the tim...

Страница 12: ...visi ble red laser is used as a visual reference point for zeroing Use the ar row keys on the keypad to move the reticle to the correct position Once the box area of the ABL reticle is cen tered around the red la ser press the OK button to confirm the reticle correction Exit the menu and return to the Homescreen To range a target press and release the Func tion button The ABL ret icle will instant...

Страница 13: ...nd customary manner b subjected to misuse c subjected to alterations mod ifications or repairs by the Customer or by any party other than ATN without prior written consent of ATN d special order or close out merchandise or merchandise sold as is by either ATN or the ATN dealer or e merchandise that has been discontinued by the manufacturer and either parts or replace ment units are not available d...

Страница 14: ...nsible for improper postage or missing or damaged mer chandise during shipment When sending product back please clearly mark the RMA on the outside of the shipping box Please include a letter that indicates your RMA Name Return Address reason for service return Contact information such as valid telephone numbers and or e mail address and proof of purchases that will help us to establish the valid ...

Страница 15: ... Corporation For customer service and technical support please contact American Technologies Network Corp 2400 NW 95 Ave Doral FL 33172 phone 800 910 2862 650 989 5100 e mail service atncorp com www atncorp com ...

Отзывы: