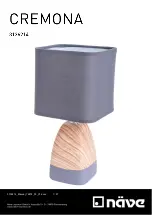
ADJ Products, LLC - www.adj.com - LED Pixel 4C User Manual Page 11
ADJ Products, LLC - www.adj.com - LED Pixel 4C User Manual Page 12
LED Pixel 4C ADJ LED RC Operation
The
ADJ LED RC
infrared remote
(sold seperately) has many dif-
fernet functions and gives you complete control of your LED Pixel 4C.
To control the your desired fixture you must aim the controller at the
front of the fixture and be no more the 30 feet away. To use the ADJ
LED RC you must first activate the fixtures infrared receiver, to acti-
vate the receiver please see the instructions on page 10.
BLACKOUT
-
Pressing this button will blackout the fixture.
AUTO RUN -
Press this button to switch between the Color Change
mode and Color Fade mode. Use the “+” and “-” buttons to scroll
through the 24 programs of each mode. You can control the speed of
the modes by pressing the SPEED button first and then pressing the
“+” and “-” buttons.
PROGRAM SELECTION
-
This button activates static color mode
and lets you select which tube to control. See Static Color mode for
information on selecting the LED Pixel tube. Use the “+” and “-” but-
tons to scroll through the 7 static colors and to scroll through the LED
Pixel tubes. Press the Flash button to activate strobing and use the
“+” and “-” buttons to adjust the strobe speed.
SOUND ACTIVE
-
This button activates sound active mode. Use
the “+” and “-” buttons to scroll through the 24 sound active modes.
Press this button again to switch to sound sensitivity adjustment and
use the “+” and “-” buttons to adjust the sound sensitivity.
FLASH
-
This button will activate the strobe effect. You can control
the flash rate by pressing the “+” and “-” buttons. Press this button
again to exit strobe mode.
SPEED
-
Press this button to activate and use the “+” & “-” buttons
to adjust the speed of color fade and color change mode, color fade
mode, color change mode, and the sound sensitivity level.
DMX MODE -
This button will let you select which DMX mode you
want to use. Use the “+” and “-” buttons to scroll through the DMX
channel modes. Some fixtures will come with different DMX channel
modes. This button will switch between the different modes. Please
see pages 14-20 for DMX modes, values, and traits.
Master-Slave Operation:
This function will allows you to link units together to run in a Master-Slave
configuration. In a Master-Slave configuration one unit will act as the
controlling unit and the others will react and copy the controlling units
operation. Any unit can act as a Master or as a Slave however, only one
unit can be programmed to act as the “Master.”
Master-Slave Connections and Settings:
1. Daisy chain your units via the XLR connector on the rear of the unit.
Use standard XLR data cables to link your units together. Remember
that the Male XLR connector is the input and the Female XLR con-
nector is the ouput. The first unit in the chain (master) will use the
female XLR connector only. The last unit in the chain will use the
male XLR connector only.
2. Connect the first “Slave” unit to the “Master.” Set the “Slave” to any
DMX Channel mode.
3. Set the “Master” unit to your desired mode of operation. The “Slave”
unit will now follow the “Master”.
LED Pixel 4C Operating Instructions