background image


24

4-3. Setup Network Connections     

This chapter walks you to set up the network for the remote access.   

Follow up the steps to set up the Network configuration. 

1. 

Click 

  icon to set up network configuration.


2. 

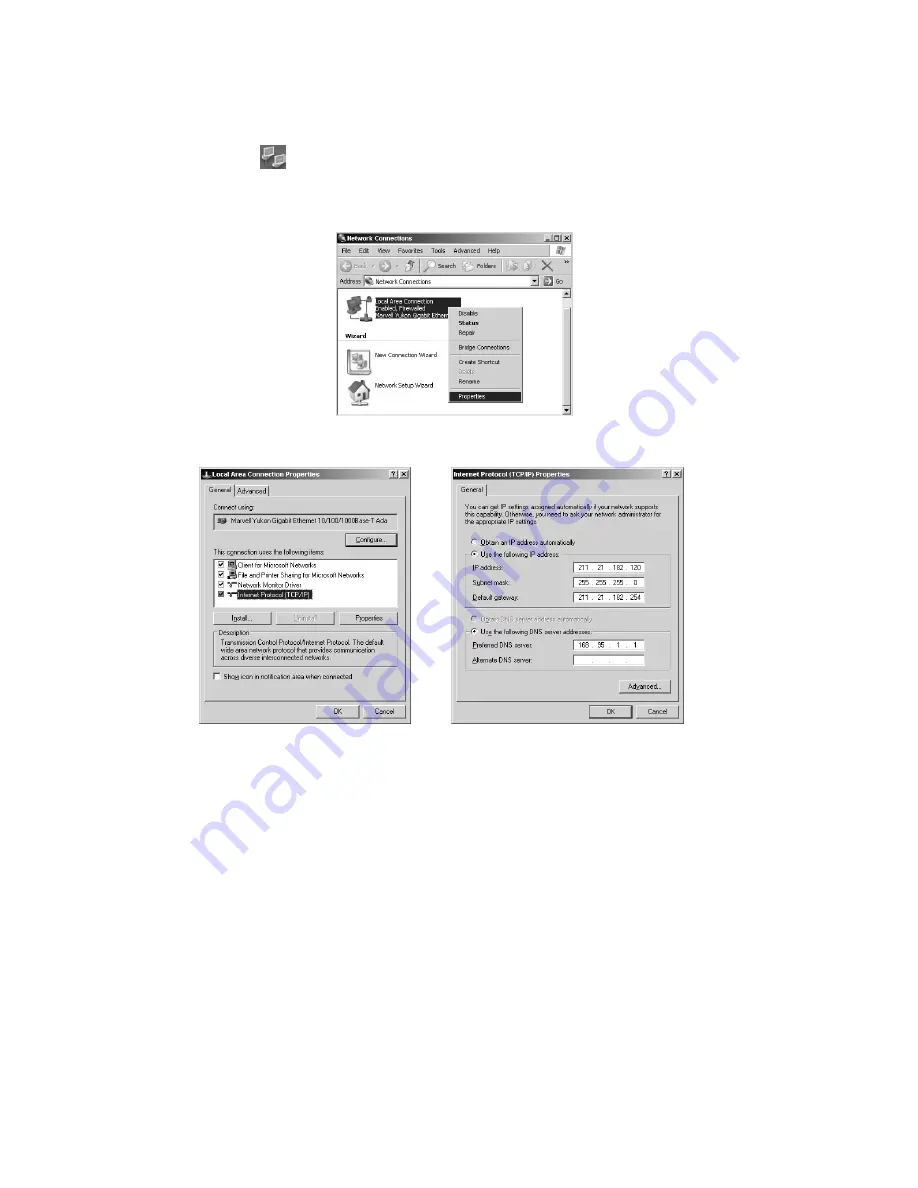
Move the mouse to the icon as the block picture, click right of Mouse and then select 

“ 

Properties

 “ item, as below.


3. 

Select “ 

Internet Protocol (TCP/IP)

 “ item and then click “ 

Properties

 “, as Fig 4-3.1


4. 

Select “ 

Using the following IP address

 “ item and entry the IP address of yours, as Fig 4-3.2.


Fig 4-3.1                                                                            Fig 4-3.2 

Содержание DigiCap II

Страница 1: ...1...

Страница 2: ...stall Memory module 14 3 5 Install HDD 15 4 System Configuration 17 4 1 Display Properties 19 4 2 Disk Management 21 4 3 Setup Network Connections 24 4 4 Setup Shared Folders 25 5 The panel descriptio...

Страница 3: ...7 15 Setting Up a Software Motion DetectionArea 85 7 16 How to Trigger Speed Dome Camera 86 7 17 Creating anAlarm Wave File 87 7 18 Using TV Out For Call Monitor Site 88 7 19 Back up the video clips 9...

Страница 4: ...ly 116 11 1 The PDAView Installation 116 11 2 The PDAView Pro Tool Menu Bar 117 11 3 Connecting PDAView Pro to DigiCap PRO XPDVR site 118 11 4 Using the Site Book 118 12 UsingAnyView Pro For Modem to...

Страница 5: ...may cause undesired operation FCC WARNING This equipment has been tested and found to comply with the limits for a Class B digital device pursuant to Part 15 of the FCC Rules These limits are designed...

Страница 6: ...ogram CD and Nero CD 2 x SATA disk cable and 1 x 80 conductor IDE cable Remote controller and battery 1 x 16 channel Audio input cable and 1 x A V cable Digi 1600XP A only 1 x 16 channel video input c...

Страница 7: ...ply case Before handing components to avoid damaging them due to static electricity 3 Hold components by the edges to avoid touching the ICs on them 4 Whenever you uninstall any components place it on...

Страница 8: ...pcs with low resolution 360 240 video recording 1 5 G RAM DDR 400 512 MB RAM x 3 pcs with low resolution 720 480 video recording 7200 RPM hard drive speed or better recommended Speakers are required f...

Страница 9: ...2 Press the load lever with your thumb A and remove it to the left B until it is released from the retention tab Fig 3 3 2 3 Lift the load lever in the direction of arrow to a 135 degree angle Fig 3...

Страница 10: ...hing any component 2 DO NOT force the CPU into the socket to prevent bending the connectors on the socket and damage the CPU Fig 3 3 7 Fig 3 3 8 3 3 2 Installing the heat sink and fan 1 Place the heat...

Страница 11: ...wing figure shows the location of DDR DIMM sockets and steps to install a DIMM 1 Unlock a DIMM socket by pressing the retaining clips outward 2 Align a DIMM on the socket such that the notch on the DI...

Страница 12: ...D device as Master Check the label on the IDE device for the jumper setting 2 Mount the drives in the chassis Please refer to Fig 3 5 1 Please install 1st 4th into chassis 1 5th 6th on chassis 2 Allow...

Страница 13: ...16 Fig 3 5 2 Fig 3 5 3 Fig 3 5 4 Fig 3 5 5...

Страница 14: ...otherwise using the O S will be ILLEGALITY 2 You MUST obey the rules of Microsoft to process the license of Embedded XP 3 To avoid the virus problem please remove the LAN cable and reboot DVR system w...

Страница 15: ...Setup Shared Folders Allows you to share the right of folders for TCP IP user Adjust Volume Control Allows you adjust the sound volume Save System Setting Allows you to save the configuration of DVR s...

Страница 16: ...save the DVR configuration You want to change to use dual monitors please following the steps to configure the setting of VGA again a Connect two monitors on the DVR before you start set up the VGA c...

Страница 17: ...20 Fig 4 1 3 Fig 4 1 4...

Страница 18: ...Follow up the steps to format Hard disk 1 Click icon to format HDD and then it will show picture as below 2 Move the mouse to new HDD click right of Mouse and then select New partition item 3 Select N...

Страница 19: ...ard 7 Move the mouse to new HDD click right of Mouse and then select New Logical Drive item as below 8 Click Next to continue 9 Select Logical drive partition type and then clicks Next to continue as...

Страница 20: ...Select Format this partition with the following settings item and then click Next to continue as below 12 Click Finish to complete hard disk partition process 13 Repeat Step 1 12 to format another Har...

Страница 21: ...tion 1 Click icon to set up network configuration 2 Move the mouse to the icon as the block picture click right of Mouse and then select Properties item as below 3 Select Internet Protocol TCP IP item...

Страница 22: ...em folder for network user 2 Select File New and File Share item as below 3 Click Browse to search folder to share and then click Next to continue as Fig 4 4 1 4 Select Proclips folder and click OK fo...

Страница 23: ...26 Fig 4 4 1 Fig 4 4 2 Fig 4 4 3 Fig 4 4 4...

Страница 24: ...uch as Modem 6 Panic button port Connect to push button for emergency call For Dry contact input only 7 USB port Connect to USB device such as USB external storage device 8 LAN port For TCP IP connect...

Страница 25: ...elay output 21 TV out 1 RCA Display pop up 1 16 camera on TV when camera is triggered automatically For Digi 3200Pro only 22 Audio input 2 1 16 audio input For Digi 1600XP A and Digi 800XP A only 23 T...

Страница 26: ...Press key to divide the window into 8 split screens Press key to divide the window into 9 split screens Press 1 16 key to divide the window into 16 split screens Camera 1 16 Press 17 32 key to divide...

Страница 27: ...ress Login Out to login logout of DigiCap II DVR Press Cancel to close the function Press Mute to stop the sound alarm when camera is triggered Press key to play back all videos Press key once to paus...

Страница 28: ...select Press key to increases the playback frame rate of video file which you select Press Pre key to jumps to the previous video which you select Press Next key to jumps to the next video which you...

Страница 29: ...have similarly of chapter 5 2 Right Near Panel Playback multi videos file If you want to playback the single video clip press M Play key and then select the function key of playback Default is M Play...

Страница 30: ...n S1 S4 For ID address setting the table of ID address as below 2 It will show the ID address on the LED of front panel after your setting Dipswitch The default ID address is 0 It does not need to cha...

Страница 31: ...applications Setup Video Parameters EzSetup Allows you set up system configuration Please refer chapter 6 2 Surveillance Server DigiCap XP DigiCap PRO series Allow you to record and view cameras It al...

Страница 32: ...DVR DVR via IE browser The detail setting please refer Chapter 10 Remote Server EzRServer Allows remote client to control the DigiCap PRO XP DVR via EzRClient program Allow the user to set up the par...

Страница 33: ...icon from main screen and follow the instructions as below Fig 6 2 1A Fig 6 2 2A Fig 6 2 1B Fig 6 2 2B Digi 3200Pro Digi 1600Pro System Setup Use mouse to double click on the device to modify its came...

Страница 34: ...352 x 240 NTSC 704 x 576 704 x 288 and 352 x 288 PAL Capture audio will enable cameras with microphones to record sound Each device driver can select one channel audio recording from Recording camera...

Страница 35: ...instructions below to set up audio recording for single camera 1 Select your sound card from the Audio device of drop down menu as the window above 2 Select the port you plugged the audio into at the...

Страница 36: ...ecording There are four options 720 x 756 720 x 480 360 x 288 and 360 x 240 Compress Default is MPEG 4 Compress mode Default is Microsoft format We will provide the other compress mode later Video qua...

Страница 37: ...stem The default settings are as follows Login name root Password 123 Enter these and then click OK to login To logout click the same icon and confirm Click to modify system time clock Click in the bo...

Страница 38: ...is function automatically registers DigiCap PRO XP DVR from the current IP address using IP Identify Server provided by I View Communication Inc To solve dynamic IP address problems please consult Cha...

Страница 39: ...e limitation connection period of a remote client Set up E Map you can create a map for setting the location of cameras and sensors Entry the DVR s information once motion is detected the information...

Страница 40: ...w when playback Enable this function the video file will close and renew a new one automatically when you click Playback icon You can playback the current video file without waiting till the file clos...

Страница 41: ...g Phone Pager notify function should select which modem will be used and enable Monitor below to communicate with DVR If user s modem and fax share one telephone line user must disable monitor when no...

Страница 42: ...4 Click Add icon to save the rotation image 5 Repeat 1 to 4 for adding other rotation videos 6 Click OK to complete the setting 1 The rotation camera for 4 split screen which can select 1 4 5 8 9 12 o...

Страница 43: ...ser account to allow specified user to login quit system create remote users account play back clips etc To set up passwords please consult Chapter 7 9 Click to view save and printing the start shutdo...

Страница 44: ...ill close your application Please remember to restart it If you find playback function work abnormal running this function could repair video clip Set up video compression You can choose three differe...

Страница 45: ...first As an example if 1200 MB is entered 1200MB will be erased when the limit is reached Click for DigiCap PRO XP copyright and software version information Click to minimize DigiCap PRO XP software...

Страница 46: ...on real time viewing the Video Tools shown the functions as Fig 6 3 4 will work Focus Zoom IRIS click on or of Fig 6 3 3 to adjust the parameters of PTZ camera Fig 6 3 3 Fig 6 3 4 Video Tools Right cl...

Страница 47: ...the picture taken by snapshot Allow user to change the picture taken by snapshot to be gray Allow user to change the picture taken by snapshot to be its original color Allow user to save the picture t...

Страница 48: ...here is room If you want to test settings by moving the camera to the preset position just press Goto and it will move to the position you set it to Refer Fig 6 3 7 Pressing S on the menu bar will all...

Страница 49: ...tions below to set your desired parameter settings PRO series please refer Fig 7 1 1 XP series please refer Fig 7 1 2 Fig 7 1 1 Fig 7 1 2 Set Camera location First choose a camera in the pull down men...

Страница 50: ...applied please enable this item However their ID should set correctly Otherwise you cannot use Speed Dome or PTZ camera function For details please consult the Chapter 7 8 Audio Output to speaker Whe...

Страница 51: ...ecording schedule For details please consult Chap 7 7 After finishing with Set up schedule recorded video filenames will be saved under the starting time The time length in the File saving box decides...

Страница 52: ...up Schedule has Motion detection recording selected and also the correct schedule selected otherwise motion may not be detected Also make sure that Camera configuration Recording has Enable Recording...

Страница 53: ...n of Back panel When the sensor is triggered it will start to record and trigger the port of relay output Tolerance This function is used to help prevent false alarms by defining acceptable movement I...

Страница 54: ...that detected it will pop up Enable sound alarm You can set each camera to have its own unique alarm sound For this sound you can select from our provided sounds or record your own Use the functions...

Страница 55: ...l move to preset positions when on the alert Select positions Configure Speed Dome setting Click this button and you will see the following window At the top of the window you can select a specific ca...

Страница 56: ...function when alarm is triggered For detail please refer Chapter 7 18 Trigger relays You can select the specific trigger relays to use and select from Relay 01 to Relay 03 You also can trigger the re...

Страница 57: ...notification Each camera can have its own unique notification and you can set up different ways to notify someone To Set up notification please refer Chapter 7 14 Trigger speed dome Enabling this opt...

Страница 58: ...era position Authentication alarm Enable this function when the position of camera is moved that will be alarm Pop up original position image Enable this function will pop up pre setup image for the c...

Страница 59: ...detection as the trigger Please also refer to the section 7 4 Notification Please follow the instructions below to customize your settings Everyday 1 Select Sequence recording or Motion detection reco...

Страница 60: ...ld set it as two segments 7 00 to 23 59 and 00 00 to 7 30 2 When you set schedules of sequential recording and motion detection recording please do not schedule overlapping periods Overlapped periods...

Страница 61: ...64 7 8 Setting up PTZ camera and I O configuration 7 8 1 PTZ Camera Configurations The Speed dome camera configuration...

Страница 62: ...65 The PTZ camera configuration The last NC 180AZ PTZ Receiver must be terminated...

Страница 63: ...nd for trigger the device such as Light Beeper etc 1 You must use the dry contact for Sensor in otherwise it will cause the module damage 2 The Relay out for NO Normal Open type device only 3 The curr...

Страница 64: ...elay number Duration Enter the controller s working period when relay trigger OK Click to accept setting Copy Copy the parameter setting to another relay Cancel Discard changes in parameter Fig 7 8 3...

Страница 65: ...to set up Notification in Chapter 7 13 7 14 of Software operation manual Trigger speed dome See details on how to set up position in Chapter 7 16 of Software operation manual Enable TV out See details...

Страница 66: ...supervisor name and password is listed below Username root Password 123 Enter this to login Please follow the steps below to modify the supervisor s name and password 1 Enter new supervisor name and...

Страница 67: ...ve steps click Add to finish user setup 5 To add more users repeat 1 4 1 If the supervisor s password or username is lost DigiCap PRO XP must be reinstalled All previous settings will be lost However...

Страница 68: ...time Follow the steps below to remove a video from your archive Step 1 Click on right screen to search for videos Step 2 Decide which recording way for deletion by Options Step 3 Select the videos tha...

Страница 69: ...o previous frame Next frame Jump to next frame First frame Jump to the first frame of video clip Last frame Jump to the last frame of video clip Repeat playback Click this icon once have the videos pl...

Страница 70: ...evious video Jumps to the previous video Decrease frame rate Decreases the frame rate Normal frame rate Adjusts frame rate back to normal Increase frame rate Increases the frame rate Screen size can b...

Страница 71: ...w to smart search videos Step 1 Click icon and you will see the above window Step 2 Select date from the time table on the top of window Step 3 Select the Motion detection section and then the event t...

Страница 72: ...he area will change to a yellow mesh to mark a protected detection area If more than one area is desired repeat Step 1 and Step 2 Step 4 Select Sensitivity Speed and Range and then click Search icon t...

Страница 73: ...Stop to search when object is detected Enable this function it will stop the search process when object is detected Fig A 1 Fig A 1 Fig A 2 1 If you playback on Local Server as shown on Fig A 2 pleas...

Страница 74: ...After the folder and files are shared available follow these steps to playback video clips of DigiCap PRO XP via LAN user Step 1 By clicking on the button from main screen to play the LANPlayback prog...

Страница 75: ...bove setting you can playback the video clips of DigiCap II DVR via LAN The detail process of playback video clips please refer Chapter 7 10 Enable Use default icon that you can playback video file wi...

Страница 76: ...ce When the Auto connect to IP Identify Server option is enabled the DigiCap PRO XP sends a message to the central IP Identify Server per hour This machine then knows what IP address your DVR has for...

Страница 77: ...annot locate IP address or the error message Cannot identify server please contact the manufacturer of your Firewall and ask them how to create a PORT MAPPING This will create a hole in your firewall...

Страница 78: ...er the DVR name into Site name 3 Click Map source icon to browse the map file from DVR folder and then click Update icon after you find out the Map file The map file can be a BMP or JPG file 4 Enter t...

Страница 79: ...chedule Select Enable audio recording if you also wish to record audio 3 Click the icon to set up the recording schedule See details at Chapter 7 7 4 Select the method of motion detection Software det...

Страница 80: ...ith the remote site To set the Auto launch function use the following steps 1 Enter the phone number or IP address or DNS into the Name IP box 2 Specify a Link time in the number box 3 Enter the TCP I...

Страница 81: ...n will be disconnected 1 minute later 3 You must to use I View specify Modem for phone notification 4 If there are extension numbers in the telephone system use one or several commas to separate the p...

Страница 82: ...e key to form a highlighted box 2 Click the Add area button to add highlighted area The area will change to a yellow mesh to mark a protected detection area 3 If more than one area is desired repeat 1...

Страница 83: ...Speed dome also can move to preset positions when trigger is over Please refer chapter 7 4 Follow these steps to preset position Duration of trigger 1 Select a specific speed dome camera at the top of...

Страница 84: ...on the button To record a sound Make sure you have sound card and an audio device attached to your computer Examples of audio devices are CD players and microphones 1 On the function menu click File a...

Страница 85: ...o on TV and also can setup the Pop Up function when the camera is triggered automatically via the software The customer also can assign to display the video out 1 4 6 8 9 10 13 16 4x4 9x9 split video...

Страница 86: ...out from far away site via Remote Controller Please follow the process as below to achieve this function a Please use the shading cable such as 28 2C S type b The sensor cable includes 3 wire cable Re...

Страница 87: ...ats step 1 3 to add one more setting Set TV out when stop triggered Set which video will be shown on TV when no more alert Similarly in the lower part of the window you can select which card and which...

Страница 88: ...back up videos 1 Click in the top of left side to search for videos in database And you will see below window 2 Select the camera To play multiple videos select 00 Camera 00 3 Decide which recording w...

Страница 89: ...I View s EZPlayback program 7 Click to complete backup Video tool bar on backup screen Search Click this icon to search video files Select Click this icon to select remove all video clips to back up...

Страница 90: ...ver It will synchronize the time clock of DVRs with Standard Time Server Please refer chapter 7 20 Follow the steps below to auto adjust the DVR s time clock Step 1 Click Adjust System Clock EzcClock...

Страница 91: ...audio communcation On DVR site Step 1 Click icon from Main screen of system And you will see Fig 7 21 1 window Step 2 Enable Auto run system icon the program will be enabled when you turn on the DVR...

Страница 92: ...iCap II DVR DigiCap PRO XP default is 1701 Step 4 Choose the Audio sample rate Choosing a 16K audio rate will give a better audio quality but also take up more bandwidth Oppositely choosing a 8K rate...

Страница 93: ...o is only for TCP IP remote viewing 2 AnyView Pro is only for modem to modem remote viewing 3 PDAView is only for Pocket PC PDA remote viewing 8 2 FreeView Pro Installation Remote Client PC TCP IP vie...

Страница 94: ...Next to continue as Fig 8 2 4 5 Click Finish to complete installation Fig 8 2 3 Fig 8 2 4 8 3 AnyView Pro Installation Remote Client PC Modem to modem Follow these steps to install AnyView Pro Softwa...

Страница 95: ...n the Start button the Programs folder then FreeView Pro and then clicking on the Remote Viewer FreeView Pro icon The following icons are available Remote Viewer FreeView Pro FreeView Pro enables you...

Страница 96: ...cal DVR Server video channels save video files and configure exactly how you want the program to work Before you can do anything you must login You cannot access any of the functions in FreeView Pro w...

Страница 97: ...system configuration Please see chapter 9 6 Set up privileges Use for setting user privileges It is very similar to that of DigiCap PRO XP in Chap 7 9 View log Press this to see the log in logout rec...

Страница 98: ...3 Connecting to the Local DVR Server via Internet Local DVR Server has a fix IP 3 1 Enable IP address at the top of the window 3 2 Enter the IP address IP address or DNS 3 3 Enter the site name that...

Страница 99: ...size will give a better image but also take up more space and take longer to transmit Oppositely choosing a Half size will give a worse quality and faster transmission speed 11 Press the Connect butt...

Страница 100: ...t will show the available camera s for your selection before you connect to the Local DVR Server Concurrently monitor multiple Local DVR Servers When user wants to monitor multiple Local DVR Servers a...

Страница 101: ...to site A showing the 2 cameras of A then to B only showing the 4 cameras of B The rotate time is up to user Click or to rotate camera views onscreen manually Click to start or stop recording Red mean...

Страница 102: ...ose to print it out Adjust Image Colors Right click on the video screen and you will be able to adjust brightness contrast saturation and hue This function is designed to zoom in amplify the video dis...

Страница 103: ...e not already being used the numbers are only for distinction Note that if you ever add an entry with the same number as an existing one in the book the original will be deleted 2 Fill in Site name or...

Страница 104: ...ress Enable this function you will be able to see real DNS IP address instead of Multi FreeView Pro Enable this function the PC will be allowed to run multi FreeView Pro program on a PC Minimize windo...

Страница 105: ...number of Port must be matched between FreeView Pro and DigiCap PRO XP software FreeView Pro default is 1501 Select default LAN card It will speed transmission while FreeView Pro PC installs more tha...

Страница 106: ...to search for videos of DVR site 3 Enter a date and time into After Date Before Date or both 4 Click the Search button All videos stored on the specified site during the specified period will be list...

Страница 107: ...k and please make sure you already select Remote playback on the Play with box Then you could play back videos in multiple sites concurrently For Splitter function please refer Concurrently monitor mu...

Страница 108: ...1 Remote playback tool bar When viewing camera s of Local DVR Server you can right click of mouse on the video of screen to bring up more options as below For detail functions please refer Chapter 7 1...

Страница 109: ...Play with box as Fig 9 3 1 then click Connect 3 Decide which recording way will be searched by Options 4 Enter a date and time into After Before or both 5 Click Search button All files during the spec...

Страница 110: ...tep 3 On FreeView Pro Client site Click on the bottom Tool bar of FreeView Pro and you should see below window Fig 9 9 2 Fig 9 9 1 Fig 9 9 2 Step 4 Create a specified user account name in Local EzRcli...

Страница 111: ...zWebServer program The monitor will display the tab as below Step 2 Click Enable auto run system and Hide window to have EzWebServer program automatically starts every time you reboot On the Remote cl...

Страница 112: ...dows as Fig 10 2 If the DVR and Web server use the same PC that the DVR IPAddress and Web IPAddress must be same Step 2 If you want to auto connect the DVR site via IE Browser without need to entry th...

Страница 113: ...ideo security and surveillance via the Wireless LAN or Internet 11 1 The PDAView Installation You may install the PDAView Pro program into the PDA by following the steps below 1 Plug your PDA via USB...

Страница 114: ...onnect to the Local DVR Server via Wireless LAN or Intranet control the video channels of the Local DVR Server display Local DVR Server video channels save video files and configure exactly how you wa...

Страница 115: ...llowing Fig 11 2 2 4 Enter the IPAddress User name and Password 5 The number of Port must be matched between PDAView Pro and DigiCap PRO XP software 6 Choose an Image quality 7 Press the Connect butto...

Страница 116: ...I View specify modem for the phone notify and modem to modem remote viewing 12 1 General Information Once you have finished installing the software two icons will be created for you You may access th...

Страница 117: ...following window 2 Connecting to the Local DVR Server via modem 2 1 Enter the site name that you wish to connect to in the local site box 2 2 Enter the Dial number Telephone line connected to modem 2...

Страница 118: ...to connect to a Local DVR Server please make sure the Local DVR Server select a correct modem and enable monitor 12 4 Video Window Function Description The Video Window functions in AnyView Pro behav...

Отзывы: