Amcrest IP3M-941B Скачать руководство пользователя страница 13


                                                        13 


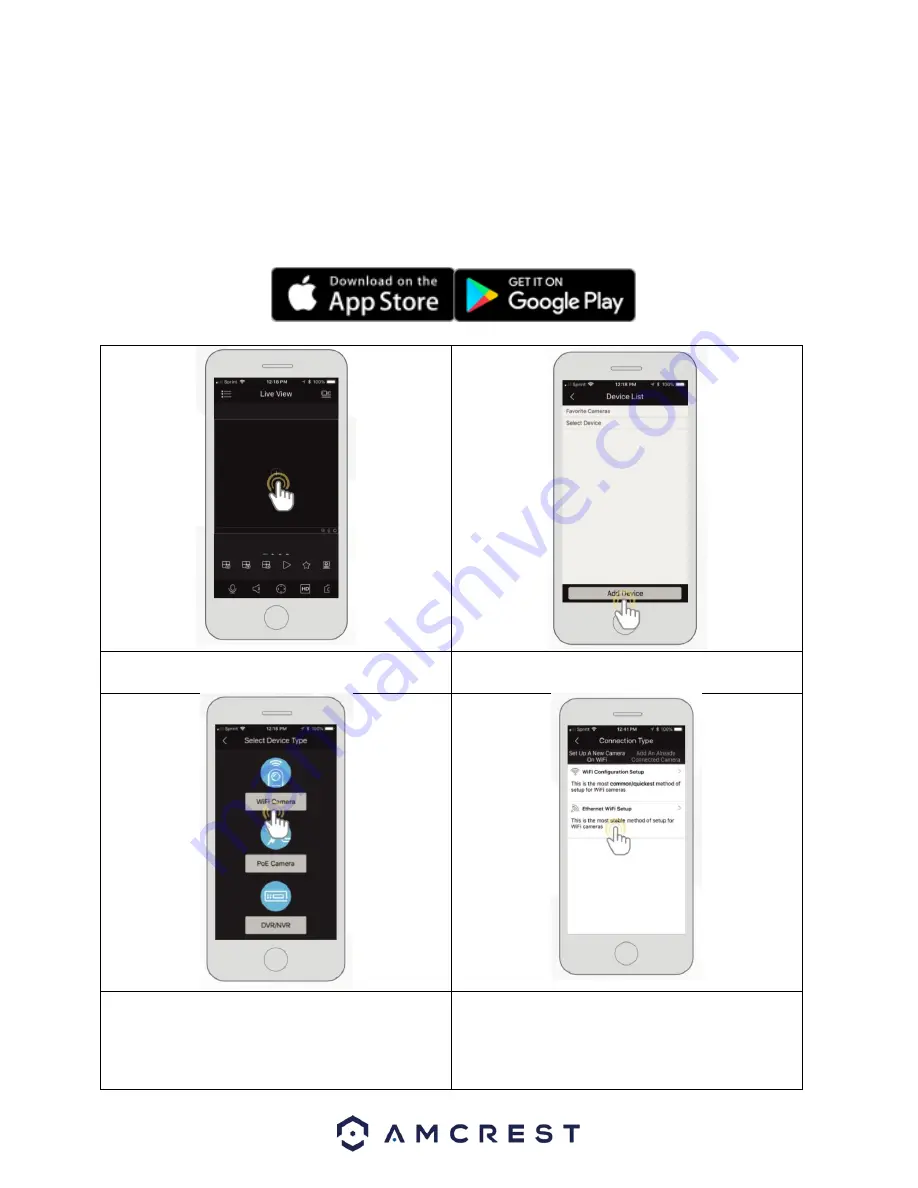
4.3.2. Amcrest View Pro Setup  


Make sure your camera is plugged into a power source and your Ethernet cable is connected from the camera to your 
router. 


Make sure your camera and mobile device are on the same network during setup.  


1.


Download and open the Amcrest View Pro app from the App Store or Play Store.    


2. Open the app and tap on the + symbol in the middle 
of the screen to begin adding your WiFi device. 

2.


3. Tap on 

Add Device

 to add a new device to your app.  


4. Tap on 

WiFi Camera 

3.


5.

 Select your connection type, in this case, select the left 

tab 

Set Up A New Camera On WiFi 

or 

Connect New Device 

(on Android) to begin adding the device to the app. Tap 

Ethernet WiFi Setup 

to continue.


4.


Содержание IP3M-941B

Страница 1: ...Amcrest IP3M 941S IP3M 941B IP3M 941W 3MP ProHD Indoor Wi Fi Camera User Manual Version 1 0 3 Revised April 4th 2019...

Страница 2: ...0 4 2 3 For Cloud Storage and Playback 10 4 2 4 For Quick Web Access to Your Cameras 10 4 3 App Setup 10 4 3 1 Amcrest Cloud App Setup 10 4 3 2 Amcrest View Pro Setup 13 4 4 Desktop Access Setup 16 Am...

Страница 3: ...refox 60 How To Access the Web User Interface Using Internet Explorer 65 4 4 4 Remote Web Access Setup 67 UPnP DDNS Remote Web Access Setup 68 Port Forwarding Remote Web Access Setup 68 4 5 Amcrest Cl...

Страница 4: ...5 4 4 2 2 SD Card 111 5 4 4 2 3 FTP 111 5 4 4 2 4 NAS 112 5 4 4 3 Record Control 113 5 4 5 System 113 5 4 5 1 General 114 5 4 5 2 Manage Users 115 5 4 5 3 Default Settings 116 5 4 5 4 Import Export 1...

Страница 5: ...thorized access please make sure to follow the steps below Always make sure that your camera has the latest firmware as listed on www amcrest com firmware subscribe Never use the default password for...

Страница 6: ...sers This camera connects to any router and uses an internet connection to allow the user to access all of its functionality from many internet connected devices It s easy to use and can be set up in...

Страница 7: ...to the existence of different product series 2 Device Overview The image below is a representation of your device Please refer to the following chart for information about the camera and its ports Po...

Страница 8: ...es information about the connection and installation of your camera 3 1 Connection Guide The camera initially should be connected via the following method WiFi Connection Indicator Light Status Device...

Страница 9: ...ce and drill the marked holes using a power drill 5 Insert the included wall anchors into the holes and using a hammer tap the wall anchors into the holes making them as flush as possible to the mount...

Страница 10: ...Amcrest Cloud service and get 4 hours of free storage 4 2 4 For Quick Web Access to Your Cameras AmcrestView com is a web portal that allows you to view your cameras and recordings quickly and easily...

Страница 11: ...your camera is on 2 Register for an Amcrest Cloud account To register click on Sign Up and fill out the form to complete registration 3 Tap on Add Camera 4 Give your camera a name Ex Garage Living Roo...

Страница 12: ...WiFi process and have your WiFi camera running solely as a wired device tap on Skip WiFi Setup 9 If you wish to enable WiFi on your WiFi camera tap Scan to scan and select your WiFi network from the W...

Страница 13: ...and open the Amcrest View Pro app from the App Store or Play Store 2 Open the app and tap on the symbol in the middle of the screen to begin adding your WiFi device 2 3 Tap on Add Device to add a new...

Страница 14: ...a Tap Next to continue 6 8 Scan the QR code on the back side bottom of the camera or manually enter the camera s serial number into the Enter camera S N serial number field Press Next to continue 7 9...

Страница 15: ...ange the password for your camera Enter a password between 8 and 32 characters and confirm the password Press OK to continue 13 Your camera is not set up and ready for use on the Amcrest View Pro app...

Страница 16: ...re the most stable and recommended method of accessing your devices from your computer It is a free software provided by Amcrest that can provide a means of accessing all your devices in one central l...

Страница 17: ...utilize your hard drive HDD on your PC to store and access recorded video To proceed with the installation click Next Select the destination folder in which you would like recorded files to be retain...

Страница 18: ...ing the software directly after pressing finish select the Run Amcrest Surveillance Pro checkbox When complete click the Finish button to proceed Setting a Password After the installation of the Amcre...

Страница 19: ...the software If you do not wish to have to retype your password every time you log into the system click on the Remember Password checkbox If you wish to exit the software click Exit Main Interface Ov...

Страница 20: ...the IP address for your device it is recommended to download the Amcrest IP Config tool To get the Amcrest IP Config tool go to amcrest com downloads and click on the IP Config software link for eithe...

Страница 21: ...era as well as change the port number username and password To update the password remove the default password and type the new password in this field When done click on Save to save the information f...

Страница 22: ...device configuration menu under General click on the Network icon to access the network settings for your device In the Network Settings menu in the Mode section click on the Static radio button to s...

Страница 23: ...ice navigate to the Home Page of the software and click on the LIVEVIEW icon located in the Basic section In the Organizations menu on the far right side of the live view screen double click the devic...

Страница 24: ...unction 1 Bit stream information and shortcut operation menu Please refer to the following contents for detailed information Enable disable local record Snapshot Enable disable audio Enable disable bi...

Страница 25: ...ist Display device group and the corresponding channel Here you can create a new group and drag a device to it Right click a channel you can select main stream sub stream or quickly go to the device s...

Страница 26: ...config to access the IPv4 Address for your computer When the IPv4 address for your computer has been located navigate back to the home page in the Amcrest Surveillance Pro software and click on the De...

Страница 27: ...mpt screen Lastly enter the username and password The username and password will both be admin When complete press Save and Continue to proceed The PC NVR entry will then be added into the Devices men...

Страница 28: ...el window will appear select your camera from the Default Group or Custom Group list you ve created The camera will appear in the right screen check the IPCamera check box Click Save How to Setup Stor...

Страница 29: ...sh to use for recording purposes you may allocate as much space as you have available on the drive within its minimum and maximum allowance Once you ve set a number between the possible storage sizes...

Страница 30: ...o a PC NVR and have the camera recording any or all the motion events you have set up internally on the cameras main interface How to Setup Recording The Amcrest Surveillance Pro software allows you t...

Страница 31: ...d only when a specific alarm is triggered This is designated by a red color in the software MD Alarm MD Alarm combine both motion detection and alarm settings into on specific attribute This field is...

Страница 32: ...n on 00 00 00 23 59 59 Next select which days you would like the schedule to apply with and click Save to continue If you would like the schedule to apply to all days click the All button On the main...

Страница 33: ...fault stream will be Main Stream Then select a specified date and time for the file and click on Search The play back controls can now be used to play stop skip to next event control the speed of play...

Страница 34: ...ace install and run the Amcrest IP Config tool You can download the IP Config software from www amcrest com under the Support tab Apps Software The IP Config tool s interface looks like the below imag...

Страница 35: ...k IP cameras or an analog capture card with DirectShow drivers Recommendations when using many and or HD cameras Intel core i7 with QuickSync for hardware decoding 8GB or more RAM Microsoft Windows 8...

Страница 36: ...the default path click Change It is recommended to leave the default download path when installing the software To continue the installation click Next Select the features you want to install and des...

Страница 37: ...o begin installing the software click on the Install button and allow the software to download to your computer When the software has finished downloading click on the Finish button to launch the soft...

Страница 38: ...ou find the Blue Iris software useful please register and purchase a license To continue the free trial version of this software click Next to continue Amcrest offers two versions of the Blue Iris sof...

Страница 39: ...When accessing the software make sure to Allow access to all communications blocked by Windows Defender How To Add a Device Into Blue Iris To add a device into the Blue Iris software locate the IP add...

Страница 40: ...vice navigate to the Blue Iris software and click on the button In the New Camera menu provide a name for your camera This can be a full name and a short name Select which type of camera is being adde...

Страница 41: ...en enter the user name and password for your device If this is the first time using your camera the password will be admin Click OK to continue The next screen will be the settings menu for your devic...

Страница 42: ...o view an informative video on how to add an Amcrest device into the Amcrest Blue Iris software please view this informative video https www youtube com watch v RqcfLHANCd8 For more information on the...

Страница 43: ...n browsers such as Safari 11 may be compatible however would require the user to revert from their current version of Safari to Safari 11 Amcrest has devised ways Mac users can enjoy their Amcrest pro...

Страница 44: ...eckbox next to the I accept the terms in the License Agreement checkbox Click Next to continue Choose the type of setup you prefer There are two types of setup Standard and Custom In this case it is r...

Страница 45: ...en prompt you to install the software onto your computer Click the Install button to install the browser Allow the browser to install on your computer When it has finished installing click on Finish t...

Страница 46: ...oads menu click on IP Config Software to begin the free download Once the download has completed installing locate the IP address associated with the device you would like to view in the browser Enter...

Страница 47: ...ord used should be between 8 and 32 characters long with a combination of letters and numbers Click Ok when done to log into the web user interface To view your device on the browser you will need to...

Страница 48: ...of your connected device in the web user interface For more information on the web user interface and the features it provides please refer to the user manual for your device User manuals can be foun...

Страница 49: ...e via a web browser Pale Moon is only compatible with Windows and Linux operating systems however a beta version is coming soon for Mac The browser is a continuation of the former Mozilla Application...

Страница 50: ...en prompt you to install the software onto your computer Click the Install button to install the browser Allow the browser to install on your computer When it has finished installing click on Finish t...

Страница 51: ...oads menu click on IP Config Software to begin the free download Once the download has completed installing locate the IP address associated with the device you would like to view in the browser Enter...

Страница 52: ...ord used should be between 8 and 32 characters long with a combination of letters and numbers Click Ok when done to log into the web user interface To view your device on the browser you will need to...

Страница 53: ...ck on the and click on the webplugin exe file in the download manager The browser will then show the live feed of your connected device in the web user interface For more information on the web user i...

Страница 54: ...e higher megapixel camera s plugins will take precedence over the lower megapixel camera s plugin How To Access a Device Using the Google Chrome Extension Web based access for Amcrest device can be ut...

Страница 55: ...In the All Downloads menu click on IP Config Software to begin the free download Once the download has completed installing locate the IP address associated with the device you would like to view in...

Страница 56: ...word enter the new password you would like to use in the New Password field and confirm The password used should be between 8 and 32 characters long with a combination of letters and numbers Click Ok...

Страница 57: ...nent solution to the issue but currently we recommend using a previous version of Firefox such as Firefox 49 0 2 For more information on how to revert to Mozilla Firefox 49 0 2 refer to the instructio...

Страница 58: ...dard setup since it is the most common This is selected by default in the wizard To continue click the Next button The wizard will then prompt you to install the software onto your computer Click the...

Страница 59: ...tomatic updates are applied to the browser If an automatic update were to occur the browser will revert to the most current version of the Firefox web browser which will prevent the use of plugins on...

Страница 60: ...ore accessing your device using Mozilla Firefox ensure you are using the correct version of Firefox As discussed previously later versions of Firefox may prevent the use of plugins which are needed to...

Страница 61: ...n the browser Accessing the Web User Interface To access the web user interface locate the IP address for your device using the Amcrest IP Config Tool The Amcrest IP Config Tool can be downloaded at t...

Страница 62: ...password will both be admin Click on Login If this is the first time logging into your device you will be prompted to modify the password for your device To modify the password enter the new password...

Страница 63: ...ase click here to download and install the plugin prompt in the middle of the screen Click on Save File to being downloading the plugin The webplugin exe file will save to your downloads folder To ins...

Страница 64: ...IP address for your device into the browser and log into the web user interface with your device s login credentials Click on the Activate MMX icon in the middle of the screen to activate the plugin T...

Страница 65: ...he Web User Interface Using Internet Explorer To access your device using the Google Chrome Extension please refer to the information provided below Locate the IP address for your device using the Amc...

Страница 66: ...device you will be prompted to modify the password for your device To modify the password enter the new password you would like to use in the New Password field and confirm The password used should b...

Страница 67: ...ad the plugin The browser will then show the live feed of your connected device in the web user interface 4 4 4 Remote Web Access Setup There are two main methods for setting up remote access UPnP DDN...

Страница 68: ...says AmcrestDDNS com 10 Click the UPnP menu item on the left hand menu and click the enable checkbox at the top 11 While in the UPnP menu double click the HTTP port and change both the internal and ex...

Страница 69: ...Open the port forwarding guide section on the left hand side menu 14 Find the router brand name in the list and click it 15 Find the router model number and click it 16 Click the Default Guide link ne...

Страница 70: ...com or give us a call at 1 888 212 7538 Step by step video tutorials available at http www amcrest com videos 4 6 Web Access Setup AmcrestView com 1 Connect the camera to power and wait 30 seconds fo...

Страница 71: ...rface Click install to download the plugin and then click on the plugin installation file to install the plugin If the browser prompts you to allow the plugin to work on the computer hit Allow to ensu...

Страница 72: ...button to activate the zone selection function This allows the user to use the mouse to select a zone to zoom in on Snapshot Click this button to take a screenshot of the live feed The picture is sav...

Страница 73: ...screen mode Width Height Ratio This button allows the user to change the width height ratio for the live feed The options are Original and Adaptive Original uses the aspect ratio of the stream s set...

Страница 74: ...ic date range From here the user can download these videos to their PC 5 Trim Panel This panel allows the user to trim playback video for download By specifying time stamps the user can trim down 6 Re...

Страница 75: ...site At this website amcrestcloud com users can register for new accounts as well as view or modify existing accounts For more information on Amcrest Cloud visit amcrest com support 5 4 Setup The Setu...

Страница 76: ...he camera 3 Menu Tab These tabs open menu options for certain menu items 5 4 1 Camera This menu section allows the user to change different camera settings for video and to manage image profiles 5 4 1...

Страница 77: ...the value is too high For the grey part of the video distortion may occur if the white balance is not accurate Please note the video may not be clear if the value is too low The recommended value ran...

Страница 78: ...setting without sacrificing exposure timing Shutter Priority This setting will maximize the fastest shutter speed and will sacrifice the gain in return Manual This setting lets you select your shutte...

Страница 79: ...eature that came out of necessity due to overexposure from strong light sources like headlights or spotlights To reset to default settings click the Reset Defaults button To refresh the screen click o...

Страница 80: ...s click the Save button 5 4 1 5 Day Night Used to determine when black and white mode is turned on in a dark environment Below is a screenshot of this menu Color always represents picture in color doe...

Страница 81: ...t settings click the Reset Defaults button To refresh the screen click on Refresh To save the settings click the Save button 5 4 1 6 Night Vision This menu allows the user to select whether the IR lig...

Страница 82: ...mal Mode This dropdown box allows the user to select whether to turn the indication light on or off To reset to default settings click the Reset Defaults button To refresh the screen click on Refresh...

Страница 83: ...e system supports H 264 and MJPEG video compression protocols Resolution This dropdown box allows the user to set the resolution The system supports various resolutions and they can be selected from t...

Страница 84: ...the user to select a snapshot mode There are two snapshot modes General Snapshots are taken as scheduled Event Snapshots occur when a motion detection alarm or tampering alarm is triggered Image Size...

Страница 85: ...ables the feature The Input Channel Title field allows the channel title to be modified For Time the radio button enables or disables the feature Clicking the Display Weekdays checkbox will show the w...

Страница 86: ...se button to select a different destination folder The Playback Download field allows the user to select where to save playback video downloads to Click the Browse button to select a different destina...

Страница 87: ...ne Volume This slider allows the user to select the microphone volume The value ranges from 0 to 100 The default value is 50 To reset to default settings click the Reset Defaults button To refresh the...

Страница 88: ...ocal area network LAN IP Version This dropdown allows the user to select the IP version The two options are IPV4 and IPV6 IP Address This field allows the user to enter a custom IP address Subnet Mask...

Страница 89: ...ettings tab Below is an explanation of the fields on the Connection settings tab Max Connections This field allows the user to specify the maximum number of users that can be connected to the camera a...

Страница 90: ...keep the same IP address thus allowing remote users uninterrupted access to the camera rather than having to request a new IP address to use for remote access anytime a change is made To use this feat...

Страница 91: ...Add IP MAC This button opens a popup that allows the user to add IP or MAC addresses to the trusted site list Note When accessing the camera externally please add the MAC address of the router on the...

Страница 92: ...and alarm emails sent by the camera Authentication This dropdown box allows the user to select an encryption type There are two types of email encryption protocols that are available SSL Secure Socke...

Страница 93: ...or each protocol listed below have been remapped by the UPnP protocol o The first column shows the checkboxes to enable the corresponding service on the table o The second column shows the name of the...

Страница 94: ...ss Trap Address This field allows the user to write in a trap address Trap Port This field allows the user to write in a trap port number The trap port number should not be the same as the SNMP port N...

Страница 95: ...ngs screen Enable This checkbox allows the user to enable Multicast functionality Multicast Address This field allows the user to enter a multicast address Port This field allows the user to enter a m...

Страница 96: ...nce complete the SSID field will show a green Connected prompt The WiFi camera will now be connected to your WiFi network You can now remove the Ethernet cable from the device Please note the IP addre...

Страница 97: ...Below is an explanation of the fields on the QoS screen Realtime Monitor This field allows the user to enter in a priority value for real time monitoring packets The range is between 0 63 Command Thi...

Страница 98: ...ction allows the user to change different settings for triggering events 5 4 3 1 Video Detection The video detection menu has two tabs Motion Detect and Video Tamper 5 4 3 1 1 Motion Detect This tab a...

Страница 99: ...n go off a tour can begin a snapshot can be taken or the camera can begin recording o For example if the anti dither time is set to 10 seconds each alarm may last 10 seconds if the local alarm is acti...

Страница 100: ...save button on the motion detection settings screen otherwise the motion detection zones will not go into effect Clicking the cancel button to leave the motion detection zone and will not save the zo...

Страница 101: ...button 5 4 3 1 2 Video Tamper This tab allows the user to modify video tamper settings Below is a screenshot of the Video Tamper tab Below is an explanation of the fields on the Video Tamper tab Enab...

Страница 102: ...arm port on the back of the camera when a video tamper alarm is triggered Alarm Delay This field specifies in seconds how long the delay between alarm activation and Relay alarm activation should be S...

Страница 103: ...the user to adjust sensitivity and threshold settings for audio detection o Sensitivity The higher the sensitivity the more likely that audio will trigger an alarm o Threshold The lower the threshold...

Страница 104: ...ideo when an audio detection alarm is triggered Record Delay his field specifies in seconds how long the delay between alarm activation and recording should be Send Email This checkbox allows the user...

Страница 105: ...e anti dither time has expired Record This checkbox allows the user to enable the camera to record video when an audio detection alarm is triggered Record Delay his field specifies in seconds how long...

Страница 106: ...his tab allows the user to set the camera s response to a Network related abnormality Below is a screenshot of the Network tab screen Below is an explanation of the fields on the Network settings tab...

Страница 107: ...detected Alarm Delay This field specifies in seconds how long the delay between alarm activation and relay alarm activation should be Send Email This checkbox allows the user to enable the camera to s...

Страница 108: ...only footage when an alarm is activated Alarm recording is represented by the color red Video Recording Schedule To specify a video recording range first select the type of recording desired then clic...

Страница 109: ...apshots when an alarm is activated Alarm recording is represented by the color red Snapshot Recording Schedule To specify a snapshot range first select the type of snapshot desired then click and drag...

Страница 110: ...days to designate as holidays Once a day is designated it can be customized to stop recording or snapshots for that day by using the Record and Snapshot checkboxes To refresh the page click the Refre...

Страница 111: ...SD Card tab Below is an explanation of the fields on the SD Card settings tab Device Name This column designates the name of the SD card that is currently in the camera Status This column designates t...

Страница 112: ...field allows the user to specify a remote directory on the FTP to send the recorded media to Emergency Store on SD Card This checkbox allows the camera to store recorded media on the SD card in case t...

Страница 113: ...Full This dropdown box allows the user to designate what the camera should do when the disk is full There are 2 options Overwrite or Stop Record Mode This set of radio buttons allows the user to desig...

Страница 114: ...d in the camera Video Standard This dropdown box allows the user to select either the NTSC or PAL video standard To reset to default settings click the Reset Defaults button To refresh the page click...

Страница 115: ...ently the camera pings the NTP server to ensure it has the correct time The range is from 0 30 minutes To reset to default settings click the Reset Defaults button To refresh the page click the Refres...

Страница 116: ...d in this field Default Settings Only the IP address user management and other settings can be recovered after reset Factory Default Completely resets the camera to factory default settings No setting...

Страница 117: ...ve button 5 4 5 6 Upgrade This menu allows the user to upgrade the camera s firmware Below is a screenshot of the Upgrade screen To upgrade the firmware for your camera follow the steps provided below...

Страница 118: ...NVIF version are displayed Also the S N Token ID is displayed here 5 4 6 2 Log This screen is where the camera s activity log is kept Below is a screenshot of the Log screen To view logs for a specifi...

Страница 119: ...e checkboxes allow the user to narrow down which alarms they want to see in the alarm log Clicking the checkbox next to Prompt will cause the system to pop up a dialog box anytime an alarm is triggere...

Страница 120: ...ate Time tab Click on PC Sync to sync the date and time Click Save to save and apply the new date and time settings 5 Motion detection does not work Below are a few possible reasons why this may be oc...

Страница 121: ...s not match any other routes in the routing table and when the default gateway is not available Anti Dither This time value controls how long the alarm signal lasts The values in this field can range...

Страница 122: ...is a protocol used to easily connect devices to the internet Video Tamper Video Tamper refers to any major changes happening to the video feed such as it being blocked out interfered with or disconnec...

Страница 123: ...appareil est conforme aux CNR d Industrie Canada applicables aux appareils radio exempts de licence L exploitation est autoris e aux deux conditions suivantes 1 l appareil ne doit pas produire de brou...

Страница 124: ...neous materials in the parts is above the relevant threshold of the SJ T11363 2006 standard During the environmental friendly use period EFUP period the toxic or hazardous substance or elements contai...

Отзывы: