SERVICING
22
Deep Vacuum Method (Recommended)
The Deep Vacuum Method requires a vacuum pump
rated for 500 microns or less. This method is an effective
and efficient way of assuring the system is free of non-
condensable air and moisture. As an alternative, the Triple
Evacuation Method is detailed in the Service Manual for
this product model.
It is recommended to remove the Schrader Cores from the
service valves using a core-removal tool to expedite the
evacuation procedure.
1. Connect the vacuum pump, micron gauge, and
vacuum rated hoses to both service valves.
Evacuation must use both service valves to eliminate
system mechanical seals.
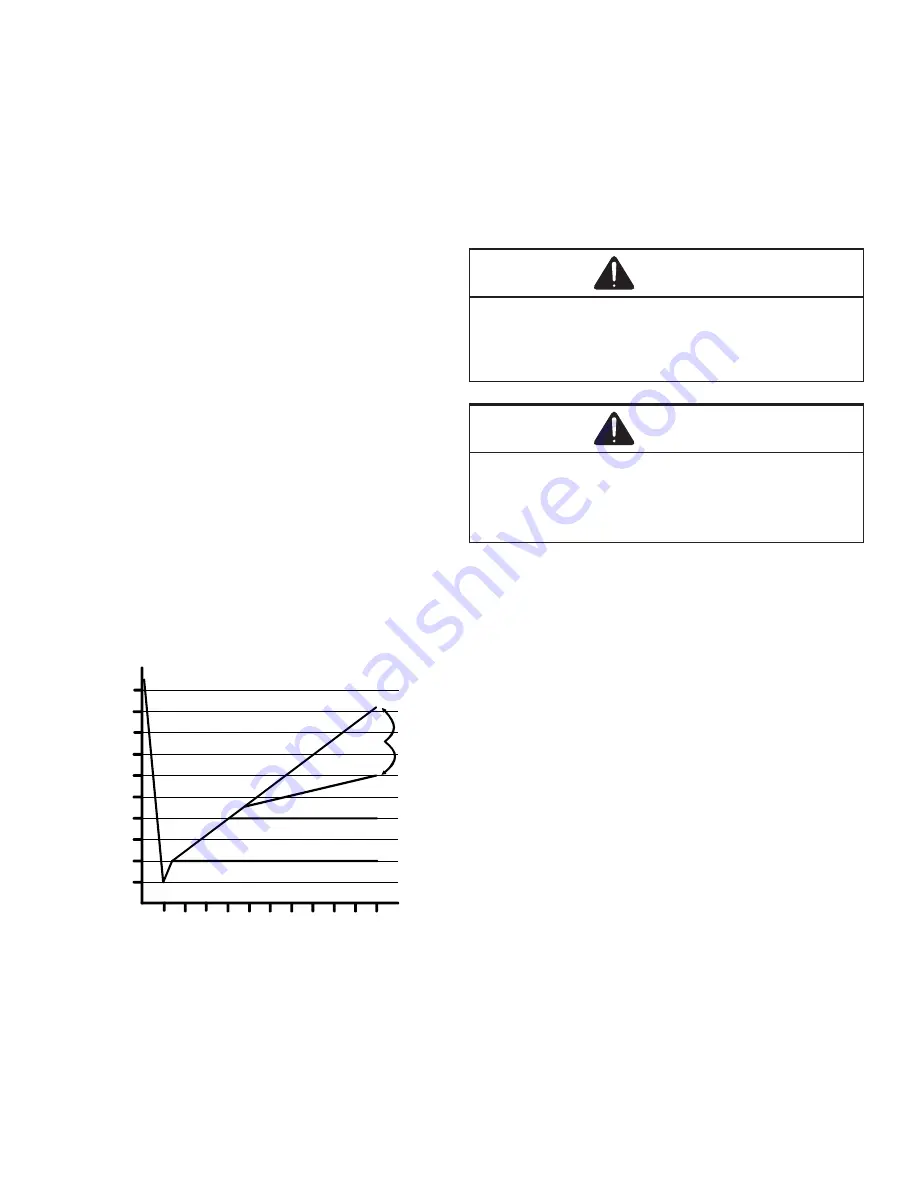
2. Evacuate the system to less than 500 microns.
3. Isolate the pump from the system and hold vacuum
for 10 minutes (minimum). Typically, pressure will rise
slowly during this period. If the pressure rises to less
than 1000 microns and remains steady, the system
is considered leak-free; proceed to system charging
and startup.
4. If pressure rises above 1000 microns but holds
steady below 2000 microns, non-condensable air or
moisture may remain or small leak is present. Return
to step 2: If the same result is achieved, check for
leaks and repair. Repeat the evacuation procedure.
5. If pressure rises above 2000 microns, a leak is
present. Check for leaks and repair. Repeat the
evacuation procedure.
5000
4500
4000
3500
3000
2500
2000
1500
1000
500
0 1 2 3 4 5 6 7 8 9 10
LEAK(S)
PRESENT
MINUTES
V
ACU
UM
IN
MI
CR
O
NS
CONDENSIBLES OR SMALL
LEAK PRESENT
NO LEAKS
NO CONDENSIBLES
Triple Evacuation Method (Alternate)
1. Evacuate the system to 4000 microns and hold for 15
minutes. Break the vacuum with dry nitrogen, bring
the system pressure to 2-3 PSIG, and hold for 20
minutes. Release the nitrogen,
2. Evacuate to 1500 microns and hold for 20 minutes.
Break the vacuum with dry nitrogen again, bring the
system pressure back to 2-3 PSIG, and hold for 20
minutes.
3. Evacuate the system to 500 microns and hold for 60
minutes.
4. If the pressure rises to 1000 microns or less and
remains steady the system is considered leak free;
proceed to start-up.
Charging
WARNING
REFRIGERANT UNDER PRESSURE!
•
Do not overcharge system with refrigerant.
•
Do not operate unit in a vacuum or at negative
pressure.
Failure to follow proper procedures may cause property
damage, personal injury or death.
CAUTION
Only use refrigerant certified to AHRI standards. Used
refrigerant may cause compressor damage. Goodman is not
responsible for damage or the need for repairs resulting
from the use of unapproved refrigerant types or used or
recycled refrigerant. Most portable machines cannot clean
used refrigerant to meet AHRI standards.
Charge the system with the exact amount of refrigerant.
Refer to the specification section or check the unit
nameplates for the correct refrigerant charge.
An inaccurately charged system will cause future problems.
1. Using a calibrated set of refrigerant scales, allow
liquid refrigerant only to enter the high side.
2. After the system will take all it will take, close the
valve on the high side of the charging manifold.
3. Start the system and charge the balance of the
refrigerant through the low side.
NOTE: R410A should be drawn out of the storage
container or drum in liquid form due to its fractionation
properties, but should be “Flashed” to its gas state
before entering the system. There are commercially
available restriction devices that fit into the system
charging hose set to accomplish this. DO NOT charge
liquid R410A into the compressor.
4. With the system still running, close the valve on the
charging cylinder. At this time, you may still have
some liquid refrigerant in the charging cylinder hose
and will definitely have liquid in the liquid hose.
Reseat the liquid line core. Slowly open the high side
manifold valve and transfer the liquid refrigerant from
the liquid line hose and charging cylinder hose into
the suction service valve port. CAREFUL: Watch so
that liquid refrigerant does not enter the compressor.


