background image

6

Chapter 1: Introduction

1.5 Product Application

A

B

C

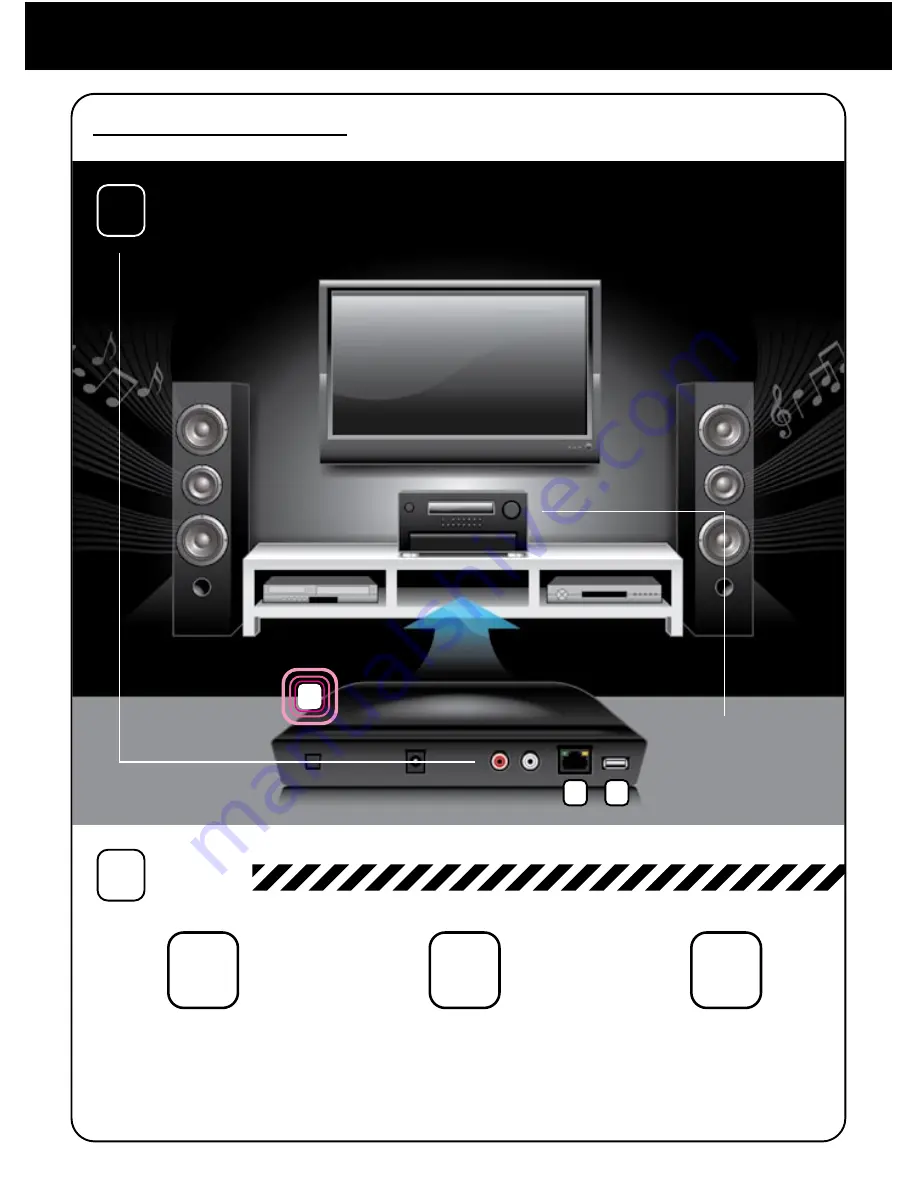
Simply connect to your receiver or external speakers 

via the included RCA cables

Stream Internet Radio 

from your WiFi / wireless 

802.11 B / G router.

Connect your local 

CAT5 Ethernet cable to 

stream Internet Radio.

Plug in any USB Drive 

and listen to your 

music files.

C

B

A

Built-in WiFi

Supports all 

receivers

1

2

CONNECT

LISTEN

OR

OR

Содержание AIREC01F

Страница 1: ...WiFI Wireless Internet Radio Home Theater Edition Instructional Manual AIREC01F mnl M10109 Copyright 2009 Aluratek Inc All Rights Reserved aluratek com ...

Страница 2: ...4 Listen to Various Music 4 1 Listen to Internet Radio 4 2 Listen to Music in Your Computer 4 3 Listen to the Music in Your USB Drive 4 4 The Playback Screen 4 5 How to Add Stations Thru the Web Portal Chapter 5 Advanced Tools 5 1 Network Setting 5 2 Configure Network 5 3 Reset to Default 5 4 Clear Favorites 5 5 Device MAC Address 5 6 Firmware Version 5 7 Firmware Upgrade Chapter 6 Misc 6 1 Clock ...

Страница 3: ... sure only quality materials are used for manufac turing Aluratek is also dedicated to provide the best customer satisfac tion and support The goal of Aluratek is to embody Simple Elegance in every product it designs manufactures and sells The product focus of Aluratek is to bring simple yet elegant connectiv ity solutions to the consumers to enhance their consumer electronics communications and c...

Страница 4: ...on a USB 2 0 flash drive MP3 player or Hard drive through the unit s USB port 2 RCA plugs Stereo Lineout for external speakers No PC is required 1 Year limited warranty 1 3 Requirements Wired wireless router Internet connection 1 4 Package Contents Your order has been carefully packaged and inspected The following should be included in your package Please inspect the contents of the package to ens...

Страница 5: ...xternal speakers via the included RCA cables Stream Internet Radio from your WiFi wireless 802 11 B G router Connect your local CAT5 Ethernet cable to stream Internet Radio Plug in any USB Drive and listen to your music files C B A Built in WiFi Supports all receivers 1 2 CONNECT LISTEN OR OR ...

Страница 6: ...listen to Internet radio and external USB storage MP3 players No computer is needed For digital music files that are stored in your computer you need to install streaming server software in the computer so that AIREC01F can request the streaming service from that server AIREC01F is compliant to UPnP protocol It works with media server software such as Microsoft Windows Media Player 11 WMP11 Micros...

Страница 7: ...etwork configuration through the Setup menu Setup Advanced Setup Configure Network AIREC01F will connect wirelessly if it detects an 802 11b g wireless network With no Ethernet cable attached you just need to power on the device and AIREC01F will automatically enter the wireless client mode To connect AIREC01F to the wireless network for the first time you will need to set the encryption key for a...

Страница 8: ...cont Go to next screen Notes Type in the encryption key if the AP is encrypted Select the desired AP to connect Screenshot Instructions 4 5 button or OK button OK button button Numeric key pads Confirm to the settings Set a proxy server if any 6 7 OK button OK button Apply new settings 8 ...

Страница 9: ...e wireless client mode 3 4 button or OK button button or OK button button 1 time Numeric key pads Select the desired AP to connect Scanning for available APs 5 6 button or OK button Type in the encryption key if the AP is encrypted 7 OK button button 4 times button OK button button or OK button Manually configured as the Wireless Client Mode ...

Страница 10: ...onfiguration Go to next screen Notes Confirm to the settings above Set a proxy server if any Screenshot Instructions 8 9 10 OK button OK button Apply new settings Manually configured as the Wireless Client Mode cont ...

Страница 11: ...re is no 802 11b g wireless network AIREC01F can also connect to the wired network through an Ethernet cable For this case prior to power on the device you have to plug in the Eth ernet cable into the LAN RJ45 connector on the back of the unit After you power on the device it will automatically go into the wired client mode when it detects a link status through the Ethernet connection First time u...

Страница 12: ...dvanced Setup menu Screenshot Instructions 2 3 button or OK button button or OK button button 4 times button 1 time Manually select the wired client mode 4 button or OK button button 1 time Select the DHCP for auto configured IP address 5 button or OK button button 1 time Confirm to the settings above 6 OK button Apply new settings 7 ...

Страница 13: ...ireless Access Point AP Mode AIREC01F can also be configured as a wireless AP With such feature you can easily extend the wireless coverage without purchasing another AP To configure the AIREC01F as an wireless AP you have to manually setup the device through selecting the setup menu Setup Advanced Setup Con figure Network AP mode And then further setup the IP address scheme SSID channel number an...

Страница 14: ...ect the wire less channel to be allocated to this AP Screenshot Instructions 7 8 OK button OK button Numeric key pads button 1 time Type in the encryption key if the AP is encrypted 9 OK button Numeric key pads Set a proxy server if any 10 OK button Confirm to the settings above 11 OK button Apply new settings 12 Numeric key pads Select one of the security schemes ...

Страница 15: ...ction The first screen of Internet Radio function shows 2 items for you to select Station List Retrieve the Internet radio station lists from the Internet portal server Favorite Stations Retrieve the favorite station lists that stored in the device Press OK button or button to retrieve the Station List The device will try to connect to the Internet radio server to retrieve the Internet radio stati...

Страница 16: ...et And you will see the next screen This means the AIREC01F is connected to the Internet server and received the information from the server If you see the following screen instead it means that the device has encountered problem in retrieving the list from the internet server please try again ...

Страница 17: ...uctions 2 3 button or OK button button or OK button 4 button or OK button 5 button or OK button 6 button or OK button button 4 times button 14 times The following screen shots illustrate the sequence to browse to a specific ratio station such as 4U Classic Rock in France and start to playback the music from it ...

Страница 18: ...on to add current station to favorite list for quick access later 7 button or OK button Go to next screen Notes Connecting to the radio station Screenshot Instructions 8 9 Music started 10 button 5 times Start buffering the music from the radio station ...

Страница 19: ...tware After you installed and activated the media server you can enjoy listening to the streaming music from AIREC01F Please select the Media Server function from the main menu and then press the OK button to enter the Media Server function Then the following message will be displayed during discovering all the available media servers in your network It takes few seconds to finish Finally the scre...

Страница 20: ...trouble shooting chapter to identify the problem and resolve it step by step The following screen shots illustrate the sequence to connect to a media serv er JAMES NB James and browsing to the Music album Best of Roxette Select Media Server function 1 button or OK button Go to next screen Notes Searching for media server Screenshot Instructions 2 3 Select media server 4 button Found two media serv...

Страница 21: ...queue for quick access 8 button Music started 9 button or OK button Next song started 10 button button or OK button Wait till end of song or press to next song Chapter 4 Listen to Various Music Once the music starts you can freely control the song playback through the playback buttons just like you are controlling a traditional stereo or CD player ...

Страница 22: ...the MP3 Player function from the main menu and then press the OK button to enter the MP3 player function The first screen of MP3 Player function shows the root folder content of the attached USB drive If you see the screen NO DEVICE there was a problem accessing the USB device Please remove the USB device and connect again For music playback from the USB drive you just need to browse to the music ...

Страница 23: ...ton or OK button button 2 times button 1 time 4 button or OK button Music started 5 Chapter 4 Listen to Various Music The following screen shots are an example of how to play a music file 4 4 The Playback Screen When the music starts you can see the playback information saved with the file on the screen It may include the title of the song station the album artist information ...

Страница 24: ...irmware can be found on http www aluratek com download_drivers_manuals php 2 Please go to http aluratek vtuner com 3 Use vTuner ID you can find the id either from menu Setting vTunerID or the MAC address on the label that is on the bottom of the unit 4 Please use your vTuner ID to login to the website 5 Create account login by providing your email address and password 6 Please login to your accoun...

Страница 25: ...n to Various Music 8 Please fill in info for the station that you wish to add 9 Power Off On the unit 10 You should able to access the newly added station under Stations List Added Stations Folder on your internet radio ...

Страница 26: ... operate the device properly 5 1 Network Setting Check current network information 5 2 Configure Network Please refer to chapter 3 for network configuration 5 3 Reset to Default When you reset the device to its factory default your favorites Internet radio and FM radio will not be erased ...

Страница 27: ...nternet radio station and FM radio station stored 5 5 Device MAC Address Check MAC address of the device 5 6 Firmware Version Check current firmware version 5 7 Firmware Upgrade If there is any new firmware released please download and follow the upgrade procedure below ...

Страница 28: ...e into the front USB port of the AIREC01F Step 3 Operate the AIREC01F to get into the F W upgrade menu Setup Ad vanced Setup F W Upgrade thru USB then press the OK button to activate the F W Upgrade function You should see the following messages F W Upgrading and Don t Power OFF After a few seconds the device will reboot automatically when the upgrade operation is completed Step 4 You can verify t...

Страница 29: ...clock menu the first one will display the cur rent date and time the second item is for you to set the date and time manually or via auto Sync automatically synchronize with network time server If you select the Auto sync function the device will periodically synchronize with the server The third option lets you change time dis play format between 12 Hours or 24 Hours There is a built in battery i...

Страница 30: ...e and clock screen You can use the four directional buttons and the OK button to set the current date time Use buttons to switch between the items to be adjusted The selected item will be flashing Use buttons to adjust increase or decrease the value of the specific item Press the OK button to confirm and finish the time setup ...

Страница 31: ... to set the clock automatically please go into the Auto Sync NTP menu and select the correct time zone for your location After that the device will set the date and time automatically 6 1 3 Time Display Format Choose time display format bewteen 12 Hour or 24 Hours ...

Страница 32: ...s ON You can set the backlight to be turned OFF once the device is idle no key press after a specific time elapsed The backlight can be switched off automatically in 1 3 10 30 minutes 6 3 Equalizer Setting In the Setup menu you can change the setting of the equalizer The op tions available are Normal Classic Rock Jazz and PoP ...

Страница 33: ...oad Windows Media Player 11 WMP11 installation file e g wmp11 windowsxp x86 enu exe from Microsoft s web site Install wmp11 windowsxp x86 enu exe without any changes needed Just click on next to finish the installation Step 1 Activate the Media Player Find the Windows Media Player icon from the Program list and click on this program to activate it ...

Страница 34: ...ew by clicking on the Library Tab to manage the content and share your media You will see the following view Step 3 Add your Media content to WMP11 media library Click on the Library tab again you can see a pull down menu To add your media files to the WMP11 media library please click on the item Add to Library ...

Страница 35: ...will see the following view Click on the add button and select the media folder in your computer and then click the OK button For example you can put all the music files in the directory D Music so you just need to add the folder to the share list ...

Страница 36: ... included in the WMP11 monitor folder lists Then press the OK button A pop up window will appear and show you the WMP11 is searching for the media files When it finished click on the Close button Now you can browse and manage your media content with the WMP11 Library manager ...

Страница 37: ...on the Media Sharing item to activate the media sharing function The following dialog windows will appear Check the Share my media checkbox and click on OK button The WMP11 will try to discover the available network devices in your LAN The following display showed that no device is found at this moment ...

Страница 38: ... home network you will see the following display that WMP11 found a network device named Aluratek AIREC01F Step 5 Manage the setting of sharing media Click on the Settings button and specify the name of the WMP11 server to be displayed on your AIREC01F Then press OK to exit AIREC01F ...

Страница 39: ...se select the device icon and then click on the Allow button to grant further streaming requests from that device Then you will see that the device icon state changed consequently Then press the OK button to apply the setting There is another approach to manage the access for your network devices There will be a small icon appeared on the Windows XP status bar to alert you WMP11 found network devi...

Страница 40: ...yer on the remote control and then AIREC01F will start the server discovery process After a few seconds it will find server like PC_Hostname Server Name This is the WPM11 server that you installed Press the OK button to try to connect to the server You will see the AIREC01F screen shows Connecting and finally shows the following list You can now browse the Music list and playback the music you wan...

Страница 41: ... from Microsoft web site Install the wmcsetup exe without any changes needed Just click on next to finish the installation Step 1 Activate WMC You can find a new installed file icon Windows Media Connect from the Windows XP Program list Click on this program to activate WMC Step 2 You will see a pop up window asking for select the device you want to allow access to your computer Just skip it by pr...

Страница 42: ...lect the desired folder for your computer For example you can put all the music files in the directory D Music so you select Let me choose which folders and add the folder to the share list Finally press Finish to finish the setup of the Windows Media Connect Then you can see a small icon on the lower right corner of the startup bar ...

Страница 43: ...art the server discovery process After a few seconds it will find server like PC_Hostname 1 Windows Media Connect Then press the OK button to try to connect to the server You will see the AIREC01F screen shows Connecting As the same time you will see the following prompt in your PC It means that WMC detected an un authorized device trying to access the content of the WMC server You just double cli...

Страница 44: ...lect the device and then click on the Allow button Then press the close button to finish the authorization process At this moment AIREC01F can get the contents or service from the WMC server You can browse the list and playback the music you want ...

Страница 45: ...ort If you need further assistance please contact Aluratek support department prior to returning this device E mail support aluratek com Web www aluratek com support Local Irvine CA 949 419 6504 Toll free 1 866 580 1978 ...

Страница 46: ... uses and can radiate radio frequency energy and if not installed and used in accordance with the instruction may cause harmful interference to radio communications However there is no guarantee that interference will not occur in a particular installation If this equipment does cause harmful interference to radio or television reception which can be determined by turning the equipment off and on ...

Страница 47: ...y anyone other than Aluratek D Products sold AS IS or WITH FAULTS IN NO EVENT SHALL ALURATEK S LIABILITY EXCEED THE PRICE PAID FOR THE PRODUCT FROM DIRECT INDIRECT SPECIAL INCI DENTAL OR CONSEQUENTIAL DAMAGES RESULTING FROM THE USE OF THE PRODUCT IT S ACCOMPANYING SOFTWARE OR IT S DOCUMENTATION Aluratek makes no warranty or representation expressed implied or statutory with respect to it s product...

Страница 48: ...Aluratek Inc 12A Mauchly Irvine CA 92618 sales aluratek com 949 419 6504 office 949 419 6477 fax ...

Отзывы: