background image

Page 9 of 11

EPH-N00-06003

5-20-97

15

 - 790 DOORS ONLY

Inspect the pieces of black glazing vinyl,

and note the two different profiles.  The smaller
shape [FF] is installed vertically and the larger
shape [GG] is installed horizontally.  For structural
strength and maximum water resistance, these
vinyls are designed to fit tightly between the glass
and framing.  To speed installation, use glass
cleaner for lubrication and a small block of wood to
press the vinyl into place.

17

 - ALL DOORS

16

 - 790 DOORS ONLY

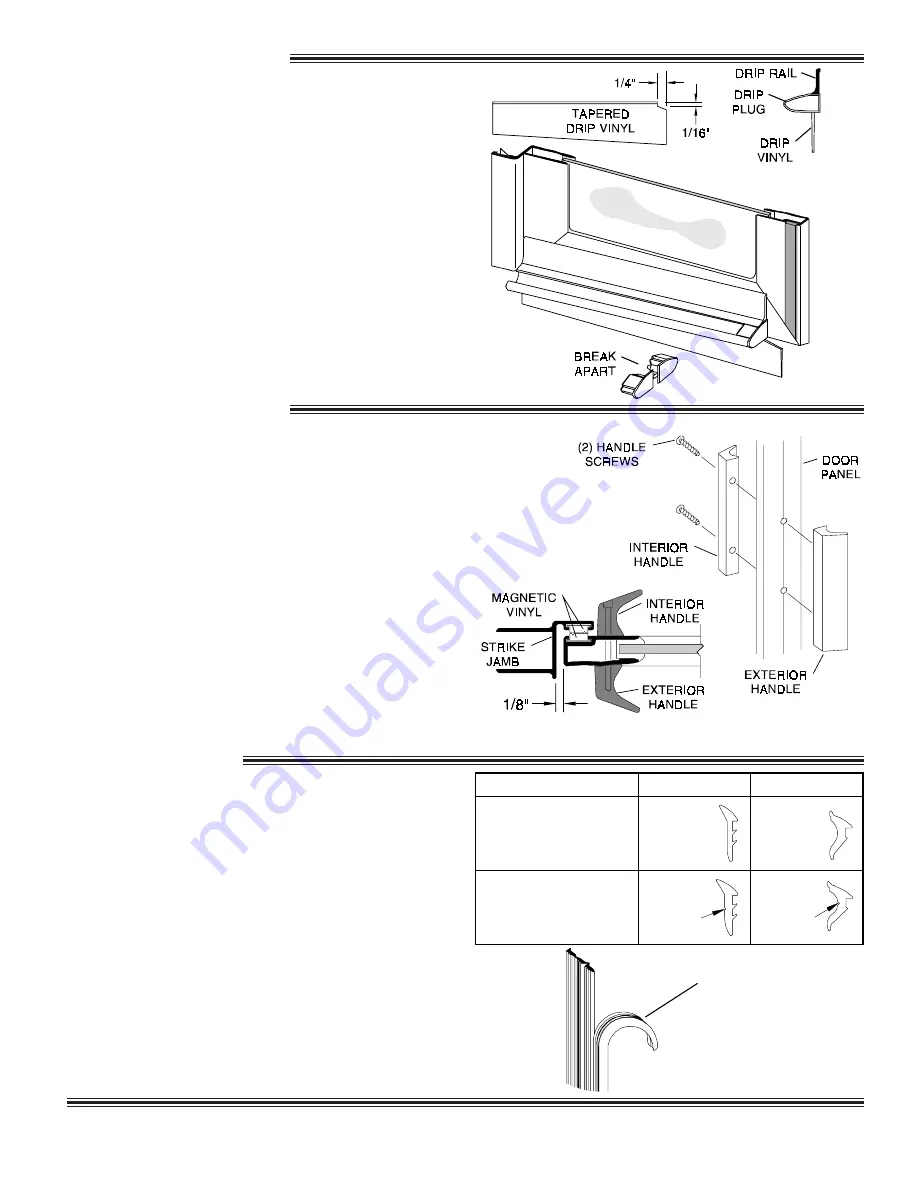
Attach the interior door handle [CC] and

the exterior door handle [DD] to the door panel
[M] with two #6-32 x 1 1/4" round head screws
[EE].

Close the door and check the clearance with the
strike jamb [P].  If necessary, loosen the set
screws [X] on the top and bottom slide bars and
adjust the door panel to align the strike magnets.
When the door panel is properly aligned, tighten
the set screws securely.

Adjust the drip vinyl [U] by sliding it left or

right until it just touches the curb.  Trim the vinyl
(flush with the pivot end and notch 1/4" longer
than the drip rail  as shown on the strike end).

The drip plug [T] is supplied with a left and right
hand plug together.  Break the right and left drip
plug apart and insert the appropriate plug into
the high (strike) side of the drip rail.  Discard the
unused drip plug.    Peel off the tape backing and
carefully press the drip rail [S] to the door in the
marked position.

1/4" GLASS

REQUIRES:

FIXED GLASS PANEL

VERTICAL

HORIZONTAL

V-219

V-220

3/16" GLASS

REQUIRES:

V-226

V-225

NOTCH

NOTCH

STANDARD SIZES

SHIPPED WITH

4 PIECE VINYLS

(TEAR APART)

Содержание Stickstall 794 Series

Страница 1: ...INSTALLATION INSTRUCTIONS 794 SERIES STIKSTALLTM SHOWER ENCLOSURE Copyright Alumax Bath Enclosures 1997 All rights reserved EPH N00 06003 5 20 97...

Страница 2: ...alers agree to pass on to its customers and users in writing ALUMAX BATH ENCLOSURE s Warranty and Remedy as set forth above Laws and building and safety codes governing the design and use of bath encl...

Страница 3: ...ost L 2 Clear Vinyl Jamb Seals M 1 Glazed Door Panel N 1 Pivot Jamb P 1 Strike Jamb Magnetic R 2 Snap in Fillers S 1 Drip Rail T 2 Drip Plugs U 1 Tapered Drip Vinyl W 1 Roll Double Stick Tape X 1 Roll...

Страница 4: ...790i Intre Hinge Door or a 1090 Heavy Frameless Pivot Door Each step in this primary instruction sheet will indicate whether it applies to all door types or if a supplement should be used If your door...

Страница 5: ...replace the curb in the exact position marked Caulk the inside of the curb ends where they meet the wall Caulk generously around the anchor plates B screws C and the inside of the mitered joints Repl...

Страница 6: ...he header where it meets the wall The minimum horizontal dimension for the door opening is the door panel width see the graphic in Step 9 plus 3 4 maximum is the door panel width plus 1 3 4 Using the...

Страница 7: ...vot jamb Center the curb filler in the curb between the pivot and strike jamb use masking tape to hold in position NOTE The snap in fillers should be exactly 3 8 longer than the door panel width 11 79...

Страница 8: ...bushing in the header filler Hold the door vertical and insert the bottom pivot pin into the pivot bushing in the curb filler It may be necessary to remove the header retaining screws and raise the h...

Страница 9: ...ike jamb P If necessary loosen the set screws X on the top and bottom slide bars and adjust the door panel to align the strike magnets When the door panel is properly aligned tighten the set screws se...

Страница 10: ...king toward the middle Be careful not to stretch the vinyl Install the top interior vinyl and the two bottom vinyls in the same way Cut four pieces of the smaller vinyl FF 1 longer than the vertical o...

Страница 11: ...eaner has been tested and is recommended by the Bath Enclosure Manufacturers Association BEMA Do not use scouring pads sharp instruments or acid based cleansers to clean the unit Thank you for choosin...

Отзывы: