background image

10 


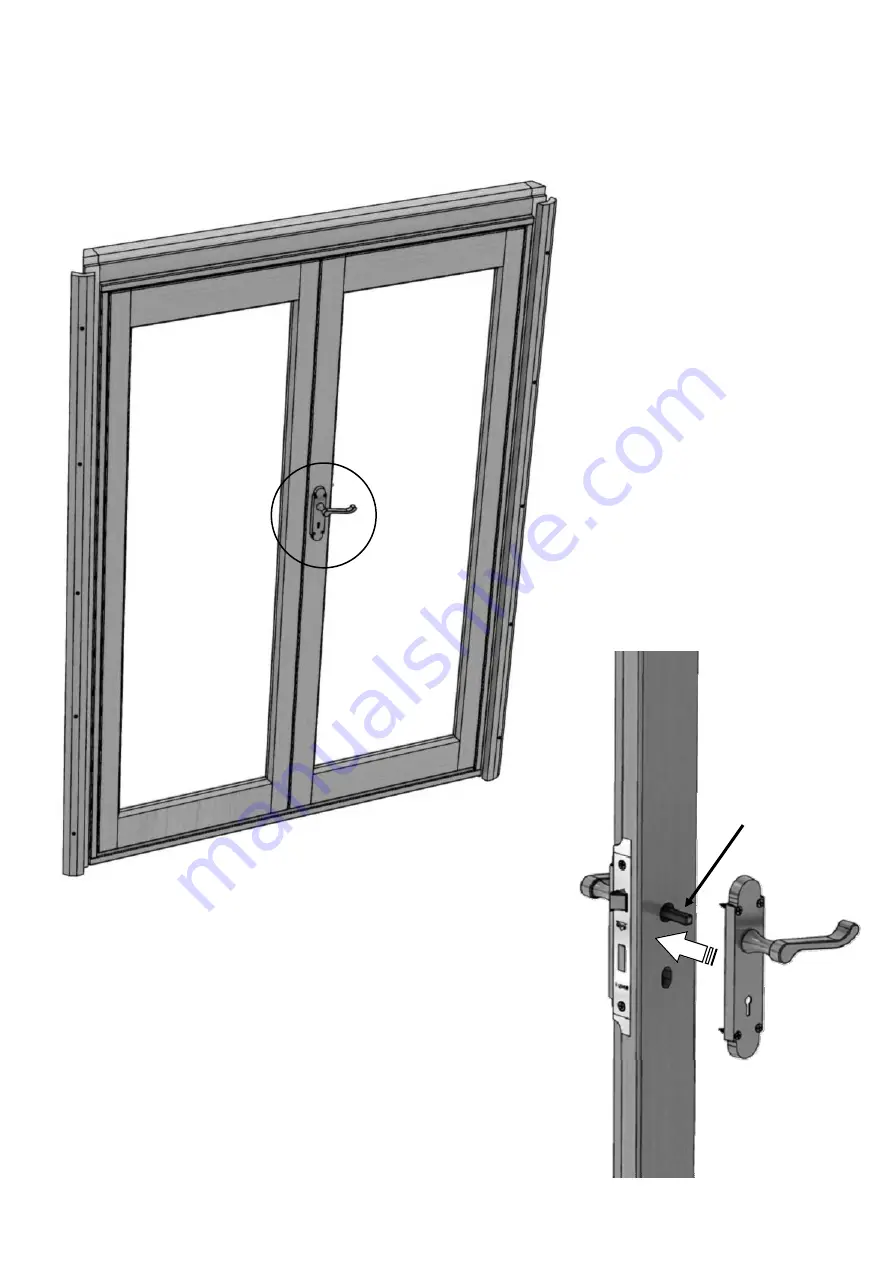
Door Installation


Dia. 12 

Before you can install the door 
section you need to fit the door 
handle.   
 
Slide the spindle through the 
lock to give you the position of 
the handle on the door as shown 
in diagram 12.   
 
Fix the handle with the  four 

25mm

 countersunk screws 

supplied.  

Diagram 11 

Diagram 12 

Spindle 

Содержание ABCEDCOR77

Страница 1: ...12 19 FAIRFORD FAIRFORD 77 88 Fairford 77 Example...

Страница 2: ...ffits Roof Panels Roof Felting Fixing To Base Trims Capping Facias Casement Stay Cabin Hook Architrave Window Trim Weather Strip Parts Lists Section 1 2 3 4 5 6 7 8 9 10 11 12 13 14 15 16 17 18 Page 3...

Страница 3: ...e most solid foundation for your summerhouse A slabbed base would be our preferred choice as this helps with drainage Avoid placing your summerhouse under trees or in other vulnerable locations To min...

Страница 4: ...ely easy to get to and convenient to bring a supply of electricity to Finally and most importantly choose a site where your Alton summerhouse will look right so that it will complement your garden Bas...

Страница 5: ...ndows are 377mm x 657mm and 1109mm x 657mm respectively The glass size in the doors are 1570mm x 485mm To build your new summerhouse you will need the following tools Spirit Level Pencil PZ2 Screwdriv...

Страница 6: ...ing in the same direction and line up with one another Drill 4mm holes as indicted by the arrows Secure together using 60mm screws 02 5110 Use the noggins AB0104 to secure the base together 3 Diagram...

Страница 7: ...how your building goes together and how well your windows and doors will operate Ensure there is 2ft around the summerhouse to allow space for fitting and maintenance with the use of ladders Before s...

Страница 8: ...ows Secure together using 80mm screws EV0334 from the outside of the building Do NOT fix any panels to the floor now as this will make construction more difficult later in the build 4 Diagram 7 7 x 7...

Страница 9: ...he panels bear in mind which faces will be most visible when you walk into the building Try to keep the screw heads on the least visible faces where possible Position a window panel as shown by diagra...

Страница 10: ...l the door section you need to fit the door handle Slide the spindle through the lock to give you the position of the handle on the door as shown in diagram 12 Fix the handle with the four 25mm counte...

Страница 11: ...s as indicted by the arrows Secure together using 60mm screws 02 5110 Ensure the top of the door is flush on both sides Check that the doors are unlocked prior to fixing It is best to have one person...

Страница 12: ...ent Diagram 15 Position the largest roof frame with the cladding facing outwards on top of the back wall panels as shown in diagram 15 Drill 4mm holes as indicted by the arrows Ensure the roof frame i...

Страница 13: ...n the next roof frame with the cladding facing outwards on top of the door frame as shown in diagram 17 Drill 4mm holes as indicted by the arrows Ensure the roof frame is flush with the door frame Sec...

Страница 14: ...st the front soffit Drill 4mm holes 10mm from the frame top face where indicted by the arrows Secure together using 100mm screws EV0339 Repeat for the other side of the door Position the back two soff...

Страница 15: ...tation Drill 4mm holes from inside the summerhouse where indicted by the arrows in diagram 27 Secure together using 80mm screws EV0334 IMPORTANT Do not stand on the roof now or at any stage of constru...

Страница 16: ...cut Once cut to length roll the felt back up and transport to the roof to avoid the felt tearing and therefore the roof leaking The felt can then be rolled out in position on the roof Diagram 29 shows...

Страница 17: ...er it against the soffit Again Nail down using Clout Nails 02 1675 while keeping them spaced around 200mm apart Diagram 31 Position the second piece of felt from diagram 29 30 on top of the roof overl...

Страница 18: ...has been installed and the building is square the walls can be fixed to the floor Drill 4mm holes as indicted by the arrows on diagram 34 looking down towards the floor Secure down using 60mm screws...

Страница 19: ...rson should internally drill 4mm holes 15mm from the top of the wall window panels Secure using 60mm screws 02 5110 Repeat for all the trim rails around the summerhouse as indicted by the arrows on di...

Страница 20: ...oaking Sides AB0057 as shown in diagram 40 using 40mm Pan Head Screws EV0332 The top section of capping is different for the Fairford 77 and 88 Refer to Table 2 for part codes and diagram 41 for place...

Страница 21: ...ent of those parts Facia 1 can be identified by the right edge having an angled cut This edge should be pushed flush with the front facia Ensure the top edge is flush with the felt Secure using 70mm P...

Страница 22: ...ed this to re attach the peg diagram 45 Then remove the transit screw and washer from the casement stay handle again keep this screw for the peg diagram 46 Next position the casement stay peg undernea...

Страница 23: ...crews 15 Diagram 48 Diagram 50 AB0145 Diagram 49 Open the vented window to its maximum and line up the door to your desired position as shown in diagram 49 Ensure the there is sufficient space so the...

Страница 24: ...e of the door frame diagram 51 and make a mark at the top and bottom on each side Line the first piece up with these marks with the end of the architrave sitting on the floor boards and fix in place w...

Страница 25: ...dow trims into place using the short ones for the top window and the longer ones for the bottom window as shown by diagram 53 Secure using panels pins 02 1680 as indicted by the arrows Repeat this pro...

Страница 26: ...he cladding as shown in diagram 56 Push it tight up against the cladding above Drill pilot holes and screw from the inside of the building through the cladding as close to the horizontal rail as possi...

Страница 27: ...3 COR Window_Panel_88 2 ABA0264 COR Door Frame Glass_To_Ground Assembly 1 ABA0247 COR Roof Frame_88_1_Cladded 1 ABA0248 COR Roof Frame_88_2a_Cladded 1 ABA0249 COR Roof Frame_88_2b_Cladded 1 ABA0250 CO...

Страница 28: ...f_77_External Cloaking Trim 2 ABCEDCORBOX88 Corner Summerhouse 8x8 Box AB0725 Roof Frame_88_Cross Under 1 AB0726 Roof Frame_88_Cross Over 1 AB0784 Roof Soffit 1a 2 AB0729 Roof Soffit 1c 2 AB0730 Roof...

Страница 29: ...fill 1 AB0802 COR Framing Top Window Bead 4 AB0803 COR Framing Bottom Window Bead 4 ABSMA015 Smalls Pack 015 1 ABSMA015 Smalls Pack 015 02 1675 Clout Nail 3 x 12mm 110 EV0336 Csk 3 5 x 25mm SS 10 02 1...

Страница 30: ...30 Notes...

Страница 31: ...31 Notes...

Страница 32: ...Alton Garden Buildings TGP Ltd Blythe Park Cresswell Stoke on Trent ST11 9RD Telephone 01782 385 409 www Altongreenhouses co uk sales altongreenhouses co uk...

Отзывы: