background image

last revision:


14/05/2018

Project Divison Projet

8

less than [12.00] 1/2”

Recommended 

ø 3”

Fig.7

2.

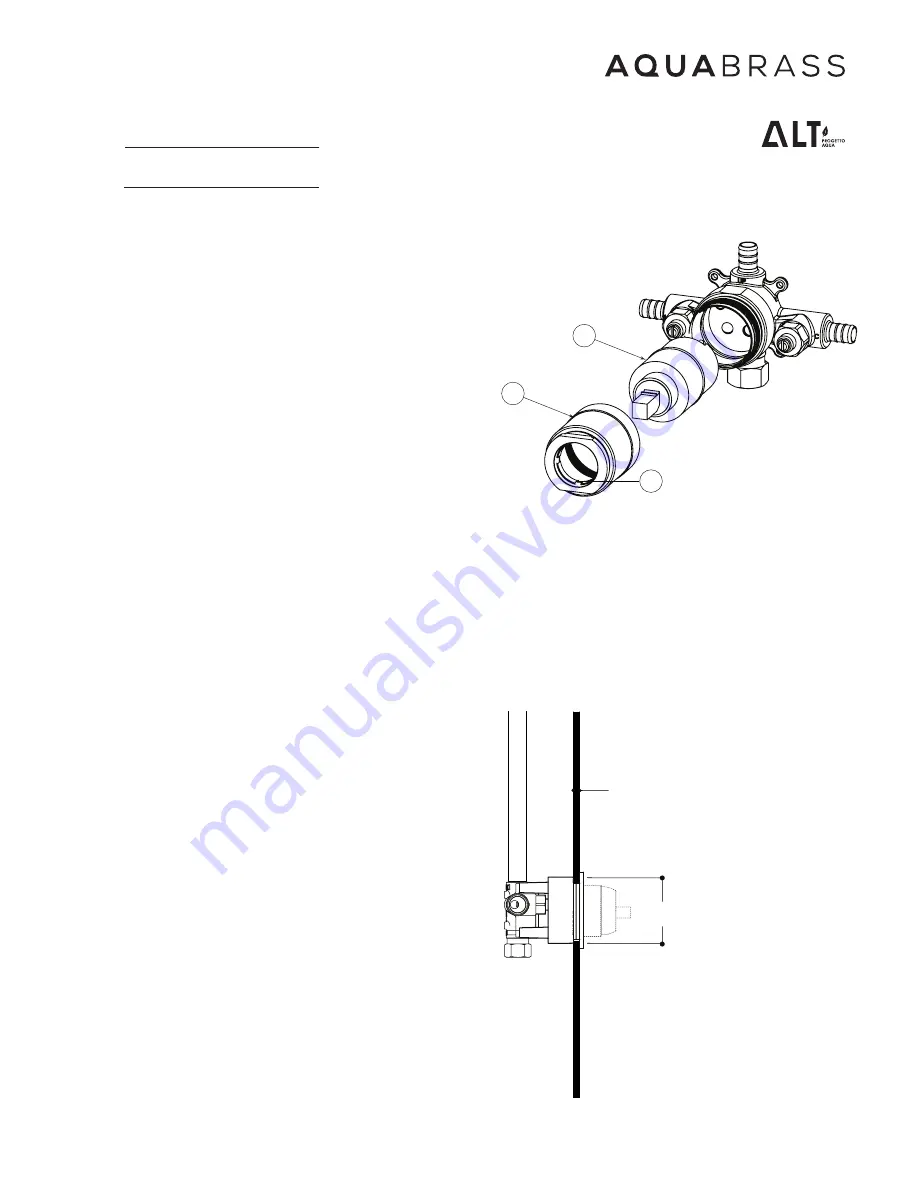
Installing the cartridge

Unscrew the cartridge holder (1) and remove the protective plug. 
Fig. 6. Make sure the "top" brass spacer remains in place (3). 
Insert the cartridge (2) into the valve body as shown. Fig.6. 
Make sure its guiding lugs line-up with the corresponding open-
ings in the rough. Push the cartridge until its surounding O-ring is 
firmly engaged. Reinstall the cartridge holder (1). DO NOT OVER-
TIGHTEN.

Installing the rough

Position the rough with the plastic cover surface firmly against the 
back of the wall.
Complete the installation by tightly grabbing the thin wall between 
the mixer rough and the circular adaptor. Fig. 7. 
Screw in place using the top left and bottom right positions. Fig 5.

Installation de la cartouche

Dévisser le manchon de la valve (1) et retirer le capuchon pro-
tecteur. Fig. 6. Assurez-vous de ne pas perdre l'anneau métallique 
monté sur le dessus (3).
Insérer la cartouche (2) dans la valve telle qu'illustré. Fig. 6
Utiliser les 2 projections en dessous comme guide pour l'orienter 
correctement. Enfoncer la cartouche, jusqu'à ce que le joint 
thorique du pourtour soit fermement engagé dans la base. refer-
mer la valve à l'aide du manchon. NE PAS TROP SERRER.

Installation de la plomberie brute

Positionner la plomberie brute avec son capuchon plastique à 
l'arrière du mur. 
Compléter l'installation en pinçant le mur fin entre la plomberie 
brute du mélangeur et l'adaptateur circulaire. Fig. 7. 
Visser les composantes en utilisant les emplacements supérieur 
gauche et inférieur droit seulement. Fig 5.  

2

1

3

Fig.6

INSTALLATION B (Thin wall)

Содержание Aquabrass ThermOne 61234

Страница 1: ...utlet Sortie d eau du bas 1 2 m le NPT soud 1 2 male bottom water outlet NPT sweat Sortie d eau du bas 1 2 m le NPT soud 61234 NPT CONNECTION 1 2 male water inlets NPT sweat Entr es d eau 1 2 m le NPT...

Страница 2: ...e enjoyment Should you require any technical or warranty assistance please visit us at www aquabrass com www alt aqua com F licitations pour l achat de votre produit Aquabrass En achetant un produit A...

Страница 3: ...eur 1 2 NPT 3 ABSP61201 Adaptor Extension for ThermOn ABHS62088PC e Adaptateur Extension pour ThermOne 4 ABSP61202 Rubber gaskets Joints en caoutchouc 5 ABSP61203 Legs extension Extensions 6 ABSP61204...

Страница 4: ...HE INSTALLATION OF THIS VALVE BE DONE BY A LICENSED PLUMBER CAUTION MAKE SURE TO PROPERLY FLUSH THE HOT AND COLD WATER SUPPLY FAILURE TO CARRY OUT THIS SIMPLE PROCEDURE COULD CAUSE PROBLEMS OR DAMAGE...

Страница 5: ...emove the plug and to install the cartridge Comment utiliser le capuchon protecteur La valve est recouverte d un capuchon protecteur en plastique Il peut tre utilis comme gabarit pour d terminer la bo...

Страница 6: ...t the right depth before securing it firmly in place Intallation de la valve Une fois l emplacement d termin positionner la valve entre 2 montants 2x4 dans le mur sur un support en contre plaqu S assu...

Страница 7: ...wer wall Comment utiliser la capuchon en plas tique dans un mur fin Pour un mur dont l epaisseur est gales ou inf rieur 3 8 Pour cette installation vous avez besoin d avoir les com posants de la finit...

Страница 8: ...g 7 Screw in place using the top left and bottom right positions Fig 5 Installation de la cartouche D visser le manchon de la valve 1 et retirer le capuchon pro tecteur Fig 6 Assurez vous de ne pas pe...

Страница 9: ...valve is fitted with 2 mixed water outlets A and B Seal the B outlet if not used Once all water connections have been made check for possible leaks Raccordement de l eau Raccorder les entr es d eau c...

Страница 10: ...he finished wall See trim plate instruction 40231 10231 20231 30231 Entretien de la cartouche Fermer l alimentation d eau principale et d monter toutes les composantes de 1 6 Fig 9 Ensuite fermer les...

Страница 11: ...nd polish leaving a protective coating to maintain your product s shine and finish Pour nettoyer et conserver l apparence de vos robinets ou accesoires Aquabrass lavez les avec un linge mouill l eau t...

Страница 12: ...r au d tail et n est PAS transf rable Aquabrass se r serve le droit de modifier des caract ristiques de ses produits sans avis ni obligation ainsi que de remplacer ou de retirer certains mod les Garan...

Страница 13: ...last revision 14 05 2018 Project Divison Projet 13 Project Divison Projet...

Отзывы: