background image

40

-EN

• 

Touch [

Disable

] when interrupted, to disable the Interruption 

function. The setting for the interruption type becomes [

Off

]. 

For example, the Interruption function becomes disabled and 

the News Interrupt setting is set to [

Off

] by touching 

[

Disable

] when “News” is interrupting.

• 

If no signal is received for more than 60 seconds, interrupt 

function exits.

• 

When the interruption broadcast is over, the unit returns to 

the previous screen.

• 

Does not interrupt during Hands-free phone talk. During 

camera image display, only the sound may be interrupted.

• 

The volume level for the interruption broadcast can be set. For 

details, see “Adjusting the Radio Volume” (page 18).

Receiving Traffic Announcement

Touch [TA].

The “TA” indicator lights up and the unit switches to standby 
mode for the traffic announcement.
When the traffic announcement is received, the “TP” 
indicator lights up and the unit switches to the radio source 
screen to receive it.

• 

The “TP” indicator lights up during standby mode off in a 

condition other than radio source to indicate that the unit is 

receiving the traffic announcement.

Displaying Radio Text

Text messages from a radio station can be displayed.

Tune in a radio station that transmits text 

messages.

Touch the information display in the FM radio 

mode repeatedly to switch to the desired 

display.

Tag Info. Mode   Radio Text Mode   Tag Info. Mode

Tag Info. Mode: 
PS Name or Frequency/PTY Name/Artist Name/Song 
Name
Radio Text Mode: 
Frequency/Radio Text
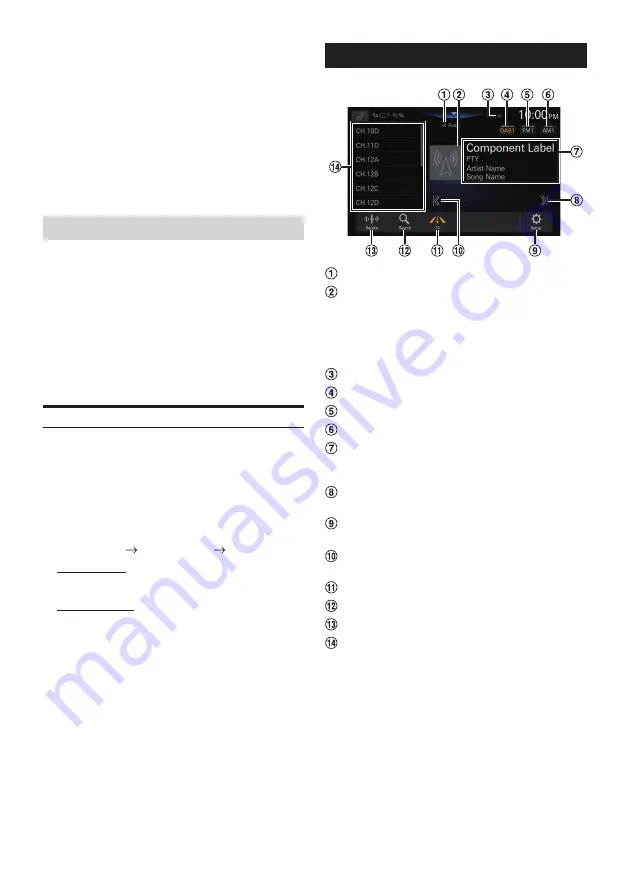
DAB/DAB+

 Signal Strength indicator
 Slide Show

Displays the program information, artist photos, and 
advertisements that are synchronised with the Service 
component currently being received. They may not be 
displayed, depending on the Service component 
currently being received.

 TP indicator
 Switch the DAB band.
 Switch the FM band.
 Switch the AM band.
 Information display

• 

For details on switching the display, see “Displaying 
DAB Text” (page 42).

 Increases frequency

Touch and hold to change the frequency continuously.

 Displays the Radio Setup Menu screen (page 

18).

 Decreases frequency

Touch and hold to change the frequency continuously.

 Traffic Information mode On/Off
 Displays the search screen
 Switches a Seek mode.
 Preset List

Displays the preset stations with a short touch.
Touch for at least 2 seconds to memorize the current 
station as a preset station.

Содержание HALO 11

Страница 1: ...165 Princes Highway Hallam Victoria 3803 Australia Phone 03 8787 1200 Ohmstrasse 4 85716 Unterschleissheim Germany Phone 49 0 89 32 42 640 For contact information on your respective country please visit www alpine europe com Aurora House Deltic Avenue Rooksley Milton Keynes MK13 8LW United Kingdom Phone 0345 313 1640 The 9th Towers Tower B 24th Floor Unit TNB01 03 33 4 Rama 9 road Huay Kwang Bangk...

Страница 2: ...2 EN ...

Страница 3: ...e Phone Calls Volume 17 Adjusting the Ringtones and Alerts Level 17 Adjusting the Notifications and Guidance Level 17 Adjusting the Voice Recognition Level 17 Adjusting the Microphone Level 17 Android Auto Setup 17 Adjusting the Media Level 17 Adjusting the Phone Calls Volume 17 Adjusting the Ringtones and Alerts Level 17 Adjusting the Notifications and Guidance Level 18 Adjusting the Voice Recogn...

Страница 4: ...heel Setting 27 Fuel Type Setting 27 EV Connector Type Setting 27 Installation Setup 27 About iLX 507A iLX F509A iLX F511A 28 Displaying the Product Information 28 Updating Firmware Version 28 Dedicated Tuning According to Your Car Car by Car Update 28 Displaying Software License 28 Initializing the Sound Settings 28 Initializing the System 28 Sound Setup Setting the Media Xpander MX 29 Equalizer ...

Страница 5: ...52 Hands free Phone Control Answering a Call 52 Hanging up the Telephone 53 Calling 53 Making a phone call using the Phone Menu 53 Phone Operation Screen 53 Adjusting the Speech Volume 53 Changing the Voice Output 54 Muting the Microphone 54 DTMF Touch Tone Function 54 Phone Book Function 54 Searching in the Phone Book 54 Synchronizing the Phone Book 54 Deleting the Phone Book Entries 54 Bluetooth...

Страница 6: ... Specifications 67 Installation and Connections WARNING 69 CAUTION 69 Precautions 70 Accessory List 70 Installation 70 Caution concerning the installation location 71 Mounting the Microphone 71 Mounting the GPS Antenna inside the vehicle 71 Note on using HDMI Connection Cables 71 Position Adjustment and Mounting Dimensions of the Display iLX F509A iLX F511A only 72 Adjusting the display position i...

Страница 7: ...ver from looking ahead thus causing an accident The driver or other people could be severely injured DO NOT WATCH VIDEO WHILE DRIVING Watching the video may distract the driver from looking ahead of the vehicle and cause an accident DO NOT OPERATE ANY FUNCTION THAT TAKES YOUR ATTENTION AWAY FROM SAFELY DRIVING YOUR VEHICLE Any function that requires your prolonged attention should only be performe...

Страница 8: ...d this product to have the work done USE SPECIFIED ACCESSORY PARTS AND INSTALL THEM SECURELY Be sure to use only the specified accessory parts Use of other than designated parts may damage this unit internally or may not securely install the unit in place This may cause parts to become loose resulting in hazards or product failure ARRANGE THE WIRING SO IT IS NOT CRIMPED OR PINCHED BY A SHARP METAL...

Страница 9: ...one iPod Lightning and Siri are trademarks of Apple Inc registered in the U S and other countries Apple CarPlay is a trademark of Apple Inc Use of the Made for Apple and Works with Apple badges means that an accessory has been designed to connect specifically to the Apple product s identified in the Made for Apple badge and to work specifically with the technology identified in the Works with Appl...

Страница 10: ...displayed while the HOME screen is displayed Press and hold this button for at least 2 seconds to turn the power off CAM button Displays the image of Camera2 Front Side Other or Camera1 Rear Press for 1 second or more to return to the previous screen button Press to seek up down a station in radio mode or up down a track etc in other audio visual sources MAP button Displays the map screen for Appl...

Страница 11: ...hing and holding Volume 0 to 35 Lowering Volume Quickly Audio Mute function instantly lowers the volume level to 0 1 Press the MUTE button to activate MUTE mode The audio level will be 0 and the mute indicator will flash 2 Press the MUTE button again to bring the audio back to previous volume level Turning off the screen button illumination Display OFF You can turn off the screen and button illumi...

Страница 12: ...the function The HOME screen can be switched between Normal mode and Enhanced Text mode For details see Setting the Home Screen Type page 26 Press the HOME button The HOME screen is displayed Normal mode screen example Enhanced Text mode screen example Touch to display the Sound Setup screen The Sound Setup screen can also be displayed by pressing the HOME button while the HOME screen is displayed...

Страница 13: ...nected hands free phone Displayed when Bluetooth setting is ON 0 1 2 3 4 5 This may not be displayed for the hands free phone Lights up when connecting the audio device via Bluetooth Does not display when connection is set to OFF Lights up when connecting the hands free phone via Bluetooth Does not display when connection is set to OFF Lights up when connecting a separately sold ALPINE KNOB RUE BK...

Страница 14: ...the Bluetooth Device Search for Bluetooth compatible devices Setting item Add New Device 1 Touch Add New Device A search for devices to connect wirelessly to the unit starts The Search List is displayed and the list of searched devices is displayed 2 Touch a device to connect in the list The Select Function screen is displayed 3 Select the function of the connecting device on the Select Function s...

Страница 15: ...he device is disconnected Deleting a Bluetooth Device from the list You can delete the information of a previously connected Bluetooth compatible device 1 Touch Delete of the Bluetooth compatible device to delete from the Paired Device list 2 Touch Yes Touching No will cancel the setting Wi Fi Setup Wi Fi is selected on the Device Setup menu screen Setting the Wi Fi Set to On when using Apple CarP...

Страница 16: ... Bluetooth or Wi Fi device name and device address of this unit Setting item Device Info Function Setup Function is selected on the Settings menu screen Function Setup Menu screen Setting items Apple CarPlay page 16 Android Auto page 17 Radio page 18 USB page 19 iPod page 20 Auxiliary page 20 HDMI page 21 Phone page 21 Bluetooth Audio page 22 CAN I F BOX page 22 Camera page 23 Dash Cam is displaye...

Страница 17: ...1 to 35 Initial setting 10 Touch or of Voice Recognition to set the volume level for voice recognition Adjusting the Microphone Level Setting item Microphone Level Setting level 1 to 11 Initial setting 5 Touch or of Microphone Level to set the microphone volume level Android Auto Setup Android Auto is selected on the Function Setup Menu screen Adjusting the Media Level Setting item Media Setting l...

Страница 18: ... Setting level 14 to 14 Initial setting 0 Touch or of Interrupt Volume to set the volume level for interruption broadcast Setting the TA Traffic Interrupt Set TA Traffic Announcement and Traffic Information interruption on or off Setting item TA Traffic Interrupt Touch Off or On of TA Traffic Interrupt Setting the News Interrupt Set News interruption on or off Setting item News Interrupt Touch Off...

Страница 19: ...na sold separately before installing the DAB antenna If an active antenna that needs power supply from this unit is used set DAB Antenna Power to On if a passive antenna that does not need power supply from this unit is used make sure to set DAB Antenna Power to Off otherwise a malfunction may occur Setting item DAB Antenna Power Touch Off or On of DAB Antenna Power USB Setup USB is selected on th...

Страница 20: ...et the display name of an external device This name is displayed as a source name on the HOME screen or Audio screen Setting item AUX Name Setting contents Off Auxiliary Initial setting Digital TV Not available when the current source is Auxiliary or Digital TV Video Setup Setting item Video Setup Touch or of Brightness Colour Contrast to set the picture quality Available only when the current sou...

Страница 21: ...ailable only when the current source is HDMI or Digital TV Adjusting Brightness Setting item Brightness Setting contents 15 to 15 Initial setting 0 Adjusting Colour of Picture Setting item Colour Setting contents 0 to 2 Initial setting 0 Adjusting Image Contrast Setting item Contrast Setting contents 15 to 15 Initial setting 0 Setting the HDMI Selector Set to On when the optional HDMI Selector is ...

Страница 22: ...e Phonebook Calendar Set the date format displayed in the phonebook Setting item Phonebook Calendar Setting contents YYYY MM DD Initial setting MM DD YYYY DD MM YYYY Bluetooth Audio Setup Bluetooth Audio is selected on the Function Setup Menu screen Adjusting the Bluetooth Audio Volume Setting item Volume Adjust Setting level 14 to 14 Initial setting 0 Touch or of Volume Adjust to set the volume l...

Страница 23: ... Camera 1 setting is On the video input signal type can be chosen Setting item Reverse Camera Signal Setting contents NTSC Initial setting PAL Camera 2 Setup Set how the second camera is used Setting item Camera 2 Setup Setting contents Off Initial setting Front Side Other Camera 2 Setup is not available when the Camera Setup screen is displayed using Setup of the Camera screen Camera 2 Signal Inp...

Страница 24: ...ouch to select the guide to adjust 3 Touch or to adjust the position of the guide 4 Touch Back or Close to complete the adjustment The setting can be returned to the default setting by touching Default Video Setup Setting item Video Setup Touch or of Brightness Colour Contrast to set the picture quality Adjusting Brightness Setting item Brightness Setting contents 15 to 15 Initial setting 0 Adjust...

Страница 25: ...pace inside the vehicle This setting does not apply to Voice Recognition function Language Setup Language Language is selected on the System Setup Menu screen The Setup menu feedback information etc for this unit can be changed to appear in the selected language Setting item Language 1 Language 2 Setting contents English Initial setting Deutsch Français Español Português Italiano Nederlands Suomi ...

Страница 26: ...etting item Key Illumination Level Setting level 2 to 2 Initial setting 0 This setting is only available when Dimmer is set to On or Auto Adjusting the Minimum Level of Backlight You can adjust the brightness of the backlight This function could be used for instance to change the screen brightness while traveling at night Setting item Screen Dimmer Level Setting contents 15 to 15 Initial setting 0...

Страница 27: ... wheel Setting Set this item when Apple CarPlay is used Android smartphone which installed Android Auto App is connected This setting influences Apple CarPlay Android Auto mode Setting item Steering wheel Setting contents Left Initial setting Right Fuel Type Setting Set the Fuel type of your car Setting item Fuel Type Setting contents Unknown Unleaded gasoline Initial setting Leaded gasoline Diese...

Страница 28: ...using the USB flash drive Introduction animation sound dedicated to the car model camera connection setting and camera guide line can be set with the data of the car model 1 Plug the USB flash drive with the update file stored into the unit 2 Touch Update of Car by Car Update 3 After the confirmation message appears touch OK Do not turn on off the power change the ignition key position until syste...

Страница 29: ...road noise Setting item Media Xpander Setting contents OFF Initial setting MX 1 MX 2 MX 3 1 Touch Media Xpander The Media Xpander setting screen is displayed 2 Touch Media Xpander to switch the level OFF MX 1 MX 2 MX 3 OFF The Media Xpander setting screen is returned to the Sound Setup Menu screen if no operation has been performed for more than 3 seconds MP3 WMA AAC FLAC WAV APE can have its own ...

Страница 30: ...ch and hold Preset 1 Preset 2 or Preset 3 for at least 2 seconds Band2 and Band11 are the same as the Bass and Treble controls For details on setting Bass and Treble see Adjusting Bass Level Treble Level page 33 Settings exceeding the frequency of adjacent bands are not available While adjusting the Parametric EQ you should consider the frequency response of the connected speakers When the Paramet...

Страница 31: ...performing the following procedures see About Time Correction page 34 Correction mode Setting item Time Correction 1 Touch the Correction mode button and then select ms cm or inch 2 Touch or for each speaker to adjust the time or distance 0 00 msec to 20 00 msec 0 02 msec step 0 0 cm to 680 0 cm 0 68 cm step 0 0 inch to 268 0 inch 0 268 inch step All speaker setting values are adjustable in the ra...

Страница 32: ...ther channels 7 To store the adjusted setting value touch and hold Preset 1 Preset 2 or Preset 3 for at least 2 seconds Touch Flat to initialise all values If the Rear Speaker setting is Off the Rear Speaker setting cannot be edited page 31 If the Subwoofer setting is Off the Subwoofer setting cannot be edited page 31 While adjusting the X OVER you should consider the frequency response of the con...

Страница 33: ...displayed Adjusting the Subwoofer Level You can set the Subwoofer level when a Subwoofer is connected Setting item Subwoofer Level Setting contents 0 to 15 Initial setting 0 Slide the lever left or right to adjust the level This setting is only available when Subwoofer is set to On page 31 Setting the Subwoofer Phase The subwoofer output phase is toggled Subwoofer Normal 0 or Subwoofer Reverse 180...

Страница 34: ...d be made according to the recommended crossover frequency of the connected speakers Determine the recommended crossover frequency of the speakers Adjusting to a frequency range outside that recommended may cause damage to the speakers For the recommended crossover frequencies of Alpine speakers refer to the respective Owner s Manual We are not responsible for damage or malfunction of speakers cau...

Страница 35: ...the sound of other speakers Example 2 Listening Position All Seats Adjust the time correction level of each speaker to almost the same level 1 Sit in the listening position driver s seat etc and measure the distance in meters between your head and the various speakers 2 Calculate the difference between the distance correction value to the farthest speaker and the other speakers L distance to farth...

Страница 36: ...en the Android Auto compatible smartphone is connected by USB while in Apple CarPlay mode a message appears Only charging is available on the Android Auto compatible smartphone When switching to Android Auto switch from the Device List See Connecting the Device Registered in the Device List page 15 The App must be Apple CarPlay compatible in order to appear in the Apple CarPlay screen Some functio...

Страница 37: ...ch Android Auto The Android Auto screen is displayed Android Auto button When another smartphone is connected by USB while using Android Auto with the wireless connection a message appears Touch Yes to switch the smartphone When the iPhone is connected by USB while in Android Auto mode a message appears Only charging is available on the iPhone When switching to Apple CarPlay switch from the Device...

Страница 38: ...uning mode The radio frequency up or down button changes depending on the tuning mode Seek mode Both strong and weak stations will be tuned in Manual mode The frequency is manually tuned in steps PTY mode RDS FM Radio Mode only The currently selected program type station will be tuned Preset mode You can directly switch preset stations 4 Touch to change the radio frequency up or down respectively ...

Страница 39: ...e Frequencies On or Off page 19 RDS mode is not be displayed for the AM band When the AF ON mode is selected the unit automatically tunes to a strong signal station in the AF list Use the AF OFF mode when automatic re tuning is not required Tips The RDS digital data includes the following PI Programme Identification PS Programme Service Name AF List of Alternative Frequencies TP Traffic Programme ...

Страница 40: ...g the traffic announcement Displaying Radio Text Text messages from a radio station can be displayed 1 Tune in a radio station that transmits text messages 2 Touch the information display in the FM radio mode repeatedly to switch to the desired display Tag Info Mode Radio Text Mode Tag Info Mode Tag Info Mode PS Name or Frequency PTY Name Artist Name Song Name Radio Text Mode Frequency Radio Text ...

Страница 41: ... select the desired band and repeat the procedure A total of 36 services can be stored in the preset memory 12 stations for each band DAB1 DAB2 or DAB3 If a preset memory has already been set in the preset button it will be cleared and the new station will be memorized Tuning to Preset Service You can tune in the preset stations in memory on either band using its preset number Touch any one of the...

Страница 42: ...r than the DAB source to indicate that the unit is receiving the traffic announcement This setting works interlocked with the traffic announcement Emergency Broadcast of RDS Displaying DAB Text Text messages from a DAB station can be displayed 1 Tune in a DAB station that transmits text messages 2 Touch the information display in the DAB mode repeatedly to switch to the desired display Tag Info Mo...

Страница 43: ...FLAC WAV APE video files MP4 MOV FLV MKV stored in a USB flash drive on the internal player of this system WARNING It is dangerous for the driver to watch video while driving the vehicle The driver may be distracted from looking ahead and an accident could occur Install the unit correctly so that the driver cannot watch a video unless the car is stopped and the parking brake is applied If the unit...

Страница 44: ...tons provide the same functions above Touch or slide the Time Bar to fast forward or fast reverse 3 To pause playback touch Touching again will resume playback If there is tag information artist name album name track name is displayed ID3 tag WMA tag If an MP3 WMA AAC FLAC WAV APE file contains ID3 tag WMA tag information the ID3 tag WMA tag information is displayed e g song name artist name and a...

Страница 45: ...re displayed 5 Touch the desired song s name The selected song is played back USB Video The video formats USB Flash drive supported by the unit are as follows Supported Container MP4 MOV FLV MKV Supported Video Coding MPEG 4 H 263 H 264 MPEG 4 AVC MPEG 1 MPEG 2 Supported Audio Coding MP3 WMA AAC WAV FLAC APE USB Video mode screen Folder Name File Name Current file number Total file number Changes ...

Страница 46: ... Fast reverse or touch and hold Fast forward Touch and hold for more than 1 second to forward reverse at 2x speed Keep touching to switch the speed to 3x 8x 16x and 32x 2 Release or to return to normal playback The buttons provide the same functions above Touch or slide the Time Bar to fast forward or fast reverse Repeat Play Touch or to select Repeat Play mode All All files are repeatedly played ...

Страница 47: ...layed iPod mode on iPhone Optional A separately sold Lightning to USB cable etc is required This unit does not support video playback from an iPhone which connected to this unit via the USB Connector Internet or telephone function etc of the iPhone is not controllable from the unit but these functions can be controlled using the iPhone itself When an iPhone is connected Apple CarPlay mode is turne...

Страница 48: ...f 64 characters is recommended The maximum number of characters for the unit is 64 Some characters may not be correctly displayed Searching for a Music File An iPhone can contain thousands of songs For this reason this unit can make various searches using the search function as shown below Using the Playlists Artists Albums Podcasts Audiobooks Genres Composers Songs Radio search mode s individual ...

Страница 49: ...uch to select Shuffle Play mode Album The songs on each album are played back in proper order Upon completing of all the songs on the album the next album is selected randomly This continues until all albums have been played Songs Randomly plays back songs within a selected category playlist album etc The songs within the category are played just once until all songs have been played Off Shuffle m...

Страница 50: ... an HDMI output interface Not all devices with an HDMI output interface can be recognised by this unit Use only the Alpine Special HDMI connection cable 1 Press the HOME button to select HDMI The display shows the HDMI mode screen 2 During the HDMI playback touch and hold the screen to display the operation screen The HDMI operation screen is displayed for about 5 seconds For your safety video is ...

Страница 51: ... to stop your car in a safe place Depending on the connected Bluetooth compatible device s the function may differ Also refer to the Owner s Manual of the connected device s About the Hands free Phone Hands free calls are possible when using a HFP Hands Free Profile compatible mobile phone with this unit Avoid performing a hands free call in heavy traffic or on narrow or winding streets Close the ...

Страница 52: ...When 90 items exist in the list the oldest item is deleted when a further item is to be added Phone Book You can make a phone call from the Phone Book Keypad screen Use to type a phone number Setup Displays the Phone Setup Menu screen page 21 Switch Device You can switch between Hands Free 1 and Hands Free 2 Answering a Call 1 An incoming call triggers the ringtone and an incoming call display 2 T...

Страница 53: ...l is started Entering a Phone Number to Make a Call 1 Touch Keypad on the Phone menu The number input screen Keypad appears Touch to delete an entered number Touch Delete All to delete all entered numbers 2 Enter the phone number you wish to call You can enter up to 40 digits 3 Touch Call The phone call is started Phone Operation Screen Name or phone number If it is registered with a Group the Gro...

Страница 54: ...ch you want to call 1 Touch the initial search bar on the Phone Book screen and slide your finger up and down to align the bar with the target letter 2 Touch the name of the contact you want to call The Detail info screen is displayed 3 Touch the phone number The phone call is started If there are no names in the list beginning with that letter the next letter of the alphabet is searched For examp...

Страница 55: ... Profile or AVRCP Audio Video Remote Control Profile is required Not all functions work with all devices During a call sound on the Bluetooth audio source is paused Compatible AVRCP versions 1 6 Available functions may differ depending on the AVRCP version Playback 1 Press the HOME button and select Bluetooth Audio mode The display shows the Bluetooth Audio mode screen When the Bluetooth is set to...

Страница 56: ... run through the connection procedure again 1 Touch Phone Setting The Device List screen is displayed 2 Touch Connect Bluetooth connection will start For details see Displaying Device List page 14 Disconnecting the Bluetooth Connection 1 Touch Phone Setting The Device List screen is displayed 2 Touch Disconnect The Bluetooth connection is disconnected For details see Disconnecting the Connected De...

Страница 57: ...X playback touch and hold the screen to display the operation screen The Auxiliary AUX operation screen is displayed for about 5 seconds For your safety video is not displayed and only audio can be heard while driving For details on the connected auxiliary device refer to its owner s manual Source Title The name which is given as the source name in Setting the Auxiliary AUX Name page 20 is display...

Страница 58: ...ift the gear lever to the reverse R position The rear view image is displayed while the car remains in reverse 2 If you shift the gear lever to a position other than reverse R the monitor returns to the previous screen Never depend solely on the camera when backing up Always turn and look and only use the camera for additional assistance This function is effective when the reverse wire is properly...

Страница 59: ...a image Guides appear to help visualize the car s width and distance from the rear bumper Car width extension lines red yellow and green in order of distance If properly calibrated the marks indicate the car s width This helps guide the car s path when backing up in a straight line The marks represent the distance from the rear of the car from the rear end of the bumper The marks do not move in sy...

Страница 60: ...ion mark represents the distance to the road surface The distance to an object on the road is not accurately represented by the guides Error between the screen and the actual road surface In the following conditions errors are produced between the screen guidance and the actual road surface The illustrations represent a case when the camera is installed in the standard position When there is a ste...

Страница 61: ...see the camera Owner s Manual You can perform a Guide Adjustment For details see Camera Guide Setup page 23 Front Camera Operation Displaying the Camera Image from the HOME screen 1 Press the CAM button The Camera view image is displayed 2 Touch the screen when the image from the camera is displayed The operation screen is displayed on the screen 3 Touch Front The Front Camera view image is displa...

Страница 62: ...our vehicle 1 Available functions differ depending on your vehicle For details refer to your vehicle s instruction manual A CAN Interface Box sold separately is required Available functions differ depending on your vehicle For details refer to your vehicle s instruction manual You can check the air conditioner settings on the Climate screen 2 You can check for obstacles on the Parking Sensor scree...

Страница 63: ...t be displayed Vehicles that do not have the obstacle detection sensor cannot use this function Parking Sensor Camera interlock screen example Rear camera You can check for obstacles through an interlocked camera image by connecting a Camera Touch the car icon to switch to the Parking sensor full screen Touch Back on the Parking Sensor full screen to return to the Parking Sensor Camera interlock d...

Страница 64: ...dio Coding and is a basic format of audio compression used by MPEG2 or MPEG4 What is FLAC FLAC Free Lossless Audio Codec is an audio file codec for lossless compression developed and offered as open source software Codecs with lossy compression forms such as MP3 and AAC reduce part of the data to improve compression efficiency However FLAC can reconstruct compressed data to be an identical copy of...

Страница 65: ...s are counted if their formats are playable on this unit Media supported The media that this device can play back a USB flash drive Corresponding File Systems This device supports FAT 16 32 exFAT The maximum nested folder depth is 8 including the root directory File names are limited to 256 characters including the extension Valid characters for folder file names are letters A Z all caps numbers 0...

Страница 66: ...cessary Unable to tune stations in the seek mode You are in a weak signal area Make sure the tuner is in Seek mode If the area you are in is a primary signal area the antenna may not be grounded and connected properly Check your antenna connections make sure the antenna is properly grounded at its mounting location The antenna may not be the proper length Make sure the antenna is fully extended if...

Страница 67: ... operate it again The HDMI devices are not connected properly Remove the HDMI devices from the unit and then reconnect them Enable the output setting on the HDMI devices HDMI monitor communication error Please check the connection or ACC off on Connection error Turn OFF ON the engine ACC or check the HDMI connection cable of the HDMI compatible monitor Specifications MONITOR SECTION Screen Size 7 ...

Страница 68: ...EE 802 11 a n ac 5 GHz Channels 1 13 ch 2 4 GHz 149 165 ch 5 GHz Security Protocols WPA3 WPA2 PSK TKIP AES GENERAL Power Requirement 14 4 V DC 11 16 V allowable Operating temperature 20 C to 60 C Power Output 50 W 4 Maximum Current Consumption 15 A Audio output level Preout Front Rear 4V 10k ohms max Preout Subwoofer 4V 10k ohms max Weight 1 4 kg iLX 507A 2 3 kg iLX F509A 2 6 kg iLX F511A CHASSIS ...

Страница 69: ...ge or obstruct pipes fuel lines tanks or electrical wiring Failure to take such precautions may result in fire DO NOT USE BOLTS OR NUTS IN THE BRAKE OR STEERING SYSTEMS TO MAKE GROUND CONNECTIONS Bolts or nuts used for the brake or steering systems or any other safety related system or tanks should NEVER be used for installations or ground connections Using such parts could disable control of the ...

Страница 70: ...e Guide 1set Cables Power cable 1 GPS Antenna 1 Antenna mounting plate 1 Cable clamp for antenna 1set USB extension cable 1 PRE OUT cable 1 Microphone 1 CAMERA cable 1 REMOTE cable 1 Main unit mounting parts Face Plate 1 HDMI Bracket 1 Flush head screw M5 8 4 Screw M5 8 4 iLX F509A iLX F511A Main unit 1 Display unit 1 Quick Reference Guide 1set Cables Power cable 1 GPS Antenna 1 Antenna mounting p...

Страница 71: ...sive tape Mounting the GPS Antenna inside the vehicle 1 Clean the mounting location 2 Put on the GPS Antenna mounting plate 3 Mount the GPS Antenna GPS Antenna Antenna mounting plate This unit Do not mount the GPS Antenna inside the centre console Mount the GPS Antenna on a flat plane of the dash board or rear tray Make sure the GPS Antenna is not covered obstructed by any metallic surface or obje...

Страница 72: ...ation of any other control switches It impairs confirmation of gauges or warning indicators It interferes with vehicle equipment switches panels etc Depending on the vehicle the glove compartment or cup holders may become inaccessible or air conditioner ventilation ducts may be covered Display mounting dimensions and adjustable positions Front back position Forward position 51 5 mm 31 5 mm Back po...

Страница 73: ...l mounting bracket to the unit using the supplied screws If you do not have the original mounting bracket mount the Double din KIT provided with the side mounting bracket etc to the main unit Sold separately iLX 507A Original Mounting Bracket Screws M5 8 included Face plate Included iLX F509A iLX F511A Original Mounting Bracket Screws M5 8 included 2 Connect all other leads of the unit according t...

Страница 74: ...t Rear Included up down position 2 50 mm for up down position 0 mm or 60 mm 2 35 mm for up down position 15 mm or 45 mm 2 20 mm for up down position 30 mm 0 mm Sheet Rear 2 50 mm 15 mm Sheet Rear 2 35 mm 30 mm Sheet Rear 2 20 mm Sheet Rear 2 20 mm 45 mm Sheet Rear 2 35 mm 60 mm Sheet Rear 2 50 mm 3 Attach the Cover Rear to the rear of the display unit using 2 screws M2 6 6 Secure the screws then a...

Страница 75: ...8 Doing so may not turn power on 2 Mount the Power Plate Power Plate Included If the Power Plate is not mounted the display unit may not be turned power on Make sure to mount it 3 Mount the Cover Hinge using 2 screws M3 4 Secure the screws then attach the Sheet Hinge Sheet Hinges Included Screws M3 4 Included Cover Hinge Included ...

Страница 76: ...Right Rear Right To input terminal of amplifier when adding an external amplifier REAR OUT REMO Blue White REVERSE Orange White PARKING BRAKE Yellow Blue ACC Red BATT Yellow GND Black Green Green Black White White Black Gray Black Gray Violet Black Violet SUBW FRONT OUT P ANT Blue To power antenna STEERING REMOTE HDMI REMO OUT AUX REMO OUT To steering remote control interface To HDMI Selector Inte...

Страница 77: ...l Power Supply Connector PRE OUT Connector REM Connector DAB Antenna Connector To DAB Antenna sold separately Radio Antenna Receptacle MIC Input Connector To microphone included Steering Remote Control Interface Connector To steering remote control interface For details about connections consult your nearest Alpine dealer HDMI REM OUT Lead Brown Connect this lead to the remote input lead of your H...

Страница 78: ...n Battery Lead Yellow Connect this lead to the positive post of the vehicle s battery Ground Lead Black Connect this lead to a good chassis ground on the vehicle Make sure the connection is made to bare metal and is securely fastened using the sheet metal screw provided Fuse Holder 15A USB Connector 2 4A To USB flash drive iPhone or Android smartphone USB Connector 1 5A To iPhone or Android smartp...

Страница 79: ...e unit draws some current several hundred milliamperes even when its switch is placed in the OFF position and the battery may be discharged To prevent external noise from entering the audio system Locate the unit and route the leads at least 10 cm away from the car harness Keep the battery power leads as far away from other leads as possible Connect the ground lead securely to a bare metal spot re...

Страница 80: ...ely Lightning to USB Cable KCU 471i sold separately Do not leave an iPhone in a vehicle for a long time Heat and humidity may damage the iPhone and you may not be able to play it again Connection of a USB Flash Drive USB Connector 2 4A Black USB Flash Drive sold separately Do not leave a flash drive in a vehicle for a long time Heat and humidity may damage the flash drive ...

Страница 81: ...ld separately Lightning Digital AV Adapter Apple Inc products sold separately Connection of an HDMI Device Android device HDMI input connector Android device with MHL connector sold separately MHL connection kit KCU 610MH sold separately HDMI connection cable MHL conversion adapter Micro USB conversion cable USB connector 2 4A Black A connection kit or adapter kit suitable for the type of terminal...

Страница 82: ...nversion adapter Micro USB conversion cable HDMI REMO OUT Brown REMOCON IN Brown White USB POWER HDMI IN 2 HDMI IN 1 HDMI OUT HDMI SELECTOR INTERFACE KCX 630HD sold separately DVD Player sold separately HDMI connection cable REM Connector HDMI connection cable supplied with DVD Player HDMI REM OUT Lead Brown A connection kit or adapter kit suitable for the type of terminal on the connecting device...

Страница 83: ...me in the OWNER S MANUAL Connection of an External Amplifier PRE OUT Connector Power Supply Connector Power cable PRE OUT cable REMO Blue White REMOTE ON Blue White REMOTE ON Blue White SUBW Amplifier for subwoofer sold separately To subwoofer input terminal FRONT OUT REAR OUT To front input terminal Amplifier 4 ch sold separately To rear input terminal Red Red White White Subwoofer Front speaker ...

Страница 84: ...on cable included with direct rearview camera Rear Camera sold separately Front or Side Camera sold separately REAR CAMERA FRONT CAMERA Camera extension cable included with direct frontview camera Connect to the plus side of the car s reverse lamp Reverse Lead Orange White REAR CAMERA Input Connector FRONT CAMERA Input Connector ...

Отзывы: