background image

28

-EN

Auxiliary Device Operation (Optional)

Operating Auxiliary Devices

To operate your devices connected to the AUX
terminals on the rear panel of IVX-C806/IVX-M706/
CVA-1006R, follow the procedure described below.

WARNING

It is dangerous (and illegal in many states) for the
driver to watch the TV/Video while driving the
vehicle. The driver may be distracted from looking
ahead and an accident could occur.

Install the IVX-C806/IVX-M706/CVA-1006R
correctly so that the driver cannot watch TV/Video
unless the vehicle is stopped and the emergency
brake is applied.

If the IVX-C806/IVX-M706/CVA-1006R is not
installed correctly, the driver will be able to watch
the TV/Video while driving the vehicle and may be
distracted from looking ahead causing an
accident. The driver or other people could be
severely injured.

1

Press the SOURCE button.
The main menu screen appears on the display.

2

Rotate the rotary encoder and select "AUX", then
press the rotary encoder to execute the
selection.

NOTE

If the AUX mode is not displayed on the main menu,
select "AUX IN" in the Setup mode screen. Either AUX1
or AUX2 should be turned ON.

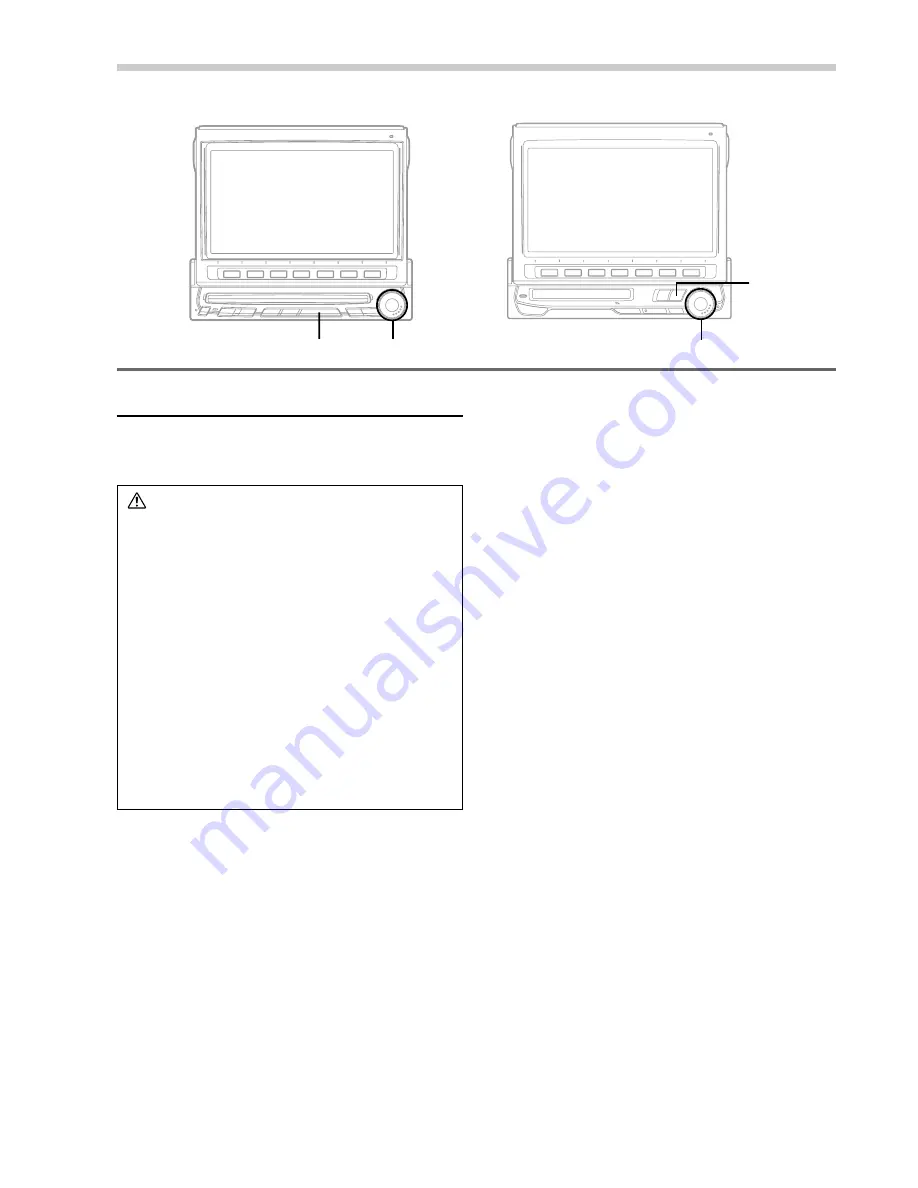
SOURCE

SOURCE Rotary encoder

Rotary encoder

(IVX-C806)

(IVX-M706 .... with MD built-in
 CVA-1006R ... without MD built-in)

Содержание CVA-1006R

Страница 1: ...ria Alava Apdo 133 Spain Tel 34 45 283588 ALPINE ELECTRONICS OF AUSTRALIA PTY LTD 6 8 Fiveways Boulevarde Keysborough Victoria 3173 Australia Tel 03 9769 0000 ALPINE ELECTRONICS GmbH Kreuzerkamp 7 11 40878 Ratingen Germany Tel 02102 45 50 ALPINE ITALIA S p A Via C Colombo 8 20090 Trezzano Sul Naviglio MI Italy Tel 02 48 47 81 Designed by ALPINE Japan Printed in Japan Y 68P41262Y58 O Mobile Multime...

Страница 2: ...s de confort Un changeur de CD Alpine permet d augmenter la plage des sélections musicales de votre système embarqué Tous les modèles l exception du CHM S620 peuvent être contrôlés à partir des autoradios Alpine et offrent une excellente qualité audio Le modèle CHA S624 est un changeur 6 disques ultra performant compatible Ai NET et équipé d un convertisseur N A standard d une sortie optique numér...

Страница 3: ...ing CD MD Radio 16 Priority PTY Programme Type 17 Turning Emergency Alarm Display On or Off 17 Displaying Radio Text 17 1 EN CD player Operation IVX C806 only IVX M706 CVA 1006R optional Playback 18 Fast Forward and Backward 18 Music Sensor Skip 19 Repeat Play 19 M I X Random Play 19 Displaying and Scrolling CD Title Text 19 Displaying List of Track Titles CD Titles 20 Controlling CD Changer Optio...

Страница 4: ...g Spectrum Analyzer IVX C806 only 39 Displaying Spectrum Analyzer IVX M706 CVA 1006R only 40 Turning Defeat Mode On and Off 40 Titling CDs 41 Adjusting Subwoofer Level when subwoofer is used with other speakers 42 Switching Phase 43 Setting the External Device Interrupt Mode 43 2 EN Setting Interrupt Icon Display IN INT 44 Interrupt Feature MIX LEVEL 44 Setting Bass Frequency 45 Setting Visual Mod...

Страница 5: ...N REPLACING FUSES Failure to do so may result in fire or electric shock DO NOT BLOCK VENTS OR RADIATOR PANELS Doing so may cause heat to build up inside and may result in fire USE THIS PRODUCT FOR MOBILE 12V APPLICATIONS Use for other than its designed application may result in fire electric shock or other injury DO NOT PLACE HANDS FINGERS OR FOREIGN OBJECTS IN INSERTION SLOTS OR GAPS Doing so may...

Страница 6: ...label side is facing up when you insert the disc Your player will automatically eject any disc that is inserted incorrectly If the player continues to eject a correctly inserted disc push the RESET switch with a pointed object such as a ballpoint pen Playing a disc while driving on a very bumpy road may result in skips but this will not scratch the disc or damage the player New Discs As a protecti...

Страница 7: ...rs CORRECT INCORRECT CORRECT Disc Stabilizer Transparent Sheet New Discs Before inserting an MD Never install warped or irregular shaped MD into this unit Use your finger to feel around the outer edge of the MD to make sure there are no irregularities Inserting defective or damaged MD could severely damage the mechanism Using an MD Check and ensure the following Under no circumstances should you o...

Страница 8: ...attention will be on the road and not on the IVX C806 IVX M706 CVA 1006R This has been done for the safety of the driver and passengers Title Input and Audio Processor Adjustments cannot be made if the car is moving The car must be parked and the parking brake must be engaged for the procedure described in the Owner s Manual to be valid The warning CAN T OPERATE WHILE DRIVING will be displayed if ...

Страница 9: ... of AUX2 Radio Mode Screen Volume Level Current Time Selected Source The Function Guide displays the labels for each of the Function buttons These labels will change depending upon the functions for the selected source 5 Press the rotary encoder to execute the selection The Radio mode screen is displayed NOTE If PAGE 1 2 or PAGE 1 3 appears in the Function Guide menu there are additional functions...

Страница 10: ...tacle and press the OPEN CLOSE button again to lower the monitor When the movable monitor is opened do not place any object on the monitor and be careful not to bump or apply any pressure to the monitor while it is open This can cause damage to the mechanism Under low ambient temperature conditions the display may be dark for a short period of time immediately after the power is turned on Once the...

Страница 11: ...used for an extended period of time An SPST Single Pole Single Throw switch sold separately can be added to simplify this procedure Then you can simply place it in the OFF position when you leave the vehicle Turn the SPST switch back ON before using the IVX C806 IVX M706 CVA 1006R For connecting the SPST switch refer to Connection Diagram of SPST switch on page 63 Some operation of the unit cannot...

Страница 12: ...tton to return to the main menu screen Adjusting the Volume Bass Treble Balance Between Left and Right Fader Between Front and Rear 1 Press the rotary encoder repeatedly until the mode you wish to adjust is obtained Each press changes the modes as follows BAS TRE BAL FAD VOL The volume level can be adjusted at any time by just rotating the rotary encoder NOTE When the subwoofer mode is ON its leve...

Страница 13: ...ton is released NOTE When a stereo FM station is tuned in the STEREO indicator appears in the display Automatic Seek Tuning 1 Press the BAND button repeatedly to select the desired radio band FM MW or LW 2 Press the 2 TUNE button to select the desired mode DX or Local Each press changes as follows Distance Local Manual There are two modes you can select for auto tuning DX and Local DX Distance mod...

Страница 14: ...ET1 through 6 P SET6 for at least 2 seconds The Function Guide indicators in the display P SET1 through P SET6 will blink for 5 seconds 3 While the P SET1 through P SET6 indicators in the display are blinking press the Function button into which you wish to store the station within 5 seconds The indicators in the display stop blinking showing that the station has been memorized at the Preset butto...

Страница 15: ...Function buttons 1 Press the BAND button in the radio mode to choose the desired radio band Each press changes the radio bands 2 Press the Function button 1 P SET1 through 6 P SET6 that has your desired preset station in memory The preset station is received T R V S Search for Local Stations Using the T R V S feature of this unit you can automatically seek and memorize up to 12 local stations max ...

Страница 16: ...is not required 3 Press the FUNC RETURN or RDS button to return to the radio mode NOTE To display the RDS Setting information screen in other mode than FM radio band for example press the RDS button 1 FUNC SOURCE 1 FUNC SOURCE 3 3 5 5 RDS RDS Tips The RDS digital data includes the followings PI Programme Identification PS Programme Service Name AF List of Alternative Frequencies TP Traffic Program...

Страница 17: ...rmation being received lightly press the 4 T INFO button to skip that traffic information message The T INFO mode will remain in the ON position to receive the next traffic information message If the volume level is changed while receiving traffic information the changed volume level will be memorized When traffic information is received next time the volume level will be automatically adjusted to...

Страница 18: ...e CD MD player or the regular FM broadcast When the traffic information broadcast finishes the unit automatically returns to the original source you were playing before the traffic information broadcast began RDS Operation 1 FUNC FUNC 3 RDS R TEXT RDS R TEXT 2 4 6 1 3 2 4 6 When traffic information stations cannot be received In the CD MD mode When the TP signal can no longer be received the traff...

Страница 19: ...urs 4 Press and hold the 6 P PTY button for at least 2 seconds to turn on the Priority PTY interrupting mode To disable the PRIORITY PTY interrupting function press and hold the 6 P PTY button for more than 2 seconds NOTE In the PRIORITY PTY function unlike in the T INFO function the volume does not increase during operation 5 Press the FUNC RETURN button to return to the previous screen Turning E...

Страница 20: ...rting an CD into the optional CD player starts playback automatically 3 To temporarily pause playing press the 2 J button To resume play press the 2 J button for a second time 4 Press the eject c button when you want to eject the CD If you use an optional CD player press the eject button on the optional CD player NOTES IVX C806 only Three inch 8 cm CD s can be used Only compact discs containing th...

Страница 21: ...er equipped with the M I X ALL function is connected M I X ALL will also be selectable In this mode the tracks on all the CDs in the current magazine will be included in the random playback sequence During M I X play Repeat Play for a single track will be disabled Displaying and Scrolling CD Title Text If titles have been memorized for CDs the CD titles can be shown on the display for titling CDs ...

Страница 22: ...selected title plays the title list screen closes and the CD mode main screen or CD Changer mode main screen appears Rotary encoder LIST NOTES If the disc is not titled the display shows NO TITLE CD If no disc is loaded the display shows NO DISC Pressing the LIST or FUNC RETURN button while the list of the disc titles is being displayed changes the display back to the CD CD Changer mode screen IVX...

Страница 23: ...splay changes and now the Function buttons 1 6 represent disc numbers 7 12 Press the Function buttons 1 through 6 to select your desired disc For example to select 9th disc press 3 DISC 9 button NOTES To select your desired track number on the selected disc lightly press the 1 g or 3 f repeatedly until your desired track number is displayed After selecting the desired you can operate in the same w...

Страница 24: ...me play press the 2 J button for a second time 4 Press the eject c button when you want to eject the MD If you use an optional MD player press the eject button on the optional MD player NOTES IVX M706 only The player accepts only one MD at a time for playback Do not attempt to load more than one MD Before inserting an MD make sure that the MD cartridge is clean and not warped If it is dirty wipe i...

Страница 25: ... least 2 seconds to start the auto scrolling The title will be scrolled repeatedly To deactivate the auto scrolling press and hold the 6 SCROLL button for at least 2 seconds NOTES Depending on the MD deck used for recordings inputting titles the characters may not be displayed correctly If the MD title or track titles are not memorized the unit displays NO TITLE Displaying List for Track Titles MD...

Страница 26: ...execute the selection The display shows the DVD player mode screen Insert a disc into the DVD video CD CD player the player starts playing NOTE Press the 6 F GUIDE button during DVD video CD CD play to turn on or off the Function Guide display In the ON position The Function Guide display will always be shown In the OFF position The Function Guide display will disappear after approx 5 seconds if n...

Страница 27: ...ions of your DVD player DVD changer Displaying List of Disc Titles If titles have been memorized for Video CDs CDs the list of the Video CDs CD titles can be displayed and Video CDs CDs can be selected by their titles For memorizing titles see page 41 1 Press the LIST button in the DVD DVD Changer mode The list of disc titles will be displayed and memorized titles will be displayed also When DVD d...

Страница 28: ...our desired disc loaded The Function buttons 1 DISC1 through 6 DISC6 select the discs from the first disc to 6th disc For example press the 3 DISC 3 button to select the third disc SOURCE SOURCE Rotary encoder Rotary encoder Function buttons 1 through 6 NOTES To select your desired track number on the selected disc lightly press the 1 g or 3 f repeatedly until your desired track number is displaye...

Страница 29: ...e for the remote control supplied with your navigation system NOTES When the V SEL button is pressed while the Navigation selection mode is being selected in the VISUAL setting refer to page 45 the navigation mode will be directly activated If the Navigation mode menu is not displayed on the main menu screen select AUX IN in the Setup mode screen and set the Navigation mode to the ON position If y...

Страница 30: ...cle is stopped and the emergency brake is applied If the IVX C806 IVX M706 CVA 1006R is not installed correctly the driver will be able to watch the TV Video while driving the vehicle and may be distracted from looking ahead causing an accident The driver or other people could be severely injured 1 Press the SOURCE button The main menu screen appears on the display 2 Rotate the rotary encoder and ...

Страница 31: ...ponding Function button 1 FLAT through 6 NEWS You can select your desired equalizer characteristic curve from 6 preset characteristic curves FLAT MALE FEMALE POPS ROCK and NEWS 5 When you have selected your desired characteristic curve press the FUNC RETURN The display returns to the Audio Processor List screen NOTE When the FUNC RETURN button is pressed the display returns to the previous screen ...

Страница 32: ...ary encoder at the desired level Repeat the above steps to adjust other frequencies 6 When the adjustments have been completed press the FUNC RETURN button The display changes to the Equalizer mode screen Selecting Factory Surround Mode Presets Depending upon the music source you listen to you can choose your desired surround mode from 6 factory preset surround modes 1 Press the SOURCE button The ...

Страница 33: ...tal Harmonic Enhancer Mode The DHE mode enhances the sound of musical instruments or vocals while masking road noises of a moving vehicle The result is music with more clarity 1 Press the SOURCE button The main menu screen appears on the display 2 Press the 4 A PROC button to display the Audio Processor List screen 3 Rotate the rotary encoder and select DHE then press the rotary encoder to execute...

Страница 34: ...ocessor is designed to return the natural balance of harmonic time alignment which disappears when the sound signal is amplified and reproduced by loudspeakers The result of this processing is crisp clean sound with tighter transients and sharper imaging If you make the BBE adjustments after adjusting the surround settings the audible processing result will be enhanced remarkably 1 Press the SOURC...

Страница 35: ...ss the rotary encoder to execute the selection The display changes to the L P S Listening Position Selection mode screen 4 Press the Function button 2 ALL through 5 FRONT RIGHT that has your desired listening position NOTES The black squares show the listening positions When the 1 OFF button is pressed the L P S mode is deactivated 5 When selection has been completed press the FUNC RETURN button T...

Страница 36: ...e Correction mode screen Tip When the FUNC RETURN button is pressed the display returns to the previous screen Adjusting Cross Over X Over Point of 2 Way Divider If an optional Alpine Channel Divider PRA H400 is connected you can control the Divider from the IVX C806 IVX M706 CVA 1006R Use this procedure when one or two 2 way system or 3 way system channel dividers are connected 1 Press the SOURCE...

Страница 37: ... least 2 seconds in the Divider mode The mode changes to the Divider Adjustment mode 2 Press the 2 LEVEL button The mode changes to the Level Adjustment mode 3 Press the rotary encoder and select the channel you wish to adjust Each press changes the channels as follows When only one 2 way system divider is connected L Low R Low F High L R High R R High L F High R When two 2 way system dividers are...

Страница 38: ...he mode switches between the Front adjustment and Rear adjustment modes and the display also changes L Low R Low L High R High When only one 3 way divider is connected L Low R Low L Mid R Mid L High R High When two 3 way dividers are connected L Low R Low L Mid R Mid L High R High Each time the 6 F R button is pressed the mode switches between the Front adjustment and Rear adjustment modes and the...

Страница 39: ...enu is displayed on the display 2 Press the 4 A PROC button The Audio Processor List screen is displayed 3 Rotate the rotary encoder and select Adaptive EQ The Function Guide screen is displayed 4 Press the Function button 1 P SET1 through 6 P SET6 that has your desired setting memorized using the optional divider 5 Press the FUNC RETURN button The display returns to the main menu screen Memorizin...

Страница 40: ...ou can select your desired characteristic curves directly from the Audio Processor A PROC List without switching to individual mode screens 1 Display the Audio Processor List screen Rotate the rotary encoder and select the desired mode by moving the cursor The Function Guide for the selected mode is displayed 2 Press the Function buttons 1 through 6 that has your desired characteristic curve The l...

Страница 41: ...button the spectrum analyzer modes change There are three modes select your desired mode to match the music being played Mode 1 This mode can be used for any genre of music Mode 2 This mode is suitable to vocal song music Mode 3 This mode emphasizes the rhythmical bass sound and gives an image of vivid low frequencies SCAN Display It displays mode1 to mode3 repeatedly 3 To deactivate the spectrum ...

Страница 42: ... an image of vivid low frequencies SCAN Display It displays mode 1 to mode 3 repeatedly 5 To deactivate the spectrum analyzer mode press the 1 OFF button Turning Defeat Mode On and Off When the defeat mode is on the sound signals bypass the BBE and surround circuits and directly go to the line output The equalizer curve therefore becomes flat 1 Press the SOURCE button The main menu screen appears ...

Страница 43: ...ng has been completed press the 6 WRITE button to store the title in memory The display changes to the CD mode The input titles will be displayed when a CD titled is selected NOTES If the memory capacity for CD titles is full and if you attempt to title a new CD the oldest title will be erased to make room for the new one To delete a title select the title you want to delete then select SPC space ...

Страница 44: ...5 Press the rotary encoder repeatedly to select SUB W Each press changes the modes as follows SUB W BAS TRE BAL FAD VOL 6 Rotate the rotary encoder and adjust the subwoofer output level 7 When your adjustment has been completed press the FUNC RETURN button The display returns to the main menu NOTES For further information please contact your Alpine dealer When you connect a subwoofer you need an a...

Страница 45: ...ple you can listen to the voice guidance of your navigation system when it occurs even while you are playing a CD or MD The CD MD player will be automatically muted during voice guidance For further details please refer to the manual for NVE K200 Immediately after inputting titles or changing the settings of Setup Mode or Display Mode While the system is inputting the titles or data automatically ...

Страница 46: ... C806 IVX M706 CVA 1006R the voice guidance of the navigation system will be mixed with the radio or CD MD play You can adjust the volume level of the voice guidance You cannot use this function with an external amplifier Immediately after inputting titles or changing the settings of Setup Mode or Display Mode While the system is inputting the titles or data automatically do not turn the ignition ...

Страница 47: ... of the V SEL button switches the modes NAV AUX1 AUX2 DISPLAY NOTES When the voice guidance of the Navigation system starts to interrupt the audio the display is automatically changed to the navigation screen The volume level of the audio will be automatically reduced when the voice guidance of the Navigation system starts Setting Bass Frequency Immediately after inputting titles or changing the s...

Страница 48: ...ar seat monitor if the navigation system is connected When the 2 AUX1 button is pressed the device connected to Terminal AUX 1 will be played on the rear seat monitor and the monitor produces picture and sound When the 3 AUX2 button is pressed the device connected to Terminal AUX 2 will be played on the rear seat monitor and the monitor produces picture and sound Other Useful Features NOTES If the...

Страница 49: ...nt mode The Function Guide appears 4 Press the 1 DN or 2 UP button to delay or advance the hours respectively 5 Press the 3 DN or 4 UP button to delay or advance the minutes respectively 6 Press the FUNC RETURN button after adjusting the clock The display returns to the main menu screen NOTE To quickly set the time to the nearest hour press the 5 TIME RESET button If the displayed time is before t...

Страница 50: ... the main menu screen Demonstration In the Demonstration mode the unit performs scanning of the basic operation of each source Immediately after inputting titles or changing the settings of Setup Mode or Display Mode While the system is inputting the titles or data automatically do not turn the ignition key engine key to OFF Otherwise the title may not be written or the settings may not be changed...

Страница 51: ...Brightness of Picture Immediately after inputting titles or changing the settings of Setup Mode or Display Mode While the system is inputting the titles or data automatically do not turn the ignition key engine key to OFF Otherwise the title may not be written or the settings may not be changed NOTE The Parking Brake must be engaged to access the display mode screen Attempting to access this scree...

Страница 52: ...ion DVD AUX1 and AUX2 modes Colour adjustment cannot be made if a Navigation system with the RGB feature is connected Immediately after inputting titles or changing the settings of Setup Mode or Display Mode While the system is inputting the titles or data automatically do not turn the ignition key engine key to OFF Otherwise the title may not be written or the settings may not be changed 1 Rotate...

Страница 53: ... mode to keep the background illumination of the monitor bright Press the 2 ON button to keep the background illumination of the monitor dark 5 When the setting has been completed press the FUNC RETURN button The display returns to the main menu screen Switching Background Textures Colours You have a choice of 12 different background textures colours preset at the factory Select them following the...

Страница 54: ... Auto Background Texture colour Scroll mode To turn off the Auto Background Texture colour Scroll mode press the 1 OFF button The background textures colours will scroll when the ignition key is turned off once and turned back on again as follows MARBLE SKY WOOD GRAD METAL C6 C5 C4 C3 C2 C1 ABYSS Switching Display Modes 1 Press and hold the V SEL button for at least 2 seconds in the AUX or NAVI mo...

Страница 55: ...rrent source 1 Press the SOURCE button The main menu appears on the display 2 To change only the audio portion while watching the current video source Press the 2 A SEL button to select the audio portion Example NOTE Operative only when the video source is DVD Navigation AUX1 or AUX 2 To change only the video portion while listening to the current audio source Press the 3 V SEL button to select th...

Страница 56: ...lect a disc in ascending order 8 g Button Radio mode SEEK DN Button CD CD Changer mode Press the button to go back to the beginning of the current track Audio Processor Mode When the main menu is displayed After pressing the A PROC button tilt the button to select the factory preset curves in the selected mode When the adjustment mode screen is displayed Tilt to select the personal preset curves 9...

Страница 57: ...l within 2 meters from the IVX C806 IVX M706 CVA 1006R 1 Opening the battery cover Slide out the battery cover while firmly pressing the direction of arrow 2 Replacing the battery Put the batteries in the case observing the polarities as illustrated 3 Closing the cover Push the cover as illustrated until a click is heard IVX C806 IVX M706 with MD built in CVA 1006R without MD built in Remote senso...

Страница 58: ... should be replaced In Case of Difficulty If you encounter a problem please review the items in the following checklist This guide will help you isolate the problem if the unit is at fault Otherwise make sure the rest of your system is properly connected or consult your authorized Alpine dealer Basic No function or display Vehicle s ignition is off If connected following instructions the unit will...

Страница 59: ...e to high temperature The indicator will disappear when the temperature returns to within operation range No CD is inserted Insert a CD Although a disc is inserted NO DISC is displayed and the unit does not start to play or eject the disc Remove the disc by following these steps 1 Press the c button The movable display will open 2 Press the c button again for at least 3 seconds while the movable d...

Страница 60: ...ature returns to within operation range NO DISC ERROR HI TEMP Indication for CD Changer Optional Temperature in the vehicle is too high Allow the vehicle s interior temperature to cool The indicator will disappear when the temperature returns to within operation range No CD magazine is loaded into the CD Changer Insert a magazine Malfunction in the CD Changer Consult your Alpine dealer Press the m...

Страница 61: ... IVX M706 only Signal to Noise Ratio 90 dB Dynamic Range 90 dB at 1 kHz Wow Flutter WRMS Below measurable limits Frequency Response 20 20 000 Hz 0 5 dB REMOTE CONTROL Battery Type AAA batteries 2 pcs Width 42 mm 1 21 32 Height 121 mm 4 25 32 Depth 23 mm 29 32 Weight 50 g 1 8 oz GENERAL Power Requirement 14 4 V DC 11 15 V allowable Operating temperature 32 F to 113 F 0 C to 45 C Maximum Power Outpu...

Страница 62: ...ker cables to each other or to the vehicle body The Display must be completely retracted in the casing when installing If it is not problems may occur When installing in automobiles make sure the Display can open close without coming in contact with the shift lever Installation and Connections IMPORTANT Please record the serial number of your unit in the space provided below and keep it as a perma...

Страница 63: ...o a clean metal spot using a screw already attached to the vehicle s chassis NOTE For the screw marked use an appropriate screw for the chosen mounting location Connect each input lead coming from an amplifier or equalizer to the corresponding output lead coming from the left rear of the IVX C806 IVX M706 CVA 1006R Connect all other leads of the IVX C806 IVX M706 CVA 1006R according to details des...

Страница 64: ... soft textured onto the mounting location such as under the front passenger s seat etc Mount the Tuner aligning the Velcro Fasteners When mounting with Screws When mounting the tuner with the screws be sure to choose a flat location When making holes be careful not to scratch any pipes or wires 1 Connect the bracket to both the flanks of the tuner with the supplied pan screws M4x8 2 Install the tu...

Страница 65: ...res even when its switch is placed in the OFF position and the battery may be discharged 1 Vehicle Cable Stopper Monitor Cable Pinch Connector 2 Pliers Battery Red SPST SW Optional Yellow IVX C806 IVX M706 CVA 1006R Monitor and Tuner Cautions for handling the I F cord The I F cord is used to connect the monitor and the tuner BOX Press the LOCK button gently while removing the I F cord out of the t...

Страница 66: ... Green Black Green Violet Violet Black Grey Black Grey SPEAKER LEFT REAR GND R Lch 3 Yellow BATTERY ACC Pink Black Yellow Blue Red ACC Red P ANT Blue Yellow Black AUDIO INTERRUPT IN PARKING BRAKE REMOTE TURN ON POWER ANT GND BATTERY ILLUMINATION BATT ILLM SPEAKER RIGHT REAR SPEAKER RIGHT FRONT 5 8 9 Black GND Black 3 4 0 2 1 Orange Yellow Orange Blue Blue White 6 White Brown REMOTE OUT AUX2 6 7 fi ...

Страница 67: ...ect this lead to the B terminal of your power antenna if applicable Audio Interrupt In Lead Pink Black To vehicle phone Parking Brake Lead Yellow Blue Connect this lead to the power supply side of the parking brake switch to transmit the parking brake status signals to the IVX C806 IVX M706 CVA 1006R Connect this lead to the parking brake lead powered when parking brake is engaged Switched Power L...

Страница 68: ...or Box Navigation Connector Box Navigation White Brown White Brown White Brown White Brown White Brown White Brown Yellow Red Yellow Red White Green White Green Red R ch Yellow Tuner Colour Control of TV Tuner is set to OFF White L ch Red R ch White L ch SUB W REAR AUDIO FRONT Ai NET L R VIDEO L MONO AUX INPUT R AUX1 AUX2 DISPLAY OUTPUT NAVIGATION INPUT FM ANTENNA REMOTE OUT POWER SUPPLY R L MONO ...

Страница 69: ...9 Subwoofer Input Terminal Connect the output lead of an amplifier for the subwoofer to this terminal 0 To Video output Terminals RCA Extension Cable Sold separately RGB Cable Included with Navigation System Switch When connecting an equalizer or divider using Ai NET feature place this switch in the EQ DIV position When no device is connected leave the switch in the NORM position NOTE Be sure to t...

Страница 70: ...68 EN ...

Отзывы: