background image

18

-EN

01GB05CDA9883E.fm

ALPINE CDA-9883E 68-08564Z12-A (EN)

Connecting to an External Amplifier

When an external amplifier is connected, sound quality can be 
improved by stopping the power supply of the built-in amplifier. 

No sound is produced by the system when the power output is set to 
OFF.

Turning Mute Mode On/Off (INT MUTE)

If a device having the interrupt feature is connected, audio will be 
automatically muted whenever the interrupt signal is received from the 
device.

Setting the AUX Mode (V-Link)

You can input TV/video sound by connecting an optional Ai-NET/RCA 
Interface cable (KCA-121B) or Versatile Link Terminal (KCA-410C) 
to this component.
You can change the AUX name display when AUX IN is set to ON. 
Press 

/

/

ENT

 when AUX IN is set to ON, and select AUX NAME 

by turning the 

Rotary encoder

, and then press 

/

/

ENT

. After that, 

turn the 

Rotary encoder

 to select the desired AUX name. If the KCA-

410C is connected, it is possible to select two AUX names.

Via KCA-410C, up to 2 external devices with RCA output can be 
connected. In this case, press 

SOURCE/

 to select AUX mode and 

then press 

BAND

 to select your desired device.

Changer Name Setting

This setting is used when the head unit is connected to the USB Adapter 
for MP3 (KCA-620M). You can set the name to be displayed on the unit 
depending on the device to which the USB Adapter for MP3 (KCA-
620M) is connected.

Setting the External Digital Input

When an ALPINE Ai-NET compatible digital audio processor (PXA-
H701) and a DVD player (DVE-5207) not compatible with Ai-NET are 
connected, set Digital AUX to ON to enjoy 5.1-channel surround sound.

Press 

SOURCE/

, and select the DIGITAL-AUX mode, and adjust 

the volume, etc.

Depending on the connected audio processor, DVD player sound 
may continue to be output, even though the source is changed to 
another one. If this occurs, set the DVD player’s power to OFF.

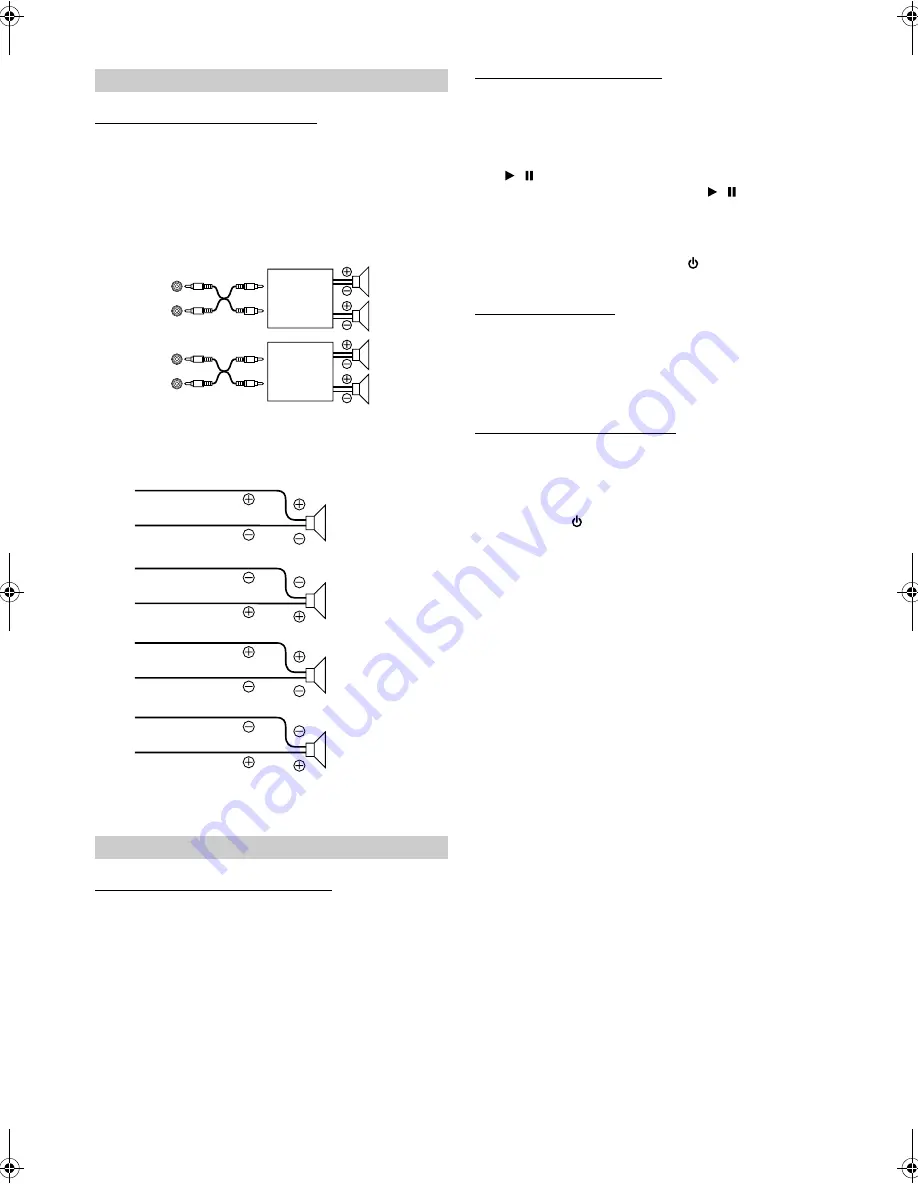
External Device

POWER IC ON (Initial setting) / POWER IC OFF

POWER IC OFF:

Use this mode when the line output of this unit 
is used to drive an external amplifier. In this 
setting, the head unit’s internal amplifier is 
turned OFF and can not drive speakers.

POWER IC ON :

The speakers are driven by the built-in 
amplifier.

General Setting

MUTE ON / MUTE OFF (Initial setting)

Amplifier

Front
left

Front
right

Amplifier

Rear 
left

Rear 
right

Speakers

SPEAKER 
RIGHT FRONT

Front
right

SPEAKER 
RIGHT REAR

Rear 
right

SPEAKER 
LEFT REAR

Rear 
left

SPEAKER 
LEFT FRONT

Front 
left

AUX IN ON / AUX IN OFF (Initial setting)

CHANGER (Initial Setting) / USB / PORTABLE

D-AUX ON / D-AUX OFF (Initial setting)

01GB00CDA9883E.book  Page 18  Tuesday, December 26, 2006  6:42 PM

Содержание CDA-9883E

Страница 1: ...RONICS OF AUSTRALIA PTY LTD 161 165 Princes Highway Hallam Victoria 3803 Australia Phone 03 8787 1200 ALPINE ELECTRONICS GmbH Frankfurter Ring 117 80807 M nchen Germany Phone 089 32 42 640 ALPINE ELEC...

Страница 2: ...Defeat 13 Setting the Bass Control 13 Setting the Bass Centre Frequency 13 Setting the Bass Bandwidth 13 Setting the Bass Level 13 Setting the Treble Control 14 Setting the Treble Centre Frequency 14...

Страница 3: ...eat Play 21 Displaying the Text 21 Changer Optional Controlling CD Changer Optional 21 Playing MP3 Files with the CD Changer Optional 22 Multi Changer Selection Optional 22 Remote Control Controls on...

Страница 4: ...in fire electric shock or other injury DO NOT PLACE HANDS FINGERS OR FOREIGN OBJECTS IN INSERTION SLOTS OR GAPS Doing so may result in personal injury or damage to the product HALT USE IMMEDIATELY IF...

Страница 5: ...her such instrument then insert the disc again Irregular Shaped Discs Be sure to use round shape discs only for this unit and never use any special shape discs Use of special shape discs may cause dam...

Страница 6: ...xtreme temperatures or sunlight e g left in the car or this unit CDs recorded under unstable conditions CDs on which a recording failed or a re recording was attempted copy protected CDs which do not...

Страница 7: ...in normal usage especially the connector terminals on the back of the front panel This is not a malfunction To protect the front panel place it in the supplied carrying case When detaching the front p...

Страница 8: ...l bring the audio back to its previous level Setting Time 1 Press and hold FUNC SETUP for at least 2 seconds to activate the SETUP selection mode 2 Turn the Rotary encoder to select CLOCK ADJUST and t...

Страница 9: ...station Presetting Stations Automatically 1 Press BAND repeatedly until the desired radio band is displayed 2 Press and hold TUNE A ME for at least 2 seconds The frequency on the display continues to...

Страница 10: ...The CD player can play discs containing audio data MP3 data WMA data and AAC data MP3 is display during MP3 playback WMA is displayed during WMA playback AAC is displayed during AAC playback WMA forma...

Страница 11: ...during MP3 WMA AAC playback 2 Turn the Rotary encoder to select Folder Name Search mode or File Name Search mode and then press ENT Folder Name Search mode 3 Turn the Rotary encoder to select the desi...

Страница 12: ...may not play back correctly depending on sampling rates ID3 tags WMA tags This device supports ID3 tag v1 and v2 and WMA tag If tag data is in an MP3 WMA AAC file this device can display the title tra...

Страница 13: ...te This value shows how many times per second the data is sampled recorded For example music CDs use a sampling rate of 44 1 kHz so the sound is sampled recorded 44 100 times per second The higher the...

Страница 14: ...isplayed bass frequency ranges 2 2 Press SOURCE to select the desired bass bandwidth Changes the boosted bass bandwidth to wide or narrow A wider setting will boost a wide range of frequencies above a...

Страница 15: ...function is inoperable when DEFEAT is set to ON The adjustment can also be made by pressing Rotary encoder AUDIO Refer to Adjusting Bass Treble Balance Between Left and Right Fader Between Front and R...

Страница 16: ...o Text Disc Name or Track Name DISC TEXT TRACK TEXT is displayed DISC TEXT TRACK TEXT is displayed for changer 2 ID3 tag WMA tag If an MP3 WMA AAC file contains ID3 tag WMA tag information the ID3 tag...

Страница 17: ...he unit to suit your own preferences and usage From the SETUP menu Sound Customizing Visual Customizing etc can be modified 1 Press and hold FUNC SETUP for at least 2 seconds to activate the SETUP mod...

Страница 18: ...may be difficult In this case you can select playback of a single session only containing the CD data When a disc contains both CD and the MP3 WMA AAC data playback starts from the CD data portion of...

Страница 19: ...s connected to the USB Adapter for MP3 KCA 620M You can set the name to be displayed on the unit depending on the device to which the USB Adapter for MP3 KCA 620M is connected Setting the External Dig...

Страница 20: ...activate the search selection mode 2 Turn the Rotary encoder to select the Artist search mode and then press ENT PLAYLIST ARTIST ALBUM SONG PODCAST GENRE COMPOSER PLAYLIST 3 Turn the Rotary encoder t...

Страница 21: ...list Artist Album Podcast Genre Composer Playlist Artist Album Podcast Genre Composer can be easily changed For example if you listen to a song from a selected album the album can be changed Press or...

Страница 22: ...it is Ai NET compatible With a CD Changer connected to the Ai NET input of this unit the CD Changer will be controllable from this unit Using the KCA 400C Multi Changer Switching device or the KCA 41...

Страница 23: ...ontrol until the desired changer indicator appears on the display If the selected CD Changer is not connected the display will show NO CHANGER No To operate the selected changer see CD MP3 WMA AAC pag...

Страница 24: ...ld this button to select a disc in descending order iPod mode Switches Playlist Artist Album Mute Button Press this button to lower the volume by 20 dB instantly Press this button again to cancel Batt...

Страница 25: ...ehicle s interior or trunk temperature to cool CD playback sound is wavering Moisture condensation in the CD Module Allow enough time for the condensation to evaporate about 1 hour CD insertion not po...

Страница 26: ...lfunction in the CD Changer Consult your Alpine dealer Press the magazine eject button and pull out the magazine Check the indication Insert the magazine again If the magazine cannot be pulled out con...

Страница 27: ...Capture Ratio 2 0 dB Tuning Range 531 1 602 kHz Sensitivity IEC Standard 22 5 V 27 dB Frequency Response 5 20 000 Hz 1 dB Wow Flutter WRMS Below measurable limits Total Harmonic Distortion 0 008 at 1...

Страница 28: ...e dealer where you purchased this product to have the work done USE SPECIFIED ACCESSORY PARTS AND INSTALL THEM SECURELY Be sure to use only the specified accessory parts Use of other than designated p...

Страница 29: ...Removal on page 29 Detachable Front Panel Less than 35 Mounting Sleeve Included Dashboard This unit Pressure Plates 2 Reinforce the head unit with the metal mounting strap not supplied Secure the gro...

Страница 30: ...ocked as you do so JAPANESE CAR Secure the ground lead of the unit to a clean metal spot using a screw 3 already attached to the vehicle s chassis 3 Slide the CDA 9883E into the dashboard until it cli...

Страница 31: ...r or equalizer To vehicle phone Ignition Key Battery Speakers Front right Rear right Rear left Front left CD Changer Sold Separately Speakers Amplifier Amplifier Amplifier Rear Left Rear Right Front L...

Страница 32: ...nnect this to the output or input connector of another device CD Changer Equalizer etc equipped with Ai NET Interface adapter for iPod KCA 420i is not recommended for use with this product You can inp...

Страница 33: ......

Отзывы: