Alpine 68-14470Z51-A Скачать руководство пользователя страница 17

15

-EN

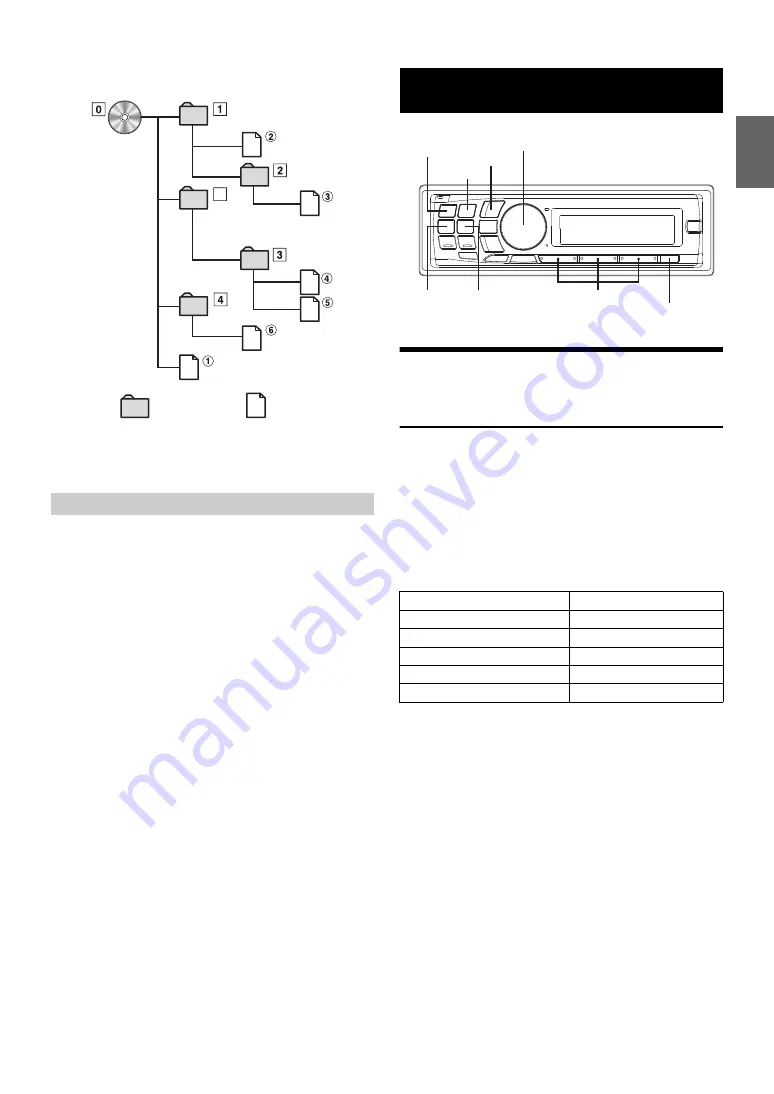
Verify the writing order in the software’s documentation. The playback 
order of the folders and files is as follows.

*

The folder No./ folder Name will not be displayed if no file is contained 
in the folder.

Bit rate

This is the “sound” compression rate specified for encoding. The higher 
the bit rate, the higher the sound quality, but also the larger the files.

Sampling rate

This value shows how many times per second the data is sampled 
(recorded). For example, music CDs use a sampling rate of 44.1 kHz, so 
the sound is sampled (recorded) 44,100 times per second. The higher 
the sampling rate, the higher the sound quality, but also the larger the 
volume of data.

Encoding

Converting music CDs, WAVE (AIFF) files, and other sound files into the 
specified audio compression format.

Tag

Song information such as track titles, artist names, album names, etc., 
written into MP3/WMA/AAC files.

Root folder

The root folder (or root directory) is found at the top of the file system. 
The root folder contains all folders and files. It is created automatically 
for all burned discs.

Adjusting Subwoofer Level/Balance 
(Between Left and Right)/Fader (Between 
Front and Rear)/Black Out/Defeat

1

Press 

AUDIO

 repeatedly to choose the desired mode.

Each press changes the mode as follows:

SUBWOOFER

*1


 BALANCE 

 FADER 

 BLACK OUT

*2


 DEFEAT 

 VOLUME 

 SUBWOOFER

*1

When the subwoofer mode is set to OFF, its level cannot be 
adjusted, refer to “Turning Subwoofer ON/OFF” on page 16.

*2

When Blackout mode is turned on, after 5 seconds, all display 
indications on this unit will turn off to reduce power 
consumption. This additional power enhances the sound quality.

Notes

• If no operation is performed for 5 seconds after selecting the 

SUBWOOFER, BALANCE, FADER, BLACK OUT or DEFEAT mode, 
the unit automatically returns to normal mode.

• If any button on the unit is pressed during the Blackout Mode, the 

function is displayed for 5 seconds before returning to Blackout mode.

2

Turn the 

Rotary encoder

 until the desired sound is 

obtained in each mode.

Note

• Depending on the connected devices, some functions and display 

indications do not work.

Terminology

*

Root folder

Folder

MP3/WMA/AAC File

Sound Setting

Subwoofer level

0 ~ 15

Balance

−15 (L) ~ 15 (R)

Fader

−15 (R) ~ 15 (F)

Black Out

ON/OFF

Defeat

ON/OFF

Volume

0 ~ 35

/ESC

BAND

AUDIO/SOUND SETUP

SOURCE/

Rotary encoder/ENTER/

Preset buttons (1 through 6)

Содержание 68-14470Z51-A

Страница 1: ...D 161 165 Princes Highway Hallam Victoria 3803 Australia Phone 03 8787 1200 ALPINE ELECTRONICS GmbH Wilhelm Wagenfeld Str 1 3 80807 M nchen Germany Phone 089 32 42 640 ALPINE ELECTRONICS OF U K LTD Al...

Страница 2: ......

Страница 3: ...een Left and Right Fader Between Front and Rear Black Out Defeat 15 Sound Setting 16 Adjusting the High Pass Filter 16 Turning Subwoofer ON OFF 16 Setting the Subwoofer System 16 Setting the Subwoofer...

Страница 4: ...raffic Information from SAT Radio 28 Instant Replay Function SIRIUS only 28 Changing the Display 29 Setting the Auxiliary Data Field Display XM only 29 USB Memory Portable audio player optional Connec...

Страница 5: ...nal 43 Multi Changer Selection optional 43 Remote Control Controls on Remote Control 43 Operating the Audio Processor 44 Battery Replacement 44 Controllable With Remote Control 44 Connectable to Remot...

Страница 6: ...ions Failure to heed them can result in injury or material property damage HALT USE IMMEDIATELY IF A PROBLEM APPEARS Failure to do so may cause personal injury or damage to the product Return it to yo...

Страница 7: ...g sound quality However most of them will influence the thickness and or diameter of the disc Using such accessories can cause the disc to be out of standard specifications and may create operational...

Страница 8: ...o direct sunlight or high temperatures Anywhere the possibility of high humidity or corrosive substances are present Fix the Portable audio player in a location where driver operation will not be hind...

Страница 9: ...off the unit power 2 Press OPEN to open the front panel figure 1 To close the front panel press the left side until it locks as shown in the figure 2 3 Grasp the front panel firmly slide to the left a...

Страница 10: ...2 HD Radio 3 XM 4 SIRIUS 5 Bluetooth 1 Displayed only when INT Mute is OFF and the mode is set to other than Bluetooth Audio 2 Not displayed when HD Radio Tuner module is connected 3 Only when HD Radi...

Страница 11: ...18 stations can be stored in the preset memory 6 stations for each band FM1 FM2 and AM If you store a station in a preset memory which already has a station the current station will be cleared and re...

Страница 12: ...isplay Tuner 2 HD Radio 3 XM 4 SIRIUS 5 Bluetooth 1 Displayed only when INT Mute is OFF and the mode is set to other than Bluetooth Audio 2 Not displayed when HD Radio Tuner module is connected 3 Only...

Страница 13: ...Note Operate the unit while the F indicator lights up If no operation is performed for 5 seconds the F indicator goes out Receiving Traffic Information While Playing CD or Radio 1 Press and hold TA fo...

Страница 14: ...ge every time the button is pressed For details refer to Displaying the Text on page 18 Playback 1 Press OPEN The front panel will open 2 Insert a disc with the label side facing up The disc will be p...

Страница 15: ...ng the track numbers associated with each song 1 Press ENTER during play This will set the search mode 2 Turn the Rotary encoder to select the desired track and then press ENTER This will play the sel...

Страница 16: ...s encoded by iTunes is supported Supported playback sampling rates and bit rates MP3 WMA AAC This device may not play back correctly depending on sampling rates In the USB mode the playback time may n...

Страница 17: ...ting Subwoofer Level Balance Between Left and Right Fader Between Front and Rear Black Out Defeat 1 Press AUDIO repeatedly to choose the desired mode Each press changes the mode as follows SUBWOOFER 1...

Страница 18: ...ubwoofer is on you can select either System 1 or System 2 for the desired subwoofer effect Setting item SUBW System Setting contents SYSTEM 1 Initial setting SYSTEM 2 SYSTEM 1 Subwoofer level changes...

Страница 19: ...arametric EQ from the Sound Field mode press BAND to select the band to be adjusted Band 1 Band 2 Band 3 Band 4 Band 5 Band 1 2 Press or to select frequency bands Adjustable frequency bands 63 Hz to 1...

Страница 20: ...tored Sound Field Settings contain Parametric EQ Graphic EQ and T Correction settings that are stored in the preset memory 1 After selecting any item of the Sound Field mode e g Parametric EQ press an...

Страница 21: ...en Long and Short refer to HD Radio Station Call Setting on page 25 Displayed in 1 line when Short is set displayed in 2 lines when Long is set When displaying Text the following indicators are lit ac...

Страница 22: ...red item and then press ENTER Bluetooth 1 General Display Tuner 2 HD Radio 3 XM 4 SIRIUS 5 Bluetooth e g Select General 3 Turn the Rotary encoder to select a setting item and then press ENTER e g Sele...

Страница 23: ...enu in step 2 Birthday Opening Message Setting Birthday Set While Opening MSG is set to ON refer to Opening Message ON OFF Setting on page 24 and then input your birthday details a message can be disp...

Страница 24: ...me Setting item Digital AUX Setting contents ON OFF Initial setting Notes Press SOURCE and select the D Aux mode and adjust the volume etc After input selection is completed turn the ignition off and...

Страница 25: ...e title has scrolled TYPE 2 Words are built up from left to right a single character at a time When the display is full it is cleared and the subsequent words are displayed the same way until all word...

Страница 26: ...f skipped channels No Keep the skip state Notes You cannot set a channel as skipped channel from this unit Please operate from the SIRIUS Receiver Box For details refer to the owner s manual of the op...

Страница 27: ...e 3 1 Set the stored Artist alert to on 2 Set the stored Artist alert to off 3 Delete the stored Artist alert If the selected alert is Song alert you can manage the alert as following Song Seek On 1 S...

Страница 28: ...remote control 2 Press Enter on the remote control within 5 seconds to receive the Channel Note When using the optional remote control RUE 4190 etc an SAT Radio Channel can be directly called up with...

Страница 29: ...details refer to Setting the Favorite Sports Team announcement on page 24 If no operation is perform for 10 seconds the setting mode is canceled Storing the desired Artist Song SIRIUS only A stored ar...

Страница 30: ...he song program title list or toggle the display between the team names and the current score of any live play by play game by pressing VIEW Press ESC in the search mode to return to the previous mode...

Страница 31: ...F function for the SIRIUS receiver 1 Press and hold SETUP for at least 2 seconds to activate the SETUP selection mode 2 Turn the Rotary encoder to select the XM mode and then press ENTER Bluetooth 1 G...

Страница 32: ...ery 1 000 songs stored in USB Memory Portable audio player into individual banks to make searching and playing back a song easier A maximum of 1 000 songs for one bank can be stored according to the o...

Страница 33: ...der File Playlist 4 Turn the Rotary encoder to select the desired Artist and then press ENTER 5 Turn the Rotary encoder to select an album and then press ENTER 6 Turn the Rotary encoder to select a so...

Страница 34: ...d When this unit is connected by using the cable the controls on the iPod are not functional Notes Internet and telephone functions of the iPod touch or iPhone ect can also be used while connected to...

Страница 35: ...y back all songs in the iPhone iPod or selected search mode While in the search mode if you press and hold ESC for 2 seconds or no operation is performed for 60 seconds the search mode is canceled In...

Страница 36: ...are listed alphabetically and can be skipped every 200 titles If there are fewer than 200 titles titles beginning with the next alphabetical character are selected Search Position Memory During iPhon...

Страница 37: ...ence music the way the artist intended When the IMPRINT audio processor PXA H100 sold separately is connected to this unit MultEQ and the following sound adjustment can be performed Changing MultEQ mo...

Страница 38: ...r Sound Field 4 MultEQ Mode e g Select Subwoofer 1 These functions are inoperable when Subwoofer is set to OFF 2 This function can be operable only when PXA H100 sold separately is connected and 2 2ch...

Страница 39: ...e music clearly even in cars with a lot of road noise 1 Changing the source to which you want to apply Media Xpander FM MX level 1 to 3 The medium to high frequencies become clearer and produces well...

Страница 40: ...Band 6 Band 7 Band 1 2 Turn the Rotary encoder to adjust the level Adjustable output level 6 to 6 dB 3 To adjust another band repeat steps 1 and 2 and then adjust all bands Adjusting the Time Correct...

Страница 41: ...ttons 1 through 6 in any item of the Sound Field Adjustment mode e g X Over press and hold the desired preset buttons for at least 2 seconds 2 Turn the Rotary encoder to select PROTECT YES NO and then...

Страница 42: ...e various speakers 2 Calculate the difference between the distance correction value to the farthest speaker and the other speakers L distance to farthest speaker distance to other speakers These value...

Страница 43: ...41 4 95 1 72 7 2 244 8 96 5 73 7 3 248 2 97 8 74 7 4 251 6 99 2 75 7 5 255 0 100 5 76 7 6 258 4 101 8 77 7 7 261 8 103 2 78 7 8 265 2 104 5 79 7 9 268 6 105 9 80 8 0 272 0 107 2 81 8 1 275 4 108 5 82...

Страница 44: ...ed to this unit if it is Ai NET compatible With a CD Changer connected to the Ai NET input of this unit the CD Changer will be controllable from this unit Using the KCA 400C Multi Changer Switching de...

Страница 45: ...ars on the display Notes If the selected CD Changer is not connected the display will show NO CHANGER No To operate the selected changer refer to CD MP3 WMA AAC on page 12 For further details about th...

Страница 46: ...n descending order iPod mode Switches Playlist Artist Album Genre Composer Mute Button Press this button to lower the volume by 20 dB instantly Press this button again to cancel Operating the Audio Pr...

Страница 47: ...ossible A CD is already in the CD player Eject the CD and remove it The CD is being improperly inserted Make sure the CD is being inserted following instructions in the CD Player Operation section Una...

Страница 48: ...vate the eject function When the CD Changer finishes the eject function insert an empty CD magazine into the CD Changer to receive the disc left inside the CD Changer No magazine is loaded into the CD...

Страница 49: ...connected Make sure the USB Memory device Portable audio player is correctly connected and the cable is not excessively bent No song file is stored in the USB Memory Portable audio player Connect the...

Страница 50: ...Wow Flutter WRMS Below measurable limits Total Harmonic Distortion 0 008 at 1 kHz Dynamic Range 95 dB at 1 kHz Signal to Noise Ratio 105 dB Channel Separation 85 dB at 1 kHz USB requirements USB 1 1...

Страница 51: ...specified accessory parts Use of other than designated parts may damage this unit internally or may not securely install the unit in place This may cause parts to become loose resulting in hazards or...

Страница 52: ...from the left rear of the CDA 117 Connect all other leads of the CDA 117 according to details described in the CONNECTlONS section Note For the screw marked 2 use an appropriate screw for the chosen m...

Страница 53: ...the USB cable to the USB connector of the unit and then secure the connection using the lock case supplied with USB cable as shown below Remove USB Memory Pull out USB Memory squarely from the USB ca...

Страница 54: ...ehicle phone ILLUMINATION Orange To the instrument cluster illumination lead IGNITION Red Ignition Key Yellow BATTERY Black GND Battery To USB Memory Portable audio player or iPhone iPod Gray Speakers...

Страница 55: ...ring Remote control interface box Rear Output Input RCA Connectors It can be used as Rear Output or Input RCA Connectors RED is right and WHITE is left Front Output Input RCA Connectors It can be used...

Страница 56: ...hipped to an Authorized Alpine Service Center or Alpine Alpine will pay the return shipping charges You should provide a detailed description of the problem s for which service is required You must su...

Отзывы: