Allied 18H86A Скачать руководство пользователя страница 8

Page 8

STEP 3 – LEAK TEST AND EVACUATION 
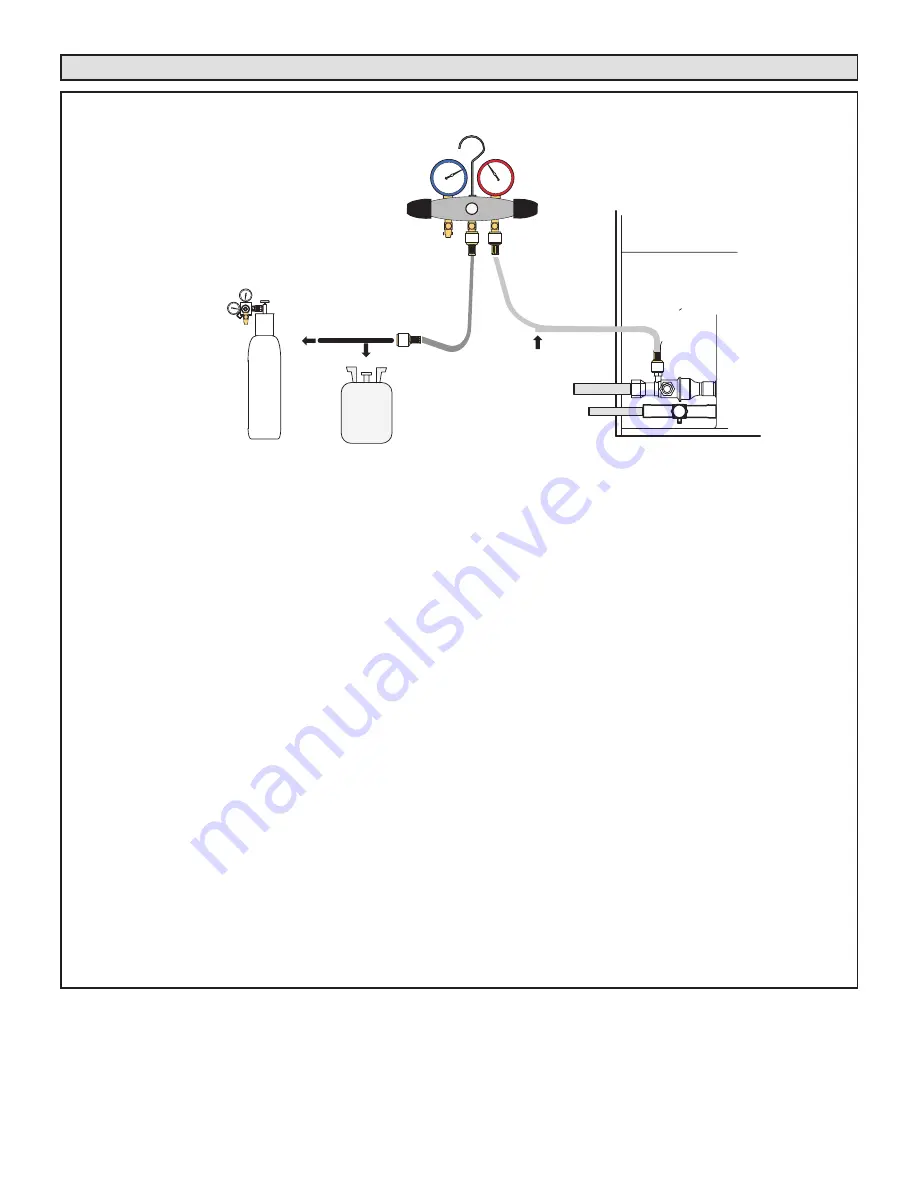
TO VAPOR

SERVICE VALVE

HFC-410A

MANIFOLD GAUGE SET

OUTDOOR UNIT

HIGH

LOW

1

2

A

B

NITROGEN

NOTE  -

  Position

canister to deliver

liquid refrigerant.

 A -

With both manifold valves closed, connect the cylinder of HFC-410A refrigerant to the center port of the

manifold gauge set. Open the valve on the HFC-410A cylinder (vapor only).

 B -

Open the high pressure side of the manifold to allow HFC-410A into the line set and indoor unit. Weigh in

a trace amount of HFC-410A.

 [A trace amount is a maximum of two ounces (57 g) refrigerant or three

pounds (31  kPa)  pressure.] 

Close the valve on the HFC-410A cylinder and the valve on the high

pressure side of the manifold gauge set. Disconnect the HFC-410A cylinder.

 C -

Connect a cylinder of nitrogen with a pressure regulating valve to the center port of the manifold gauge

set.

 D -

Adjust nitrogen pressure to 150 psig (1034 kPa). Open the valve on the high side of the manifold gauge set

in order to pressurize the line set and the indoor unit.

 E -

After a few minutes, open one of the service valve ports and verify that the refrigerant added to the

system earlier is measurable with a leak detector.

 F -

After leak testing, disconnect gauges from service ports.

After the line set has been connected to the indoor and outdoor units, check the line set connections and

indoor unit for leaks. Use the following procedure to test for leaks:

 A -

Connect the high pressure hose of an HFC-410A manifold gauge set to the vapor valve service port.

NOTE - Normally, the high pressure hose is connected to the liquid line port. However, connecting it

to the vapor port better protects the manifold gauge set from high pressure damage.

 B -

With both manifold valves closed, connect the cylinder of HFC-410A refrigerant to the center port of

the manifold gauge set.

CONNECT GAUGE SET

TEST FOR LEAKS

NOTE - Later in the procedure, the HFC-410A container will be replaced by the nitrogen container.

LEAK TEST

FIGURE 8 

Содержание 18H86A

Страница 1: ... SPLIT SYSTEM HEAT PUMP R410A REFRIGERANT IMPORTANT The Clean Air Act of 1990 bans the intentional venting of refrigerant CFCs HCFCs and HFCs as of July 1 1992 Approved methods of recovery recycling or reclaiming must be followed Fines and or incarceration may be levied for noncompliance CAUTION As with any mechanical equipment contact with sharp sheet metal edges can result in personal injury Tak...

Страница 2: ...ider any weather conditions especially wind that may cause panels to be blown around and damaged IMPORTANT Exhaust vents from dryers water heaters and furnaces should be directed away from the outdoor unit Prolonged exposure to exhaust gases and the chemicals contained within them may cause condensation to form on the steel cabinet and other metal components of the outdoor unit This will diminish ...

Страница 3: ...eld Fabricated NOTE Some applications may require a field provided 7 8 to 1 1 8 adapter NOTE When installing refrigerant lines longer than 50 feet refer to the Refrigerant Piping Design and Fabrica tion Guidelines manual WARNING When using a high pressure gas such as nitrogen to pressurize a refrigeration or air conditioning system use a regulator that can control the pressure down to 1 or 2 psig ...

Страница 4: ...d line to the indoor unit s liquid line orifice housing LOW HIGH EXISTING INDOOR UNIT GAUGE MANIFOLD CYLINDER CONTAINING CLEAN HCFC 22 TO BE USED FOR FLUSHING Positioned to deliver liquid refrigerant LIQUID LINE SERVICE VALVE INLET DISCHARGE TANK RETURN CLOSED OPENED RECOVERY CYLINDER RECOVERY MACHINE NEW OUTDOOR UNIT VAPOR LINE SERVICE VALVE VAPOR LIQUID 1 A HCFC 22 cylinder with clean refrigeran...

Страница 5: ... ends The pipe must remain round Do not crimp end of the line Remove service cap and core from both the vapor and liquid line service ports 1 2 LIQUID LINE SERVICE VALVE SERVICE PORT CORE SERVICE PORT CAP SERVICE PORT CORE SERVICE PORT CAP CUT AND DEBUR LINE SET SIZE MATCHES SERVICE VALVE CONNECTION DO NOT CRIMP SERVICE VALVE CONNECTOR WHEN PIPE IS SMALLER THAN CONNECTION 3 VAPOR LINE SERVICE VALV...

Страница 6: ... cloths WHEN BRAZING LINE SET TO SERVICE VALVES POINT FLAME AWAY FROM SERVICE VALVE PREPARATION FOR NEXT STEP 7 WRAP SERVICE VALVES To help protect service valve seals during brazing wrap water saturated cloths around service valve bodies and copper tube stubs Use additionalwater saturated cloths underneath the valve body to protect the base paint 4 FLOW NITROGEN Flow regulated nitrogen at 1 to 2 ...

Страница 7: ... bulb insulation is required if mountedexternal to the coil casing sensing bulb installation for bulb positioning STUB END TEFLON RING LIQUID LINE ASSEMBLY WITH BRASS NUT DISTRIBUTOR ASSEMBLY 3 Install one of the provided Teflon rings around the stubbed end of the check expansion valve and lightly lubricate the connector threads and expose surface of the Teflon ring with refrigerant oil 4 Attach t...

Страница 8: ... 150 psig 1034 kPa Open the valve on the high side of the manifold gauge set in order to pressurize the line set and the indoor unit E After a few minutes open one of the service valve ports and verify that the refrigerant added to the system earlier is measurable with a leak detector F After leak testing disconnect gauges from service ports After the line set has been connected to the indoor and ...

Страница 9: ...nifold gauge valves F When the absolute pressure requirement above has been met disconnect the manifold hose from the vacuum pump and connect it to a cylinder of HFC 410A positioned to deliver liquid refrigerant Open the manifold gauge valve 1 to 2 psig in order to release the vacuum in the line set and indoor unit G Perform the following Close manifold gauge valves Shut off HFC 410A cylinder Rein...

Страница 10: ...ay result in property damage Size wiring and circuit breaker s per Product Specifications bulletin EHB and unit rating plate WARNING ELECTROSTATIC DISCHARGE ESD Precautions and Procedures Electrostatic discharge can affect electronic components Take care during unit installation and service to protect the unit s electronic controls Precautions will help to avoid control exposure to electrostatic d...

Страница 11: ...SPECIFIC THERMOSTAT AND INDOOR UNIT REVERSING VALVE POWER COMMON 1ST STAGE AUX HEAT INDOOR BLOWER COMPRESSOR POWER COMMON EMERGENCY HEAT Low Voltage Wiring with Auxiliary Heat HIGH VOLTAGE FIELD WIRING LOW VOLTAGE FIELD WIRING FACTORY WIRING FIGURE 11 STEP 5 UNIT START UP IMPORTANT If unit is equipped with a crankcase heater it should be energized 24 hours before unit start up to prevent compresso...

Страница 12: ...TEM SHOWN CLOSED INSERT HEX WRENCH HERE SERVICE PORT CORE SERVICE PORT CAP ANGLE TYPE SERVICE VALVE FRONT SEATED CLOSED STEM CAP VALVE STEM SHOWN OPEN INSERT HEX WRENCH HERE ANGLE TYPE SERVICE VALVE BACK SEATED OPENED 1 Remove stem cap with an appropriately sized wrench 2 Use a service wrench with a hex head extension 3 16 for liquid line valve sizes and 5 16 for vapor line valve sizes to back the...

Страница 13: ...ds going in and out of the defrost mode when the compressor delay jumper is installed Factory default is jumper installed NOTE The 30 second compressor feature is ignored when jumpering the TEST pins Time Delay The timed off delay is five minutes long The delay helps to protect the compressor from short cycling in case the power to the unit is interrupted or a pressure switch opens The delay is by...

Страница 14: ...ingle thermostat demand To reset a 5 strike pressure switch lockout cycle 24V control power to the defrost control or place the defrost control in the TEST mode by shorting the TEST pins for 2 seconds Homeowners Information CAUTION Beforeattemptingtoperformanyserviceormaintenance turn the electrical power to unit OFF at disconnect switch In order to ensure peak performance your system must be prop...

Страница 15: ...pump In EMERGENCY HEAT mode all heating demand is sat isfied by auxiliary heat heat pump operation is locked out After a six hour compressor crankcase warm up period the thermostat can be switched to the HEAT setting and normal heat pump operation may resume Professional Maintenance NOTICE Failure to follow instructions will cause damage to the unit This unit is equipped with an aluminum coil Alum...

Страница 16: ... will turn on the air conditioner to check operating functions such as the startup and shutoff operation He will also check for unusual noises or odors and measure indoor outdoor temperatures and system pressures as needed He will check the refrigerant charge per the charging sticker information on the outdoor unit 2 Verify that system total static pressure and airflow settings are within specific...

Отзывы: