background image


68 


Configuring the Extricom Series WLAN System 

Time & Date 

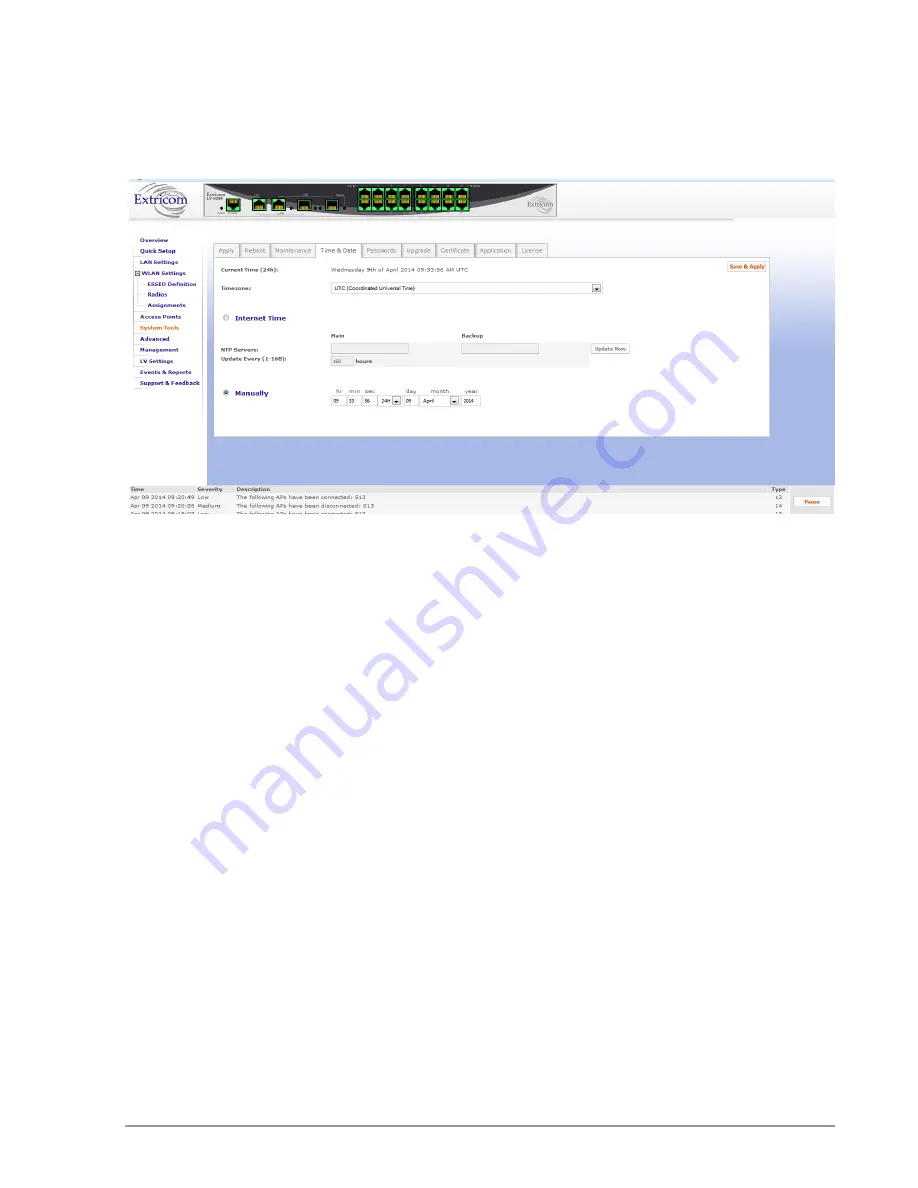
Use this configuration tab to set the time and date on the switch.


 The Extricom Series system 

supports two ways of setting the time and the date - manually or using the NTP protocol. 


Figure 43: Time & Date Configuration Tab 


To manually set the time and date on your Extricom Series Switch: 

1.


Select the 

Manually

 radio button.  

2.


Enter the time and the date in the corresponding fields. 

3.


Click 

Save and Apply

To set the time and date on your Extricom Series Switch using NTP protocol: 

1.


Select the 

Internet Time

 radio button. 

2.


Select the 

Timezone

 from the drop-down menu. 

3.


Specify Custom Main and Backup servers by entering their IP addresses in the 

Custom Server 

IP:

 fields. 

4.


Specify the NTP update interval (in hours) in the 

Update Every (1-168): 

field.


5.


Click 

Save & Apply 

to immediately start the NTP process. 

6.


Click 

Update Now 

to synchronize the system clock with the NTP server.  

Содержание Extricom AT-EXLS-3000

Страница 1: ...613 002120 Rev A Extricom Series WLAN System AT EXMS 1000 AT EXLV 2000 AT EXLS 3000 AT EXMS 500 AT EXRP 22n 32n 22En 32EOn Installation and User Guide ...

Страница 2: ... Copyright 2015 Allied Telesis Inc All rights reserved The products described herein are protected by U S Patents and may be protected by other foreign patents or pending applications Important Notice Read this guide safety instructions and the release notes for your switch firmware before installing and operating the Extricom Series WLAN system Disclaimer Allied Telesis makes no representations o...

Страница 3: ...m Series access point includes multiple WLAN radio modules each radio module is configured separately and serves a different set of clients There is no relation between transmissions on different radio modules hence in a single AP o Radio modules cannot transmit simultaneously over the same radio channel o A client device may transmit and receive data through one radio module Please check the rele...

Страница 4: ...mplies with Part 15 of the FCC IC Rules Operation is subject to the following two conditions 1 This device may not cause harmful interference 2 This device must accept any interference received including interference that may cause undesired operation Important Note FCC and IC Radiation Exposure Statement This equipment complies with FCC and IC radiation exposure limits set forth for an uncontroll...

Страница 5: ...ransmitting the same information are prohibited under this high EIRP category However remote stations of point to multipoint systems shall be permitted to operate at the point to point EIRP limit provided that the higher EIRP is achieved by employing higher gain directional antennas and not higher transmitter output powers ...

Страница 6: ... Extricom Series Wireless Network Topology 13 Switch Cascade 15 AT EXLS 3000 18 Chapter 2 Installing the Extricom Series WLAN System 19 Unpacking the Extricom Series WLAN System 19 Switches 19 Access Points 19 AT EXRE 1000 Range Extender 20 AT EXMC 1000 Media Converter 20 Additional Equipment 20 Cables for Connecting Two Switches in Switch Cascade 20 Cable for Connecting the AT EXLS 3000 to AT EXL...

Страница 7: ...meters 38 Configuring WLAN Settings 40 Configuring ESSID Definition 40 Configuring WLAN Radios 54 ESSID Assignment 61 Access Points 62 System Tools Configuration 65 Apply 65 Reboot 65 Maintenance 66 Time Date 68 Passwords 69 Upgrade 70 Certificate 71 Application 71 License 72 Advanced Configuration 73 Cascade Resiliency 73 Rogue 75 System Logging 76 SNMP 78 IDS 80 Portal Captive Portal 82 Multicas...

Страница 8: ... EXLV 2000 Differences 97 Enabling Large Public Venue 97 Configuring Honeypot 97 Configuring Access Point Parameters 99 Switch Load Balancing 100 Chapter 6 Troubleshooting 102 Chapter 7 Northbound SNMP Traps 104 Appendix A Internal Access Point Mounting Template 111 Appendix B Certifications 112 ...

Страница 9: ...d correctly A warning alerts the user of important operating instructions Safety Precautions Follow the instructions in the guide to ensure proper installation and operation of the switch and APs The use of wireless devices is subject to the constraints imposed by local laws Operate the switch and APs apart from AT EXRP 32EOn in an indoor environment Disconnect the switch and APs from power source...

Страница 10: ...2 About This Guide CAUTION Always replace the battery with the same type to avoid the risk of explosion Dispose of a used battery according to the instructions provided with the new battery ...

Страница 11: ...ning and interference analysis a highly expensive aspect of owning a WLAN is also eliminated Finally the Extricom Series WLAN approach eliminates most WLAN maintenance tasks The Extricom Series WLAN System is specifically designed to provide increased network capacity seamless mobility high level of security and easy installation and configuration Overview of the Extricom Series WLAN System The Ex...

Страница 12: ...vered across the blanket s service area that is the combined coverage of all APs connected to the switch with interference free operation and consistent capacity throughout As the client moves through the coverage blanket different APs take over the communication with it depending on which AP is in the best position to serve the client at the time The switch always uses the optimal uplink and down...

Страница 13: ... and 11 in 2 4 GHz to be simultaneously used within the same AP to form overlapping Channel Blankets using the same physical set of APs TrueReuse bandwidth TrueReuse technology multiplies the bandwidth of a standard 802 11 channel by dynamically optimizing the reuse of each frequency Within a Channel Blanket up to three APs are permitted to simultaneously transmit on the same channel when the True...

Страница 14: ...ies products support WEP 64 WEP 128 WPA TKIP WPA2 AES CCMP encryption The authentication modes supported include RADIUS 802 1x and WPA Pre Shared Key PSK Power save Full power conservation management is enabled for associated mobile devices over unicast multicast and broadcast frames This is based on various IEEE 802 11 standard power save specifications such as PS Poll and U APSD for 802 11a b g ...

Страница 15: ...s are enhanced to provide support for RTLS by integration with AeroScout and Ekahau active RFID technology Generally device location is determined based on several APs picking up a radio transmission attribute from an AeroScout or Ekahau Tag device or any Wi Fi client performing measurements and reporting the measurements to an AeroScout or Ekahau Location Engine AeroScout and Ekahau positioning a...

Страница 16: ...me interval during which a station can send as many frames as possible but the transmission time must not extend beyond the maximum duration of the TXOP Each priority level is assigned a TXOP and this mechanism prevents low speed stations from spending too much time using the media when other clients including those with traffic in higher priority queues are waiting Another mechanism introduced by...

Страница 17: ...e firmware installed on it Figure 3 AT EXLV 2000 The AT EXLV 2000 is equipped with 2 RJ45 SFP GBE Combo port uplinks and 16 GBE PoE Power over Ethernet edge side ports The AT EXLV 2000 is specifically designed to provide wireless access in large venue environments Figure 4 AT EXLS 3000 The AT EXLS 3000 is equipped with 2 RJ45 SFP GBE Combo port uplinks and 8 GBE ports to connect AT EXMS 1000 edge ...

Страница 18: ...ing on the firmware installed in it Configuring a switch and its associated set of APs is as simple as configuring a single traditional AP greatly reducing the effort required to deploy and maintain the WLAN Configuration is done via a dedicated secured web interface that comes standard with every switch SFP modules are not shipped with the AT EXMS 500 1000 To use the SFP ports you must use Class ...

Страница 19: ...ricom Series APs are connected to the Extricom Series WLAN Switch via standard Cat5e 6 cables The APs are powered by the standard 802 3af Power over Ethernet PoE and only a single Cat5e 6 cable connection is required to support all radios in an Extricom Series AP An EXRE 1000 range extender can be used between the AP and the switch for extended reach Figure 6 AT EXRP 22n 32n AP Access Points with ...

Страница 20: ...ber Duck RP SMA part number ANT 2458 5RD RSP More specifications on this antenna can be found at http www netgate com product_info php products_id 386 With AT EXRP 22En Use only xPVC or similar jacket cable which is NEC Article 725 and 444 Compliant and plenum rated per NFPA 262 UL 910 standard Outdoor Access Points with Connectors for External Antennas Outdoor applications may require rugged wate...

Страница 21: ...er over Ethernet PoE but can be powered by an external power supply if desired An antenna with an N type plug male connector can be connected to the AT EXRP 32EOn A Typical Extricom Series Wireless Network Topology An Extricom Series WLAN switch is connected to the wired LAN and the APs distributed throughout the enterprise Figure 9 shows a typical Extricom Series enterprise topology consisting of...

Страница 22: ...tch is only permitted with the following AT EXRP 22n AT EXRP 32n AT EXRP 22En and AT EXRP 32EOn IMPORTANT NOTE While these AP configurations are possible it should be noted that this may result in a heterogeneous wireless coverage between the different Channel Blankets throughout the deployment area Extricom Series APs must be directly connected to the switch to function An Extricom range extender...

Страница 23: ...or more details about the interconnect hardware and maximum distance between cascaded switches The APs of both switches together form a seamless Channel Blanket Up to 3 seamless Channel Blankets can be deployed Up to 32 APs can be deployed in a cascade topology In Figure 10 above a basic Switch Cascade configuration is depicted In a switch cascade the secondary switch routes all of the traffic fro...

Страница 24: ...nnection between the switches See the following examples Figure 11 Uplink Redundancy in Switch Cascade Topology In Figure 11 above the switch configuration provides uplink redundancy if the primary switch uplink connectivity is lost for some reason the secondary switch takes over the primary switch and replaces its functionality with no loss of wireless service In this configuration there is no re...

Страница 25: ... the event of a failure In an AP interleaved deployment APs are deployed as in Figure 12 with one or more APs from the primary switch placed in the coverage area of the secondary switch and vice versa Such cross connect provides necessary redundancy and prevents failure in wireless coverage when one of the switches primary or secondary or the interconnect fails See the Resiliency section for furth...

Страница 26: ...s connected to the LAN2 port of each edge switch See Connecting the AT EXLS 3000 Switch for more details about the interconnect hardware and maximum distance between AT EXLS 3000 and edge switches In the AT EXLS 3000 topology the edge switches route all of the traffic from their APs to theAT EXLS 3000 switch over the interconnect cables The AT EXLS 3000 switch performs the full set of Extricom swi...

Страница 27: ...witch an Extricom range extender 100 and 150 meters from the switch or media converter over 150 meters from the switch may be used between the AP and the switch Refer to AT EXRE 1000 Range Extender for range extender shipping box contents or AT EXMC 1000 Media Converter for media converter shipping box contents The AT EXLS 3000 switch is also shipped with AT EXMS 1000 edge switches shipped as part...

Страница 28: ...ccording the SFP module in use A range Extender EXRE 1000 is required for any AP that will be located between 100 and 150 meters from the WLAN switch For cabling distances over 150 meters EXMC 1000 media converters and optical fiber cables must be used Two stainless steel pan head 8x1 1 4 self tapping Phillips screws for wall or ceiling mounting each AP optional Cables for Connecting Two Switches ...

Страница 29: ...ocation for the required coverage the Extricom Deployment Tool may be used The APs should be placed in a stable secure location such as mounted on a wall or ceiling The switch should be placed near the distribution point of the LAN line This is usually in the communications closet of your enterprise Extricom Series Switches The AT EXMS 1000 and AT EXLV 2000 switches have 21 connectors see Figure 1...

Страница 30: ...wisted pair port or SFP slot of a combo port pair but not both at the same time If you connect both the twisted pair port and SFP slot of a combo port pair to network devices the SFP slot takes priority and the twisted pair port is blocked The SFP slot becomes active when the SFP transceiver establishes a link to a network device The twisted pair port and SFP slot of a combo port pair share the sa...

Страница 31: ...lternating the license is not loaded onto the switch LAN LAN1 LAN2 Ports Act Link Green Solid On operational connection Blinking activity over connection Orange On LAN connection is operational at 1000 Mbps Off LAN connection is operational at 100 Mbps Status SFP links Green Solid On 1000 Mbps full duplex SFP connection Off no SFP connection WLAN Ports Link Green Solid On operational connection Bl...

Страница 32: ...tor The AT EXRP 22En and AT EXRP 32EOn have external antenna connectors The Access Points have an LED located near the LAN port on the front face of the device This LED functionality can be enabled or disabled in the web configuration GUI and when enabled indicates the status of the AP refer to the tables which follow for details Figure 17 AT EXRP 22n 32n Figure 18 AT EXRP 22En Figure 19 AT EXRP 3...

Страница 33: ... the power supply must be a standard round DC plug with 5 5mm outer ring diameter and 2 5mm inner ring diameter Plug polarity Outer Inner WLAN RJ45 connector used to connect the Extricom Series AP to the Extricom Series switch Power is provided by the Extricom Series switch to the AP when directly connected to it Table 3 Extricom Series AP Connectors LEDs Color Description Left Green Blinking norm...

Страница 34: ...n 32EOn APs can be mounted on a wall or ceiling For this purpose a separate mounting bracket is provided for ease of installation The bracket has two holes for mounting to the wall and one hole for a screw that mounts the AP to the bracket The mounting bracket is shown in Figure 21 Figure 21 AP Mounting Bracket AT EXRP 22n 32n APs can be mounted on a wall or ceiling without additional mounting bra...

Страница 35: ... Extricom Series switch is connected to the wired LAN and to the APs that are located throughout the enterprise To connect a switch and access points 1 Using a CAT 5e 6 100 1000Mbps cable connect the RJ45 LAN1 connector located on the front panel of the switch refer to Figure 14 to the LAN switch 2 Using a CAT 5e 6 cable connect each AP to one of the switch s RJ45 WLAN connectors If an AP must be ...

Страница 36: ...th ends of the fiber termination must be in the same SFP mode To connect a switch cascade AT EXMS 1000 and AT EXLV 2000 1 Connect the primary and secondary switch to the LAN via the LAN1 port and to its APs via WLAN ports as directed in the section above 2 Verify that both switches are running the same firmware release and that this is the newest release that supports Switch Cascade 3 Refer to the...

Страница 37: ... must be less than 2m Note EXMC and EXRE are not to be used with uplink ports for example in the case of interconnect Connecting the AT EXLS 3000 Switch The AT EXLS 3000 Switch is designed to greatly increase the coverage area of the Extricom Series solution The Large Scale solution is a b g n Wi Fi compliant The Extricom Large Scale LS switch is typically connected to the wired LAN and to between...

Страница 38: ...anel of the edge switches and plug the other end of the power cables into a power source 6 Verify that the Power LEDs on all the switches are green Additional APs can be connected or disconnected while the switch is active If using fiber media converters ATI 100Mbps CTC 1000Mbps to extend switch to AP distance The switch side media converter is powered via PoE from the WLAN switch or optional exte...

Страница 39: ... Switch Interconnect Distance Fiber Interconnect Cable 100 400 150 with EXRE 300 Distance Between Secondary Switch and Its Farthest AP Fiber cable Max Switch Interconnect Distance Copper Interconnect Cable 400 with EXMC 50 The total length of the copper based cable to from EXMC must be less than 2m Note EXMC and EXRE are not to be used with uplink ports for example in the case of Interconnect To c...

Страница 40: ...ltaneously injects PoE to the extended cable segment EXMC 1000 Media Converter The EXMC 1000 Media Converter allows users to extend the size of their WLAN with the use of fiber cabling The EXMC 1000 functions as a GbE range extender providing fiber connectivity to Extricom Series access points and Extricom Series WLAN switches at distances of up to 400 meters assuming that the switches and the APs...

Страница 41: ...the switch provided with your purchase Note that https must be used not http in order to initiate a secure browsing session SSL with the switch Prior to opening the configuration tool make sure your console PC is configured with an IP address in the same subnet as the switch If you did not receive a switch IP address with the switch the factory default value for the switch IP address is 192 168 1 ...

Страница 42: ... receive a notice in a pop up window stating that there is a problem with the website s security certificate 1 Press the tab key on your keyboard until you see the link Continue to this website not recommended 2 Click on it Using the Extricom Series Web Configuration Pages The Extricom Series Web Configuration pages have four main areas Switch image The Extricom Series Web configuration page displ...

Страница 43: ...the switch to be managed by the CloudBlanket NMS LV Settings only available on the AT EXLV 2000 Configure additional features related to Large Venues Events Reports view system events and performance reports Support Feedback The work area displays the configuration settings corresponding to the category selected in the navigation tree Use this area to configure Extricom system parameters where app...

Страница 44: ...that is in the same subnet with the switch and start a new https session The event and alarm area displays real time SNMP trap messages You can pause the traps by selecting Pause Please see the Northbound SNMP Traps section for more details Overview of the Configuration The Overview page provides a summary of the current configuration To get to it click Overview in the navigation tree Figure 25 Co...

Страница 45: ...2 11n b g or Rogue Channel Displays the channel for each radio ESSIDs VLAN Displays the ESSIDs and their related VLANs defined and assigned to each radio TrueReuse Shows whether TrueReuse is enabled or disabled for each radio Other ESSIDs Displays other ESSIDs that are defined but are not assigned to any specific radio Access Points PoE Configuration Connected Access Points List of the active APs ...

Страница 46: ...k In that case enter the value in the Alternate field Network Mask Network mask for the LAN 1 IP address You may also add an alternate network mask in the alternate filed for the alternate IP address defined Edge s Subnet Subnet of a redundant pair Primary Secondary or Main Standby Only appears if the switch is defined as a part of a redundant pair i e in a cascade configuration Default Gateway IP...

Страница 47: ...on the primary port the secondary port becomes active and remains active even when the primary port recovers If failures occur on both ports the first port that recovers becomes the active port Force SFP 1000 Full Duplex When using an SFP to connect to the LAN you might need to force the link to 1000 Full duplex to work with certain LAN switches Table 6 LAN Configuration Parameters 3 Click Save to...

Страница 48: ...tworks on the same channel The following is the data structure used by the Extricom Series systems Each radio is assigned one channel Each channel can support up to 8 different ESSIDs see note below Each ESSID can be associated with a VLAN tag The same ESSID name can be repeated for different channels Up to 7 ESSIDs are allowed on channel 1 and up to 8 ESSIDs are allowed on each of the remaining c...

Страница 49: ...e Rename or the Delete Save button on the right New ESSID Type in the new ESSID name string and click on the Add Save button on the right ESSID ESSID name Settings Allow Default ESSID If this option is enabled a wireless device will be allowed to connect to the Extricom Series WLAN without requesting a specific ESSID i e default or any ESSID If this option is disabled then a wireless device needs ...

Страница 50: ...d on both ESSIDs In order for wireless devices associated to different ESSIDs to be able to communicate with each other the ESSIDs must be defined on the same VLAN or no VLAN at all If this option is disabled all traffic goes through the LAN switch This could be used by IT managers to apply security settings or various policies on the LAN network Multicast Rate Control This option when enabled pro...

Страница 51: ...eature 802 11d support per ESSID must first be enabled under the Others tab on the Advanced page AeroScout Support Enables support for AeroScout location services To use this feature AeroScout support must be enabled in the Location Based Service tab on the Advanced page Enable ARP Caching This option when enabled provides an immediate response to ARP requests directed towards WLAN stations associ...

Страница 52: ...N tag to assign to the ESSID Assigning a VLAN to an ESSID enables you to control a wireless device s privileges through the existing wired network definitions Disassociation Timeout Enter the amount of time in seconds a wireless device can remain inactive no data sent to or from the wireless device before automatically disconnecting it from the network DTIM DTIM stands for Delivery Traffic Indicat...

Страница 53: ...y however it is recommended to use both encryption and authentication The Extricom Series WLAN makes configuration of ESSID security parameters easier by listing available combinations of Encryption and Authentication protocols Security definitions are configured for each ESSID individually To configure the security definitions 1 Click on the ESSID for which you want to configure the security defi...

Страница 54: ... WPA WPA2 Personal Wi Fi Protected Access Wi Fi Protected Access 2 Also referred to as WPA PSK Pre shared key mode it is designed for home and small office networks and does not require an authentication server Each wireless network device authenticates with the access point using the same 256 bit key generated from a password or passphrase WPA WPA2 Enterprise Also referred to as WPA 802 1X mode a...

Страница 55: ... a wireless device is authorized to connect to the WLAN and verify the wireless device s identity Authentication methods such as specific EAP methods available in the WPA WPA2 enterprise option also verify that the association process is secured Authentication utilizing WPA WPA2 enterprise can also support encryption key changes The following methods are available 802 1x if the cipher is WEP40 or ...

Страница 56: ... WPA2 Personal Enterprise If WPA WPA2 Personal or WPA WPA2 Personal Enterprise with Pre Shared key authentication method is used the WPA PSK field is enabled In this case select one of the following input formats and enter the corresponding key listed For ASCII enter 8 63 characters For HEX enter 64 digits You may select to either show or hide the key characters by either pressing Show Key or Hide...

Страница 57: ...e authentication tickets are used on this SSID this is where the ESSID secret used to create the tickets is configured Table 8 Security Definition Parameters RADIUS Accounting Server The RADIUS Accounting Server option enables the administrator to forward information about clients connected to a specific ESSID to an accounting server Once enabled the Extricom Series Switch forwards to the accounti...

Страница 58: ...able from the Event Menu When a new event message notification appears informing you of a new client it will have a button in the Add field Once you click this button the MAC address of the new client is automatically added to the All MACs list 5 You may also remove a MAC address from the All MACs list by highlighting it and clicking Delete below the All MACS field 6 Click Save Apply to save the c...

Страница 59: ...hen proceed to the Task Settings area of the configuration as described in Table 9 below Field Description Task Name Assign a name to a selected schedule by entering an alphanumeric string in this field Time Interval You may assign periodicity of an ACL by selecting one of the following radio buttons Once Monthly Weekly Daily Start Date Click inside the date field and navigate to the desired start...

Страница 60: ...resses will NOT be scheduled activated Configuring RADIUS To configure the RADIUS server option select the RADIUS tab in the ESSID Definition configuration section The RADIUS Servers work area displays the already configured RADIUS servers in the system RADIUS server bank Here you may also configure new RADIUS servers as well as delete entries that are no longer needed Figure 30 RADIUS Configurati...

Страница 61: ...ltiple RADIUS servers can be used to authenticate on a single ESSID if using RADIUS authorization check the box on all of the servers The order of priority is configured in the ESSID page Only the first server is used unless it is non responsive in which case the switch would use the second configured server on the list then the third and so on Acc Interim The interval in seconds to send accountin...

Страница 62: ...LAN Wizard Configuration Page Using the step by step WLAN Wizard facility and starting with either the Current Configuration or a new one Start Over you may simplify the process of configuring the radios following the five pre determined steps below 1 Access Point Type 2 Rogue AP Detection Blanket 3 Blanket Types 4 TrueReuse 5 Additional Parameters At each step a corresponding entry is displayed o...

Страница 63: ...ss point connected to the switch When the Radios page is initially displayed it appears in its abridged form To see all of the configuration options click on the More Options button The window shown in Figure 32 below appears When configuring 802 11a b g radios the 802 11n displayed parameters cannot be configured and are grayed out Figure 32 Radios Configuration Page The configuration parameters ...

Страница 64: ...ueReuse Enable the TrueReuse function on the selected radio Requires a TrueReuse License Not all TrueReuse configuration scenarios are available This depends on which bands are configured on all other radios the type of access point in use and the configured radio state See the Release Notes for possible configuration scenarios More Less Options Click this to hide or reveal additional configuratio...

Страница 65: ...ystem automatically configures the second 20MHz channel to be used for bonding as either above Upper or below Lower the primary 20MHz channel Select 802 11n Mode Two blanket operational modes are supported Mixed In this mode the Channel Blanket is available to all WLAN clients for example clients operating in 802 11a 802 11b 802 11g modes HT Only High throughput only In this mode the Channel Blank...

Страница 66: ...l your wireless devices can support When working in mixed mode there should be at least one Basic data rate from the 802 11b rates Optional If you configure a data rate as Optional the network will provide that data rate to wireless devices that can support it Disabled Disabled data rates are not available to wireless devices Because the Extricom Series WLAN system allows for dense deployment of A...

Страница 67: ...are 3 7 15 31 63 127 255 511 and 1023 time slots The default values for the following categories are Voice 7 Video 15 Best Effort 63 Background 1023 AIFSN Arbitration Inter Frame Spacing Number predetermined and fixed for each Access Category and may not be changed TXOP Transmit opportunity Interval in milliseconds during which a station can send as many frames as possible Available values are 0 1...

Страница 68: ...atic 802 11 QoS Value Priority Background 2 Lowest Best Effort 0 Video 5 Voice 7 Highest Table 13 WMM Standard Prioritisation The WMM to DiffServ tab maps the WMM AC of packets which arrive from wireless clients into DSCP codes in the IP header Layer 3 If the packet is tagged that is the ESSID is assigned a VLAN then the 802 11 QoS priority code is also written into the 802 1p field three bits The...

Страница 69: ...fic radios to individual ESSIDs select Assignments under WLAN Settings in the navigation tree Figure 34 ESSID Assignment Page The web page displays a cross reference table of previously defined ESSIDs and radios up to 4 Check the box for each ESSID you wish to assign to any of the four radios ...

Страница 70: ...y activate your selection click the Apply button on the right side of the configuration screen An image of an AP connected to the RJ45 connector will appear if an AP is powered on and connected to the port To power on all of the APs with PoE click the Power on all button on the right side of the screen To power off all of the APs with PoE click the Power off all button on the right side of the scr...

Страница 71: ...n the right side of the screen Figure 37 Access Points Status Page APs of Cascaded Switches When two switches have been cascaded together as primary and secondary refer to the Switch Cascade section for details about Switch Cascade configuration the Access Point window is somewhat different A tree of the two switches appears on the left to allow the user to easily toggle between views of the APs o...

Страница 72: ... a specific AP on or off by clicking on its image The radio image will turn either green or grey depending on whether it has been powered on or off respectively To immediately activate your selection click the Apply button on the right side of the configuration screen The image of the switch on the top of the page also colored illustrates the PoE status of the APs ...

Страница 73: ...ng the Save button on a Configuration page to the new active configuration file Figure 39 System Tools Configuration Page Reboot Use this tab to reboot the system and save the configuration changes created when clicking the Save button on a Configuration page In some cases such as upgrading or downgrading the firmware or returning the Switch Cascade from failover to normal operation a system reboo...

Страница 74: ...an offline disk Upload Configuration Upload a configuration from an offline disk to the switch Use the browse field to locate the configuration file You will see a pop up window stating Please select configuration elements to upload Factory Defaults Restore factory default configuration You will see a pop up window stating Please select configuration elements to Restore Undo Configuration Changes ...

Страница 75: ...ate configuration elements in the Browse pop up window then click Upload Figure 41 Pop up Window Configuration Elements to Upload To restore the factory default parameters check the appropriate boxes in the Browse pop up window then click Restore Figure 42 Pop up Window Configuration Elements to Restore ...

Страница 76: ...y radio button 2 Enter the time and the date in the corresponding fields 3 Click Save and Apply To set the time and date on your Extricom Series Switch using NTP protocol 1 Select the Internet Time radio button 2 Select the Timezone from the drop down menu 3 Specify Custom Main and Backup servers by entering their IP addresses in the Custom Server IP fields 4 Specify the NTP update interval in hou...

Страница 77: ...ords are used when accessing the switch for maintenance and service purposes Changing these passwords should be performed only by an Allied Telesis authorized engineer For security purposes it is important that all the passwords including operator and root passwords be changed from the default values when the switch is first installed as well as periodically updated Record all passwords and store ...

Страница 78: ...pgrade file The file s name with the full path appears in the Upgrade File field 5 You can check the Reboot the switch after firmware upgrade checkbox for the switch to automatically reboot at the end of the upgrade process or you can manually reboot the switch at a later time 6 Click Upgrade to upgrade the firmware and wait for the upgrade process to end 7 If you did not check the Reboot the swit...

Страница 79: ...o install them on the switch 1 Select the Certificate configuration tab 2 Browse to the location of each file Once located the name and the path of the RSA private key file and the signed certificate file will appear in the corresponding fields 3 Click Upload to complete the installation Figure 45 Certificate Configuration Tab Application In the Application configuration screen you can change the ...

Страница 80: ...the switch click on the License configuration tab 1 Browse to the location of the License file on your computer 2 Click Install Reboot to finish activating the switch The switch reboots and the license details are displayed in the Installed License Details section of the License Configuration tab Figure 47 License Configuration Tab ...

Страница 81: ...cade Resiliency supports redundancy between cascaded switches Both switches serve a single BSSID until any of them is at fault As soon as one of the switches fails the surviving switch serves mobile devices by itself with no human intervention The eventual replacement of the faulty switch does not necessitate any interruption in service while returning to a fully redundant mode Figure 48 Resilienc...

Страница 82: ...made you must click Save then go to System Tools and apply changes as described in the Apply section in order for them to take effect When a switch or link failure is detected a failover occurs and the cascaded switch that remains fully operational goes into primary mode Table 17 below indicates which cascaded APs provide service in the event of a failover Failure Type Primary APs Secondary APs Co...

Страница 83: ... The primary switch GUI is fully operational if the primary switch is interconnected to a functional secondary switch The secondary switch GUI is always read only except for the following menus Reboot Application LAN Settings Upgrade and License If the primary switch is not interconnected to a functioning secondary switch the GUI will behave identical to a secondary switch read only apart from the...

Страница 84: ...event logging is turned off You may turn it on using the System Logging configuration tab in the Advanced section To do this 1 Select the Enable System Logging checkbox 2 Enter the IP address of the server on which the Syslog protocol log will be stored 3 Click Save Figure 50 System Logging Configuration Tab The following lists events that are logged refer to Northbound SNMP Traps for definitions ...

Страница 85: ... authentication failure attack Intrusion detection authentication flood attack Intrusion detection de authentication broadcast Intrusion detection de authentication flood attack Intrusion detection EAPOL logoff attack Intrusion detection EAPOL start attack Intrusion detection RF jamming attack Last RADIUS failed License failed PoE reset RF localization failed Radio is functioning normally in all A...

Страница 86: ... of traps to describe events occurring on the WLAN In general these traps can be categorized as follows AP events for example connections disconnections Client events for example associations disassociations Switch events Configuration events RADIUS events Redundancy events for Switch Cascade Security events intrusion detection rogue AP detection etc Traps are displayed in the Events and Alarms ar...

Страница 87: ...ay be sent by an Extricom Series switch SNMP Agent You may configure the switch to respond to SNMP queries from various management systems on the network To do this 1 Enable the function by selecting the Enable SNMP Agent checkbox 2 Set the password for SNMP Get Requests by entering it in the Read Community field 3 Set the password for SNMP Set Requests by entering it in the Write Community field ...

Страница 88: ...ndition by flooding the WLAN network A denial of service condition is identified through attack signatures or other factors most of which are well known The IDS tab allows the user to enable this mechanism set thresholds for identifying an attack and choose the types of attacks to be detected The IDS mechanism detects 802 11 duration attacks and 802 11 management message flooding attacks Upon atta...

Страница 89: ... specific event is allowed during the event threshold Each of the possible attack types listed below this parameter is assigned a limit per station All station Number of times a specific event is allowed during the event threshold Each possible attack type listed below this parameter is assigned with a limit to all stations Authentication Flood Flooding the WLAN with authentication requests De Aut...

Страница 90: ...enticates the user via RADIUS Server Secured Logging is used for applications that require authentication based access such as hotels and guest access Open Access In an Open Access model a user trying to access the web is redirected to a welcome web page which might for example contain Terms of Use to which the user must agree before being allowed internet access Open Access is used for applicatio...

Страница 91: ...on Allowed Destination Walled Garden You can define a list of up to 10 free access network destinations 10 rules WLAN clients associated to the captive portal restricted ESSID can reach these destinations without going through the Captive portal authentication process A network destination a rule is defined by an IP address subnet mask port numbers and an Internet Protocol TCP UDP ICMP It is advis...

Страница 92: ...icast configuration tab you may limit the amount of time the system is busy with sending Multicast traffic this feature mostly applies to specific applications communicating mostly via multicast traffic The Multicast tab is available only when Expert mode is enabled from the Advanced settings Figure 55 Multicast Configuration Tab ...

Страница 93: ...n Tab Expert Under the Expert tab Expert User mode provides advanced configuration options which are not visible via the basic settings To activate Expert User mode select the Enable Expert Mode checkbox and click Apply Figure 57 Expert Configuration Tab Others Under the Others tab a number of advanced configuration options such as 802 11d are provided Select the 802 11d Support checkbox if you wi...

Страница 94: ...ion Select the In Band Management checkbox if you wish to enable this option this is a general enabling of the option and requires per ESSID configuration Select the Band Steering checkbox if you wish to enable this option To activate these options per ESSID after selecting the above checkboxes refer to the Configuring WLAN Settings section of this guide Figure 58 Others Configuration Tab ...

Страница 95: ...nd Steering Operational Flow Band steering only works if the Wi Fi network has at least two radios one for the 2 4 GHz band and one for the 5 GHz band Viewing Events and Reports The Events Reports page provides performance reports and lists various system events To access this page click Events Reports in the navigation tree Within the page you will find the following configuration tabs System Eve...

Страница 96: ...and level of Severity On both the System Events page and Clients Events page there are three buttons on the right side of the screen Pause Continue toggle which lets you stop or start the flow of the events History which brings up the list of the most recent past events up to 1000 and Export which lets you save an event log into an HTML file on your computer If a message has a sign in the Add fiel...

Страница 97: ...wide range of per radio channel based and per switch based statistics Figure 62 Reports Tab The following table describes the information available on this page Field Description Downlink Throughput Mbps A one second snapshot of the data volume carried by all downlinks on a particular radio channel Channel Blanket Total Total downlink throughput of the switch based on a one second snapshot of data...

Страница 98: ...r a MAC address on the page Any matching MAC address in the list of clients MAC addresses will be highlighted Disconnect Selected Client s Used to reset a client connection in order to help a client establish a working connection The client must then re authenticate to reconnect to the WLAN Table 21 Reports Window Fields The statistics window does not get updated automatically Click Refresh to upd...

Страница 99: ...king Generate begins generating a series of statistics snapshots which are organized into a series of files and packaged into a compressed archive of html files Debug Log Click Generate to dump a log into a log file Access Points Diagnostics CCA Percentage Clear Channel Assignment result in 0 100 A higher value indicates there is more medium consumption Duration is measured in seconds This functio...

Страница 100: ... transfer to measure the drop packets threshold The recommended duration for the cable test is 1200 seconds Overall Test Initiates all three tests CCA Percentage CRC Errors and Cable Test The results are displayed in the right portion of the screen Table 22 Diagnostics Tab Parameters and Tests ...

Страница 101: ...l Edge PoE on or off by clicking on its RJ45 connector image The RJ45 connector image will turn either green or grey depending on whether it has been powered on or off respectively To immediately activate your selection click the Apply button on the right side of the configuration screen An image of an AT EXMS 1000 switch connected to the RJ45 connector will appear if an Edge switch is powered on ...

Страница 102: ...the navigation tree For more detailed information refer to Advanced Configuration on page 73 Redundancy Switch redundancy refers to redundancy over wired LAN media and provides the master to backup auto fallback functionality Both switches serve a single BSSID until either of them is at fault As soon as one of the switches fails the surviving switch serves mobile devices by itself with no human in...

Страница 103: ...uide 95 Figure 65 Redundancy Configuration Tab Redundancy is only available if an appropriate license is installed To check whether redundancy has been installed refer to License on page 72 If it is not available contact your Allied Telesis distributor ...

Страница 104: ...ection Timeout Interval in seconds before a timeout state occurs The default is 10 seconds Table 23 Redundancy Configuration Tab Parameters for a Primary Cascade Switch Once the changes are made you must click Save then go to System Tools and apply changes as described in the Apply section in order for them to take effect When a switch failure or a link failure has been detected a failover occurs ...

Страница 105: ... Public Venue Enabling this option provides for the enhanced functionality to provide the IEEE 802 11 service within large public venue sites Configuring Honeypot The Honeypot configuration provides for reducing the RF level at the site by providing response to mobile devices that are probing the air and keep trying to reconnect their last location such as Home WLAN network Office WLAN network or ...

Страница 106: ...e ESSID which has been configured to be the honeypot See below for honeypot ESSID configuration Preset ESSIDs Allows configuring certain SSIDs within the honeypot to be assigned unique VLANs Block Traffic If checked client traffic apart from DHCP on this SSID will not be passed on to the LAN Blacklist ESSIDs Add all the ESSIDs which serve real traffic and MUST NOT get stuck in the Honeypot Table 2...

Страница 107: ...s not supported Enable ARP Caching Enable Provide immediate response to ARP request directed toward the WLAN stations The switch answers on behalf of the WLAN stations Bandwidth Saving ARP Caching Enable Reduce the number of ARP packets sent over the wireless medium VLAN Tag Any number with the 1 4096 range Disassociation Timeout 3600 The amount of time in seconds that a mobile device can remain i...

Страница 108: ...of the time such as convention centers casinos and concourses at arenas or stadiums High The mobile device is served by the optimized access point however the decision to be served by another access point is evaluated more carefully by the switch and frequent roaming between access points is eliminated This configuration applies to cases in which the mobile devices are at the same location along w...

Страница 109: ...ad balanced must have the same group name configured Switch Threshold The load threshold above the average of the group that triggers this switch to stop accepting new connections ESSID Threshold The load threshold above the average of the group that triggers this switch to stop accepting new connections per ESSID Switch Stickiness If a client that is already associated to another switch in the gr...

Страница 110: ...nfigured to use the same authentication method If the RADIUS Server is used verify that the wireless device is registered and has the necessary authorization Cannot connect to the Extricom Series web configuration pages Verify that the switch is connected to the LAN Verify that the correct IP address is used Low data rates Verify that the switch was not mistakenly configured to use low data rates ...

Страница 111: ...3 Problem Solution Cannot access the switch s web configuration GUI Verify that the workstation on which the web browser is running is connected to the same LAN as the switch Verify that the URL entered for the switch begins with https Table 27 Troubleshooting ...

Страница 112: ...ich the client is associated 2 Client Disassociation This trap is sent whenever a client disassociates from the switch The trap includes the client MAC address and AID as well as the BSSID and ESSID to which the client is disassociated The disassociation reason code is also sent 4 EAPOL Key Error A client attempted to associate using WPA but there was an error with the EAPOL key The trap details w...

Страница 113: ...2 Redundancy keepalive connection down When using Normal not Cascade redundancy the switch lost connectivity to the Reference IP 25 Redundancy status up When using Normal not Cascade redundancy this switch has taken over the wireless responsibility If the secondary switch is issuing this trap it is because it detected a failure in the primary switch If the primary switch is issuing this trap it ha...

Страница 114: ...tatus of a rogue AP has been updated This trap always comes after trap 29 This trap details if the rogue network is an AP or ad hoc the relevant BSSID and ESSID what channel the rogue is transmitting on which Extricom Series AP is closest to the rogue AP and approximately how far the rogue AP is from the Extricom Series AP 43 Intrusion detection Duration attack Available only when Intrusion Detect...

Страница 115: ... per station limitation the trap also includes the client MAC address 50 Intrusion detection RF Jamming attack Available only when Intrusion Detection is enabled Indicates that the switch has detected an RF Jamming attack 51 Intrusion detection EAPOL Start attack Available only when Intrusion Detection is enabled Indicates that the switch has detected an EAPOL Start Flood attack The trap details h...

Страница 116: ...st 57 RF localization failed The switch localization lock is missing or corrupt Contact an Allied Telesis representative 59 Firmware upgrade startup Switch firmware upgrade has started 60 Firmware upgrade done Switch firmware upgrade has ended 61 Firmware upgrade progress This trap is sent with a progress update during the switch firmware upgrade 62 Firmware upgrade failed Switch firmware upgrade ...

Страница 117: ...ss set The trap details the client MAC address AID and the IP address it is set to use The IP address was either received via DHCP or statically set and is being used by the client 73 Start sh Started Start sh is being run on the switch 74 Start sh ended Start sh has finished running on the switch 75 Starting Boot The switch is being rebooted 76 Changed Wireless Status On Off The wireless has been...

Страница 118: ...Northbound SNMP Traps Trap No Trap Name Description 79 POE reset An AP was reset but is still not working properly The AP was power booted via PoE The trap details which AP was PoE reset Table 28 SNMP Traps ...

Страница 119: ... Point Mounting Template 4 25 inches 10 8 cm Important Note Due to variations in printers when printing this page printer Page Scaling should be set to None or diagram may be automatically reduced in size As a double check make sure the distance between drill points is as indicated above ...

Страница 120: ...B Safety EN 60950 1 2006 A11 A12 A1 UL 60950 1 IEC 60950 1 RoHS ROHS2 2011 65 EU Radio FCC Part 15 Class C and Part 15 Class E VCCI Technical Requirements V 3 2001 04 EN 300 328 V1 8 1 EN 301 893 1 7 1 Switches EMC ETSI EN 300 386 V1 4 1 2008 04 ETSI EN 55024 98 A1 2001 A2 2003 ETSI EN 55022 2006 A1 2007 FCC Part 15 Class B Safety EN 60950 1 2006 A11 A12 A1 UL 60950 1 IEC 60950 1 RoHS ROHS2 2011 6...

Отзывы: