


Chapter 13: Installing the AT-MCF2000M Management Module
114
Section II: Installation
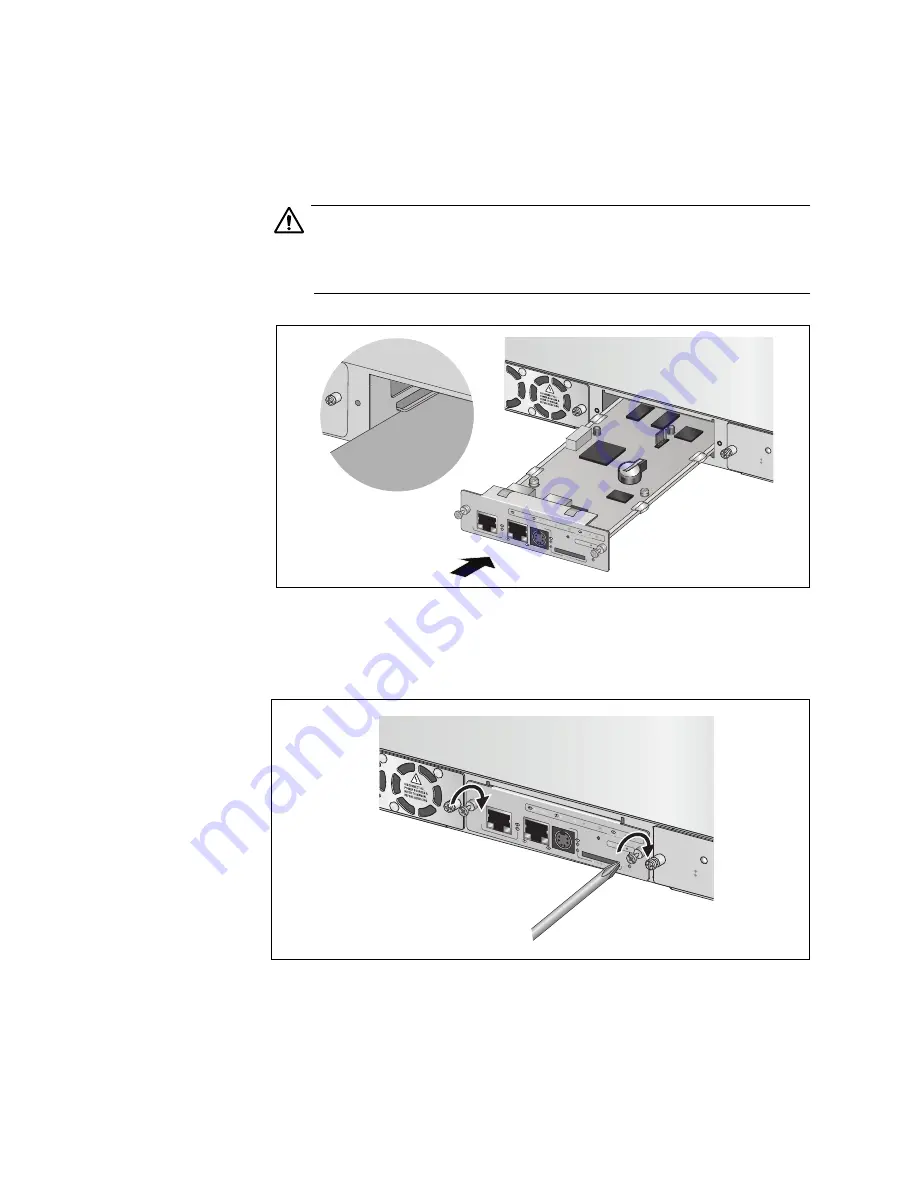
5. Align the edges of the module with the guides in the slot and carefully
slide the module into the chassis until it is flush with the front of the
chassis. Light pressure may be necessary to firmly seat the module
connector on the connector on the back panel of the chassis.
Caution
Do not force the module into place. If there is resistance, remove the
module and before reinserting it, verify that the edges of the card are
properly aligned in the guides in the chassis’ module slot.
Figure 57. Installing the Management Module
6. Secure the management module to the chassis by tightening the two
captive screws on the module with a cross-head screwdriver.
Figure 58. Securing the Management Module
AT-MCF2KF
AN
NORMA
L
FAULT
S
TATU
S
AT-MCF2000M
STACK
MANAGEM
ENT
TERMINAL
10/100/1000
BASE-T
RS-232
RESET
SD
RDY
BUSY
MASTER
POWER
BOOT
RDY
FAULT
1000 LINK
ACT
10/100 LIN
K
ACT
FDX
HDX
COL
LINK
ACT
PORT ACTIVITY
1200a
1201a
AT-MCF
2000
M
S
TACK
MANAG
EMENT
TER
MINAL
10/100
/1000
BA
S
E-T
R
S
-2
3
2
RE
S
ET
S
D
RDY
BU
S
Y
MA
S
TER
POWER
BOOT
RDY
FAULT
1000 L
INK
ACT
10/100
LINK
ACT
FDX
HDX
COL
LINK
ACT
PORT A
CTIVITY
AT-MCF2KF
AN
NORM
AL
FAULT
S
TAT
U
S
Содержание AT-MCF2000
Страница 8: ...Contents 8...
Страница 12: ...Tables 12...
Страница 18: ...Preface 18...
Страница 20: ...20 Section I Features...
Страница 26: ...Chapter 1 AT MCF2000 Multi channel Media Converter Series 26 Section I Features...
Страница 54: ...Chapter 3 AT MCF2012LC AT MCF2012LC 1 and AT MCF2032SP Modules 54 Section I Features...
Страница 72: ...Chapter 4 AT MCF2000M Management Module 72 Section I Features...
Страница 84: ...Chapter 5 AT MCF2000S Stacking Module 84 Section I Features...
Страница 86: ...86 Section II Installation...
Страница 90: ...Chapter 6 Reviewing the Safety Precautions 90 Section II Installation...
Страница 92: ...Chapter 7 Selecting a Location 92 Section II Installation...
Страница 96: ...Chapter 8 Unpacking the AT MCF2000 or AT MCF2300 Chassis 96 Section II Installation...
Страница 98: ...Chapter 9 Removing the Rubber Feet 98 Section II Installation...
Страница 106: ...Chapter 11 Installing the AT MCF2KFAN Module 106 Section II Installation...
Страница 110: ...Chapter 12 Installing a Media Converter Module 110 Section II Installation...
Страница 122: ...Chapter 15 Installing the Chassis in an Equipment Rack 122 Section II Installation...
Страница 128: ...Chapter 17 Installing the SFP Modules in the AT MCF2032SP Module 128 Section II Installation...
Страница 130: ...Chapter 18 Cabling the Ports on the Media Converter Module 130 Section II Installation...
Страница 134: ...Chapter 19 Cabling the AT MCF2000M and AT MCF2000S Modules 134 Section II Installation...
Страница 138: ...Chapter 20 Powering on the Chassis 138 Section II Installation...
Страница 156: ...Chapter 23 Troubleshooting the Modules 156 Section II Installation...
Страница 186: ...Appendix C Cleaning Fiber Optic Connectors 186...
Страница 190: ...Index 190...


