© Copyright, Alliance Laundry Systems LLC – DO NOT COPY or TRANSMIT
Maintenance
1800000
26
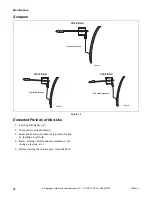
To install new clothing:
1. Place clothing on last roller.
2. Affix the felt with one screw at each end of the
roller. Do not trim off the sides yet.
3. Tie the leading edge of the felt to the springs
every 12 inches (300 mm) using wire. These
must remain until clothing is stitched, then they
should be cut and removed.
4. Repeat the procedure to each subsequent roller as
described in 1, 2 and 3 above.
5. Wrap a cloth around the leading edge of the new
felt to protect it.
6. Turn the roller one third of a revolution until the
leading edge of the felt is in the bed.
7. With the pressure set at 284.47 lb./in
2
(20 kg/cm
2
), raise the beds of the felt to meet at
the top of the roller.
8. Firmly tension the felt over the whole length of
the trailing edge with a strong pair of pliers.
9. With a strong sharp knife, cut away any excess
felt across the whole width of the roller (cut short
so that a 3/4 inch gap remains between first and
last edge).
10. Stitch the clothing.
To stitch new clothing:
1. Make a small noose at the end of the wire.
2. Insert the needle into the clothing and pass it
through the noose to secure an end.
3. Draw wire into felt by making a shallow cut .07
to .11 inch (2 to 3 mm deep) into felt and allow
wire to sink into the cut. The wire should not pop
out anywhere.
4. By hand, stitch 20 inches (508 mm) leaving
approximately 1-1/4 inch (30 mm) between
stitches. Then draw up the wire firmly into the
clothing, at the same time hammering wire into
felt.
5. Finish at the ends by making a cross stitch.
Continue stitching over the remainder of the
clothing in the same method.
6. Lower the beds.
NOTE: Never turn the rollers in cold beds!
7. Trim off the felt around circumference of rollers
at each end (cut off overlapping felt at each side
of the roller).
8. Make holes in the felt and screw the felt down
around the rollers at both ends using screws
retained from the old clothing.
9. Tension the clothing.
Baking of Roll Padding
IMPORTANT: DO NOT turn rolls in cold beds. DO
NOT turn rolls in the beds before the baking.
1. Open the beds and visually divide the roll in four
parts.
2. Remove wax paper from rolls.
3. Ungrease and clean beds.
4. Heat beds to working temperature.
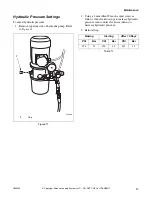
5. Adjust the hydraulic pressure regulation valve to
.
6. Press beds against 1/2 of roll for about
15 minutes, at appropriate hydraulic pressure.
Refer to
7. Open beds and turn roll 1/2 revolution (180
o
).
Press beds against roll again for 15 minutes.
NOTE: To turn roll with open beds, a special switch
in electrical box is used.
8. Open beds and turn roll 1/4 revolution (90
o
).
Press beds against roll again for 15 minutes.
9. Repeat Step 7 seven more times so baking takes
2 1/2 hours total.
10. Open beds and set pressure regulation valve to
.
11. Wrap a sheet around roll. Press beds against roll
and turn for about 15 minutes.
NOTE: During turning, put some wax at bed
entrance between roll and bed. Open beds and
remove sheet.
.
NOTE: While ironing, if padding becomes loose,
stop roll, open beds and turn loose part down. Press
beds against roll for 15 minutes. DO NOT TURN
ROLL.
NOTE: This procedure should be repeated when
replacing roll padding on any machine.
Содержание UL24A118
Страница 2: ......

