background image

© Copyright, Alliance Laundry Systems LLC – DO NOT COPY or TRANSMIT

Installation

1800000

14

Electrical Connection

Electrical connections should be made by a qualified 
electrical contractor in accordance with all applicable 
local and national requirements. A differential circuit 
breaker (obtain locally), correctly sized for the power 
consumption of the finisher, must be installed near 
finisher. Refer to 

Table 3

Table 4 

an

Table 5

IMPORTANT: Electrical specifications in 

Table 3

Table 4

 and 

Table 5

 are subject to change without 

notice. Always refer to product serial plate for most 
current specifications of product being installed.

NOTE: Use copper conductors only.

NOTE: Connect to individual branch circuit.


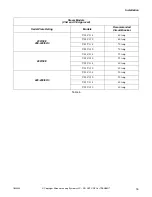
Electrical Models 

(CE Approved)

Serial Plate Rating

Model

Recommended
Circuit Breaker

Heater Element

All Voltages

UL24*118

100 Amp

60 kW (80 hp) 

UL24*130

125 Amp

75 kW (101 hp)

UL32*118

160 Amp

 90 kW (121 hp)

UL32*130

160 Amp

90 kW (121 hp)

Table 3 

Gas Models 

(CSA and CE Approved)

Serial Plate Rating

Models

Recommended
Circuit Breaker

230/50/3 

208-240/60/3

UL24*118

60 Amp

UL24*130

60 Amp

UL32*118

70 Amp

UL32*130

70 Amp

400/50/3

UL24*118

40 Amp

UL24*130

40 Amp

UL32*118

40 Amp

UL32*130

40 Amp

440-480/60/3

UL24*118

30 Amp

UL24*130

30 Amp

UL32*118

40 Amp

UL32*130

40 Amp

Table 4 

Содержание UL24A118

Страница 1: ...eated Finishers 24 inch 600 mm Models and 32 inch 800 mm Models Refer to Page 2 for Model Identification Part No 1800000R2 September 2007 Keep These Instructions for Future Reference If this machine changes ownership this manual must accompany machine ...

Страница 2: ......

Страница 3: ...nstallation Inspection 12 Location Requirements 12 Moving Finisher with Crane 13 Moving Finisher with Forklift 13 Electrical Connection 14 Gas Connection 17 Inlet Pressure 18 Manifold Pressure 18 Steam Connection 19 Steam Connection Requirements 19 Exhaust Requirements 20 Start up Procedures 21 Purging Moisture 21 Operation Instructions 22 Pre Operation 22 Daily Check Points 22 Operating Instructi...

Страница 4: ... LLC DO NOT COPY or TRANSMIT 1800000 2 Introduction Model Identification Information in this manual is applicable to these models UL24F118 UL24F130 UL24R118 UL24R130 UL24A118 UL24A130 UL32F118 UL32F130 UL32R118 UL32R130 UL32A118 UL32A130 ...

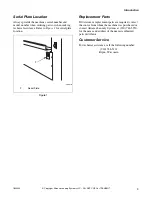
Страница 5: ...ance Refer to Figure 1 for serial plate location Figure 1 Replacement Parts If literature or replacement parts are required contact the source from whom the machine was purchased or contact Alliance Laundry Systems at 920 748 3950 for the name and address of the nearest authorized parts distributor Customer Service For technical assistance call the following number 920 748 3121 Ripon Wisconsin FWF...

Страница 6: ... used to inform the reader of specific procedures where minor machine damage will occur if the procedure is not followed NOTE The word NOTE is used to communicate installation operation maintenance or servicing information that is important but not hazard related The WARNING and IMPORTANT instructions appearing in this manual are not meant to cover all possible conditions and situations that may o...

Страница 7: ...s and warnings Learn all aspects of the equipment such as what is hot which parts move all safety shut offs and all emergency procedures Do not come close to moving or heated parts Do not wear loose clothing sweaters jewelry or neck ties when near the finisher 8 Frequent scheduled safety meetings are a must to review and update rules If anyone is observed breaking the rules the supervisor or manag...

Страница 8: ...ng to the Installation instructions in this manual All connections for electrical power grounding and gas supply must comply with local codes and be made by licensed personnel when required 22 Do not turn hard or meltable materials into the machine 23 Do not operate the machine without feed sheets 24 Do not crawl or walk on the machine 25 Always wear protective gloves when working at the machine T...

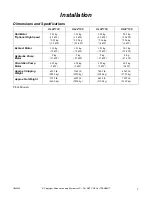
Страница 9: ...5 hp 2 2 kW 2 95 hp 2 2 kW 5 36 hp 4 kW 2 95 hp 2 2 kW 5 36 hp 4 kW Exhaust Motor 1 01 hp 75 kW 1 01 hp 75 kW 1 01 hp 75 kW 1 01 hp 75 kW Hydraulic Pump Motor 5 hp 37 kW 5 hp 37 kW 5 hp 37 kW 5 hp 37 kW Circulation Pump Motor 4 02 hp 3 kW 4 02 hp 3 kW 4 02 hp 3 kW 4 02 hp 3 kW Approx Shipping Weight 6503 lb 2950 kg 7165 lb 3250 kg 7605 lb 3450 kg 8267 lb 3750 kg Approx Net Weight 5732 lb 2600 kg 6...

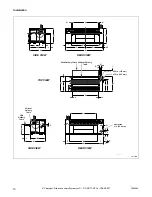
Страница 10: ...stallation 1800000 8 FWF54N Without Delivery Table With Delivery Table A B C D H 14o F G E Gas Intake X Gas Outlet N N P Q Y Z O M L A B D C J I H R W J X V U T S Roll Exhaust SIDE VIEW REAR VIEW SIDE VIEW FRONT VIEW TOP VIEW 4 75 in 120 mm 4 75 in 120 mm 1 in 25 4 mm ...

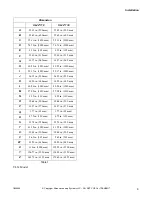
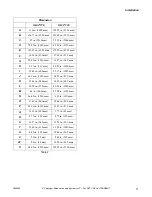
Страница 11: ...1030 mm 39 17 in 1030 mm J 36 22 in 920 mm 36 22 in 920 mm K 18 90 in 480 mm 18 90 in 480 mm L 40 94 in 1040 mm 40 94 in 1040 mm M 57 09 in 1450 mm 57 09 in 1450 mm N 4 33 in 110 mm 4 33 in 110 mm O 19 68 in 500 mm 19 68 in 500 mm P 14 57 in 370 mm 14 57 in 370 mm Q 1 77 in 45 mm 1 77 in 45 mm R 4 72 in 120 mm 4 72 in 120 mm S 13 78 in 350 mm 13 78 in 350 mm T 41 39 in 1050 mm 41 39 in 1050 mm U 1...

Страница 12: ... H I H G F R Q M Exhaust Outlet Gas Outlet I X P V V J M K T S Gas Intake U I F N M I O With Delivery Table Without Delivery Table L G K I N J M With Delivery Table Without Delivery Table SIDE VIEW REAR VIEW TOP VIEW REAR VIEW SIDE VIEW 6 25 in 160 mm 4 75 in 120 mm 1 in 25 4 mm F A E B A A B C E D 25 ...

Страница 13: ... in 110 mm 40 55 in 1030 mm I 23 62 in 600 mm 39 17 in 1030 mm J 40 16 in 1020 mm 36 22 in 920 mm K 22 83 in 580 mm 18 90 in 480 mm L 38 39 in 975 mm 40 94 in 1040 mm M 63 in 1600 mm 57 09 in 1450 mm N 86 62 in 2200 mm 4 33 in 110 mm O 37 80 in 960 mm 19 68 in 500 mm P 45 28 in 1150 mm 14 57 in 370 mm Q 11 42 in 290 mm 1 77 in 45 mm R 4 73 in 120 mm 4 72 in 120 mm S 14 37 in 265 mm 13 78 in 350 mm...

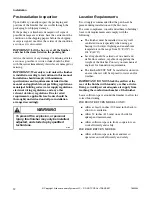
Страница 14: ...ngly Location Requirements It is strongly recommended that the purchaser be present during installation and the first tests To assure compliance consult and adhere to building local code requirements and comply with the following The finisher must be installed in a very well ventilated room especially when using gas heating with correct lighting and an ambient temperature in the range from 32 F 0 ...

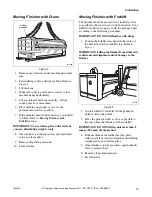
Страница 15: ...The finisher should be moved with a forklift as close as possible to the area where it will be installed Use a forklift of sufficient capacity to lift the packaged unit according to the following procedures IMPORTANT DO NOT lift finisher with slings 1 Position the forklift arms beneath the center of the unit in the built in forklift slots Refer to Figure 3 IMPORTANT Lifting the finisher from eithe...

Страница 16: ...ys refer to product serial plate for most current specifications of product being installed NOTE Use copper conductors only NOTE Connect to individual branch circuit Electrical Models CE Approved Serial Plate Rating Model Recommended Circuit Breaker Heater Element All Voltages UL24 118 100 Amp 60 kW 80 hp UL24 130 125 Amp 75 kW 101 hp UL32 118 160 Amp 90 kW 121 hp UL32 130 160 Amp 90 kW 121 hp Tab...

Страница 17: ...CE Approved Serial Plate Rating Models Recommended Circuit Breaker 230 50 3 208 240 60 3 UL24 118 60 Amp UL24 130 60 Amp UL32 118 70 Amp UL32 130 70 Amp 400 50 3 UL24 118 32 Amp UL24 130 32 Amp UL32 118 40 Amp UL32 130 40 Amp 440 480 60 3 UL24 118 30 Amp UL24 130 30 Amp UL32 118 40 Amp UL32 130 40 Amp Table 5 ...

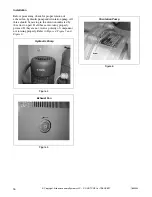
Страница 18: ... fan hydraulic pump and circulation pump All three should be moving in the direction indicated by the arrow on part If all three are rotating properly proceed If they are not reverse polarity of component not rotating properly Refer to Figure 4 Figure 5 and Figure 6 Figure 4 Figure 5 Hydraulic Pump Exhaust Fan Figure 6 Circulation Pump Arrow ...

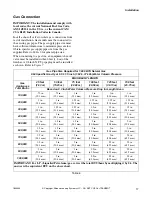
Страница 19: ...100 feet 30 50 m 125 feet 38 13 m 150 feet 45 75 m Based on 0 3 Inch Water Column Pressure Drop for Length Given 100 000 75 in 19 1 mm 75 in 19 1 mm 1 in 25 4 mm 1 in 25 4 mm 1 in 25 4 mm 1 in 25 4 mm 200 000 1 in 25 4 mm 1 in 25 4 mm 1 25 in 31 8 mm 1 25 in 31 8 mm 1 25 in 31 8 mm 1 25 in 31 8 mm 300 000 1 in 25 4 mm 1 25 in 31 8 mm 1 25 in 31 8 mm 1 5 in 38 1 mm 1 5 in 38 1 mm 1 5 in 38 1 mm 400...

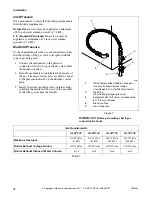
Страница 20: ...ssure of the gas The measured gas pressure must be equal to the pressure indicated on the finisher s serial plate 3 Install a pressure regulator valve obtain locally suited for the nature and flow rate of the gas used in the tube system near the finisher IMPORTANT Before proceeding check gas connection for leaks D233i 1 New Stainless Steel Flexible Connector Use only if allowed by local codes Use ...

Страница 21: ...nes it is recommended that each have a pipe union and globe valve for disconnection of the steam to service to finisher Before connecting the trap and check valve to the finisher open the shut off valve in steam supply line and allow steam to flow through the finisher to flush out any debris This will assure proper operation of the trap when it is connected After flushing the system install a vacu...

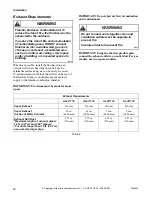
Страница 22: ...ce the risk of fire the finisher must be exhausted to the outdoors To reduce the risk of fire and accumulation of combustible gases DO NOT exhaust finisher air into a window well gas vent chimney or enclosed unventilated area such as an attic wall ceiling crawl space under a building or concealed space of a building W679 WARNING Do not connect vents together Gas and ventilation outlets must be sep...

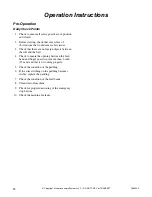
Страница 23: ... Refer to Baking of Roll Padding Purging Moisture At the first heating of the machine moisture must be purged out of the system To do this 1 Take off existing hose Do not throw away Refer to Figure 8 2 Connect the teflon hose provided on top of the machine in its place 3 Place one end of the teflon hose into a tub Refer to Figure 9 4 Heat the machine fully 5 Let teflon hose drain into tub 6 Remove...

Страница 24: ...issues 3 Check that there are no foreign objects between the roll and the bed 4 Check to ensure the opening between the feed band and finger guard is not more than 6 inch 15 mm and that it is working properly 5 Check the condition of the padding 6 If the wire stitching on the padding becomes visible replace the padding 7 Check the condition of the feed bands 8 Clean dust off machine 9 Check for pr...

Страница 25: ...tton again Touching the finger guard will stop the roll at once but temperature will remain constant To start again push start button IMPORTANT When the finger guard is tripped the bed remains pressed against the roll It is strongly recommended to start the roll as soon as possible or to stop the machine completely Temperature Setting NOTE Set temperature to read in degrees Fahrenheit if desired S...

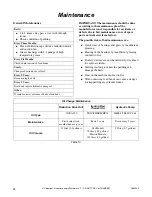
Страница 26: ...nds can cause a danger for trapped fingers or feeder linens Daily 2 to 4 times a day pass a wax cloth through ironer Check condition of padding Every Three Months Clean ventilation caps of drive reduction motor and suction fan Grease bearings with 1 2 pumps of high temperature grease Every Six Months Check chain tension of feed bands Yearly Change reduction drive roll oil Every 2 Years Drain ironi...

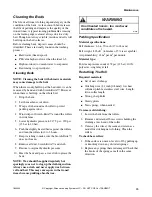
Страница 27: ...urs 7 Keep watching to make sure the Scotch Brite does not loosen 8 Remove all dust Scotch Brite and cloth 9 Restore to original hydraulic pressure 10 Heat the beds and pass a wax cloth to grease the beds NOTE Wax should be applied regularly but sparingly so as not to clog up the clothing suction Always use a cloth and never apply wax between roll and bed This may cause spots in the ironed items b...

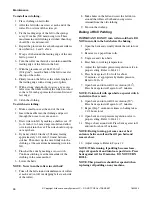
Страница 28: ...the ends by making a cross stitch Continue stitching over the remainder of the clothing in the same method 6 Lower the beds NOTE Never turn the rollers in cold beds 7 Trim off the felt around circumference of rollers at each end cut off overlapping felt at each side of the roller 8 Make holes in the felt and screw the felt down around the rollers at both ends using screws retained from the old clo...

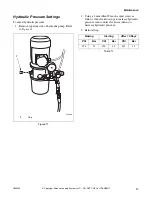
Страница 29: ...emove cap from side of hydraulic pump Refer to Figure 11 2 Using a 4 mm Allen Wrench adjust screw as follows turn clockwise up to increase hydraulic pressure turn counter clockwise down to decrease hydraulic pressure 3 Reinstall cap FWF98N 1 Cap Figure 11 FWF98N 1 Baking Starting After 10 Days PSI Bar PSI Bar PSI Bar 508 35 290 20 363 25 Table 11 ...

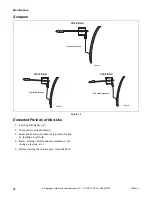
Страница 30: ...Wrap plastic around roller s 3 Grease the beds with some oil to prevent rusting by feeding an oil cloth 4 Keep carrying out the annual maintenance oil change greasing etc 5 Before starting the ironer again clean the beds Figure 12 FWF51N POSITION A correct pressure FWF51N FWF53N Too little pressure Too much pressure POSITION B FWF52N POSITION C FWF53N ...

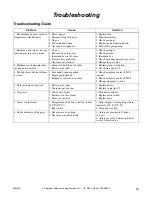
Страница 31: ...lose 1 Green start button out of order 2 Motor out of order 1 Replace green start button 2 Check motor print C2 4 The bed closes but the roll does not turn 1 Foot pedal option pushed 2 Finger guard pushed 3 Frequency control out of order 1 Check or replace contact F D C4 option 2 Check or replace contact F D C2 3 Change frequency control 5 Roll suction does not work 1 Motor out of order 2 Contacto...

Страница 32: ...ll be ironed b The ribbon length is uneven Uneven length ribbons will not drive the roll evenly Only a few articles can be ironed before the finish quality deteriorates The operators must wait a few minutes before proceeding in order to process linen to the proper finish 1 There is too much water in the fabric Large articles with excessive water content will remove a great amount of heat from the ...

Отзывы:

Похожие инструкции для UL24A118