background image

26

801805

Section 3 Troubleshooting (Washer Control)

© Copyright, Alliance Laundry Systems LLC – DO NOT COPY or TRANSMIT

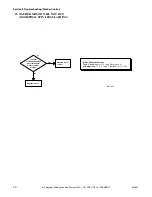
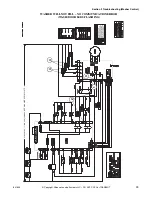
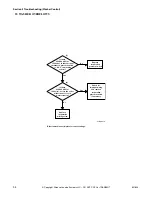
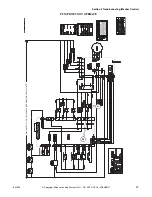
21. WASHER WILL NOT START – DOOR OPEN ERROR

(WASH/RINSE LEDS FLASHING – DOOR MUST BE CLOSED AND ATTEMPTING TO LOCK)

Is there  

220-240 VAC (or  

120 Volts)*  across  

"H4-5" to "H6-5" on  

the machine

control? 

(1)

(2)

Yes

No

Is there  

220-240 VAC (or  

120 Volts)* from the  

BLU/BLK wire on door  

lock assembly

to neutral?

Replace the  
secondary door  
switch.

Replace machine
control.

Yes

No

Is there  

220-240 VAC (or  

120 Volts)* from the  

BLK wire on the secondary 

door switch to 

neutral?  

(3)

Correct wiring
to the secondary
door switch.

Replace door
lock assembly.

Yes

No

FLW1728S

*Refer to machine serial plate
for correct voltage.

Содержание LTS97A*N2802

Страница 1: ...www comlaundry com SWD441C Part No 801805 October 2004 Service Homestyle Stacked Washer Dryers Refer to Page 3 for Model Numbers ...

Страница 2: ......

Страница 3: ...othes Do Not Dry in Dryer 19 15 Timer Does Not Advance In Automatic Cycle 20 16 Clothes Are Too Hot When Removed From Dryer 21 17 Excessive Chattering Or Vibrating Noise in Dryer 21 18 Excessive Humming Or Whistling Noise in Dryer 21 Washer Control 19 Washer Error Code Listing 23 20 Washer Will Not Start No LEDs Lights lit No response to start switch 24 21 Washer Will Not Start Door Open Error Was...

Страница 4: ... 90 70 Air Duct 90 71 Dryer Motor and Exhaust Assembly 91 72 Dryer Front Bulkhead Assembly 95 73 Cylinder Belt 97 74 Dryer Cylinder Assembly 98 75 Dryer Rear Seal 99 76 Cylinder Rollers 101 77 Outlet Cover 101 78 Rear Bulkhead and Heater Duct 102 79 Terminal Block or Power Cord 104 Section 6 Adjustments 80 Cabinet Leveling Legs 107 81 Washer Loading Door 108 82 Washer Motor Belt Tension 109 83 Was...

Страница 5: ... LLC DO NOT COPY or TRANSMIT Model Identification Information in this manual is applicable to these washers LTS97A N3000 LTS97A N3300 LTS97A N4350 LTS99A N3000 LTS99A N3080 LTZ97A N2802 LTZ99A N0902 Add Letter To Designate Color W White Q Bisque ...

Страница 6: ...4 801805 Copyright Alliance Laundry Systems LLC DO NOT COPY or TRANSMIT Notes ...

Страница 7: ... instructions IMPORTANT The word IMPORTANT is used to inform the reader of specific procedures where minor machine damage will occur if the procedure is not followed NOTE The word NOTE is used to communicate installation operation maintenance or servicing information that is important but not hazard related In the interest of safety some general precautions relating to the operation of this machin...

Страница 8: ... technician and using authorized factory parts To reduce the risk of electric shock fire explosion serious injury or death Disconnect all electric power to the machine and accessories before servicing Close gas shut off valve to gas dryer before servicing Never start machine with any guards panels removed Whenever ground wires are removed during servicing these ground wires must be reconnected to ...

Страница 9: ...om whom the machine was purchased or contact Alliance Laundry Systems at 920 748 3950 for the name and address of the nearest authorized parts distributor For technical assistance call 920 748 3121 Nameplate Location When calling or writing about your product be sure to mention model and serial numbers Model and serial numbers are located on nameplate s as shown SWD1134P Nameplate ...

Страница 10: ...Stacked Washer Dryer Works SWD666N Pressure Switch Located inside control cabinet Control Located inside control cabinet Electric Drain Pump Motor Outer Tub Inner Basket Mixing Valve Exhaust Fan Inverter Control Mounted to base of washer Motor Cylinder Air Duct Lint Filter Heating Element Electric Models ...

Страница 11: ...ds This agitation continues until the wash soak cycle The machine stops agitating and turns on the pump which removes the wash water Upon completion of the wash cycle the machine goes into two rinse cycles Fresh cold water is brought into the inner basket via the mixing valve until the pressure switch shuts off the water while agitating The rinse cycle consists of agitation for a predetermined amo...

Страница 12: ...10 801805 Section 2 Introduction Copyright Alliance Laundry Systems LLC DO NOT COPY or TRANSMIT Notes ...

Страница 13: ...ires are removed during servicing these ground wires must be reconnected to ensure that the machine is properly grounded Washer motor not grounded Disconnect electric power before servicing motor W502 WARNING Copyright Alliance Laundry Systems LLC DO NOT COPY or TRANSMIT Section 3 Troubleshooting 1 WASHER MOTOR CIRCUIT Resistance Values Tachometer Circuit Terminals 4 5 Approx 115 ohms Windings Ter...

Страница 14: ...12 801805 Section 3 Troubleshooting Copyright Alliance Laundry Systems LLC DO NOT COPY or TRANSMIT Notes ...

Страница 15: ...rical fuse Check both fuses for electric models Loading door not closed Close door Inoperative door switch Test switch and replace if inoperative Timer improperly set Reset timer or try another cycle Inoperative timer Test timer and replace if inoperative Motor starting functions inoperative Does not start or motor just hums Refer to Paragraph 88 to check motor switch and motor windings Motor is d...

Страница 16: ...ING SMELL CYCLES ON MOTOR THERMAL PROTECTOR POSSIBLE CAUSE TO CORRECT Incorrect Voltage Refer to nameplate in door well for correct voltage Refer to Installation Instructions supplied with dryer for electrical requirements Clothes load too large Remove part of load A normal washer load is a normal dryer load Maximum load dryer cylinder one half full of wet clothes Clothes cylinder is binding Check...

Страница 17: ...condition Check front and rear bulkheads for warping Check cylinder rollers for binding Check cylinder seals and glides for wear or damage Broken weak or disconnected idler lever spring Replace or reconnect spring Refer to Figure 44 Belt routed on wrong side of idler lever Reroute belt Refer to Figure 43 Oil on cylinder Wipe oil from cylinder Belt is inside out Reinstall belt with ribbed surface a...

Страница 18: ...ative Reset or test switch and replace if inoperative Timer improperly set set in a cool down period or a no heat cycle Reset timer Try another cycle Inoperative limit thermostat Test thermostat and replace if inoperative Inoperative drive motor switch Test switch and replace if inoperative Electric Models Inoperative heater assembly Test heater assembly and replace if cold Ohms do not read betwee...

Страница 19: ...ace sensor Igniter broken or open Replace igniter POSSIBLE CAUSE TO CORRECT Improper or inadequate exhaust system Weather hood flapper restricted Refer to Installation Instructions supplied with dryer for exhaust requirements Burner heat not holding sensor contacts open Replace sensor or correct gas supply problem Insufficient gas supply Check gas supply and pressure Make sure gas shut off valve i...

Страница 20: ...e Refer to Paragraph 85 Cycling off on limit thermostat Momentarily connect a jumper wire across thermostat terminals If heater element heats or burner ignites when jumper wire is connected refer to Paragraph 12 Gas models Sensor contact closing Replace sensor Paragraph 65 step e or adjust burner flame Refer to Paragraph 85 Inoperative cycling thermostat Test thermostat and replace if inoperative ...

Страница 21: ...g Refer to wiring diagram Heater assembly shorted Remove heater assembly and check for short POSSIBLE CAUSE TO CORRECT Heater assembly does not heat or burner does not ignite Refer to Paragraph 7 Too much water in articles being dried Remove excess water Laundry load too large Remove part of load A normal washer load is a normal dryer load Maximum load Dryer cylinder one half full of wet clothes L...

Страница 22: ...r Electric Models Test resistor and replace if inoperative Heater assembly does not heat or burner does not ignite Refer to Paragraph 4 Heater assembly or burner cycles off prematurely Refer to Paragraph 8 Improper or inadequate exhaust system Refer to INSTALLATION INSTRUCTIONS supplied with dryer for exhaust requirements Drying large load Timer will not advance until the load is almost dry Broken...

Страница 23: ...ved from dryer before cycle has completed Allow the dryer to complete the cycle through the cool down to the OFF position Inoperative cycling thermostat Test cycling thermostat and replace if inoperative Inoperative timer not allowing cool down Test timer and replace if inoperative Inoperative seals air leaks Check and replace any inoperative seals in the following areas 1 Seal between loading doo...

Страница 24: ...22 801805 Section 3 Troubleshooting Dryer Copyright Alliance Laundry Systems LLC DO NOT COPY or TRANSMIT Notes ...

Страница 25: ... fill the control will enter Error Mode The control will turn off all outputs and flash the WASH and DOOR LEDs one second on one second off to indicate a fill error This is a fatal error The machine must be unpowered to clear this error Door Open Error If the control senses the door open during Run Mode the control will enter Error Mode The control will turn off all outputs and flash the WASH and ...

Страница 26: ...es Yes Is there continuity across terminals H9 3 to H9 7 on the machine control when the start switch is depressed Replace machine control Refer to machine serial plate for correct voltage No Yes 1 Is there 24 VAC from H1 1 to H1 3 on the machine control Replace transformer Check wiring to transformer No Correct wiring to and or replace start switch 4 Is the configuration header plugged into H7 No...

Страница 27: ...rol Copyright Alliance Laundry Systems LLC DO NOT COPY or TRANSMIT WASHER WILL NOT START NO LEDS LIGHTS LIT NO RESPONSE TO START SWITCH 220 240 VAC or 120 VAC 50 60Hz SEE MACHINE SERIAL PLATE CONFIG RESISTOR 6 8k Ohm Models with 220 240 VAC 3 2 1 4 ...

Страница 28: ...120 Volts across H4 5 to H6 5 on the machine control 1 2 Yes No Is there 220 240 VAC or 120 Volts from the BLU BLK wire on door lock assembly to neutral Replace the secondary door switch Replace machine control Yes No Is there 220 240 VAC or 120 Volts from the BLK wire on the secondary door switch to neutral 3 Correct wiring to the secondary door switch Replace door lock assembly Yes No FLW1728S R...

Страница 29: ...iance Laundry Systems LLC DO NOT COPY or TRANSMIT WASHER WILL NOT START DOOR OPEN ERROR WASH RINSE LEDS FLASHING DOOR MUST BE CLOSED AND ATTEMPTING TO LOCK 220 240 VAC or 120 VAC 50 60Hz SEE MACHINE SERIAL PLATE CONFIG RESISTOR 6 8k Ohm Models with 220 240 VAC 1 2 3 ...

Страница 30: ...stment and or wiring Replace door lock if necessary Yes Is there 220 240 VAC or 120 Volts at machine control terminals H4 4 to H6 5 Replace machine control No Yes Is there 220 240 VAC or 120 Volts at the door lock between the WHT RED and the PNK BLK wires 4 Correct wiring between machine control and door lock assembly Replace transformer Replace door lock assembly No Yes FLW1729S Is the Wash light...

Страница 31: ...her Control Copyright Alliance Laundry Systems LLC DO NOT COPY or TRANSMIT WASHER WILL NOT START NO DOOR LOCK DOOR LED FLASHING 220 240 VAC or 120 VAC 50 60Hz SEE MACHINE SERIAL PLATE CONFIG RESISTOR 6 8k Ohm Models with 220 240 VAC 2 1 3 4 ...

Страница 32: ... TRANSMIT 23 WASHER MOTOR WILL NOT RUN DOOR FINAL SPIN LEDS FLASHING 1 No Is there continuity between motor terminals Refer to values at right Yes Replace motor control Replace motor FLW1712S Motor Resistance Values Tach Circuit Approx 115 ohms Terminals 4 5 Windings Approx 4 5 ohms Terminals 1 2 1 3 2 3 ...

Страница 33: ...asher Control Copyright Alliance Laundry Systems LLC DO NOT COPY or TRANSMIT WASHER MOTOR WILL NOT RUN DOOR FINAL SPIN LEDS FLASHING 220 240 VAC or 120 VAC 50 60Hz SEE MACHINE SERIAL PLATE CONFIG RESISTOR 6 8k Ohm Models with 220 240 VAC 1 ...

Страница 34: ...C or 120 Volts at terminals H9 1 to H1 1 on the motor control board Yes 1 2 3 Yes Replace pressure switch Correct wiring between machine control and pressure switch Yes No No Replace motor control Replace mixing valve 4 Is there 220 240 VAC or 120 Volts at the mixing valve Is there 220 240 VAC or 120 Volts between the BRN YEL wire on the pressure switch and H6 5 on machine control Is the door lock...

Страница 35: ...rol Copyright Alliance Laundry Systems LLC DO NOT COPY or TRANSMIT WASHER WILL NOT FILL NO COMMUNICATION ERROR WASH DOOR LEDS FLASHING 220 240 VAC or 120 VAC 50 60Hz SEE MACHINE SERIAL PLATE CONFIG RESISTOR 6 8k Ohm Models with 220 240 VAC 2 1 3 4 4 ...

Страница 36: ...t the over level terminal on pressure switch to H6 5 on machine control Yes No Replace inoperative pressure switch Is there 220 240 VAC or 120 Volts across the coil of either the hot or cold water solenoid Yes No Check for improper wiring and replace inoperative pressure switch if necessary Replace inoperative mixing valve 1 2 FLW1691S Refer to machine serial plate for correct voltage ...

Страница 37: ...Troubleshooting Washer Control Copyright Alliance Laundry Systems LLC DO NOT COPY or TRANSMIT WASHER OVERFLOWS 220 240 VAC or 120 VAC 50 60Hz SEE MACHINE SERIAL PLATE CONFIG RESISTOR 6 8k Ohm Models with 220 240 VAC 1 2 2 ...

Страница 38: ... WHT wire going to the pump Is there 220 240 VAC or 120 Volts from H6 2 to H6 5 on the machine control NOTE Check at beginning of spin drain portion of cycle If the pump does not operate check for obstruction and replace if necessary Correct wiring between pump and machine control Replace machine control 1 2 No Yes No Yes FLW1692S Refer to machine serial plate for correct voltage NOTE Check at beg...

Страница 39: ...roubleshooting Washer Control Copyright Alliance Laundry Systems LLC DO NOT COPY or TRANSMIT PUMP DOES NOT OPERATE 220 240 VAC or 120 VAC 50 60Hz SEE MACHINE SERIAL PLATE CONFIG RESISTOR 6 8k Ohm Models with 220 240 VAC 2 1 ...

Страница 40: ... wiring between machine control and motor control Is there continuity through each wire of the harness from H2 on the machine control to H7 on the motor control Yes Replace the harness NOTE Machine must be restarted to check voltage Voltage is intermittently present for the first 15 seconds until error mode is displayed Is there 220 240 VAC or 120 Volts across terminals H6 5 and H6 6 on machine co...

Страница 41: ...r Control Copyright Alliance Laundry Systems LLC DO NOT COPY or TRANSMIT SERIAL COMMUNICATION ERROR FINAL SPIN RINSE LEDS FLASHING 220 240 VAC or 120 VAC 50 60Hz SEE MACHINE SERIAL PLATE CONFIG RESISTOR 6 8k Ohm Models with 220 240 VAC 1 2 3 4 ...

Страница 42: ...40 801805 Section 3 Troubleshooting Washer Control Copyright Alliance Laundry Systems LLC DO NOT COPY or TRANSMIT Notes ...

Страница 43: ...r before servicing motor W502 WARNING Section 4 Grounding 28 WALL RECEPTACLE POLARITY CHECK Washer Power Cord Refer to Figure 1 Figure 1 W011GE3A Neutral Side Round Grounding Prong L1 Neutral Ground 0 V A C 115 12 V A C 115 12 V A C NOTE Have a qualified electrician check polarity of wall receptacle If a voltage reading is measured other than that illustrated the qualified electrician should corre...

Страница 44: ...rvicing Never start machine with any guards panels removed Whenever ground wires are removed during servicing these ground wires must be reconnected to ensure that the machine is properly grounded Washer motor not grounded Disconnect electric power before servicing motor W502 WARNING 29 DRYER GROUND WIRES FROM TERMINAL BLOCK OR POWER CORD TO REAR BULKHEAD AND FROM REAR BULKHEAD TO CONTROL HOUSING ...

Страница 45: ...801805 43 Section 4 Grounding Copyright Alliance Laundry Systems LLC DO NOT COPY or TRANSMIT Notes ...

Страница 46: ...ver ground wires are removed during servicing these ground wires must be reconnected to ensure that the machine is properly grounded Washer motor not grounded Disconnect electric power before servicing motor W502 WARNING 30 WASHER GROUND CONNECTIONS Refer to Figure 3 Ground to Control Panel Assembly Ground to Control Cabinet Base Ground to Electronic Control Ground Power Cord to Control Cabinet Gr...

Страница 47: ...801805 45 Section 4 Grounding Copyright Alliance Laundry Systems LLC DO NOT COPY or TRANSMIT Figure 3 SWD3G Ground Wire from Dryer 2 3 1 4 5 6 7 8 9 ...

Страница 48: ...e removed during servicing these ground wires must be reconnected to ensure that the machine is properly grounded Washer motor not grounded Disconnect electric power before servicing motor W502 WARNING 31 WASHER GROUND CONNECTIONS Washers with suffix 4350 in Model No Refer to Figure 3 Ground to Control Panel Assembly Ground to Control Cabinet Base Ground to Electronic Control Ground Power Cord to ...

Страница 49: ...801805 47 Section 4 Grounding Copyright Alliance Laundry Systems LLC DO NOT COPY or TRANSMIT Figure 4 SWD5G Ground Wire from Dryer 2 1 4 5 6 7 8 9 3 Washers with suffix 4350 in Model No ...

Страница 50: ...achine with any guards panels removed Whenever ground wires are removed during servicing these ground wires must be reconnected to ensure that the machine is properly grounded Washer motor not grounded Disconnect electric power before servicing motor W502 WARNING 32 DRYER GROUND CONNECTIONS Refer to Figure 5 Terminal Block and Rear Bulkhead to Control Cabinet Motor Terminal Block to Base Motor to ...

Страница 51: ...801805 49 Section 4 Grounding Copyright Alliance Laundry Systems LLC DO NOT COPY or TRANSMIT Figure 5 SWD4G 3 1 2 4 5 ...

Страница 52: ...50 801805 Section 4 Grounding Copyright Alliance Laundry Systems LLC DO NOT COPY or TRANSMIT Notes ...

Страница 53: ...Disconnect electric power before servicing motor W502 WARNING Section 5 Service Procedures IMPORTANT When reference is made to directions right or left in this manual it is from operator s position facing front of machine 33 TO REMOVE THE DRYER Refer to Figure 6 IMPORTANT Two people are required to perform this task a Remove all electrical gas and venting connections to dryer b Remove front access...

Страница 54: ...ires from push to start switch Remove switch through front of control panel e Disconnect two wires from each indicator light NOTE Refer to wiring diagram when rewiring light f Squeeze indicator light locking tabs together and pull light out rear of control panel g Disconnect wires from washer cycle switch terminals Remove switch from control panel NOTE DO NOT pull on wires Instead unplug by pullin...

Страница 55: ...trol Screw Right Control Cabinet Panel Rear Control Cabinet Panel Dryer Timer Control Cabinet Bottom Clip Expansion Clip Left Control Cabinet Panel Retainer Nut Control Panel Indicator Lights Washer Cycle Switch Washer Temperature Switch Dryer Temperature Switch Control Panel Overlay Screw Timer Knob Timer Knob Rocker Switch Push to Start Switch Label Temperature Switch Knob ...

Страница 56: ...vailable touch machine while it is plugged in before handling control to dissipate any charge NOTE New control is supplied in a special anti static wrapping and protected by anti static foam While holding control by its metal edges remove control from foam and wrapping a Go to rear of unit and remove screws holding rear panel to side panels of control cabinet b While supporting rear panel press in...

Страница 57: ...ing hose to switch to remove any moisture that may have accumulated in hose d Squeeze locking tabs in on pressure switch and push switch out toward rear of control shield Refer to Figure 7 37 CONTROL CABINET a Remove dryer Refer to Paragraph 33 b Remove screws holding control panel to control cabinet Refer to Figure 7 Remove panel c Remove screws holding control cabinet bottom to control cabinet R...

Страница 58: ...tatic foam While holding control by its metal edges remove control from foam and wrapping a While supporting the lower access panel remove two screws from bottom edge of lower access panel Refer to Figure 8 b Gently lower the access panel to disengage panel locators from bottom edge of front panel c Remove screws holding left cabinet brace to washer and remove brace Refer to Figure 9 d Remove scre...

Страница 59: ... WARNING 40 ELECTRIC DRAIN PUMP a While supporting the lower access panel remove two screws from bottom edge of panel and remove panel Refer to Figure 8 IMPORTANT There will always be some water that will remain in the pump and hoses Therefore before removing hoses from pump hoses must be drained to prevent water spillage b Loosen hose clamps and remove two hoses connected to electric drain pump o...

Страница 60: ...otor not grounded Disconnect electric power before servicing motor W502 WARNING 41 WASHER BELT a Go to rear of machine and remove two screws holding rear panel to side panels of control cabinet Refer to Figure 7 b Reach in through opening and remove screw holding service door to control shield and remove service door Refer to Figure 11 c Remove screws holding lower rear access panel to rear panel ...

Страница 61: ...G VALVE NOTE Mixing valve is located on upper back right corner of rear panel Refer to Figure 12 a Shut off external hot and cold water supply and remove two inlet hoses b Go to rear of washer and remove screw holding mixing valve and plate to rear panel then remove valve and plate out through opening in rear panel Refer to Figure 12 c Remove screws holding valve to mixing valve plate Refer to Fig...

Страница 62: ...g door seal can be improved using water or soapy solution to work seal around circumference of loading door Be sure to orientate seal with the tab in the 12 o clock position when installing the wire clamp ring to front panel Be careful not to overstretch tension spring e While supporting lower access panel remove two screws from bottom edge of lower access panel Refer to Figure 8 f Gently lower ac...

Страница 63: ... Figure 14 B L E A C H S O F T E N E R M A X M A X SWD1654S B L E A C H S O F T E N E R M A X M A X Pull Drawer out Slightly Remove Drawer from Housing 318P4 Dispenser Drawer Tool Insert Tool FLW1190B STEP 1 Pull seal up STEP 2 Pull seal out STEP 3 Pull seal down STEP 4 Pull seal out and remove from front panel ...

Страница 64: ...LC DO NOT COPY or TRANSMIT Figure 15 SWD1671S B L E A C H S O F T E N E R M AX M AX Door Latch Switch Attaching Screws Door Latch Switch Door Switch Wires Door Switch Wire Harness and Wires Screws Dispenser Drawer Figure 16 H205SE1A Screw Wire Clamp Ring Screw Spring Door Seal ...

Страница 65: ...ing servicing these ground wires must be reconnected to ensure that the machine is properly grounded Washer motor not grounded Disconnect electric power before servicing motor W502 WARNING 44 WASHER LOADING DOOR a Unlatch and open loading door b Remove door bezel by prying inside lip up and forward with fingers Refer to Figure 17 c While supporting loading door remove screws lockwashers and nuts h...

Страница 66: ...e screws holding control panel to control cabinet g Remove control panel away from control cabinet as far as wires permit Refer to Figure 7 h Reach in through control panel opening and remove two screws holding bottom front flange of control cabinet sides to top flange of washer front panel Refer to Figure 15 i While supporting lower access panel remove two screws from bottom edge of lower access ...

Страница 67: ...ry Systems LLC DO NOT COPY or TRANSMIT Figure 18 SWD1672S Notch Wire Harness Clip Door Switch Door Switch Wires Door Latch Switch Wire Harness Large Clamp When Installing Door Seal Align Connecting Hose In Vertical Position Door Seal Large Clamp Hose Tie Hose Clamp ...

Страница 68: ... around door opening Refer to Figure 14 Step 4 f Reach up between door seal and front panel Refer to Figure 15 Press in on switch locking tabs and push switch out through front panel only far enough to allow removal of wires from switch terminals IMPORTANT Refer to wiring diagram when rewiring switch 47 WASHER DOOR LATCH SWITCH a Open loading door b Carefully remove wire clamp ring from groove wit...

Страница 69: ... the belt can be tightened to the same location Refer to Figure 19 g While supporting the motor grasp the metal rod with a locking pliers and remove four bolts and washers holding motor to motor bracket refer to Figure 19 and remove motor out through front of washer NOTE Remove the back bolts and washers first then remove the front bolts and washers Motor Installation a Place new motor into washer...

Страница 70: ...05 Section 5 Service Procedures Copyright Alliance Laundry Systems LLC DO NOT COPY or TRANSMIT Figure 19 SWD1673S Pivot Bolt Adjusting Bolt Wire Harness Metal Rod Rear Access To Motor Adjusting Bolt Pivot Bolt ...

Страница 71: ...or seal DO NOT use pliers or sharp objects to grasp the door seal lip If lip is damaged seal will leak i Using a circular motion pull seal up Figure 14 Step 1 out Figure 14 Step 2 and down Figure 14 Step 3 j When seal releases from lip of front panel pull out and remove the seal from front panel around door opening Refer to Figure 14 Step 4 NOTE Door seal installation can be improved using water o...

Страница 72: ...nect electric power before servicing motor W502 WARNING IMPORTANT Always replace seal with a new seal Spray or apply a mixture of diluted laundry detergent to assist in installation of new seal The puffy side of seal should be installed to the inside For best results tap clamp ring all around while tightening screw and nut NOTE Install metal clamp ring by placing clamp ring opening at approximatel...

Страница 73: ... and remove access panel Refer to Figure 11 i Run belt off pulley while slowly turning pulley Refer to Figure 11 j Remove belt from motor shaft k Remove hole plug from rear panel to access pulley cap screw Refer to Figure 24 l Remove cap screw left hand thread lockwasher and flat washer holding pulley to inner basket shaft Refer to Figure 24 m Remove pulley from shaft and set on base of machine IM...

Страница 74: ...18 NOTE Door seal installation can be improved using water or soap solution to work seal around circumference of loading door opening Be sure to install seal with the tab in the 12 o clock position n Disconnect ground wire from outer tub front panel Refer to Figure 20 o Remove nut washers and screw holding clamp ring to outer tub front panel Refer to Figure 20 p Remove rubber seal from outer tub f...

Страница 75: ...ds holding trunnion to inner basket Refer to Figure 21 b If using existing trunnion clean out old Loctite from pulley bolt threads using a 3 8 24 UNF Left Hand Tap c Dip threads of three new tension rods into lightweight oil d Insert tension rods into inner basket Refer to Figure 21 Position each rod so the rounded corner of triangular head faces the center of inner basket Refer to Figure 22 e Pos...

Страница 76: ...trunnion shaft that will be contacting the front and rear bearings Refer to Figure 25 b Apply a film of grease to area of shaft that will be contacting the bearing housing seal Refer to Figure 25 Make sure seal lips also are packed with grease Refer to Figure 25 IMPORTANT When installing inner basket the following steps must be taken to ensure that the seal is properly orientated c Install inner b...

Страница 77: ...ose Clip Pressure Switch Put All Excess Pressure Hose Slack Here Rear Panel Remove Hole Plug from Rear of machine to Access Cap Screw Nut Outer Tub Inner Basket Pressure Hose Bearing Housing Assembly Mounting Plate and Pressure Hose Clip Inner Bolts Pulley Flat Washer To Remove Cap Screw Left Hand Thread Lockwasher Pressure Hose Clip Arm Bolts Washer ...

Страница 78: ...ng Housing Assembly Apply New grease in Lips of Bearing Housing Seal Outer Tub Apply grease to This Area Apply Anti Seize Compound to These areas Figure 26 FLW1733S CROSS SECTION OF BEARING HOUSING SEAL AND TRUNNION SHAFT STEP 1 Push shaft into bearings STEP 2 Pull out about 1 4 inch STEP 3 Push into bearings Trunnion Shaft Seal Lip Rolled Over 1 4 Inch ...

Страница 79: ...ound door opening Refer to Figure 14 Step 4 j Working through the control panel opening remove two screws holding bottom flange of control cabinet sides to top flange of front panel Refer to Figure 15 k While supporting the front panel assembly remove the two bottom front corner screws Refer to Figure 15 Remove front panel with loading door attached away from washer as far as wires permit NOTE Ref...

Страница 80: ... properly seat NOTE When installing new cap screw apply a thread locking compound to screw threads and torque new cap screw to 240 minimum to 260 maximum inch pounds 27 5 to 29 7 Nm v After installing belt adjust belt tension per Paragraph 82 w Carefully remove inner basket out through front of washer x Remove three screws holding bearing housing arms to outer tub IMPORTANT Prior to disassembly no...

Страница 81: ...nsure that the bearing housing seal lips are not rolled over Refer to Figure 26 Step 2 NOTE If inner basket is pulled out more than 3 8 inch past step on trunnion shaft repeat Steps c and d e Fully reseat inner basket Refer to Figure 26 Step 3 f Install pulley and cap screw Be careful not to push the shaft forward while tightening the screw IMPORTANT When installing pulley always use a new cap scr...

Страница 82: ...fer to Figure 27 b Gently lower access panel to disengage panel locators from bottom edge of access panel Refer to Figure 27 c Remove two screws holding bottom tabs on front panel to dryer cabinet Refer to Figure 28 d Swing bottom of front panel away from dryer to disengage hold down clips and locators from cabinet top e Disconnect wires from door switch Refer to Figure 34 NOTE Refer to wiring dia...

Страница 83: ...tor not grounded Disconnect electric power before servicing motor W502 WARNING 55 LINT FILTER a Open loading door and remove screw from end of lint filter Refer to Figure 31 b Lift lint filter out of air duct paying close attention to orientation IMPORTANT When installing lint filter be sure to install the filter with the words facing the front of the dryer If filter is installed backwards lint wi...

Страница 84: ...WARNING 57 DRYER INNER AND OUTER DOOR PANELS AND DOOR PULL a Remove four screws holding door assembly to hinges Refer to Figure 31 b Remove remaining screws around the door assembly and separate panels Refer to Figure 32 c Remove wedge located behind door pull by carefully prying up on center of wedge Refer to Figure 32 d Remove door pull Refer to Figure 32 58 DRYER DOOR STRIKE a Open loading door...

Страница 85: ...sher motor not grounded Disconnect electric power before servicing motor W502 WARNING 59 DRYER DOOR SEAL a Remove inner door panel from outer door panel Refer to Paragraph 57 b Grasp either end of door seal at bottom of door and remove seal from tabs on inner door panel by gently pulling on the seal Refer to Figure 33 NOTE When replacing seal be sure seal is not stretched or distorted The tab in t...

Страница 86: ...ge around inside of door opening Refer to Figure 35 NOTE Be sure seal is properly positioned when installing on front panel 61 DRYER DOOR SWITCH a While supporting the access panel remove two screws from bottom edge of access panel Refer to Figure 27 b Gently lower the access panel to disengage locators from bottom edge of front panel Refer to Figure 35 c Remove two screws holding tabs on front pa...

Страница 87: ...Copyright Alliance Laundry Systems LLC DO NOT COPY or TRANSMIT Figure 35 SWD648P Front Panel Seal Door Switch Hold Down Clip Screw Locator Sticker Door Catch Hinge Hole Plugs Nameplate Front Panel Screw Screw Locator Lower Access Panel Screw ...

Страница 88: ...er to Figure 36 b Remove four screws holding hinges to front panel Refer to Figure 36 64 DRYER HOLD DOWN CLIPS AND LOCATORS a While supporting the access panel remove two screws from bottom edge of access panel Refer to Figure 27 b Gently lower access panel to disengage panel locators from bottom edge of front panel c Remove two screws holding bottom tabs on front panel to dryer side panels Refer ...

Страница 89: ...tly lower the access panel to disengage locators from bottom edge of front panel Refer to Figure 35 c Complete Gas Valve Assembly 1 Close main gas shut off valve disconnect igniter wires at disconnect blocks sensor wires from sensor terminals and wires from gas valve coils at the quick disconnect blocks Refer to Figure 37 2 Disconnect gas shut off valve from gas valve at the union nut Refer to Fig...

Страница 90: ... dryer to disengage tab from slot on left side of burner housing Refer to Figure 37 3 Carefully rotate burner tube and igniter counterclockwise so tab is at 8 o clock position 4 Move air shutter end of burner tube slightly to right and CAREFULLY remove burner tube and igniter assembly out through front of dryer 5 Remove screw holding igniter and bracket to burner tube and remove igniter and bracke...

Страница 91: ...oward rear of dryer to disengage tab from slot on left side of burner housing Refer to Figure 37 f Carefully rotate burner tube and igniter counterclockwise so tab is at 8 o clock position g Move air shutter end of burner tube slightly to the right and CAREFULLY remove burner tube and igniter assembly out through front of dryer IMPORTANT The igniter is very fragile Be careful not to damage it duri...

Страница 92: ...x and remove heater assembly out through front of dryer Refer to Figure 39 d Disconnect wires from heater assembly Refer to Figure 39 NOTE When reassembling be sure all wire connectors are tight on element terminals thermal fuse and limit thermostat 69 THERMOSTAT a While supporting the access panel remove two screws from bottom edge of access panel Refer to Figure 27 b Gently lower the access pane...

Страница 93: ...ttom edge of access panel Refer to Figure 27 b Gently lower the access panel to disengage locators from bottom edge of front panel Refer to Figure 35 c Open loading door remove screw and lift filter out of bulkhead d Remove screws holding air duct to front bulkhead inside cylinder Refer to Figure 41 IMPORTANT When reassembling be sure seal on exhaust fan cover makes airtight seal on flange of duct...

Страница 94: ...fect dryer performance IMPORTANT When reinstalling motor and exhaust assembly be sure wire harness on right side is clipped to motor mounting bracket and is routed along dryer base between motor mounting bracket and right side of cabinet Refer to Figure 41 Tab on rear of motor mounting bracket must be slid into slot in dryer base Be sure the belt has been installed on the correct side of the idler...

Страница 95: ... tight 3 Loosen idler arm bolt 1 4 turn 4 Add grease between idler arm and motor mount m Impeller and housing 1 Remove screws holding cover to housing Refer to Figure 42 2 Hold motor pulley securely and unthread impeller from motor shaft right hand thread Use a 7 8 inch 6 point socket to aid in the removal of the impeller 3 Remove three screws holding the exhaust housing to the motor mounting brac...

Страница 96: ... at 10 o clock position The positioning tab on the motor should be engaged with the anti rotating notch in the motor bracket o Motor Connection Block Terminals Remove terminals from the motor wire harness connection block using No 283P4 Terminal Extractor Tool as follows 1 Insert the tool into the block on the back of the terminal being removed Refer to Figure 47 2 Apply tool pressure to compress ...

Страница 97: ... from cabinet top d Disconnect wires from door switch Refer to Figure 34 NOTE Refer to wiring diagram when rewiring switch e Disengage belt from motor and idler pulley Refer to Figure 43 f Remove four screws holding bulkhead to front flange of cabinet and lift complete bulkhead assembly out of slots in cabinet Refer to Figure 48 g Remove air duct assembly IMPORTANT When reassembling be sure seal o...

Страница 98: ...ly grounded Washer motor not grounded Disconnect electric power before servicing motor W502 WARNING i Front Cylinder Seal Refer to Figure 50 When installing the cylinder seal it is important to remember these two steps 1 The stitching on the seal must face towards center of dryer 2 The short flap must be glued to the bulkhead and the long flap left loose IMPORTANT The replacement seal can be adher...

Страница 99: ...ct wires from door switch Refer to Figure 34 NOTE Refer to wiring diagram when rewiring switch e Disengage belt from motor and idler pulleys Refer to Figure 43 f Remove four screws holding bulkhead to front flange of cabinet Then lift complete bulkhead assembly out of slots in cabinet Refer to Figure 48 IMPORTANT When reassembling be sure seal on exhaust fan cover makes airtight seal on flange of ...

Страница 100: ...gage belt from motor and idler pulleys Refer to Figure 43 NOTE When reinstalling belt be sure belt is properly installed on motor and idler pulleys and is on the correct side of the idler lever Refer to Figure 43 Belt must be positioned around center section of cylinder approximately three inches ahead of rear rib on cylinder with the ribbed surface of the belt against the cylinder Refer to Figure...

Страница 101: ...t be sure belt is properly installed on motor and idler pulleys and is on the correct side of the idler pulleys Refer to Figure 43 Belt must be positioned around center section of cylinder approximately three inches ahead of rear rib on cylinder with the ribbed surface of the belt against cylinder Refer to Figure 52 After installing belt manually rotate cylinder counterclockwise to check that belt...

Страница 102: ...cedures Copyright Alliance Laundry Systems LLC DO NOT COPY or TRANSMIT Figure 53 D405S Rear Bulkhead Attaching Screws Outlet Cover Rear Seal Exhaust Duct Screw Cylinder Roller Rear Bulkhead Attaching Screws Heater Box Cylinder Roller ...

Страница 103: ... 34 NOTE Refer to wiring diagram when rewiring switch e Disengage belt from motor and idler pulleys Refer to Figure 43 f Remove four screws holding bulkhead to front flange of cabinet Then lift complete bulkhead assembly out of slots in cabinet Refer to Figure 48 IMPORTANT When reassembling be sure seal on exhaust fan cover makes airtight seal on flange of duct Refer to Figure 40 If the seal is in...

Страница 104: ...eck that belt is properly aligned f Remove four screws holding bulkhead to front flange of cabinet Then lift complete bulkhead assembly out of slots in cabinet Refer to Figure 48 IMPORTANT When reassembling be sure seal on exhaust fan cover makes airtight seal on flange of duct Refer to Figure 40 If the seal is installed improperly the airflow through the exhaust system will be restricted which ca...

Страница 105: ...or not grounded Disconnect electric power before servicing motor W502 WARNING j Electric Models 1 Remove two screws holding element and plate to heater box then pull element down and away from heater box Refer to Figure 39 2 Remove all wires from terminal block Refer to appropriate wiring diagram when rewiring terminal block 3 Remove screw holding terminal block to rear bulkhead Refer to Figure 56...

Страница 106: ...of front panel Refer to Figure 35 3 Remove two screws holding bottom tabs on front panel to dryer side panels Refer to Figure 28 Swing bottom of front panel away from dryer far enough to disengage hold down clips and locators from cabinet top 4 Disconnect wires from door switch Refer to Figure 34 NOTE Refer to wiring diagram when rewiring switch 5 Remove two cabinet top hold down screws Refer to F...

Страница 107: ... grounded Disconnect electric power before servicing motor W502 WARNING b Power Cord 1 Remove access plate on rear of cabinet 2 Remove strain relief 3 Remove screw holding power cord ground wire to rear bulkhead Refer to Figure 57 NOTE Reinstall screw and ground wires into same hole in bulkhead when reinstalling power cord 4 Disconnect molex plug and remove power cord from rear of dryer cabinet NO...

Страница 108: ...106 801805 Section 5 Service Procedures Copyright Alliance Laundry Systems LLC DO NOT COPY or TRANSMIT Notes ...

Страница 109: ...ual it is from operator s position facing front of washer 80 CABINET LEVELING LEGS a Place washer in position on a clean firm and reasonably level floor Installing the washer on any type of carpeting is not recommended b Loosen locknuts and adjust the leveling legs until the washer does not rock Refer to Figure 58 c Tighten the locknuts securely against the washer base If the locknuts are not tigh...

Страница 110: ...g these ground wires must be reconnected to ensure that the machine is properly grounded Washer motor not grounded Disconnect electric power before servicing motor W502 WARNING 81 WASHER LOADING DOOR a Open loading door b Remove door bezel to gain access to nuts Refer to Figure 59 c The loading door can be adjusted up or down somewhat by loosening screws holding door to hinge then raise or lower d...

Страница 111: ...cess panel opening on rear panel a While supporting lower front access panel remove two screws from bottom edge of access panel and remove panel Refer to Figure 8 b Working through the access door opening place a locking pliers on the metal rod and loosen the two adjusting bolts Refer to Figure 60 Repeat procedure to loosen the two pivot bolts Refer to Figure 60 c Pull down on motor to increase be...

Страница 112: ...g motor W502 WARNING 83 WASHER DOOR CATCH NOTE When repairing a broken or inoperative No 685430 Door Catch proceed as follows a Remove door bezel b Remove two screws and nuts holding door catch to door and remove door catch c Install new door catch and tighten screws and nuts to the point of being snug d Adjust door catch so the outside edge is aligned with the edge of the latch Refer to Figure 61...

Страница 113: ...not grounded Disconnect electric power before servicing motor W502 WARNING 84 SHIPPING BRACES All stacked washer dryers when shipped from the factory are equipped with two factory installed shipping supports DO NOT remove this shipping material until after machine is placed in its final installed position Refer to Figure 62 IMPORTANT DO NOT tip or move washer once these supports have been removed ...

Страница 114: ... of front panel Refer to Figure 35 c Set timer to 60 minutes d Close the loading door Start the dryer in a heat setting refer to Operating Instructions supplied with the dryer The dryer will start the igniter will glow red and the main burner will ignite e Allow the dryer to operate for approximately five minutes then loosen the air shutter lockscrew Refer to Figure 63 f Turn the air shutter to th...

Страница 115: ... equipment with which the service person is familiar 86 TIMER CONTACTS Refer to Figure 64 a Disconnect wires from timer except timer motor wires NOTE Refer to appropriate wiring diagram when rewiring timer b Manually rotate timer out of OFF position and into cycle c Set test meter to read Ohms The following readings should be found 1 Motor circuit test L1 and M zero Ohms closed 2 Heat circuit test...

Страница 116: ...round wires must be reconnected to ensure that the machine is properly grounded Washer motor not grounded Disconnect electric power before servicing motor W502 WARNING 87 FABRIC SELECTOR SWITCH NOTE Refer to proper model wiring diagram when rewiring switch a Set test meter to read Ohms and apply meter probes to switch terminals NOTE Refer to proper model wiring diagram when reconnecting wires FABR...

Страница 117: ...servicing these ground wires must be reconnected to ensure that the machine is properly grounded Washer motor not grounded Disconnect electric power before servicing motor W502 WARNING 88 DRIVE MOTOR Refer to Figure 65 a Remove motor and exhaust assembly Refer to Paragraph 71 b Disconnect motor wire harness at motor disconnect block NOTE Refer to wiring schematic Section 8 for internal motor switc...

Страница 118: ...rminal 3 black or copper wire Inoperative start switch Replace switch Refer to Section 5 Unplug the motor wire harness from the motor connection block before starting this test B Manually depress actuator Continuity broken between switch terminal 5 and terminal 3 black or copper wire C Continuity broken between switch terminal 6 and terminal 5 yellow or copper wire D Manually depress actuator Cont...

Страница 119: ... SECTION 8 for Internal Wiring of the Dryer Motor Switch Disconnect electric power to dryer before performing any of the following steps or when replacing inoperative motor switch W290 WARNING G 1 2 Ohms between terminal 3 wire and orange or copper wire on the back of switch Start Winding H 1 2 Ohms between terminal 5 wire and orange or copper wire on the back of switch I Continuity exists between...

Страница 120: ...ING 89 MOTOR SWITCH a Remove motor and exhaust fan assembly Refer to Paragraph 71 b Remove the two motor switch attaching screws Refer to Figure 71 Disconnect switch leads Remove motor switch c Remove thermal overload protector NOTE The thermal overload protector is unique to the motor from which it was removed and should only be used on that motor To reduce the risk of overheating the motor do no...

Страница 121: ...ewdriver into the slot located between top of motor switch and plastic clip Lift up on handle of screwdriver until both clip and thermal overload protector detach from motor switch Refer to Figure 67 d Attach the thermal overload protector removed in Step c to the new motor switch e Install new motor switch onto motor and reconnect motor switch leads removed in Step b Refer to Figure 71 f Test mot...

Страница 122: ...ooster coil The sensor triggers the current to travel around the secondary coil and through the igniter causing the igniter to get hot c Burner Circuit In approximately 30 seconds the igniter attains ignition temperature and ignition is made The heat from the burner flame causes the sensor contacts located on burner housing beside the igniter to open A circuit is then completed through the seconda...

Страница 123: ...erminals on the dryer harness plug that would correspond to terminals 1 and 2 on the coil Figure 68 Meter should register line voltage in all Fabric settings except FLUFF which should read zero VAC g If meter does not read line voltage in step f check motor switch thermostats fabric switch accumulator or timer 92 GAS VALVE COILS CHECK Gas Models a While supporting the access panel remove two screw...

Страница 124: ...er to Figure 63 d Remove wires from sensor terminals Refer to Figure 37 e Set test meter to read Ohms and put meter probes on sensor terminals Meter should read zero Ohms If meter registers an Ohm reading of any amount replace sensor 94 IGNITER CHECK Gas Models a While supporting the access panel remove two screws from bottom edge of access panel Refer to Figure 27 b Gently lower the access panel ...

Страница 125: ...hermal fuse and the limit thermostat 96 HEATER ASSEMBLY Electric Models a While supporting the access panel remove two screws from bottom edge of access panel Refer to Figure 27 b Gently lower the access panel to disengage panel locators from bottom edge of front panel Refer to Figure 35 c Disconnect wires from heater assembly Refer to Figure 39 NOTE Refer to wiring diagram when rewiring heater as...

Страница 126: ...e supporting the access panel remove two screws from bottom edge of access panel Refer to Figure 27 b Gently lower the access panel to disengage locators from bottom edge of front panel Refer to Figure 35 c Remove two screws holding bottom tabs on front panel to dryer side panels Refer to Figure 28 Swing bottom of front panel away from dryer far enough to disengage hold down clips and locators fro...

Страница 127: ...ls removed Whenever ground wires are removed during servicing these ground wires must be reconnected to ensure that the machine is properly grounded Washer motor not grounded Disconnect electric power before servicing motor W502 WARNING Section 8 Internal Wiring of Dryer Motor Switch Figure 71 R R S 2 6 4 3 5 1 MAIN START ORANGE COPPER CUSTOMER CIRCUIT OVERLOAD PROTECTOR BLUE BROWN BLACK COPPER YE...

Страница 128: ...126 801805 Section 8 Internal Wiring of Dryer Motor Switch Copyright Alliance Laundry Systems LLC DO NOT COPY or TRANSMIT Notes ...

Отзывы: