background image

Rockwell Automation Publication 1756-RM010C-EN-P - August 2018

25

Update Considerations

Chapter 1

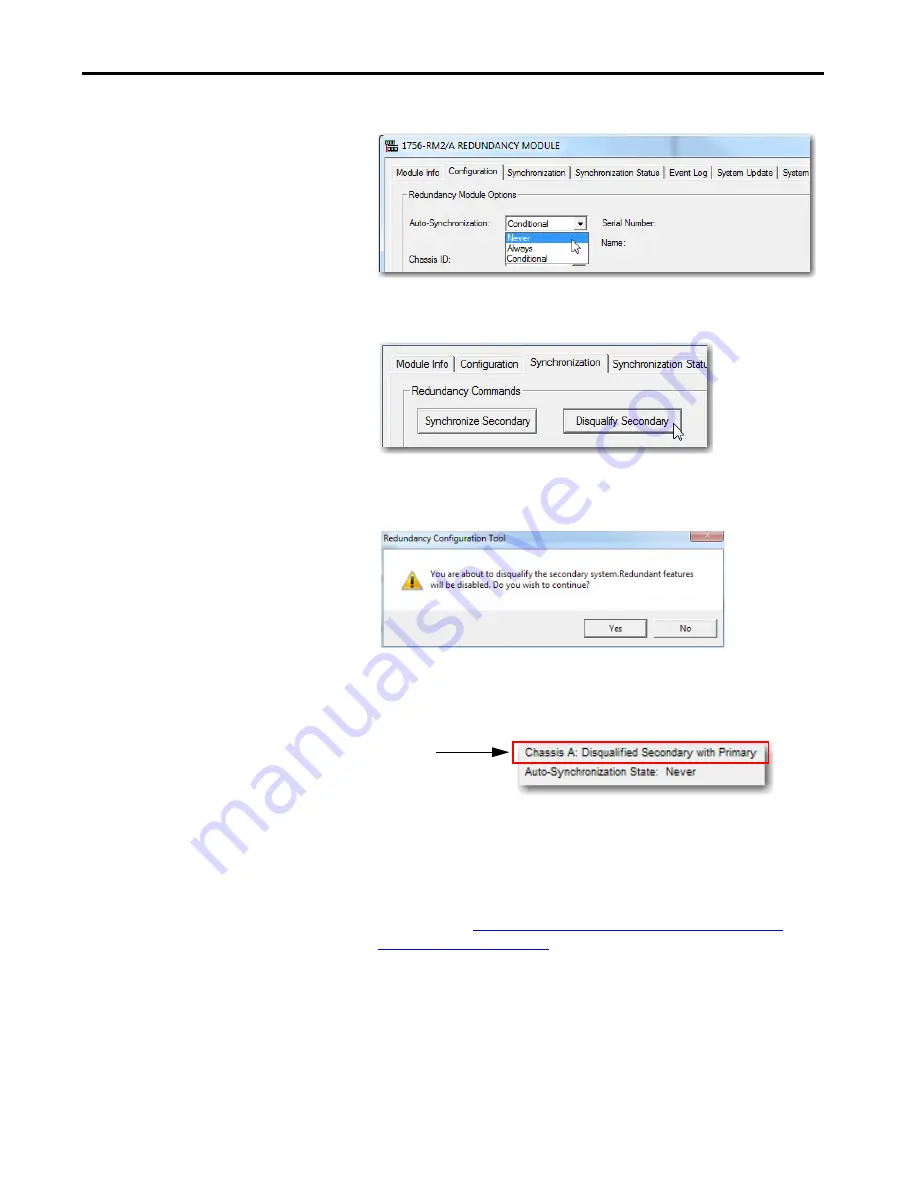
5. From the Auto-Synchronization pull-down menu, choose Never

.

6. Click Apply, and then click Yes.

7. Click the Synchronization tab.

8. Click Disqualify Secondary.

9. On the RMCT Confirmation dialog, click Yes.

The secondary chassis is disqualified as indicated by the RMCT at the 
bottom-left of the RMCT and on the status display of the redundancy 
module.

10. Click OK, and close the RMCT.

If you close the RMCT, it helps prevent a timeout from occurring when 
the firmware of the redundancy module is updated.

11. Continue with 

Update the Redundancy Module Firmware in the 

Primary Chassis on page 26

.

Status in RMCT

Содержание ControlLogix 5570 series

Страница 1: ...ControlLogixRedundancyUpdateandModuleReplacement Guidelines Product Family ControlLogix 5570 Controllers Reference Manual OriginalInstructions ...

Страница 2: ...information circuits equipment or software described in this manual Reproduction of the contents of this manual in whole or in part without written permission of Rockwell Automation Inc is prohibited Throughout this manual when necessary we use notes to make you aware of safety considerations Labels may also be on or inside the equipment to provide specific precautions WARNING Identifies informati...

Страница 3: ...gix Designer Application 20 Prepare the Controller Project for the Update 21 Update the Redundancy System Firmware 23 Before You Begin 23 Prepare the Redundant Chassis for the Firmware Update 24 Update the Redundancy Module Firmware in the Primary Chassis 26 Update Redundancy Module Firmware and Other Module Firmware in the Secondary Chassis 28 Lock the System and Initiate a Switchover to Update 3...

Страница 4: ...4 Rockwell Automation Publication 1756 RM010C EN P August 2018 Table of Contents AppendixA Align LINT Members on 8 byte Boundaries 51 ...

Страница 5: ...www rockwellautomation com global support pcdc page and search for your redundancy firmware revision In a redundant system modules can be replaced and firmware can be updated using either of the following methods Method 1 Modules are replaced and firmware is updated while the redundancy system is powered up and the controllers are left in RUN mode In this case this publication applies Method 2 If ...

Страница 6: ...umentation contact your local Allen Bradley distributor or Rockwell Automation sales representative Resource Description 1756 ControlLogix Controllers Specifications Technical Data publication1756 TD001 Technical specifications for ControlLogix controllers and accessories including redundancy modules ControlLogix Redundancy User Manual publication 1756 UM535 Provides information to install configu...

Страница 7: ... revision of controller and communication module firmware in the redundancy application project Topic Page Before You Begin 7 Download and Install ControlFLASH Software 11 Download the Redundancy Firmware Bundle and RMCT 11 Install the Redundancy Firmware Bundle 14 Install the Redundancy Module Configuration Tool 19 Install the Logix Designer Application 20 Prepare the Controller Project for the U...

Страница 8: ...ags inside a UDT You use a tag with LINT members as a producer and at least one consumer controller has firmware earlier than version 27 You use a tag with LINT members as a consumer and the producer controller has firmware earlier than version 27 For more information see these resources Align LINT Members on 8 byte Boundaries on page 51 Logix Designer online help topic LINT data types within this...

Страница 9: ... Redundant I O system x ControlNet network x DeviceNet network 1 1 In a redundancy system you can access remote I O modules on this networkonly via a ControlNet or EtherNet IP network bridge x Data Highway Plus 1 network x Universal remote I O 1 x IMPORTANT If you have RMCT version 7 or earlier it does not support the 1756 RM2 modules more information on the RMCT see Knowledgebase article 29511 IM...

Страница 10: ...le bar and choose About The About dialog box opens and indicates the RMCT version TIP The RMCT launches at the version that is compatible with the 1756 RM2 or 1756 RM2XT redundancy module firmware that is installed You must update your RMCT version and the redundancy module firmware revision so it is compatible with the new RMCT version If you do not perform this update the About dialog box cannot...

Страница 11: ... to download and install ControlFLASH or ControlFLASH Plus software see ControlFLASH Firmware Upgrade Kit User Manual publication 1756 UM105 ControlFLASH Plus Quick Start Guide publication CFP QS001 Download the Redundancy Firmware Bundle and RMCT To download the appropriate redundancy firmware bundle follow these steps 1 Go to http www rockwellautomation com global support firmware overview page ...

Страница 12: ...t the appropriate Enhanced Redundancy Bundle version 4 Click Add to Download Cart 5 Click Downloads 6 On the Download Cart dialog make sure that the firmware is selected and click Download now 7 You have to log in to download the redundancy firmware bundle Follow the download instructions on the website ...

Страница 13: ... is included in the redundancy bundle and is not available for separate download For redundancy bundles that use firmware revision earlier than 20 009 you can download the RMCT separately as a product add on 1 Go to http www rockwellautomation com global support firmware overview page 2 Select your controller 3 Search for the redundancy module catalog number for example 1756 RM2 1756 RM2XT 4 You c...

Страница 14: ...you are updating from revision 20 05x to revision 24 052 follow the steps in this section Before you update software for your redundant system use one of these methods to shut down RSLinx Classic software Right click the RSLinx Classic icon in the notification area of the screen and choose Shutdown RSLinx Classic With RSLinx Classic software open from the File menu choose Exit and Shutdown 1 Brows...

Страница 15: ...Rockwell Automation Publication 1756 RM010C EN P August 2018 15 Update Considerations Chapter 1 6 Clear Yes I want to launch ControlFLASH 7 Click Close ...

Страница 16: ...ose Shutdown RSLinx Classic With RSLinx Classic software open from the File menu choose Exit and Shutdown 1 Browse to the location of redundancy firmware revision 30 051_kit1 2 Unzip the redundancy firmware bundle on your computer 3 Browse to the directory on your computer that has the redundancy firmware bundle and unzip the Redundancy Module Configuration Tool version 8 4 1 0 on your computer 4 ...

Страница 17: ...ate Considerations Chapter 1 5 On the WinZip Self Extractor dialog click Browse and choose the location to install the files 6 After you choose your location click Unzip 7 On the installation successful dialog click OK 8 On the WinZip Self Extractor dialog click Close ...

Страница 18: ...n area of the screen and choose Shutdown RSLinx Classic With RSLinx Classic software open from the File menu choose Exit and Shutdown 1 Browse to the location of redundancy firmware revision V31 052_kit1_ENHCLXRED zip 2 Unzip the redundancy firmware bundle on your computer After you unzip you will have these files Firmware V31 052_kit1_CLXRED dmk Redundancy Module Configuration Tool version 8 05 0...

Страница 19: ...ick Next 4 When the installation is complete click Finish IMPORTANT If you have RMCT version 7 or earlier it does not support the 1756 RM2 modules For more information on the RMCT see Knowledgebase article 29511 IMPORTANT You must uninstall any existing version of the Redundancy Module Configuration Tool RMCT before you install the RMCT version 8 4 1 0 or later If you do not uninstall the previous...

Страница 20: ... redundancy firmware bundle 4 Continue with Prepare the Controller Project for the Update on page 21 IMPORTANT If you update your programming software from version 20 to version 24 we stronglyrecommendthatyoureadRockwellAutomationKnowledgebase Answer ID 565204 RSLogix 5000 Software Version 20 03 accessible at https rockwellautomation custhelp com A login is required to access the article IMPORTANT...

Страница 21: ...to a value that corresponds with the requirements of the redundancy system revision and your application 5 Cancel or assemble any pending test edits 6 Remove all sequential function chart SFC forces from the project 7 Verify that no changes are required for the following I O forces I O configuration After this step changes to I O cannot be made until after the redundancy system revision update is ...

Страница 22: ...de a UDT or you use produce consume tags with LINT member you must make sure the LINT members and UDTs with LINT Members align on 8 byte boundaries See the following Align LINT Members on 8 byte Boundaries on page 51 Logix Designer online help topic LINT data types within this tag now align on 8 byte boundaries Check produce consume connection 18 Continue with Update the Redundancy System Firmware...

Страница 23: ...oject other than with changes that are identified in these tasks Verify that no one else is also changing the project Do not use a FactoryTalk Batch Server to change equipment phase states when upgrading your redundancy system IMPORTANT Remember the following before using this section RSU is available when upgrading only from one redundancy version to another You can update only from firmware revi...

Страница 24: ... redundant controllers in both chassis of the redundant chassis pair are not in Remote Program REM mode the redundancy firmware update cannot be completed 2 Open RSLinx Classic software and browse to the redundancy module 3 To open the RMCT right click the redundancy module and choose Module Configuration 4 Click the Configuration tab in the RMCT Task Page Prepare the Redundant Chassis for the Fir...

Страница 25: ...dary 9 On the RMCT Confirmation dialog click Yes The secondary chassis is disqualified as indicated by the RMCT at the bottom left of the RMCT and on the status display of the redundancy module 10 Click OK and close the RMCT If you close the RMCT it helps prevent a timeout from occurring when the firmware of the redundancy module is updated 11 Continue with Update the Redundancy Module Firmware in...

Страница 26: ...ete these steps to update the redundancy module firmware in the primary chassis 1 Launch ControlFLASH software and click Next 2 Before you select a target device you must first tell ControlFLASH where to look for firmware files On the ControlFLASH dialog click Browse 3 On the Firmware Kit Location dialog if the location where you store firmware files is not in the Monitored folders list a Click Ad...

Страница 27: ...redundancy module catalog number as the target device 5 Click Next 6 Browse to the redundancy module in the primary chassis and select it 7 Click OK 8 Select the firmware revision to update to and click Next 9 Click Finish The firmware begins to update When the update is complete the Update status dialog box indicates completion 10 On the Update Status dialog click OK 11 Close ControlFLASH Seconda...

Страница 28: ...to replace your module hardware remove the module from the secondary chassis and replace it with the new module 2 Launch ControlFLASH and click Next 3 Select the module catalog number and click Next 4 Browse to the redundancy module in the secondary chassis and select it 5 Click OK IMPORTANT Whenreplacingcommunicationsmodules make sure thatthenode address for ControlNet modules rotary switches and...

Страница 29: ...h module in the secondary chassis 10 Close ControlFLASH 11 Download the project to the secondary controller 12 After the download is complete go offline You are now ready to lock the system and initiate a locked switchover to update the primary chassis Continue with Lock the System and Initiate a Switchover to Update IMPORTANT When you download a project that has I O forces enabled the application...

Страница 30: ...to open the RMCT 2 Click the System Update tab 3 Click Lock For Update and then click Yes at the Redundancy Configuration Tool dialog box 4 Wait for the system to lock IMPORTANT Remain offline while completing these steps Once you have locked the system do not abort the system lock Aborting the system lock during this procedure clears the project from the secondary controller Donotdisconnectanycom...

Страница 31: ... the Locked Switchover Attempts log indicates success The text in chassis status row indicates the switchover state in combination with the log Once your locked switchover is complete update the firmware revisions for modules in the new secondary chassis 6 On the RMC click OK IMPORTANT Afterthelockedswitchover thenewsecondarycontrollersnolongercontain a user application and their configuration set...

Страница 32: ...20 055_kit1 20 055_kit2 20 055_kit3 20 055_kit4 or 20 056_kit1 and ElectronicKeyingissettoExactMatch CompatibleModuleorDisableKeying and you are either a Updating 1756 EN2T C or earlier modules with 1756 EN2T C or earlier modules and the modules being replaced have rotary switches set to 2 254 b Replacing 1756 EN2T C or earlier modules with EN2T D modules and the modules being replaced have rotary...

Страница 33: ...nish The firmware begins to update When the update is complete the Update status dialog box indicates completion 8 Complete steps 1 7 for each module in the new secondary chassis including the new controllers if applicable Once you either replace or update the firmware for each of the modules in the new secondary chassis continue with Synchronize the Redundant Chassis on page 34 Primary Chassis Se...

Страница 34: ...1 In RSLinx software right click the 1756 RM2 or 1756 RM2XT module in the primary chassis and choose Module Configuration to open the RMCT 2 On the Synchronization tab click Synchronize Secondary 3 On the RMCT Confirmation dialog click Yes Wait for synchronization to complete Steps 4 8 are only applicable if the Ethernet switches are set between 2 254 4 Initiate a switchover 5 In the new secondary...

Страница 35: ... see modules that are displayed in RSLinx Classic with yellow question marks the EDS files for the modules are not registered You can right click on the module and proceed with the Upload EDS files from device wizard to upload the EDS file If this option is not available or as an alternative obtain the EDS files for modules in your system from the Rockwell Automation website at http www rockwellau...

Страница 36: ...36 Rockwell Automation Publication 1756 RM010C EN P August 2018 Chapter 1 Update Considerations Notes ...

Страница 37: ... module in the secondary chassis Replace an EtherNet IP or ControlNet communication module Replace a 1756 RM or 1756 RMXT module with a 1756 RM2 or 1756 RM2XT module Topic Page Before You Begin 37 ReplaceaModuleintheSecondaryChassisThatHastheSameCatalogNumberand Firmware Revision 38 Replace an EtherNet IP Module with a New Series 39 Replace a 1756 CN2 Module with a New Series 44 Replace a 1756 RM ...

Страница 38: ...n you replace communication modules make sure that the node address for ControlNet modules rotary switches and Port Configuration for EtherNet IP modules match the existing modules 1 Using the Redundancy Module Configuration Tool RMCT a Set Auto qualification to Never b Disqualify the redundant chassis pair if not already disqualified 2 Remove the module from the secondary chassis and replace it w...

Страница 39: ... module and replacement module use the same IP Network Mask and Gateway addresses 2 For the Redundancy Module Configuration Tool RMCT With redundancy firmware revision 24 052 make sure that the RMCT is at version 8 03 01 or later With redundancy firmware revision 30 051 make sure that the RMCT is at version 8 04 01 or later With redundancy firmware revision 31 052 make sure that the RMCT is at ver...

Страница 40: ...ify that the Electronic Keying is set to Compatible Module or Disable Keying 6 In the RSLinx Classic software start the RMCT for the redundancy module in either chassis 7 On the Configuration tab from the Auto Synchronization pull down menu choose Never 8 Click Apply 9 On the Synchronization tab click Disqualify Secondary ...

Страница 41: ...le in the secondary chassis and apply power to the chassis a After the reset is complete turn power off to the secondary chassis remove the module from the secondary chassis b Set the switches to the same settings as on the module that was removed c Reinsert the module into the secondary chassis reattach the cable and apply power to the secondary chassis d To support bridging across the backplane ...

Страница 42: ...en the update is complete the Update status dialog box indicates completion Wait for the update to complete g After the update completes connect the Ethernet cable to the secondary Ethernet module and wait for communication to resume on the network 16 Repeat steps 10 15 for all EtherNet IP modules in the secondary chassis Complete these steps to verify module compatibility and synchronization 1 At...

Страница 43: ... the module from the secondary chassis b Set the switches to the same settings as on the module that was removed c Reinsert the module into the secondary chassis reattach the cable and apply power to the secondary chassis d To support bridging across the backplane or via the USB port configure the Port Configuration of the secondary module to match the Port Configuration of the primary module e If...

Страница 44: ... the EDS files for the modules if you have not already done so 2 Make a note of the Node configuration of the ControlNet module In this example the primary ControlNet Node is configured to be Node 11 The Node value of the secondary ControlNet module must be the same value as the primary module 3 For the Redundancy Module Configuration Tool RMCT With redundancy firmware revision 24 052 make sure th...

Страница 45: ...redundancy module firmware is revision 20 010 or later 5 Go online with the primary controller 6 For each module verify that Electronic Keying is set to Compatible Module or Disable Keying 7 In the RSLinx Classic software start the RMCT for the redundancy module in the primary chassis a Start RSLinx Classic Software b Select Communications and choose RSWho c Open the branches of your network until...

Страница 46: ...w ControlNet module remove the module from the secondary chassis 15 Set the switches in the new ControlNet module to the correct Node value and reinsert the module into the secondary chassis 16 Reconnect the coaxial cable to the new secondary ControlNet module 17 Update the firmware of the ControlNet module in the secondary chassis a If necessary complete the following steps to update module firmw...

Страница 47: ... the modules are fully compatible 20 On the Synchronization tab synchronize the secondary chassis Wait for synchronization to complete 21 Initiate a switchover 22 Remove the ControlNet modules from the new secondary chassis 23 Make sure to match the node address of replacing the ControlNet module with existing module 24 Insert the ControlNet module into the new secondary chassis reconnect the modu...

Страница 48: ...derations Complete these steps to verify module compatibility and synchronization 1 In the RMCT from the Auto Synchronization pull down menu choose your preferred method 2 If necessary manually synchronize the chassis 3 Click Apply Yes and OK 4 Verify that the secondary chassis has qualified ...

Страница 49: ...the redundancy module pair in any order from the redundant chassis 7 Insert the 1756 RM2 redundancy module pair in any order in the redundant chassis into the same slots as the redundancy modules 8 If not already installed use RSLinx Classic software to upload the EDS file for the 1756 RM2 module If needed obtain the EDS file for the 1756 RM2 module Follow the procedure that is described in EDS Fi...

Страница 50: ...50 Rockwell Automation Publication 1756 RM010C EN P August 2018 Chapter 2 Replacement Considerations Notes ...

Страница 51: ...bytes can cause an increase in the size of the UDT The possible effects of data structure changes and subsequent actions that you can take as a result are described in the rest of this section PossibleImpactofRequirementChange You can adapt your project to accommodate larger structure sizes if necessary You can see the following effects due to the larger size Message instruction data lengths can r...

Страница 52: ... without Status requires the Size of the UDT to match We recommend that you copy and paste the UDT definition from one project to the other to cover both of these cases Use the Data Type editor to check the Data Type Size in both projects Figure 1 Data Type Editor If the data type size is different between the two projects modify the UDT to produce the same internal data structure The following sa...

Страница 53: ...structure is a multiple of 8 bytes Table 1 Data Structure for Logix Designer Projects Version 26 or Earlier Word Elements Byte Mapping Table 64 Bit Boundaries 0 LimitA and LimitB Pad Pad Pad Hidden SINT 0 1 Profile Real 3 Map Map Map Map 2 Map Map Map Map 1 3 Map Map Map Map 4 Interlock Int Pad Pad Map Map 2 5 MyLint LINT Map Map Map Map 6 Map Map Map Map 3 7 Speed REAL Map Map Map Map Table 2 Hid...

Страница 54: ...T Sample Memory Allocation and Alignment OK Table 3 illustrates how this data structure maps in all types of Logix 5000 controller projects The concept is the same for nested UDTs If the lower level UDT is an 8 byte type that is it contains at least one 8 byte data element you must align it to start at an 8 byte boundary Table 3 Memory Map in All Project Types Word Elements Byte Mapping Table 64 B...

Страница 55: ...until all 8 byte elements are aligned on 8 byte 64 bit boundaries 5 If needed add a DINT at the end of the UDT to satisfy the 8 byte allocation rule 6 Continue up through nested UDTs until the top level is correct When the tasks are completed the UDTs are the same size in the Logix Designer project version 24 052 or earlier and the Logix Designer project version 30 051 or later A useful technique ...

Страница 56: ...56 Rockwell Automation Publication 1756 RM010C EN P August 2018 Appendix A Align LINT Members on 8 byte Boundaries Notes ...

Страница 57: ......

Страница 58: ...eer http www rockwellautomation com global support direct dial page Literature Library Installation Instructions Manuals Brochures and Technical Data http www rockwellautomation com global literature library overview page Product Compatibility and Download Center PCDC Get help determining how products interact check features and capabilities and find associated firmware http www rockwellautomation...

Отзывы: