900W Planer
AFTER SALES SUPPORT
e-mail: [email protected]
1300 889 028
MODEL No.: PPL9001.A • 02/2021 • 704518
(toll free)
AFTER SALES SUPPORT
(toll free)
900W Planer
e-mail: [email protected]
1300 889 028
MODEL No.: PPL9001.A • 02/2021 • 704518
14
button (2). The planer is working now. To switch off, just release the on/off
trigger (3).
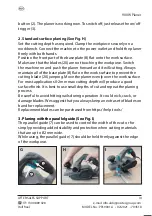
2. Standard surface planing (See Fig. H)
Set the cutting depth as required. Clamp the workpiece securely on a
workbench. Connect the machine to the power outlet and hold the planer
firmly with both hands.
Position the front part of the base plate (8) flat onto the work surface.
Make sure that the blades (20) are not touching the workpiece. Switch
the machine on and push the planer forward and it will cutting. Always
maintain all of the base plate (8) flat on the work surface to prevent the
cutting blade (20) jumping. Move the planer evenly over the work surface.
For most applications 0-2mm max cutting depth will produce a good
surface finish. It is best to use small depths of cut and repeat the planing
process.
Be careful to avoid hitting nails during operation. It could nick, crack, or
damage blades. We suggest that you always keep an extra set of blades on
hand for replacement.
Replacement blades can be purchased from https://help.tools/
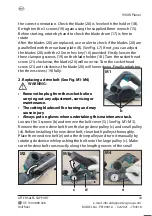
3. Planing with the parallel guide (See Fig. I)
The parallel guide (7) can be used to control the width of the cut or for
simply providing added stability and protection when cutting materials
that are up to 82 mm wide.
While using, the parallel guide (7) should be held firmly against the edge
of the workpiece.
G
H
I
1
2


