alcatraz AI Скачать руководство пользователя страница 43

3

4

2

 43

Ver. 1.01

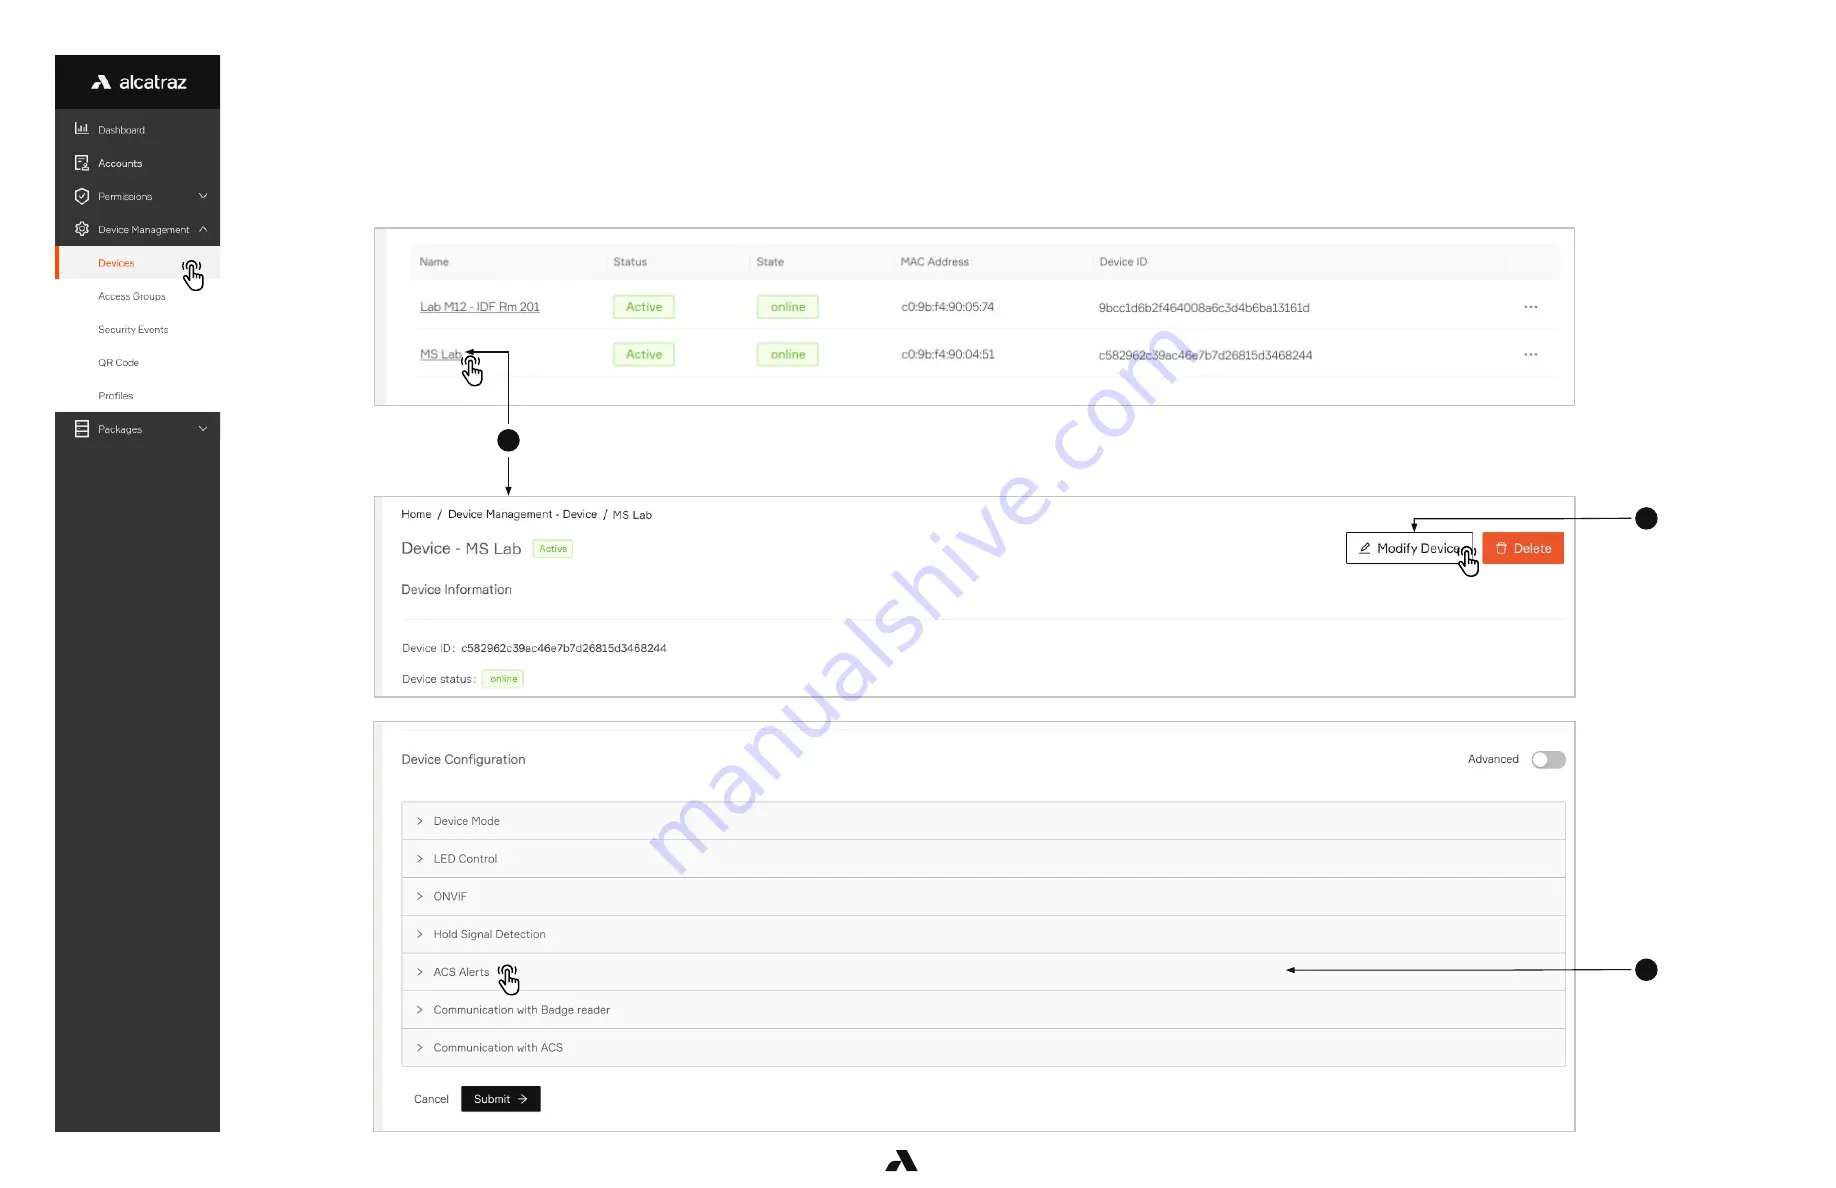
Step 3 – Configure Alerts in the Alcatraz AI Admin Portal

1.  Go to 

Device Management

 and select 

Devices

.

2.  Click on the Name of the Rock to open the Rock’s info page.
3.  Click on 

Modify Device

 to open up the configurations page.

4.  Scroll down the page to 

Device Configuration

 and expand the 

ACS Alerts section

Содержание AI

Страница 1: ...Ver 1 01 Alcatraz AI Admin Portal Guide...

Страница 2: ...read a QR code 64 6 5 Profiles 65 6 5 1 Viewing Profiles 66 6 5 2 Delete a Profile Option 1 delete through Profiles 68 6 5 3 Delete a Profile Option 2 delete through Security Event 69 6 5 4 Managing A...

Страница 3: ...enrollment where the user profile is created in one shot Mask Enforcement Mask enforcement can be set in the Rock to ensure that a user must always wear a mask when entering a space Un Authorized Ent...

Страница 4: ...ed to configure monitor and administer Rocks Log in to the Alcatraz AI Admin Portal to Monitor the status of Rocks Configure Rock mode of operation Change configuration parameters Update firmware View...

Страница 5: ...ode 4 View Security Events 5 Check Profiles 6 Enrollment 1FA Tailgating Start with 1 Generate QR Code 2 1 QuickStart Requesting an Alcatraz AI Admin Portal login from your Account Administrator or Sub...

Страница 6: ...2 Dashboard...

Страница 7: ...es to filter out the events you do not wish to view on the graph Recent Security Events View Recent Security Events as they occur on the right hand side Click on the event to view additional info incl...

Страница 8: ...Account This would include creating other admins or portal users as well as configuring card formats 3 1 Create an Account 9 3 2 Edit an Account 10 3 3 View an Account 11 3 4 Delete an Account 12 3 5...

Страница 9: ...Account 1 Go to Accounts and click on Create an Account 2 Complete the information in the Add Account pane Reference Number optional gives flexibility to add a number to associate with for example a...

Страница 10: ...ount 1 Identify the Account from the list or search for the Account in the search bar 2 Navigate to the far right click on the three dots and select Edit to open up the Edit Account pane 3 Update Acco...

Страница 11: ...count 1 Identify the Account from the list or search for the Account in the search bar 2 Click on the Account name or navigate to the far right click on the three dots and select View 3 The Account in...

Страница 12: ...a facility code and a card number but it is possible that the format only contains a card number Cards will vary in sizes such as 26 33 37 48 bits although the bits do not indicate the format The faci...

Страница 13: ...ve been pre defined and can be selected for use 1 Click on the Account name or navigate to the far right click on the three dots and select View 2 Select Create a Card Format 3 Define a custom card fo...

Страница 14: ...5 4 14 Ver 1 01 4 Select Pre defined for Card Type and select a format from the Pre defined Format list 5 Click Save and the selected card format will be displayed in the list...

Страница 15: ...before proceeding retrieve the information from your Access Control System ACS Administrator Information that may be part of your card format and needed as part of the configuration include The start...

Страница 16: ...e Give the card format a name and indicate number of bits Please note that only one card format is allowed for a given bit length 5 Follow the information retrieved from the ACS Administrator and togg...

Страница 17: ...17 Ver 1 01 3 5 3 Example of Card Format with No Parity Bits...

Страница 18: ...18 Ver 1 01 3 5 4 Example of Card Format Using Parity Bits...

Страница 19: ...ion of the Alcatraz AI Admin Portal provides capability to create new system users to log into the Alcatraz AI Admin Portal When a new system user is created they must be assigned a role This role wil...

Страница 20: ...the Account must be previously created in order to assign the user a role for an Account This is important to note for Dealer Admins who must manage multiple Accounts Note Only Dealer Admins and Inst...

Страница 21: ...lter on the User to ensure that an account has not already been set up 2 To add a new user select Create a User 3 Fill in the required information 4 Select the appropriate Role and the Account If ther...

Страница 22: ...r 1 01 4 2 Delete a User 1 Go to Permissions Users and identify the user you wish to delete 2 Navigate to the far right click on the three dots and select Delete 3 You will be asked to confirm before...

Страница 23: ...erver is maintained on customer site Before onboarding a Rock Obtain login credentials to the Alcatraz AI Admin Portal Make a request to your administrator Find out the Access Groups to assign to the...

Страница 24: ...r the 6 digit Device ID in the search bar to filter the Rock The 6 digit Device ID can be found On the outside of the package the Rock was shipped in indicated by ID as seen on label here On the back...

Страница 25: ...lly onboarded when the Status Active and State Online Refresh the browser to see the update 3 Click on Authenticate 4 A window pops open choose the Access Group and click Authenticate 5 4 Name the Dev...

Страница 26: ...2 5 26 Ver 1 01 3 2 The Rock s information will be displayed Click on Modify Device 3 Modify the Name field 4 Click Submit at the bottom of the page 5 View the new Name in the list...

Страница 27: ...e a Profile Option 2 delete through Security Event 69 6 5 4 Managing Access 70 6 5 5 Troubleshooting Tips 72 6 1 Devices 28 6 1 1 Configure Rock Mode of Operation 29 6 1 1 1 Mode Setting Demo 31 6 1 1...

Страница 28: ...the Rock and hear the door click open 1FAF Single Factor Face Only requires face as the credential This mode is used at doors that do not have a badge reader Enrollment is completed at an enrollment...

Страница 29: ...1 01 6 1 1 Configure Rock Mode of Operation 1 Go to Device Management and select Devices 2 Click on the Name of the Rock to open the Rock s info page 3 Click on Modify Device to open up the configura...

Страница 30: ...ck 6 Click Submit when done Low Friction Standard and High Security will be defaulted according to the mode but can be change The various levels will determine if the Rock will make more fewer checks...

Страница 31: ...h the door You have completed auto enrollment No badge is required simply look at the Rock as you approach the door 6 1 1 1 Mode Setting Demo In 1FA auto enrollment is completed by swiping a badge at...

Страница 32: ...de requires you to wear a mask and present your badge No enrollment is required If you are not wearing a mask when approaching the door you must put one on before swiping your badge You have been auth...

Страница 33: ...in 2FA mode or Two Factor Authentication This mode requires that you present you face and badge Seeing this on the Rock s display You will need to enroll at the enrollment station Please visit it and...

Страница 34: ...w the instructions on the display Stand in front of the Enrollment Station Start your Enrollment Look Down Look Up Look Left Look Right Enrollment Completed You must do enrollment steps again Enrollme...

Страница 35: ...number in profile Badge number updated in profile 35 Ver 1 01 6 1 1 8 Changing Badges Once a user is enrolled if at any time the user needs to switch to a new badge they can walk up to an enrollment...

Страница 36: ...d ignore any color signals from the ACS or it can be configured to change colors based on feedback from the ACS or it could be configured so that the LED color changes are controlled by the ACS 1 Go t...

Страница 37: ...n the LED color seen should be checked with ACS configurations b ACS guides LEDs LED color change is in response to ACS feedback The Rock will display green in response to a badge accepted by the ACS...

Страница 38: ...face Forum compatible The Rock is compatible for Profile S and Profile T for devices that follow the ONVIF standards 1 Go to Device Management and select Devices 2 Click on the Name of the Rock to ope...

Страница 39: ...4 39 Ver 1 01 4 Scroll down the page to Device Configuration and expand the ONVIF section ONVIF is enabled by default To disable click on the slider 5 Click Submit when done Default setting To disable...

Страница 40: ...onnected to the VMS from the list and take the last 6 digits of the Device ID as the password The HOLD signal works for both Wiegand and OSDP Asserting the HOLD signal will suspend operations no authe...

Страница 41: ...onfiguration and expand the Hold Signal Detection 5 The Hold Signal Detection is disabled by default click to enable The Rock will suspend all operations when a Hold signal is asserted from the ACS 6...

Страница 42: ...l appear under Device Management Security Events Read the badge number and facility code for the event and verify the info matches when configuring in the ACS Create one or more cardholders by assigni...

Страница 43: ...Admin Portal 1 Go to Device Management and select Devices 2 Click on the Name of the Rock to open the Rock s info page 3 Click on Modify Device to open up the configurations page 4 Scroll down the pa...

Страница 44: ...erts use table from Step 1 7 Scroll down and Click Submit when done The badge numbers should be not associated with any cardholders and are used only for the purpose of receiving alerts from the Rock...

Страница 45: ...It is possible to set one to Wiegand and the other to OSDP or one to OSDP secure channel and the other to OSDP unsecure channel Pre requirements 1 Rock is installed and powered up refer to Install Gui...

Страница 46: ...1 01 6 1 6 1 Select Rock to Configure OSDP 1 Go to Device Management and select Devices 2 Click on the Name of the Rock to open the Rock s info page 3 Click on Modify Device to open up the configurat...

Страница 47: ...5 47 Ver 1 01 4 Scroll down the page to Device Configuration 5 Expand either of the following to configure A Communication with Badge reader B Communication with ACS...

Страница 48: ...on with Badge Reader 1 Select OSDP 2 Enter the Badge Reader s a Baud Rate b Device Address c Select Unsecure or Secure OSDP channel mode d If selecting Secure channel confirm to proceed with setup Uns...

Страница 49: ...ommunication with ACS 1 Select OSDP 2 Enter the ACS a Baud Rate b Device Address c Select Unsecure or Secure OSDP channel mode d If selecting Secure channel confirm to proceed with setup Unsecure mode...

Страница 50: ...6 4 Changing from Secure to Unsecure Channel OSDP requires the exchange of encryption keys To change from secure channel to unsecure channel the keys will be deleted Confirm to continue when changing...

Страница 51: ...er OSDP secure channel is supported by ACS Badge Reader Rock device is in Install mode but no communications with the ACS Panel or Badge Reader Applicable to OSDPv2 only Check Address baud rate for mi...

Страница 52: ...can be managed in Access Groups Users can belong to more than one Access Group Access groups in turn are assigned to Rocks When an Access Group is assigned to Rock s users belonging to that Access gr...

Страница 53: ...Ver 1 01 6 2 2 Delete an Access Group 1 Go to Device Management Access Groups 2 Select the Access Group to open the Access Group Information page 3 Click on Modify Access Group 4 Click on Delete and C...

Страница 54: ...ement Access Groups 2 Select Access Group to open the Access Group Information page 3 Click on Add embedded access group 4 Select from the drop down The Access Group must be created first in order to...

Страница 55: ...ck on the Name of the Rock to open the Rock s info page 3 Click on Modify Device to open up the configurations page 4 In Default access group change the Access Group to another from the drop down Note...

Страница 56: ...al Access Groups 1 Go to Device Management Devices 2 Click on the Name of the Rock to open the Rock s info page 3 Click on Modify Device to open up the configurations page 4 In Access groups add any a...

Страница 57: ...e Factor Authentication Tailgating Intelligence tailgating crossing or unauthorized entry When an event occurs at the Rock the corresponding security event will be displayed in the Alcatraz AI Admin P...

Страница 58: ...nrollment 4 6 events will be displayed before the user is fully enrolled 1FA with auto enrollment Full Enrollment A user manually enrolled at an enrollment station Enrollment 1FA Face Access Granted A...

Страница 59: ...on gained entry when a user exited the door All Crossing by Known User A known user gained entry when a user exited the door All Tailgating by Unknown User An unknown person gained entry by tailgating...

Страница 60: ...ose settings Third print the QR code on a piece of paper or use your laptop screen Finally present that printed code to the Rock s image sensor After the Rock detects and reads that QR code the encode...

Страница 61: ...Ver 1 01 A A For DHCP Select Automatically if the Rock will acquire an IP address by DHCP than click Next B For Static IP select Manually and enter the required information than click Next to continue...

Страница 62: ...ion Select a Server Location and click Next 1 For Cloud Hosted select Hosted by Alcatraz 2 For On Premise select Local Server and enter the Server IP For On Premise Rocks a Server Hostname IP Address...

Страница 63: ...1 2 63 Ver 1 01 1 Review your settings and then hit Generate 2 Click Download QR Code to save to your computer email or text 6 4 2 Generate and Download QR Code...

Страница 64: ...con is not shown on the display the Rock cannot scan in the QR code To activate QR Code Receptive icon go to Advance Options Enabling and Disabling QR Code Receptive Icon code 6 4 3 Present QR Code to...

Страница 65: ...he user will be guided by the display icons that will allow the Rock to capture quality facial biometrics to fuse the user with their badge number to create the user profile The process is one time Ma...

Страница 66: ...66 Ver 1 01 6 5 1 Viewing Profiles 1 To view the list of Profiles for the Account go to Device Management and select Profiles 2 Hover your cursor over the Badge number to see an image of the Last Even...

Страница 67: ...3 67 Ver 1 01 3 To view additional Profile information click on the Badge Number...

Страница 68: ...68 Ver 1 01 1 Click on Device Management Profile 2 Click on a Badge Number to open the Profile 3 Click on Delete at top right to delete this Profile 6 5 2 Delete a Profile Option 1 delete through Prof...

Страница 69: ...e will open 3 Click on the Un enroll button at top right of any security event panel 4 A pop up window will appear to confirm by selecting Un enroll again Note The un enroll option will only be displa...

Страница 70: ...re is flexibility to manage badge number s associated with different Access Groups Badge 12345 Security Team Badge 67890 Employees Add an Access Group 1 Select the Badge Number to open the profile rec...

Страница 71: ...4 71 Ver 1 01 4 Click Save...

Страница 72: ...s Group 6 5 5 Troubleshooting Tips For generating profiles through enrollment follow Mode Setting 1FA for auto enrollment or Mode Setting Enrollment If the badge number is not displayed correctly revi...

Страница 73: ...ealer Administrator role or Installer role For On Prem Rocks before starting Visit support alcatraz ai to see current releases and download Submit a request for any questions Download the firmware pac...

Страница 74: ...g into the Admin Portal 2 Go to Packages Artifacts and check if the latest version is in the list 3 On prem Only Click Upload an artifact and select the file that was downloaded to your computer from...

Страница 75: ...hing but best practice is to use Rock name and firmware version number 4 Select the Artifact Name this is the firmware for updating the Rock 5 In Devices drop down menu select Search by Site and then...

Страница 76: ...y refreshing the page The Status will change as the update progresses until Deployment Status finished A restart will occur during this process The Rock will be offline for approximately 60 seconds 8...

Страница 77: ...update will show success and the number in the blue circle will indicate how many Rocks got updated successfully if multiple Rocks were being updated 2 To verify the new version for the Rock go to De...

Страница 78: ...3 78 Ver 1 01 3 The information page for the Rock will open Scroll down midway and check the Firmware Release...

Страница 79: ...equently used parameters are discussed here but it is recommended to check with Alcatraz AI when changing configurations in the Advanced section 8 1 Enabling or Disabling QR Code Receptive Icon 80 8 2...

Страница 80: ...isplay To enable the icon do the following 1 Go to Device Management Devices 2 Click on the Name of the Rock to open the Rock s info page 3 Click on Modify Device to open up the configurations page 4...

Страница 81: ...ion select device setup_mode and set the value to qrcode To disable QR Code 7 The qrcode can be turned off from the display at anytime by changing the value to disabled Note that this also removes the...

Страница 82: ...r Mode is required for installations on where the Rock is mounted on walls that are right angle to the door 1 Go to Device Management Devices 2 Click on the Name of the Rock to open the Rock s info pa...

Страница 83: ...to Device Configuration and on the right side of the page slide the Advanced slider to on 5 Scroll down to Add a Parameter 6 Under Manual Configuration select corridor_setup is_corridor_setup_enabled...

Страница 84: ...583 0011 00 01 2022 Alcatraz AI Inc All Rights Reserved...

Отзывы: