Alcatel ONETOUCH Pop NOVA LTE Скачать руководство пользователя страница 4

4

5

Power key

• 

Press: Lock the screen/Light up the screen.

• 

Press and hold: Show the pop-up menu to select from Power 
off/Restart/Airplane mode.

• 

Press the 

Power

 key for more than 9 seconds to restart while 

the phone is turned off.

• 

Press the 

Power

 key and 

Volume


up

 key to reset.

• 

Press the

 Power

 key and 

Volume down

 key to capture a 

screenshot.

Volume Keys 

• 

In call mode, adjusts the earpiece or headset volume.

• 

In Music/Video/Streaming mode, adjusts the media volume.

• 

In general mode, adjusts the ringtone volume.

• 

Mutes the ringtone of an incoming call.

1�2 

Getting started

1�2�1 

Setup

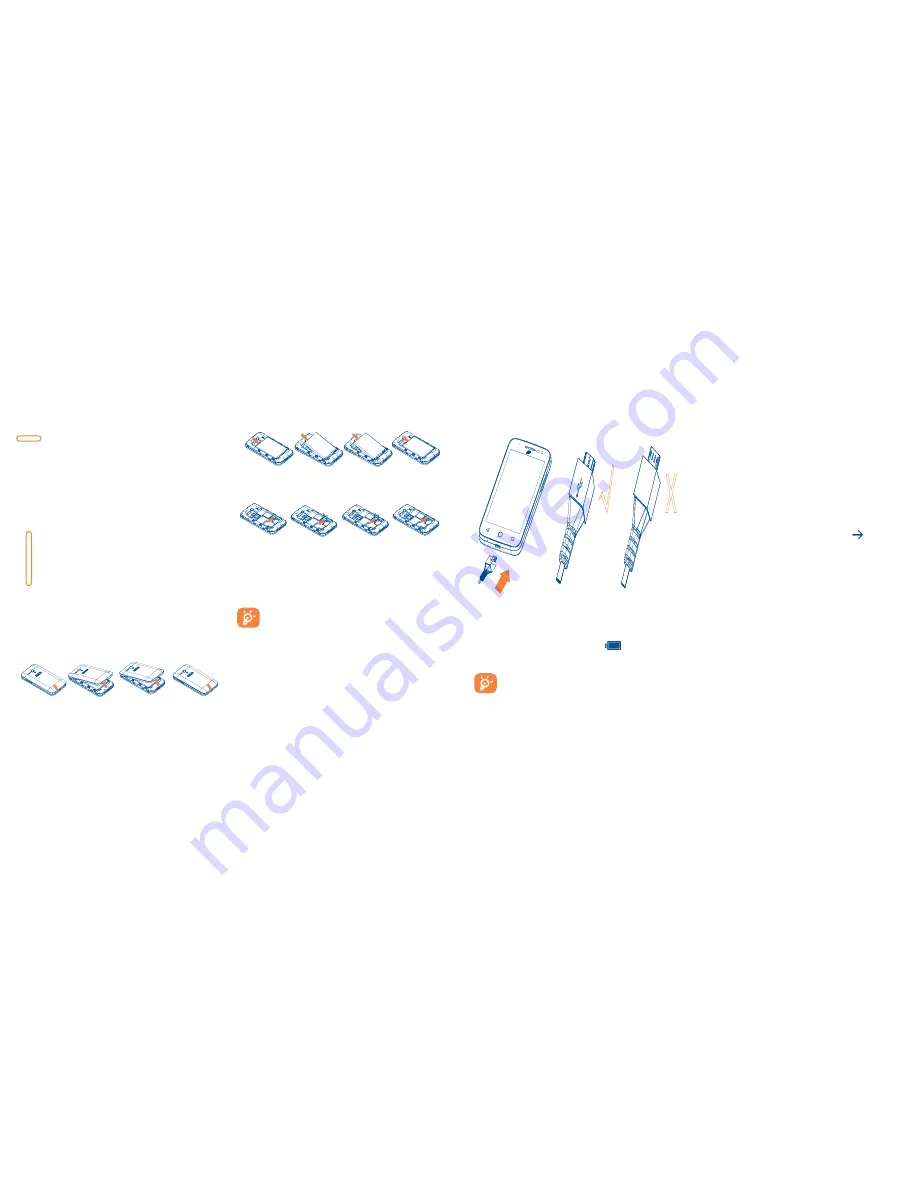
Removing or installing the back cover

Removing or installing the battery

Please power off your phone before removing the battery.

Removing or installing the microSD card

a  Open the microSD card protector according to “OPEN”  indicating 

arrow, insert the card into the slot with golden chip facing downward.

b  Cover the slot according to “LOCK” indicating arrow.
c  To remove the microSD card, open card protector, gently press it out, 

and then cover the slot.

To avoid data loss and SD card damage, before removing the SD 
card, please ensure that the SD card is unmounted (

Settings\

Storage\Unmount SD card

).

Charging the battery

Ĝ

>

Connect the battery charger to your phone and main socket respectively, the 
LED indicator will light while charging.

• 

When using your telephone for the first time, charge the battery fully 
(approximately 3 hours).

You are advised to fully charge the battery ( 

 ). Charging status is 

indicated by the percentage on screen while the phone is powered off. The 
percentage increases as the phone is charged.

To reduce power consumption and energy waste when the 
battery is fully charged, disconnect your charger from the plug; 
switch off Wi-Fi, GPS, Bluetooth or background-running 
applications when not in use; reduce the backlight time, etc.

1�2�2 

Power on your phone

Hold down the 

Power

 key until the phone powers on, unlock your phone 

(Slide, PIN, Password, Pattern or Face unlock) if necessary and confirm. The 
Home screen is displayed.
If you do not know your PIN code or if you have forgotten it, contact your 
service provider. Do not leave your PIN code with your phone. Store this 
information in a safe place when not in use.

Set up your phone for the first time

The first time you power on the phone, you should set the following options:

• 

Select the phone's language, then touch 

Get started


 .

• 

Select font size, then next.

• 

Select input method, touch next.

• 

Set Wi-Fi, touch next.

• 

Set your Google account, touch next.

• 

Set Antitheft or skip from this setting, touch next.

• 

Set backup & reset, touch next.

• 

Set Location, touch next to finish.

Even if no SIM card is installed, your phone will still power on and you will 
be able to connect to a Wi-Fi network, (refer to section “

6�1�2 Wi-Fi

”), sign 

into your Google account and use some features.

1�2�3 

Power off your phone

Hold down the 

Power 

key from the Home screen until the phone options 

appear, select 

Power off

.

1�3 

Home screen

You can bring all the items (applications, shortcuts, folders and widgets) you 
love or use most frequently to your Home screen for quick access. Touch the 

Home

 key to switch to the Home screen.

Содержание ONETOUCH Pop NOVA LTE

Страница 1: ...CJA1AY001AAA...

Страница 2: ...or more than 7 seconds until the startup screen appears In case this does not start your phone please press and hold the power key and volume up key together until the startup screen appears From the...

Страница 3: ...es of apps you ve recently worked with 11 Settings 45 11 1 Wireless network 45 11 2 Device 47 11 3 Personal 49 11 4 Add account 51 11 5 System 52 12 Making the most of your phone 55 12 1 FOTA Upgrade...

Страница 4: ...tus is indicated by the percentage on screen while the phone is powered off The percentage increases as the phone is charged To reduce power consumption and energy waste when the battery is fully char...

Страница 5: ...turning the phone sideways to have a better screen view 1 3 2 Status bar From the status bar you can view both phone status and notification information Status icons 1x connected Airplane mode 1x in u...

Страница 6: ...the Home screen then touch Settings Lock settings Screen lock Pattern Draw your own pattern Draw your unlock pattern Touch to confirm by drawing pattern again To create a screen unlock PIN Password To...

Страница 7: ...2 1 Using Onscreen Keyboard Onscreen Keyboard settings Touch the Menu key from the Home screen select Settings Language input touch the Settings icon on the right of Android keyboard and a series of...

Страница 8: ...h or the Power key when the Call settings Power key ends call option is activated Speed dial settings You can access this setting screen by touching the Menu key and then touching Speed Dial on Dial s...

Страница 9: ...Mark the checkbox to enable playing tones when using the dial pad Quick responses Touch to edit quick responses which will be used when you reject a call with messages Vibrate reminder Mark the checkb...

Страница 10: ...to voicemail Set ringtone for a contact 1 On the contact s detail screen touch the Menu key to display contacts list options menu touch All calls to voicemail When one contact has been set to send ca...

Страница 11: ...ctivated all changes to information on the phone or online will be automatically synchronized to each other Sync manually You can also synchronize an account manually on Accounts screen touch an accou...

Страница 12: ...the enter bar of the new message you are going to compose Forward Touch to forward the message to another recipient Lock Unlock Touch to lock unlock the message so it can t can be deleted if you reac...

Страница 13: ...ch Back key to save a copy To view the draft touch the icon then select Drafts If you do not want to send or save the mail you can touch the Menu key and then touch Discard To add a signature to email...

Страница 14: ...o go to the email account settings screen to enter settings manually Alternatively you can touch Manual setup to directly enter the incoming and outgoing settings for the email account you are setting...

Страница 15: ...event Enter the email addresses of the guests you want to invite with commas to separate The guests will receive an invitation from Calendar and Email When finished touch DONE from the top of the scr...

Страница 16: ...Auto rotate screen is off this item will not display 2 If Settings Display Auto rotate screen is on this item will not display Enter a number and the arithmetic operation to be performed enter the sec...

Страница 17: ...L box at the top and enter the address of the web page then touch to confirm Touch to delete all contents Touch to search and go to this address Touch to go the suggested web site The URL bar will hid...

Страница 18: ...nnecting to Bluetooth devices 1 Bluetooth is a short range wireless communication technology that you can use to exchange data or connect to other Bluetooth devices for various uses To access this fun...

Страница 19: ...nu key from the Home screen Touch Settings More VPN VPNs you have added are listed touch the VPN you want to connect with In the dialog that opens enter any requested credentials and touch Connect To...

Страница 20: ...e your downloads After you downloaded and installed an application the following further operations are available for your selection View On Google Play Store screen touch and My Apps Uninstall On Goo...

Страница 21: ...ect 8 2 Gallery Gallery acts as a media player for you to view photos and playback videos In addition a set of further operations to pictures and videos are available for your choice To access this fu...

Страница 22: ...ouch to skip to the next track in the album playlist or shuffle Touch to select repeat mode Repeating all songs Repeating current song or Repeat is off Touch to add to favorite songs Touch to hide dis...

Страница 23: ...ture and arrival time when using public transport To get reverse directions for a route you ve already made simply touch the icon No need to enter your start point and end point again 9 4 Share a loca...

Страница 24: ...radio using loudspeaker or headset Delete Delete the channel Enter frequency Enter the frequency manually Station Info Mark the checkbox to show station information Exit Turn off the radio 10 5 Note...

Страница 25: ...cess If you don t need to transmit data on other provider s mobile networks unmark the checkbox to avoid incurring significant roaming charges Preferred network type You can select your preferred netw...

Страница 26: ...reen brightness or screen timeout in Display screen 11 2 9 Apps You use the Apps settings to view details about the applications installed on your phone to manage their data and force them to stop and...

Страница 27: ...h Bluetooth headset if available Text to speech output Preferred engine Touch to choose a preferred text to speech engine touch the settings icon to show more choices for each engine Speech rate Touch...

Страница 28: ...ouch Settings About phone then touch Build number 7 times Now Developer options is available The Developer options screen contains settings that are useful for developing Android applications Take bug...

Страница 29: ...ion 12 Making the most of your phone 12 1 FOTA Upgrade Using the FOTA Upgrade tool you can update your phone s software To access Software Update please touch the Menu key from the Home screen then Se...

Страница 30: ...tteries Recycle or dispose of used batteries according to the local regulations or reference guide supplied with your product NOTE This product should be operated only with the following designated Ba...

Страница 31: ...ery life Electrical safety Accessories Use only approved accessories Do not connect with incompatible products or accessories Take care not to touch or allow metal objects such as coins or key rings t...

Страница 32: ...the FCC Rules These limits are designed to provide reasonable protection against harmful interference in a residential installation This equipment generates uses and can radiate radio frequency energ...

Страница 33: ...ess mobile phone employs a unit of measurement known as the Specific Absorption Rate or SAR The SAR limit set by the FCC is 1 6 W kg The FCC has granted an Equipment Authorization for this model devic...

Страница 34: ...ompliance with Directive 002 95 EC of the European Parliament and of the Council of 7 January 2003 on the restriction of the use of certain hazardous substances in electrical and electronic equipment...

Отзывы: