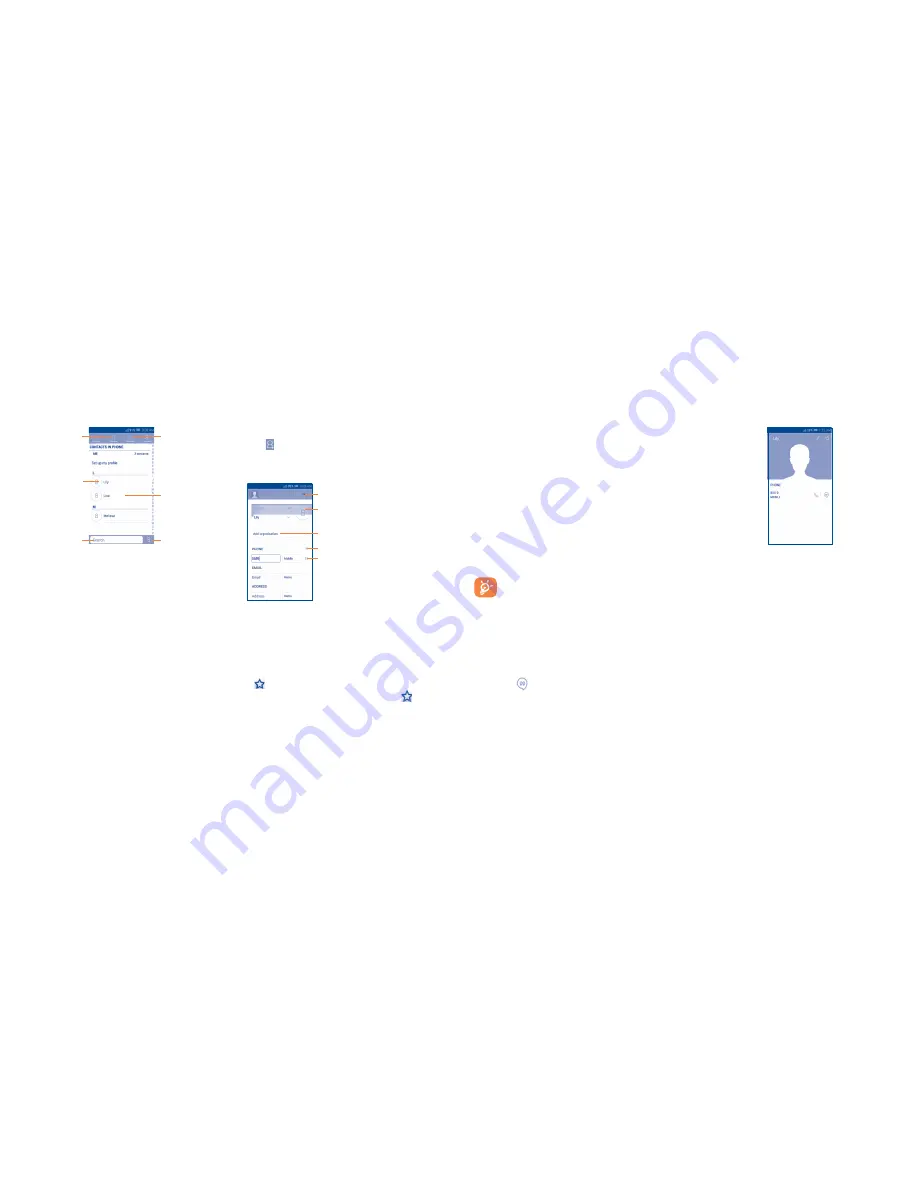
Alcatel ONETOUCH Pop NOVA LTE Скачать руководство пользователя страница 10

16

17

Touch to add 

new contact.

Touch to view the 

contact’s detailed 

information.

Touch image to call 

the contact.

Touch to view your 

favorite contacts.

Touch to view your 

contact groups.

Touch to search 

contacts.

Touch the 

Menu

 key to display contacts list option menu, following actions 

are enabled:

• 

Contacts to 
display

Choose contacts to display.

• 

Import/export

Import or export contacts between phone, SIM card, 
and microSD card, or share contacts.

• 

Delete

Select and delete unwanted contacts.

• 

Accounts

Manage the synchronization settings for different 
accounts.

• 

Settings

Touch to change the display of the sort list and 
contact names.

3�3�2 

Managing contact groups

The contact group helps you to improve the organization of your contacts. 
You can add, remove and view groups in the

 Group

 screen.

To create a new group, touch the 

Menu

 key from the group screen, then 

select 

Add Group

, enter the new name and touch 

Done

 to confirm.

3�3�3 

Adding a contact

Touch the   icon in the contact list to create a new contact.
You are required to enter the contact's name and other contact information. 
By scrolling up and down the screen, you can move from one field to 
another easily.

Touch to select a picture for the contact.

Touch to save.

Touch to add a new label.

Touch to add a new number.
Touch to delete the number.

If you want to add more information, touch 

Add another field

 to add a 

new category.
When finished, touch 

Done

 to save.

To exit without saving, you can touch the 

Menu

 key and then touch 

Discard

.

Add to/remove from Favorites 

(1)

To add a contact to favorites, you can touch a contact to view details then 
touch 

 to add the contact to favorites (the star will turn gold in color). 

To remove a contact from favorites, touch the golden star 

 on contact 

details screen.

(1)


Only phone contacts can be added to Favorites.

3�3�4 

Editing your contacts

To edit contact information, touch the 

Menu

 key in the contact details 

screen, then touch 

Edit

. When finished, touch 

Done

.

Divert calls to voicemail/Set ringtone for a contact

 (1)

On the contact's detail screen, touch the 

Menu

 key to display contacts list 

options menu, touch 

All calls to voicemail

.

When one contact has been set to send calls directly to voicemail, if he/
she calls, your phone will not ring and the caller will be sent directly to 
your voicemail.

Delete a contact

To delete a contact, touch the 

Menu

 key and 

Delete

 from contact screen. 

Tick the contact you want to remove and touch 

 to confirm. Touch 

Select 

all

 to delete all contacts.

The contact you have deleted will also be removed from other 
applications on the phone or web the next time you synchronize 
your phone.

3�3�5 

Communicating with your contacts

From the contacts list, you can communicate with your contacts by making 
a call or exchanging messages.
To launch a call to a contact, touch the contact to enter the detail screen, 
then touch the number.
To send a message to a contact, touch the contact to enter the detail screen, 
then touch the 

 icon on the right side of the number.

(1)


You can only set a ringtone for established contacts.


The icons available on Quick Contact panel depend on the information you 
have for the contact and the applications and accounts on your phone.

3�3�6 

Contacts importing, exporting and sharing

This phone enables you to import or export contacts between phone, SIM 
card, microSD card and phone storage.
From the Contacts screen, touch the 

Menu

 key to open the options menu, 

touch 

Import/export

, then select 

Import from SIM card

Export to SIM 

card

Import from phone/SD storage

Export to phone/SD storage

 or 

Share visible contacts

.

To import/export a single contact from/to your SIM card, choose an account 
and target SIM card(s), select the contact you want to import/export, and 
touch the 

√ 

icon to confirm.

To import/export all contacts from/to your SIM card, choose target SIM 
card(s), mark 

Select all

 and touch the 

√ 

icon to confirm.

You can share a single contact or contacts with others by sending the 
contact's vCard to them via Bluetooth, Gmail, etc.
Touch a contact you want to share, touch the 

Menu

 key and 

Share

 from 

the contact details screen, then select the application to perform this action. 

Содержание ONETOUCH Pop NOVA LTE

Страница 1: ...CJA1AY001AAA...

Страница 2: ...or more than 7 seconds until the startup screen appears In case this does not start your phone please press and hold the power key and volume up key together until the startup screen appears From the...

Страница 3: ...es of apps you ve recently worked with 11 Settings 45 11 1 Wireless network 45 11 2 Device 47 11 3 Personal 49 11 4 Add account 51 11 5 System 52 12 Making the most of your phone 55 12 1 FOTA Upgrade...

Страница 4: ...tus is indicated by the percentage on screen while the phone is powered off The percentage increases as the phone is charged To reduce power consumption and energy waste when the battery is fully char...

Страница 5: ...turning the phone sideways to have a better screen view 1 3 2 Status bar From the status bar you can view both phone status and notification information Status icons 1x connected Airplane mode 1x in u...

Страница 6: ...the Home screen then touch Settings Lock settings Screen lock Pattern Draw your own pattern Draw your unlock pattern Touch to confirm by drawing pattern again To create a screen unlock PIN Password To...

Страница 7: ...2 1 Using Onscreen Keyboard Onscreen Keyboard settings Touch the Menu key from the Home screen select Settings Language input touch the Settings icon on the right of Android keyboard and a series of...

Страница 8: ...h or the Power key when the Call settings Power key ends call option is activated Speed dial settings You can access this setting screen by touching the Menu key and then touching Speed Dial on Dial s...

Страница 9: ...Mark the checkbox to enable playing tones when using the dial pad Quick responses Touch to edit quick responses which will be used when you reject a call with messages Vibrate reminder Mark the checkb...

Страница 10: ...to voicemail Set ringtone for a contact 1 On the contact s detail screen touch the Menu key to display contacts list options menu touch All calls to voicemail When one contact has been set to send ca...

Страница 11: ...ctivated all changes to information on the phone or online will be automatically synchronized to each other Sync manually You can also synchronize an account manually on Accounts screen touch an accou...

Страница 12: ...the enter bar of the new message you are going to compose Forward Touch to forward the message to another recipient Lock Unlock Touch to lock unlock the message so it can t can be deleted if you reac...

Страница 13: ...ch Back key to save a copy To view the draft touch the icon then select Drafts If you do not want to send or save the mail you can touch the Menu key and then touch Discard To add a signature to email...

Страница 14: ...o go to the email account settings screen to enter settings manually Alternatively you can touch Manual setup to directly enter the incoming and outgoing settings for the email account you are setting...

Страница 15: ...event Enter the email addresses of the guests you want to invite with commas to separate The guests will receive an invitation from Calendar and Email When finished touch DONE from the top of the scr...

Страница 16: ...Auto rotate screen is off this item will not display 2 If Settings Display Auto rotate screen is on this item will not display Enter a number and the arithmetic operation to be performed enter the sec...

Страница 17: ...L box at the top and enter the address of the web page then touch to confirm Touch to delete all contents Touch to search and go to this address Touch to go the suggested web site The URL bar will hid...

Страница 18: ...nnecting to Bluetooth devices 1 Bluetooth is a short range wireless communication technology that you can use to exchange data or connect to other Bluetooth devices for various uses To access this fun...

Страница 19: ...nu key from the Home screen Touch Settings More VPN VPNs you have added are listed touch the VPN you want to connect with In the dialog that opens enter any requested credentials and touch Connect To...

Страница 20: ...e your downloads After you downloaded and installed an application the following further operations are available for your selection View On Google Play Store screen touch and My Apps Uninstall On Goo...

Страница 21: ...ect 8 2 Gallery Gallery acts as a media player for you to view photos and playback videos In addition a set of further operations to pictures and videos are available for your choice To access this fu...

Страница 22: ...ouch to skip to the next track in the album playlist or shuffle Touch to select repeat mode Repeating all songs Repeating current song or Repeat is off Touch to add to favorite songs Touch to hide dis...

Страница 23: ...ture and arrival time when using public transport To get reverse directions for a route you ve already made simply touch the icon No need to enter your start point and end point again 9 4 Share a loca...

Страница 24: ...radio using loudspeaker or headset Delete Delete the channel Enter frequency Enter the frequency manually Station Info Mark the checkbox to show station information Exit Turn off the radio 10 5 Note...

Страница 25: ...cess If you don t need to transmit data on other provider s mobile networks unmark the checkbox to avoid incurring significant roaming charges Preferred network type You can select your preferred netw...

Страница 26: ...reen brightness or screen timeout in Display screen 11 2 9 Apps You use the Apps settings to view details about the applications installed on your phone to manage their data and force them to stop and...

Страница 27: ...h Bluetooth headset if available Text to speech output Preferred engine Touch to choose a preferred text to speech engine touch the settings icon to show more choices for each engine Speech rate Touch...

Страница 28: ...ouch Settings About phone then touch Build number 7 times Now Developer options is available The Developer options screen contains settings that are useful for developing Android applications Take bug...

Страница 29: ...ion 12 Making the most of your phone 12 1 FOTA Upgrade Using the FOTA Upgrade tool you can update your phone s software To access Software Update please touch the Menu key from the Home screen then Se...

Страница 30: ...tteries Recycle or dispose of used batteries according to the local regulations or reference guide supplied with your product NOTE This product should be operated only with the following designated Ba...

Страница 31: ...ery life Electrical safety Accessories Use only approved accessories Do not connect with incompatible products or accessories Take care not to touch or allow metal objects such as coins or key rings t...

Страница 32: ...the FCC Rules These limits are designed to provide reasonable protection against harmful interference in a residential installation This equipment generates uses and can radiate radio frequency energ...

Страница 33: ...ess mobile phone employs a unit of measurement known as the Specific Absorption Rate or SAR The SAR limit set by the FCC is 1 6 W kg The FCC has granted an Equipment Authorization for this model devic...

Страница 34: ...ompliance with Directive 002 95 EC of the European Parliament and of the Council of 7 January 2003 on the restriction of the use of certain hazardous substances in electrical and electronic equipment...

Отзывы: