


HM135/HM435 Programmer software guide
Preliminary version
Page
15
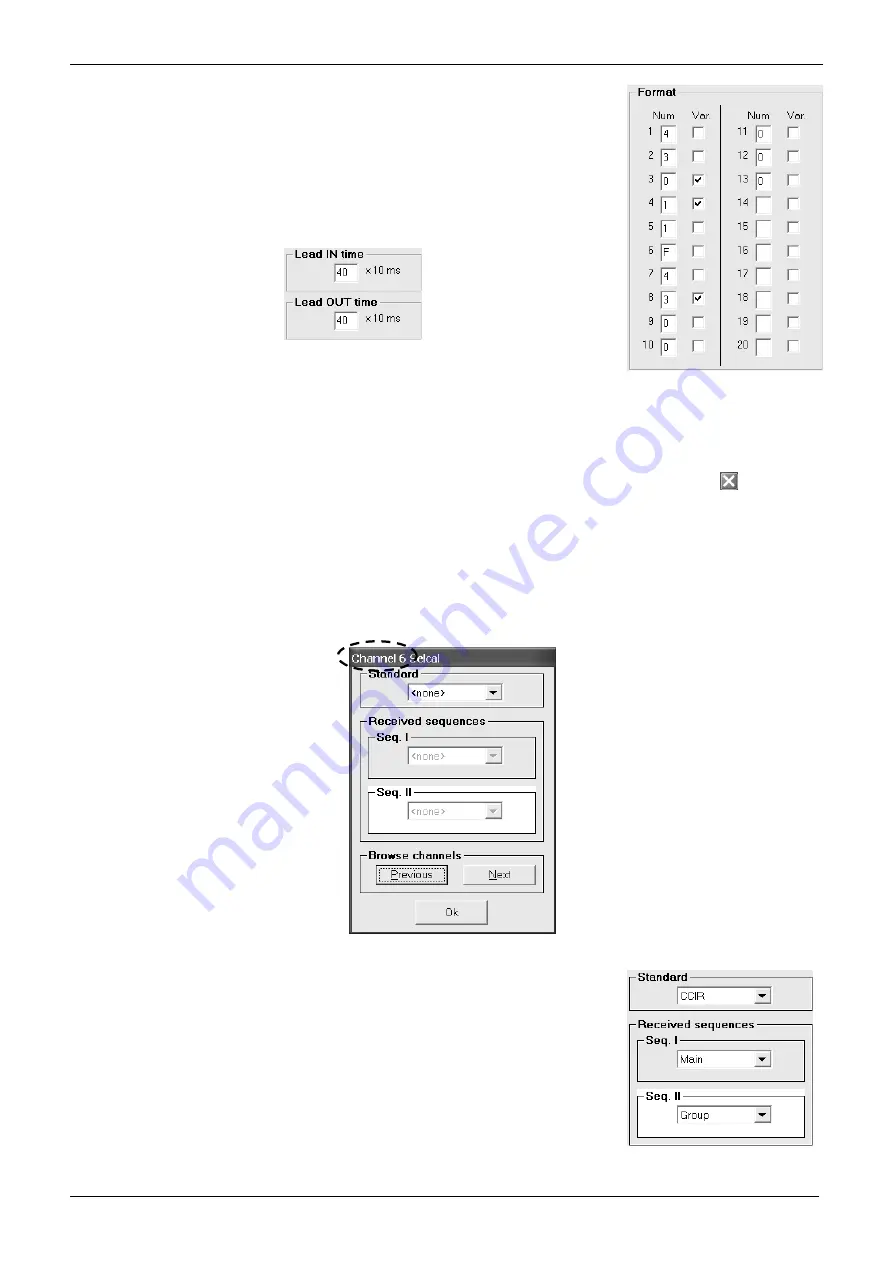
6) Now you have 20 events (from box 1 to box 20) in which you can define the tone sequence you
need. Type the related numbers or letters related to the tones you want to send. In the example
we typed the format
4 3 0 1 1 F
(pause tone)
4 3 0 0 0 0 0
.
7) If you like, you can define some tones as
variable
by ticking the
Var
checkbox , in the example
we enabled events
3
,
4
and
8
as variable tones.
8) If necessary you can adjust the
Lead IN time
. This allows to adjust the delay between the
beginning of carrier and the beginning of the transmitted sequence in order to allow a proper
operation in the other party’s decoders (for example some old decoders need more time to start
decoding after receiving a carrier). In this case go to the
Lead IN time
area and type the time
length you need.
9) Similarly, you might need to set the Lead OUT time. This allows to adjust the delay between the
end of the transmitted sequence and the end of the carrier. In this case go to the
Lead OUT
time
area and type the time length you need.
Lead IN time and Lead OUT time are expressed in x 10 ms, so if you type 40 you will obtain 400 ms.
10) You can now:
Keep on setting up new Tx sequences
in this case go back to step 3).
Enter the settings and close the Tx sequence set up
. In this case click the
OK
button
and go straight to the next paragraph
Close the Tx sequence set up without entering all the settings (in case of big mistakes).
In this case click the
button (located
in the uppermost right corner) and start from the beginning of this paragraph.
If you composed a completely wrong sequence set up, you can also reset the screen by clicking the
Data reset
button: all the settings
of the selected sequence will be canceled.
5.3 Defining RX Standard and sequences
1) Ensure you are in the
Channel Data
window. If not switch it as described in Chapter 4.
2) Make sure to be on the right RF channel and, from the
Selcal setup
area, click on
RX sequences
button: the
Channel x Sequency
window will open.
3)
Be sure you are selecting parameters on the proper channel
(shown in the heading of the window – Channel 6 in the example). If you
want to set up another channel, in the
Browse Channels
area click
Previous
or
Next
buttons to select the appropriate channel.
4) Select the RX selcal standard you need to use
for the selected channel
by clicking on the drag
down
Standard
and clicking again on the standard you need (we choose the CCIR in the
example).
5) Select the received sequence(s) you may want to decode: in the
Received sequences
area click
on either
Seq. I
and/or
Seq. II
drag down button (in the example we have chosen
Main
and
Group
respectively).
6) Now you have two choices:
If you need to program RX standard and sequences for another channel
go back to step
3).
If you don’t need to program RX standard and sequences for other channels
click the
Ok
button to enter the programmed data.
Содержание HM135
Страница 14: ...ALAN HM 135 TEST POINTS AND PCB LAYOUTS...
Страница 16: ...p d f M a c h i n e b y B r o a d G u n S o f t w a r e...
Страница 17: ...p d f M a c h i n e b y B r o a d G u n S o f t w a r e...
Страница 18: ...p d f M a c h i n e b y B r o a d G u n S o f t w a r e...
Страница 19: ...p d f M a c h i n e b y B r o a d G u n S o f t w a r e...
Страница 20: ...p d f M a c h i n e b y B r o a d G u n S o f t w a r e...
Страница 21: ...p d f M a c h i n e b y B r o a d G u n S o f t w a r e...
Страница 22: ...p d f M a c h i n e b y B r o a d G u n S o f t w a r e...
Страница 23: ...p d f M a c h i n e b y B r o a d G u n S o f t w a r e...
Страница 24: ...p d f M a c h i n e b y B r o a d G u n S o f t w a r e...
Страница 25: ...p d f M a c h i n e b y B r o a d G u n S o f t w a r e...
Страница 26: ...ALAN HM 135 ELECTRICAL DIAGRAMS...
Страница 27: ...HM135_HEAD_FEB_14_2004 SCH p d f M a c h i n e b y B r o a d G u n S o f t w a r e...
Страница 28: ...12 13 14 D 5 6 7 B 10 8 9 C p d f M a c h i n e b y B r o a d G u n S o f t w a r e...
Страница 29: ...5 6 7 B 12 13 14 D 1 2 3 A 1 2 3 A 10 8 9 C p d f M a c h i n e b y B r o a d G u n S o f t w a r e...
Страница 31: ...10 8 9 C 5 6 7 B 1 2 3 A 5 6 7 B 12 13 14 D p d f M a c h i n e b y B r o a d G u n S o f t w a r e...
Страница 32: ...p d f M a c h i n e b y B r o a d G u n S o f t w a r e...
Страница 33: ...1 2 3 4 8 A p d f M a c h i n e b y B r o a d G u n S o f t w a r e...
Страница 34: ...5 6 7 B p d f M a c h i n e b y B r o a d G u n S o f t w a r e...
Страница 35: ...5 6 7 B 10 8 9 C 1 2 3 A 12 13 14 D p d f M a c h i n e b y B r o a d G u n S o f t w a r e...
Страница 36: ...p d f M a c h i n e b y B r o a d G u n S o f t w a r e...
Страница 37: ...ALAN HM 135 EXPLODED VIEW AND PART LIST...
Страница 38: ...ALAN HM 135 PROGRAMMING MANUAL...


