background image


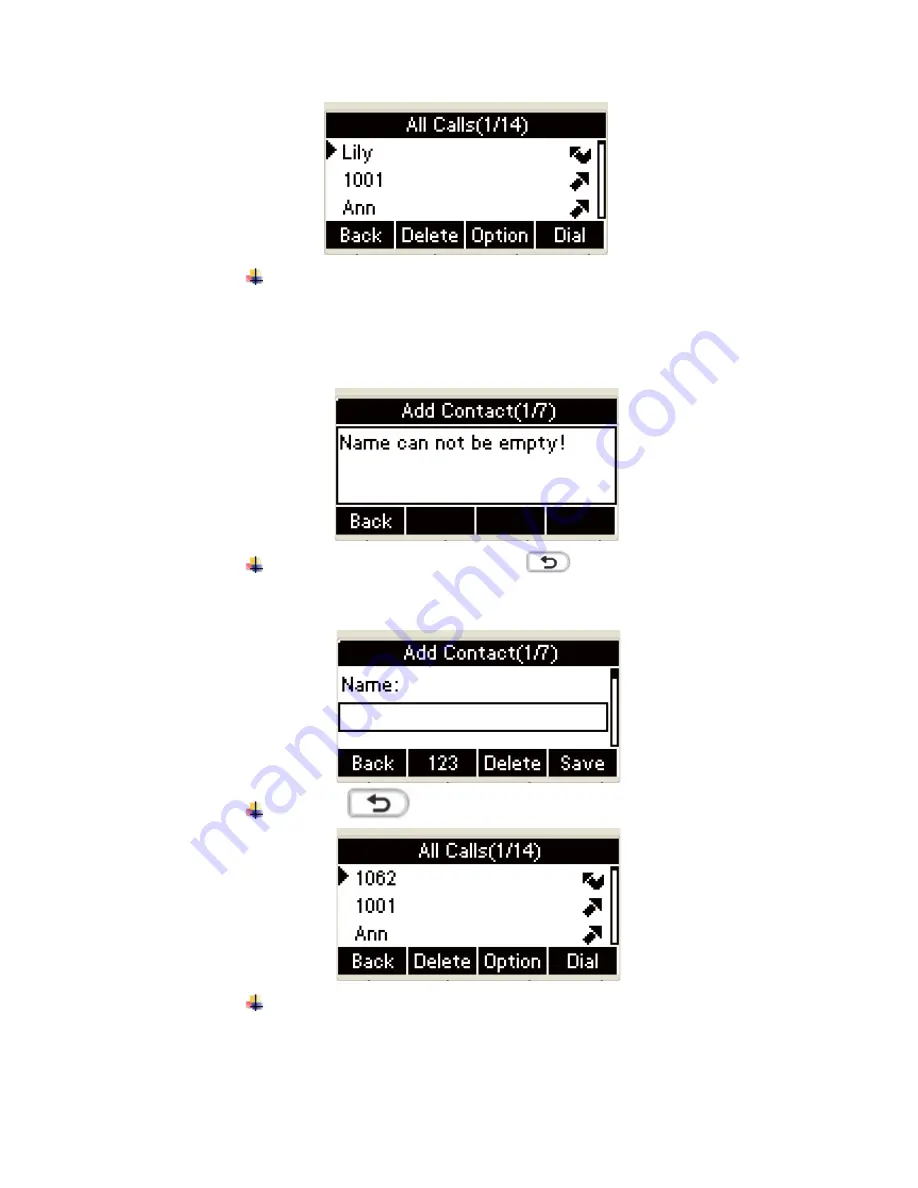
The UI will present the following warning” Name can not be 

empty”  when  pressing  the 

Save 

soft  key  or  the 

OK

key  to 

save if the name area being empty

˖

Press  the 

Back 

soft  key  or  the 

key  to  return to  the 

name area of Add Contact

˖

Press the 

key to return to All Contacts

˖

Input  the  nonredundant  name  in  the  Add  Contact  interface, 

press the save soft or the 

OK

key on the phone keyboard to 

Содержание SP-R53P

Страница 1: ... 36 Blacklists 66 Remote Phone Book 69 3 History Management 71 Check the calls history via phone interface 71 Make a call from the History via phone interface 75 Add contact from the history via phone interface 77 Delete the calls log from the History via phone interface 85 Delete all the call log via phone interface 86 4 System Customizations 90 Programmable keys 90 5 Account management 94 Regist...

Страница 2: ...ted 135 Resume multiple lines talking 136 3 Do Not Disturbed DND 136 4 Call Forward 137 5 Call Transfer 144 Blind Transfer 145 Consultation Transfer 146 6 Conference 147 4 Call Park 151 Set Call Park 152 7 Pickup 154 Specified Pickup 154 Group Pickup 158 Chapter 5 Advanced Features 166 1 Message 166 1 Text Message 166 2 Voice Message 176 Chapter 6 WEB Interface 182 1 Book Local Phone Book 182 2 Ph...

Страница 3: ...13 Status Basic 194 14 Account Basic 195 15 Account Advanced 196 16 Network Basic 197 17 Network Advanced 198 18 Upgrade Basic 199 19 Upgrade Advanced 200 20 AUTOP 201 22 DHCP AUTOP Mode Configuration 205 23 Security Basic 209 24 Security Advanced 210 Chapter 1 Overview ...

Страница 4: ...ction 2 User Interface The IP phone R53 supports two configuring mode phone interface and web interface In most cases both of the two ways can be used for phone setting except some situations Chapter 2 Getting Started ...

Страница 5: ...n the LCD 2 Phone Status Press the OK key on the phone keyboard to enter Status interface directly or press the Menu soft key to enter the main menu and then select Status The contents as below are contained in the main menu Idle Main Menu Press the Left Right to the Switch ...

Страница 6: ...o select an option then Press the OK key on the phone keyboard or the Enter soft key to enter Option 1 Status the following interfaces are contained Main interface Press the Up Down key to the Switch Press the More soft key to access another interface Press the Up Down key to Switch ...

Страница 7: ...face z Select Phone press the OK key on the phone keyboard or the Enter soft key to access phone status interface z Select Accounts Press the OK key on the phone keyboard or the Enter soft key to access accounts status interface Press the key or the Back soft key in the UI to return to the previous interface ...

Страница 8: ...Message the following interfaces are contained Option 5 History the following interfaces are contained Option 6 Phone Book the following interfaces are contained 3 In the main menu interface press the Up or Down key on the phone keyboard to select History then press the OK key on the phone keyboard or the Enter soft key to access the All Calls history interface 4 In the main menu interface press t...

Страница 9: ...tain an IP address via DHCP server you need to set a static IP address manuallyDŽ 1 IP Access Menu Settings Advanced Setting password admin Network LAN Port Static IP 1 In the Idle mode press the Menu soft key to enter the main menu 2 In the main menu press the Up or Down key on the phone keyboard to select Settings then Press the OK key on the phone keyboard or the Enter soft key ...

Страница 10: ...phone keyboard or the Enter soft key 4 A dialog box Enter Password appears enter the password admin case sensitive then Press the OK key on the phone keyboard 5 In Advanced Setting interface press the Up or Down key on the phone keyboard to switch among the following interfaces Press the Up or Down key on the phone keyboard ...

Страница 11: ...he Advanced Settings interface press the Up or Down key on the phone keyboard to select Network then Press the OK key on the phone keyboard or the Enter soft key to enter Network Settings 7 In the Network Settings interface Press the OK key on the phone keyboard or the Enter soft key to enter LAN Port ...

Страница 12: ...n the phone keyboard or the Enter soft key to enter Static IP Setting interface and input IP address 9 Press the Down key on the phone keyboard to enter the Subnet Mask of Static IP Setting and input the subnet mask Press the Down key on the phone keyboard to enter the Gateway of Static IP Setting and input the gateway ...

Страница 13: ...nput the IP address Subnet mask Gateway DNS 1 and DNS 2 in the corresponding area Press the OK key on the phone keyboard or the Save soft key to save 2 In the Advanced Setting interface press the Up or Down key on the phone keyboard to select Reset to factory Press the OK key on the phone keyboard or the Enter soft key to access the reset to factory interface ...

Страница 14: ...ancel soft key in the UI to cancel the operation and then return to the Advanced Setting interface 3 In the Advanced Setting interface press the Up or Down key on the phone keyboard to select Password Setting Press the OK key on the phone keyboard or the Enter soft key to access the Password Setting Press the abc soft key to switch the input methods then input the current password Press the Down k...

Страница 15: ...wn key on the phone keyboard Input the new password again press the Save soft key If the password is wrong the following prompt interface appears Press the key on the phone keyboard or the Back soft key in the UI to return to the Password Setting area ...

Страница 16: ...dvanced Setting interface 1 The Idle 1 After the phone starts normally the Idle displays as follows 2 The following contents appear Time Date the label of current account and four soft keysDŽ 3 In the Idle the date format that appears on the LCD is for date time settings When the network is disconnected Idle displays ...

Страница 17: ...uages are available English and Chinese Access Menu Settings Advanced Setting Language Press the Menu soft key on the phone keyboard to enter the main menu In the main menu interface press the Up or Down key on the phone keyboard to select Settings then press the OK or the Enter soft key to enter the Settings interface ...

Страница 18: ...rd or the Enter soft key The Language in default is English In the Basic Setting interface press the OK key on the phone keyboard or the Enter soft key to enter Language Setting interface In the Language Setting interface press the Up or Down key on the phone keyboard to select the language that you need English and Chinese are available ...

Страница 19: ...y 2 Set SNTP via phone interface Access Menu Settings Basic Setting Date Time SNTP SettingDŽ Press the Menu soft key in the Idle to access the main menu In the main menu press the Up or Down key on the phone keyboard to select Settings then enter the Setting interface In the Settings interface press the Up or Down key on the phone keyboard to select Basic Setting Press the OK key on ...

Страница 20: ...e keyboard or the Enter soft key to enter Date Time setting The following contents are included in the Date Time setting In the Date Time interface press the Up or Down key on the phone keyboard to select the SNTP Setting Press the OK key on the phone keyboard or the Enter soft key to enter the SNTP setting 3 Time Zone setting press the Left or Right key on the phone ...

Страница 21: ...nterface press the Down key on the phone keyboard to access the SNTP Server 1 and input the SNTP Server 1 to process setting In the SNTP Setting interface press the Down key on the phone keyboard to access the SNTP Server 2 then input the SNTP Server 2 to process setting 4 To set the Date Time manually access Menu Settings Basic Setting Date Time Manual SettingDŽ ...

Страница 22: ...g interface In the Settings interface press the Up or Down key on the phone keyboard to select Basic Setting Press the OK key on the phone keyboard or the Enter soft key In the Basic Setting interface press the Up or Down key on the phone keyboard to select Date Time Press the OK key on the phone keyboard or the Enter soft key to enter the Date Time setting ...

Страница 23: ... and process setting In the Manual Setting interface input the corresponding date and time Input the date and time in the corresponding area Press the OK key on the phone keyboard or the Save soft key to save the setting 5 To set the date time format via the phone interface access Menu Settings Basic Setting Date Time Format SettingDŽ Press the Menu soft key in the Idle to access the main menu ...

Страница 24: ...e Up or Down key on the phone keyboard to select Basic Setting press the OK key on the phone keyboard or the Enter soft key to enter Basic Setting interface In the Basic Setting interface press the Up or Down key on the phone keyboard to select Date Time Press the OK key on the phone keyboard or the Enter soft key to enter the Date Time setting ...

Страница 25: ...ft key to enter Date Time format setting UI to process setting Access the Time Format in Format Setting interface then press the Left or Right key on the phone keyboard or the Switch soft key to select the time format 12Hour or 24Hour The Time Format interface includes the following UI Press the Left or Right key on the phone keyboard or the Switch soft key ...

Страница 26: ...he phone support four Date formats The selected date format will appear in the Idle For example if the time was 2011 09 13 the date formats in the menu and the corresponding formats displayed in the Idle as follows Select the Time Format Date Format in the corresponding area and then Press the OK key on the phone keyboard or the Save soft key in the UI to save the setting For example if YYYY MM DD...

Страница 27: ...nu press the Up or Down key on the phone keyboard to select the Features to enter Features interface In the Features interface press the Left or Right key on the phone keyboard to select the Call Waiting Press the OK key on the phone keyboard or the Enter soft key to access the Call Waiting interface ...

Страница 28: ...e phone keyboard Press Left or Right key or the Switch soft key to switch between the Enable and DisableDŽ 2 DND In the Features interface press Down or Up key to select DND password Press the OK key on the phone keyboard or the Enter soft key to access the DND password interface Press the Down key on the phone keyboard to access the On ...

Страница 29: ...ey can be used to adjust the ring tones volume in the Idle modeDŽ 2 Adjust the volume via the phone interface access Menu Settings Basic Setting Phone Volume In the Volume Setting interface access the Handset Volume Hand free Volume or Headset Volume interface then press the or soft key or Left or Right key to adjust the volume Press the Save soft key to save the operation or press the Back soft ke...

Страница 30: ...the Settings interface press the Up or Down key on the phone keyboard to select the Basic Setting Press the OK key on the phone keyboard or the Enter soft key to enter In the Basic Setting interface press the Up or Down key on the phone keyboard to select the Phone Volume press the OK key on the phone keyboard or the Enter soft key to enter Phone Volume Setting UI to process setting ...

Страница 31: ...ume Setting interface In the Talk Volume interface press the Up or Down key on the phone keyboard to select the Handset Volume Hand free Volume or Headset Volume Press the OK key on the phone keyboard or the Enter soft key to enter Volume Setting interface The following contents are included in the Talk Volume interface In the Talk Volume interface press the Up or Down key on ...

Страница 32: ...ess or soft key or the Left or Right key on the phone keyboard to adjust it ǃ The Talk Handset Volume Adjusting interface ǃ The Talk Headset Volume Adjusting interface ǃ The Talk Hand free Volume Adjusting interface In the Handset Volume Hand free Volume or Headset Volume interface press or soft key or the Left or Right key on the phone keyboard to adjust the volume respectively ...

Страница 33: ...ing with the phone The IP phone R53 supports phone ring tone to distinguish the incomings from other near phones ring tone Besides The IP phone R53 support specifying different incoming ring tones for muti accounts in one phone equipment At the same time the IP phone R53 also support setting specific incoming ring tone for contactsDŽ 2 To set the ring tone via the phone interface access Menu Settin...

Страница 34: ...the Up or Down key on the phone keyboard to select Basic Setting Press the OK key on the phone keyboard or the Enter soft key to enter In the Basic Setting interface press the Up or Down key on the phone keyboard to select Ring Volume press the OK key on the phone keyboard or the Enter soft key to enter Ring Tone setting UI to process setting ...

Страница 35: ...ct the desired ring tone Press the OK key on the phone keyboard or the Save soft key to save After the ring tone is saved press the Cancel key or the Back soft key to return to the Basic Setting interface 2 Phone Book The following three types are included Local Phone Book Blacklists ...

Страница 36: ...ct from the Local Phone BookDŽ Add Contacts You can add the contacts via the following ways Add contacts manually Add contacts from the All calls History Log Add contacts from Remote phone book Add contacts manually 1 Add contacts manually from the Local phone book via Phone interface access Phone book Local phone book Add to ContactsDŽ In the Idle press the Book soft key to enter the Phone book men...

Страница 37: ...t Phone book type in the phone book menu interface Select the relevant group For example contacts and Press the OK key on the phone keyboard or the Enter soft key in the UI to enter All Contacts Press the Add soft key to enter the Add Contact interface Input name in the relevant area ...

Страница 38: ... the Down key on the phone keyboard to input other number in the relevant area Press the Down key on the phone keyboard to enter Account selection Press the Left or Right key on the phone keyboard or the Switch soft key to select the relevant account if Auto selected the phone will select the current available account automatically when the contact called from Local phone bookDŽ ...

Страница 39: ...the phone keyboard or the Switch key on the UI to select relevant account Press the Left or Right key on the phone keyboard or the Switch key on the UI to select relevant account Press the Left or Right key on the phone keyboard or the Switch key on the UI to select relevant account ...

Страница 40: ...s the Left or Right key on the phone keyboard or the Switch key in the Add Contact UI to select the relevant ring tone in the Ring Tone area Press the Save soft key in the Add Contact UI or the OK key on the phone keyboard to save The UI will present warming message below Name can not be empty when pressing the Save soft key in the Add Contact UI or the OK key on the phone keyboard to save if the ...

Страница 41: ...ntact area Press the Back soft key to cancel contact adding and return the Add contact interface The LCD will present the message below Save fail Name already exist when pressing the Save soft key or the OK key on the phone keyboard to save if adding the same contact ...

Страница 42: ...s interface ADD contact from All Calls History 1 Add contact from All Calls History in the phone interface 1 Press the History soft key 2 Press the Up or Down key on the phone keyboard to select the contact you want to add 3 Press the Option soft key to add to contactsDŽ 2 The steps as follows Press the History soft key in the Idle to enter All Calls History In the All Calls History interface press...

Страница 43: ...nterface Press the Option soft key in the All Calls interface to enter Press the Down key on the phone keyboard on the keyboard Press the Up or Down key on the phone keyboard to select Add to Contacts press the OK key on the phone keyboard or the OK soft key in the Option interface to enter the Add Contacts interface Input name in the relevant area ...

Страница 44: ...ntents and UI aǃ Press the number key in the keyboard or the Delete soft key to edit the office number bǃPress the Down key on the phone keyboard press the number key or the Delete soft key to the edit mobile number in the Mobile Number Press the Down key on the phone keyboard press the Left or Right key on the phone keyboard in the Other Number area or the Switch soft key in the Add Contact inter...

Страница 45: ...key to select account The Account of Add Contact area contains the following contents and UI aǃ In the Account of Add Contact area press the Left or Right key on the phone keyboard or the Switch soft key to select account bǃ In the Account of Add Contact area press the Left or Right key on the phone keyboard or the Switch soft key to select account ...

Страница 46: ...ents and UI aǃ In the Ring Tone area press the Left or Right key on the phone keyboard or the Switch soft key to select ring tone bǃIn the Ring Tone area press the Left or Right key on the phone keyboard or the Switch soft key to select ring tone Press the OK key on the phone keyboard or the Save soft key in Call Log to Contacts interface to save The UI will display below Save fail Name already ex...

Страница 47: ...f Add to Contact Press the Cancel soft key in the Add to contacts interface to cancel and return to the All Calls History The UI will display the following warning interface Name can not be empty when you press the Save soft key or the OK key on the phone keyboard to save if no name inputted ...

Страница 48: ...ey to cancel and return to All Calls History interface Input the nonredundant name in the Add contact interface Press the Save soft key in the Add to Contact UI or the OK key on the phone keyboard to save The interface will return to the All Calls History interface automatically after saving ...

Страница 49: ...the Up or Down key on the phone keyboard to select the contact you will edit 3 Press the Option soft key and select the Detail soft key 4 Press the Up or Down key on the phone keyboard to select contact information and edit 5 Press the Save soft key to save or press the Back soft key to cancelDŽ Press the Book soft key in the Idle to enter the Phone Book menu ...

Страница 50: ...d or the Enter soft key to enter the Local Phone Book interface Select All Contacts press the OK key on the phone keyboard or the Enter soft key to enter All Contacts interface Press the Option soft key in the All Calls interface to enter the contact option interface ...

Страница 51: ...ct editing interface the steps of editing contact as follows Aˊ Press the Up or Down key on the phone keyboard to select Detail press the OK key on the phone keyboard or the OK soft key in the Option interface to edit the contact name Bˊ Press the Down key on the phone keyboard to edit the Office Number C Press the Down key on the phone keyboard to edit the Mobile number ...

Страница 52: ...d to enter the contact account editing The contact account contains the following contents and UI a Press the Down key on the phone keyboard to edit the account b Press the Left or Right key on the phone keyboard or the Switch soft key in the account editing interface to select the contact account editing ...

Страница 53: ...ss the Left or Right key on the phone keyboard or the Switch soft key in the account editing interface to select the contact account editing F Press the Down key on the phone keyboard to enter the incoming ring tone of contact editing the contact ring tone contains the following ring tones and UI a Press the Down key on the phone keyboard to edit ...

Страница 54: ...phone keyboard or the Switch soft key to edit ring tone c Press the Left or Right key on the phone keyboard or the Switch soft key to select ring tone G Press the Down key on the phone keyboard to edit Contact Group Press the Save soft key or the OK key on the phone ...

Страница 55: ... Back soft key to return to name area of the editing interface Press the Back soft key to cancel and return to the All Contacts interface B The UI will present the warning message as follows Name can not be empty when you press the Save soft key in the editing UI or the OK key on the phone keyboard to save if no name inputted ...

Страница 56: ...ame area of editing interface Press the Back soft key to cancel and return to the All contacts interface C Input name without repeat in the name area of editing interface The UI will return to All Calls interface automatically after saving ...

Страница 57: ...elete and the warning message says as follows Delete this Contact Press the Cancel soft key to return to All Contacts interface press the OK key on the phone keyboard to delete contact and return to the All Contacts interface Move to Blacklists Press the Up or Down key on the phone keyboard to select ...

Страница 58: ... the contact to blacklists and return to the All Contacts interface Add contact from the Remote Phone Book Add contact from the Remote Phone Book via phone interface Press the Book key and select the Remote Phone Book Press the OK key on the phone keyboard or the Enter soft key to enter Remote Phone Book interface press the Up or Down key on the phone keyboard to select the Remote phone book you w...

Страница 59: ...terface The UI will display the Remote Contacts you have downloaded after the download finished press the Down or Up key to select the contact that you want to add Press the Option soft key to select remove to Local phone book DŽ Press the OK key on the phone keyboard or the OK soft key ...

Страница 60: ...soft key again the contact will be moved to local contact Press the Cancel soft key to cancel and return to Remote Contacts interfaceDŽ If the contact has existed the LCD will present Save fail Name already exist Press the Back soft key or the key to return to Remote Contacts and select contact againDŽ ...

Страница 61: ...ontacts 2 Press the Up or Down key on the phone keyboard to select the contact you want to call 3 Press the Dial soft key to make a callDŽ Press the Book soft key to enter the Phone Book menu Select the Local Phone Book Press the OK key on the phone keyboard or the Enter soft key to enter the Local Group interface ...

Страница 62: ... contacts Press the Dial soft key or the OK key on the phone keyboard to make a call Press the key or the Cancel soft key to end the dialing and return to All contacts Press the Dial soft key in the All Contacts interface to enter the contact details interface the UI will present the following ...

Страница 63: ...e Local Group via Phone interface 1 Press the Book soft key in the Idle interface Local Phone Book All Contacts 2 Press the Search soft key 3 Input keywords such as name any character of number or whole phone number 4 Press the OK key on the phone keyboard or the Search soft key The LCD will display all the contact names and number which meet the keyword select the contact you want to call and pre...

Страница 64: ...Phone Book Press the OK key on the phone keyboard or the Enter soft key to enter the Local Phone Book Press the Search soft key to search contacts Input keywords such as name any character of number or whole phone number press the Search soft key or the OK key to enter the Search Contacts interface ...

Страница 65: ...acts interface press the Option soft key in the Search contact UI to enter the Option interface Press the Dial soft key in the Contacts Detail interface to dial contact number when the number is not registered the warning interface will appears as follows Not Available The phone will flash within some seconds and display ...

Страница 66: ...one book 2 Scan and select the file you want to pose from the local computer the file format should be XML 3 Click to import the XML file the interface will present This will cover the original contacts proceed or not 4 Click the OK key to finish the import progressDŽ Blacklists 100 blacklists contacts is available with R53 IP phone You can add edit delete search or call contact The phone will reje...

Страница 67: ...cklists press the Enter soft key or the OK key to access the Blacklists interface Press the OK key on the phone keyboard or the Add soft key in the UI to add blacklists Press the 123 soft key to switch input methods then input name Press the Down key on the phone keyboard then enter the Office Number ...

Страница 68: ...d then enter the Phone number Press the 123 soft key to switch input methods input mobile number press the Down key on the phone keyboard then enter Other Number Press the 123 soft key to switch input methods then input other number press the Down key on the phone keyboard to enter the Account selection area ...

Страница 69: ...soft key to save Press the key or the Back soft key to cancel and return to Blacklists interface Remote Phone Book 1 Access the remote phone book add the contacts to the local phone book from the remote phone book or make calls from the remote phone book 5 URLs of remote phone book is available to setDŽ 2 Set the remote phone book via web interface ...

Страница 70: ...nd press the Enter soft key The phone will load the remote group information and the LCD will display the contacts of this remote groupDŽ 3 Press the key or the Back soft key to unlinkDŽ Press the Book soft key to enter the Phone Book Menu Select Remote Phone Book Press the OK key on the phone keyboard or the Enter soft key in the phone book menu interface to enter the Remote Phone Book Press the OK...

Страница 71: ...ns dialed calls received calls missed calls and forwarded calls and support 100 logs storage at most You can check the history make calls from the calls history and delete the calls history DŽ Check the calls history via phone interface 1 Press the History key the LCD will display all the recent calls 2 Press the Left or Right key on the phone keyboard to switch the lists of All Calls Dialed Calls ...

Страница 72: ...ailed information of this logDŽ Press the History soft key to enter All Calls Log menu In All Calls press the Left or Right key on the phone keyboard to switch the lists of all calls dialed calls received calls missed calls and forwarded calls All Calls Dialed calls received calls ...

Страница 73: ...on the phone keyboard to switch the lists of all calls dialed calls received calls missed calls and forwarded calls and select the log that you will check Press the Switch soft key of the all calls dialed calls received calls missed calls and forwarded calls interface to ...

Страница 74: ...elect the Detail press the OK soft key or the OK key on the phone keyboard to check the details or Press the OK key on the phone keyboard directly to check the details in the all calls dialed calls received calls missed calls and forwarded calls interface Press the Down key on the phone keyboard ...

Страница 75: ...alls received calls missed calls and forwarded calls 3 Press the Down or Up key on the phone keyboard to select the log you want to call 4 Press the Dial soft keyDŽ Press the History soft key to enter the all calls menu In All Calls press the Left or Right key on the phone keyboard to switch the lists of all calls dialed calls received calls missed calls and forwarded calls All calls Dialed calls ...

Страница 76: ...rwarded calls In the lists of all calls dialed calls received calls missed calls and forwarded calls interface press the Up or Down key on the phone keyboard to select the log you want to call press the Dial soft key to make a call ...

Страница 77: ...ress the OK key on the phone keyboard to enter name details press the Dial soft key to call the number selected Make a call from Contacts it will display as follows Add contact from the history via phone interface 1 Press the History soft key the LCD will display all the recent calls 2 Press the Left or Right key on the phone keyboard to switch the lists of all calls dialed calls received calls mi...

Страница 78: ...name and select ring tone relevant account and group 6 Press the Save soft key to save or press the Back soft key to cancelDŽ Press the History soft key to enter all calls menu In All Calls press the Left or Right key on the phone keyboard to switch the lists of all calls dialed calls received calls missed calls and forwarded calls All calls Dialed calls ...

Страница 79: ...ded calls Press the Up or Down key on the phone keyboard to select the number you want to add in the lists of all calls dialed calls received calls missed calls and forwarded calls press the Option soft key to enter the Option interface ...

Страница 80: ...ne keyboard to contacts adding and input name in relevant area Press the Down key on the phone keyboard reedit the office number in the Office Number area Press the Down key on the phone keyboard reedit mobile number in the Mobile Number area Press the Down key on the phone keyboard reedit other ...

Страница 81: ...to select account There are some contents and UI in the account area a Press the Left or Right key on the phone keyboard or the Switch soft key to select account b Press the Left or Right key on the phone keyboard or the Switch soft key to select account c Press the Left or Right key on the phone keyboard or the Switch soft key to select account ...

Страница 82: ...keyboard press the Left or Right key on the phone keyboard or the Switch key to select ring tone The ring tones have the following contents and UI a Press the Left or Right key on the phone keyboard or the Switch key to select ring tone b Press the Left or Right key on the phone keyboard or the Switch key to select ring tone ...

Страница 83: ... to save The UI will present the following warning Save fail Name already exist when inputting the same name to save Press the Back soft key and it display as follows Amend name and save the UI will skip to All calls interface automatically after file saved ...

Страница 84: ...ft key or the OK key to save if the name area being empty Press the Back soft key or the key to return to the name area of Add Contact Press the key to return to All Contacts Input the nonredundant name in the Add Contact interface press the save soft or the OK key on the phone keyboard to ...

Страница 85: ...oard to delete log 4 Press the Delete soft key to delete calls logDŽ Press the History soft key to enter the All Calls menu In All Calls press the Left or Right key on the phone keyboard to switch the lists of all calls dialed calls received calls missed calls and forwarded calls n the lists of all calls dialed calls received calls missed calls and forwarded calls press the Up or Down key on the ph...

Страница 86: ... call log via phone interface 1 Press the History soft key the LCD will display all the recent calls log 2 Press the Left or Right key on the phone keyboard to switch the lists of all calls dialed calls received calls missed calls and forwarded calls 3 Press the Option soft key to select Delete all 4 Press the OK soft key to delete all the calls logDŽ Press the History soft key in the idle interfac...

Страница 87: ...ess the Option soft key in the lists of all calls dialed calls received calls missed calls or forwarded calls Press the Down key on the phone keyboard Press the Up or Down key on the phone keyboard to delete all Press the OK key on the phone keyboard or the OK soft key to delete all the calls log the UI will display the warning interface Delete All as follows ...

Страница 88: ...ard to delete all the calls and return to the interface you selected Or press the Cancel soft key or the key to cancel operation and return to the interface you selected All Calls All calls instead of all logs 0 0 Dialed number Dialed calls instead of dialed number received calls ...

Страница 89: ...rded calls Forwarded call instead of transferred incoming call Press the Back soft key to return to the Idle after delete all the logs in the lists of all calls dialed calls received calls missed calls or forwarded calls ...

Страница 90: ...ey style in the type area 4 Input suitable value in the label area 5 Optional Select the relevant account in the account ID area 6 Optional Input suitable value in Value blank 7 Press the Save soft key to save or the Cancel soft key to cancelDŽ Press the Menu soft key to enter the mail menu In the mail menu Press the Down key on the phone keyboard to select features Press the OK key on the phone ke...

Страница 91: ... on the phone keyboard in the programmable key Press the OK key on the phone keyboard or the Enter soft key to enter the account setting Press the Up or Down key on the phone keyboard in the UI with programmable keys setting to select Soft key1 2 3 4 forward or Book Press the OK key on the phone keyboard or the Enter soft key to enter the programmable key setting ...

Страница 92: ...he Switch key to select the style the style could be History DND Menu MSG Status Book Fwd Pickup Group Pickup Intercom Speed Dial Press the Down key on the phone keyboard to set the label of soft key1 When the style set to be Pickup Group Pickup Intercom Speed Dial two more UI appear as follows a Press the Down key on the phone keyboard to the soft key1 number ...

Страница 93: ...hen pressing the OK key on the phone keyboard or the Save soft key to save if the number is empty Press the Back soft key to skip to Number input interface b Press the Down key on the phone keyboard to the soft key1 number Press the Left or Right key on the phone keyboard to set ...

Страница 94: ... for one accountDŽ Register an Account Register an account via phone interface 1 Press the Menu soft key to enter setting interface to select advanced setting input password password admin to select account 2 Select the account you want to set and press the Enter soft key 3 Select Enable in the account activation status area 4 Input the label display name register name account password and SIP sepa...

Страница 95: ...OK key on the phone keyboard or the Enter soft key to enter the setting interface In the setting style press the Up or Down key on the phone keyboard to select the Advanced setting press the OK key on the phone keyboard or the Enter soft key to enter A dialog box appears and says Enter password input password admin Press the OK soft key or the Save soft key to save the password ...

Страница 96: ...ard or the Enter soft key to enter the account setting The account interface displays the account register status Press the Up or Down key on the phone keyboard to select the account you want to set Press the OK key on the phone keyboard or the Enter soft key to enter setting a Select Enable in the account activation status area ...

Страница 97: ...c Press the Down key on the phone keyboard to enter the Display name and input display name d Press the Down key on the phone keyboard to enter register name area and input the register name e Press the Down key on the phone keyboard to enter the User name area and input user name ...

Страница 98: ... area and input the password g Press the Down key on the phone keyboard to enter the SIP server area and input the SIP server address h Press the Down key on the phone keyboard enter the SIP port and input the SIP Port i Press the Down key on the phone keyboard and ...

Страница 99: ...o select Enable j Press the Left or Right or the Switch soft key to select Disable k Press the Down key on the phone keyboard to enter the Outbound server space and input the outbound server address l Press the Down key on the phone keyboard to enter Outbound Port1 and input the outbound port1 address ...

Страница 100: ...d port2 address n Press the Down key on the phone keyboard to enter Outbound Port2 and input the outbound port2 address o Press the Down key on the phone keyboard to enter the Auto Answer Active area press the Left or Right key on the phone keyboard or the Switch soft key to select Enable ...

Страница 101: ...ive status area to select Enable Input the label display name register name user name password SIP server address separately press the Save soft key or the OK key on the phone keyboard to save and the interface return to Display name area Check the account status a Press the Menu soft key to enter the main menu ...

Страница 102: ... key to enter the Status interface c Press the OK key on the phone keyboard in the Idle to enter the Status interface d Press the More soft key to enter e Press the Down key on the phone keyboard to select Accounts Press the OK key on the phone keyboard or the Enter soft key to enter the Status interface and check the account status ...

Страница 103: ... the same as account 1 Disable account 1 Access Menu Settings Advanced setting Account password admin DŽ 2 Select the account you want to disable and press the Enter soft keyDŽ 3 Select Disable in the account active status areaDŽ 4 Press the Save soft key to save or the Back soft key to cancelDŽ Press the Menu soft key to enter the main menu ...

Страница 104: ...nter the Settings interface In the Settings interface press the Up or Down key on the phone keyboard to select advanced setting Press the OK key on the phone keyboard or the Enter soft key to access A dialog box appears and says Enter password input password admin case sensitive Press the OK soft key or the Save soft key to save the password ...

Страница 105: ...he account setting The account interface displays the account register status Press the Up or Down key on the phone keyboard to select the account you want to set Press the OK key on the phone keyboard or the Enter soft key to enter setting Press the Left or Right key on the phone keyboard or the Switch soft key to select Disable in the account active status area ...

Страница 106: ... a Press the Menu soft key to enter the main menu b In the mail menu press the Down key on the phone keyboard to select Status Press the OK key on the phone keyboard or the Enter soft key to enter the Status interface c Or Press the OK key on the phone keyboard to enter ...

Страница 107: ...rd or the Enter soft key to enter the status interface and check the account status Or press the key or the Back soft key to cancel and return to the account interface Remarks The operation and interface of account 2 and 3 is the same as account 1 2 One account can configurate multi account keys you can configurate multi account keys for one account The ...

Страница 108: ...or the account key Also you can set the timeout of dialing the hot line number then the phone will dial the hot line number automatically after the timeoutDŽ Access Menu Features Hot line Input the hot line number Input the Timeout unit second Press the Save soft key to save or the Back soft key to cancelDŽ Press the Menu soft key to enter the main menu in the Idle In the mail menu Press the Down ke...

Страница 109: ...key on the phone keyboard or the Enter soft key to enter Press the Left or Right key on the phone keyboard or the Switch soft key to enable the hot line Press the Left or Right key on the phone keyboard or the Switch soft key to disable the hot line Press the Down key on the phone keyboard to set the hot line ...

Страница 110: ...y on the phone keyboard or the Save soft key to save if the hot line number is empty Press the Down key on the phone keyboard to set the hot line timeout Press the OK key on the phone keyboard or the Save soft key to save or press the key or the Back soft key to cancel and return to the Features interface ...

Страница 111: ...wer the intercom incoming calling automatically and make a noise You can set the phone to enable silent mode when picking up the intercom call so that the other will not hear you DŽ 4 The features of intercom Allow the intercom You can enable or disable the intercom If you enable the intercom the phone will pick up the intercom call automatically if you disable the intercom the phone will refuse to...

Страница 112: ...e intercom mute with defaultDŽ 5 Set the intercom features via phone interface 1 Access Menu Features IntercomDŽ 2 Enable or disable the relevant featureDŽ 3 Press the Save soft key to save or the Back soft key to cancelDŽ Press the Menu soft key to enter the main menu in Idle In the mail menu press the Down key on the phone keyboard to select features Press the OK key on the phone keyboard or the Ent...

Страница 113: ...s the Left or Right key on the phone keyboard or the Switch soft key to enable the intercom Press the Left or Right or the Switch soft key to disable the intercom Press the Down key on the phone keyboard and then press the Left or Right key on the phone keyboard or the Switch soft key to enable intercom mute ...

Страница 114: ...h soft key to disable intercom mute Press the OK key on the phone keyboard or the Save soft key to save or press the key or the Back soft key to cancel and return to the Features interface Chapter 4 Basic Features The basic features of IP phone R53 contain the following contents Make calls Answer calls End calls ...

Страница 115: ...ways to make calls handset Hand free Headset Dial number first and then select the way of connection DŽ Search and make a call from All Calls Local phone book and remote phone bookDŽ Press the Hand free key headset key or pick up the handset to switch the connection mode during talkingDŽ The LCD can display the talking timeDŽ ...

Страница 116: ...p the handset 2 Input the number 3 Press the OK key on the phone keyboard or the Dial soft key to make a call Idle Pick up the handset and enter the dialing interface Input number Or press the Select soft key to enter the Dial Menu interface ...

Страница 117: ... calls interface Press the Up or Down key on the phone keyboard and press the Dial soft key to make the number Or press the Detail soft key or the OK key on the phone keyboard to enter Press the Dial soft key or the OK key on the phone keyboard to dial number ...

Страница 118: ...on hook status press the hand free key or the account key to enter dialing interface and input number Press the OK key on the phone keyboard or the Dial key or the Send soft keyDŽ When the handset is on hook status input number and press the hand free key the OK key the key or the Send soft key to make a call via hand freeDŽ Idle ...

Страница 119: ...e under the Hand free mode or input number when the handset under on hook status Or press the Select soft key to enter the Dial Menu interface Select the History soft key in the Dial Menu interface to enter All Calls interface Select the History soft key in the Dial Menu interface to ...

Страница 120: ...ls interface Or press the Detail soft key or the OK key on the phone keyboard to enter Press the Dial soft key or the OK key on the phone keyboard to dial number The LCD will display the talking time during talking ...

Страница 121: ...r Press the OK key on the phone keyboard or the Dial key or the Send soft key to make a callDŽ Connect the headset press the Headset key to enable the headset mode Press the Headset key again to disable the headset mode Press the Account key to enter the dialing interface Or input number or input number directly when the handset under on hook status and the headset under activated mode ...

Страница 122: ...Dial Menu interface Select the History soft key in the Dial Menu interface to enter the All Calls Press the Up or Down key on the phone keyboard and press the Dial soft key to make the number Or press the Detail soft key or the OK key to enter ...

Страница 123: ...ws Press the account key input number when the call is on hold mode Press the OK key on the phone keyboard or the Dial soft key or the Send soft key to make a callDŽ Press the Hold soft key press New soft key or the Account key input number Press the OK key on the phone keyboard or the Dial soft key or the Send soft key to make a callDŽ ...

Страница 124: ...t key to select different lines call Press the resume soft key to resume the callDŽ During the Talking interface Press the Account key again or the Hold soft key to hold the talking Press the Account key or the New soft key to enter the dialing interface Input number ...

Страница 125: ...or the Dial soft key or the Send soft key to make a call The key will flash when connecting During the talking Press the Cancel soft key directly or the key the LCD displays as follows Press the Up or Down key on the phone keyboard to select ...

Страница 126: ...the phone is available you can three ways as follows to answer the call Handset Hand free Headset Answer the call during the phone is available Under normal situation the LCD will display the current talking time and the name or numberDŽ Use the handset to answer a call Incoming interface ...

Страница 127: ...r a call Use any way as follows Press the Hand free key Press the Answer soft key in incoming interface when the handset under on hook status and the headset mode is not activated DŽ Press the Account key Flash in green LED light in incoming interface when the handset under on hook status and the headset mode is not activatedDŽ Incoming call interface ...

Страница 128: ... way as follows Press the Headset key Press the Answer soft key when the headset mode is activated Press the Account key Flash in green LED light when the headset mode is activated Answer a call during talking Use any way as follows to answer a new incoming during talking Press the Answer soft key to answer new incoming and hold the current talking Press the Down key on the phone keyboard to check...

Страница 129: ...g handset to answer calls Press the Cancel soft key if you are using the headset to answer calls Press the Hand free key or the Cancel soft key if you are using the hand free to answer calls To end the call held press the Cancel soft key to end the call directly or press the Resume soft key to resume the talking held and then end the talking Use the handset The UI will display incoming name and ta...

Страница 130: ...lking and return to Idle Use headset The UI will display incoming name and talking time during talking interface Press the Cancel soft key or put down the handset to end talking and return to Idle Use hand free The UI will display incoming name and talking time ...

Страница 131: ... interface Press the Cancel soft key or put down the handset to end talking and return to Idle Hold talking Press the Cancel soft key during the hold talking to end talking directly End the talking and return to Idle ...

Страница 132: ...n to talking interface End talking and return to Idle interface 2 Redial Redial the last dialed number Press the Redial key twice when the phone is available the phone will dial the last number automatically Press the Redial key to enter All Calls during Idle ...

Страница 133: ...o enter All Calls interface during the phone is available 2 Press the Up or Down key on the phone keyboard to select the number you will dial and then press the Redial soft key or Dial soft key to make a call Press the Redial key to enter All Calls interface during the Idle Press the Left or Right key on the phone keyboard to ...

Страница 134: ...e Redial key or the Dial soft key to make the call 3 Mute You can enable the Mute mode via close the microphone during talking while the opposite will not hear you Talking Mute Press the Mute key to make the talking silent during talking the LCD will display as follows Press the Mute key again to cancel the Mute mode during ...

Страница 135: ...alking The current talking will be held when answering new incoming The party being held may hear call hold music sent from server Connected Press the Hold soft key during talking The LED light of the Account key is flashing green under call hold status Press the Resume soft key in the call hold interface to resume talking ...

Страница 136: ...ere are four lines talking and the current talking is line 2 Moreover 1 1 means there is only one talking and the current talking is sole If multiple lines talking belong to different account press the Account key to check talkings of the account and press the Resume soft key to resume the talkings held 3 Do Not Disturbed DND If you enable DND mode the phone will reject to answer all calls automat...

Страница 137: ...resent as follows Press the View soft key to enter Missed calls interface Press the Back soft key to return to Idle 4 Call Forward You can set the static forward to switch all the incoming calls to specified number Also you can use dynamic forward to switch all the incoming ...

Страница 138: ...Switched to specified number when the phone is busy 3 No answer Forward The incoming calls will be the Switched to the specified number when the ring tones is time out without answer Press the Menu soft key to enter the main menu under Idle In the mail menu press the Down key on the phone keyboard to select features Press the OK key on the phone keyboard or the Enter soft key to enter features set...

Страница 139: ...all forward type and Press the OK key on the phone keyboard or the Enter soft key to enter Always Forward setting interface Press the Up or Down key on the phone keyboard to select Always Forward and Press the OK key on the phone keyboard or the Enter soft key to enter a Press the Left or Right key on the phone keyboard or the Switch soft key to select Enable Press the Left or Right key on the pho...

Страница 140: ...rd when the phone is available b Press the Down key on the phone keyboard to enter the Forward To of Always Forward to input number c Press the Down key on the phone keyboard to enter the On Code of Always Forward to input on code d Press the Down key on the phone keyboard to enter the Off Code of Always Forward to input ...

Страница 141: ...ve The UI will display Forward to number can not be empty when pressing the Save soft key if the Forward To area is empty Press the Back soft key to return to the Forward To of Always Forward interface e Or press the key or the Cancel soft key to return to Call Forward interface ...

Страница 142: ... the phone keyboard or the Enter soft key to enter a Press the Left or Right key on the phone keyboard or the Switch key in the UI of No Answer Forward to select Enable Press the Left or Right key on the phone keyboard or the Switch soft key to select Disable or press the FWD key on the phone keyboard to disable the No Answer Forward when the phone is available ...

Страница 143: ...e Forward To of No Answer Forward to input number c Press the Down key on the phone keyboard to enter the On Code of No Answer Forward to input on code d Press the Down key on the phone keyboard to enter the Off Code of No Answer Forward to input Off Code ...

Страница 144: ...ect the timeout and the timeout range is 0 45 seconds 5 Call Transfer You can use the following two ways to transfer talking to the other party ġŃŭŪůťġŕųŢůŴŧŦųĻġŕųŢůŴŧŦųġŵŢŭŬŪůŨġťŪųŦŤŵŭźġŵŰġŵũŦġŰŵũŦųġűŢųŵźġ without any negotiation ġńŰůŴŶŭŵŢŵŪŰůġŕųŢůŴŧŦųĻġŕųŢůŴŧŦųġŵŢŭŬŪůŨġŵŰġŵũŦġŰŵũŦųġűŦųŴŰůġ involved after the other person involved answer the incoming and with consultation ...

Страница 145: ... during the talking Enter the Trans number interface Input the number you will transfer to Press the FWD key or the Trans soft key to transfer the hold talking to the number you want to transfer to Return to the Idle automatically as follows ...

Страница 146: ...you want to transfer to is not existed Consultation Transfer Press the Trans soft key to enter the number you want to transfer to during the talking Input the number you want to transfer to Press the OK key on the phone keyboard or the Dial key to make a call ...

Страница 147: ...an use the local conference feature to hold a 3 way conference by pressing the Conference soft key to invite the current talking and one line talking held to attend conference The Network conference feature allow you to add or delete the party who attend the conference The local conference feature of IP phone R53 can invite two parties at most to attend conference The conference type of IP phone R...

Страница 148: ... key of dial interface to hold talking with first party 3 Input the number of second party and press the OK key on the phone keyboard or the Dial key or the Send soft key to make a call 4 When the second party answer your call inquire whether they want to attend conference ...

Страница 149: ...6 Press the Split soft key to split to two lines standalone talking then this two parties talking are under Hold status Press the Down key on the phone keyboard to switch to the second party talking HOLD Press the Resume soft key to resume the current talking ...

Страница 150: ... to another incoming press the Resume soft key again and the current talking being held 7 HOLD Press the Hold soft key in the UI to hold the conference Press the Resume soft key in the UI to resume the conference Press the Cancel soft key or the key to cancel the ...

Страница 151: ...or conference the talking must be on activated status For example select the talking in account 1 3 Press the conference soft key to add the two lines talking to conference You no only can press the Hold soft key to hold the conference also you can press the Split soft key to split the conference to two standalone talking press the Cancel soft key to end conferenceDŽ 4 Call Park You can use Call Pa...

Страница 152: ... on the phone LCD Dial the reserved extension number in another phone to resume the Parking talking No all server can support Call Park feature Set Call Park Press the Menu soft key to enter the main menu and select the Features Press the OK key on the phone keyboard or the Enter soft key to enter Feature interface Call Park Press the Down key on the phone keyboard to select Call Park ...

Страница 153: ...e Switch soft key to enable Call Park Call Park Press the Left or Right key on the phone keyboard or the Switch soft key to disable Call Park Target Press the Down key on the phone keyboard to set Target Account Press the Down key on the phone keyboard to set Account ...

Страница 154: ...ng call The IP phone R53 supports specified pickup and group pickup Specified pickup can answer specified user s incoming calls group pickup can answer group s user incoming calls Group pickup need to set group members Press the group pickup only to answer line 1 incoming call if there are many lines incoming calls in group Specified Pickup 1 Set specified pickup key via phone interface ...

Страница 155: ...ess the Menu soft key to enter the main menu and select feature during the Idle Press the OK key on the phone keyboard or the Enter soft key to enter the Features interface Press the Down key on the phone keyboard to select programmable keys in the features interface Press the OK key on the phone keyboard or the Enter soft key to enter the Programmable Keys Type interface ...

Страница 156: ...ne keyboard to select one setting Press the OK key on the phone keyboard or the Enter soft key to set Pickup Press the Left or Right key on the phone keyboard or the Switch soft key to select Pickup in the Type space label Press the Down key on the phone keyboard to set Label ...

Страница 157: ...ce Number can not be emptyʽ when you press the OK key on the phone keyboard or the Save soft key to save if the number is empty Press the Back soft key to return Press the Down key on the phone keyboard to set account and press the Left or Right key on the phone keyboard or the Switch soft key to select account ...

Страница 158: ...oft key to return to account key setting interface Group Pickup 1 Set group pickup via phone interface 2 Use group pickup feature You can press the group pickup key to answer incoming call when any group user answer incoming call In the Idle press the Menu soft key to enter the main menu and select features ...

Страница 159: ...ures interface Press the Down key on the phone keyboard to select programmable keys Press the OK key on the phone keyboard or the Enter soft key to enter programmable keys type interface In the programmable keys type interface press the Up or Down key on the phone keyboard to select one setting Press ...

Страница 160: ... set Group Pickup Press the Left or Right key on the phone keyboard or the Switch key in the UI to select Group pickup in the Type space label Press the Down key on the phone keyboard to set Label Number Press the Down key on the phone keyboard to set Number ...

Страница 161: ...n you press the OK key on the phone keyboard or the Save soft key to save if the number is empty Press the Back soft key to return Press the Down key on the phone keyboard to set account and press the Left or Right key on the phone keyboard or the Switch soft key to select account ...

Страница 162: ... to return to account key setting interface 8 Speed Dial You can use the Speed Dial feature to dial the specified contact speedily In the Idle press the Menu soft key to enter the main menu and select Features Press the OK key on the phone keyboard or the Enter soft key to enter the Feature interface ...

Страница 163: ...erface Press the OK key on the phone keyboard or the Enter soft key to enter the Programmable Keys Type interface In the programmable keys type interface press the Up or Down key on the phone keyboard to select one setting Press the OK key on the phone keyboard or the Enter soft key to set ...

Страница 164: ...ype space label Press the Down key on the phone keyboard to set Label Number Press the Down key on the phone keyboard to set Number The UI will present the following prompt interface Number can not be emptyʽ when you press the OK key on the phone keyboard or the Save soft key to save if the number is empty ...

Страница 165: ...n the phone keyboard to set account Press the Down key on the phone keyboard to set account and press the Left or Right key on the phone keyboard or the Switch soft key to select account The UI will skip automatically to account key setting interface after saving ...

Страница 166: ...s The advanced features of IP phone R53 contain the contents as follows Intercom Message 1 Message 1 Text Message The IP phone R53 can send and answer text message The phone will make a Du sound and present N piece of new message on the LCD For example 1 new message and a twinkling message icon will appearsDŽ ...

Страница 167: ...nu soft key in the Idle In the Idle press the Down key on the phone keyboard to select message press the OK key on the phone keyboard or the Enter soft key to enter the Message interface In the Message interface Press the Down key on the phone keyboard to select the text message press the OK key on the phone keyboard or the Enter soft key to enter the Text Message interface ...

Страница 168: ...Message interface press the Down key on the phone keyboard to select in box Press the OK key on the phone keyboard or the Enter soft key to enter the in box interface Select the message you will read and Press the OK key on the phone keyboard or the Enter soft key to read ...

Страница 169: ...soft key to reply Edit message press the 123 soft key to switch the input methods press the OK or the Send soft key to send message Press the Left or Right key on the phone keyboard or the Switch soft key to switch to the relevant addresser Input the number of addresser in the addresser area ...

Страница 170: ...sage as follows To return to in box after message sent or press the key or the Back soft key to cancel and return to in box Send Text Message In the Idle press the Menu soft key In the mail menu interface press the Down key on the phone ...

Страница 171: ...ge interface In the mail menu interface press the Down key on the phone keyboard to select Text Message press the OK key on the phone keyboard or the Enter soft key to enter Text Message interface The Text Message interface contains the following contents In the Text Message interface select New Message ...

Страница 172: ...ge and edit it press the abc soft key to switch the input methods Press the OK key on the phone keyboard or the Send soft key to send message Press the Left or Right key on the phone keyboard or the Switch soft key to switch to the relevant addresser Input the number of addresser ...

Страница 173: ...s To return to the Text Message after sending message or press the key or the Back soft key to cancel and return to Text Message interface Delete Text Message In the Idle press the Menu soft key Press the main menu interface Press the Down key on the ...

Страница 174: ...e Message interface Press the Down key on the phone keyboard to select the text message Press the OK key on the phone keyboard or the Enter soft key to enter the Text Message interface The Text Message interface contains the following contents In the Text Message interface press the Down key on the phone keyboard to select in box ...

Страница 175: ...n box interface Select the message you want to delete and press the Delete soft key Press the key or the Back soft key to cancel and return to in box interface Delete all the text messages in the in box Press the Delete soft key and select Delete All press the OK soft key then ...

Страница 176: ...resents New Voice Message on the LCD with a twinkling voice message icon No all servers support voice message Voice Message You can leave a message when the user you call is busy or unavailable to answer your call Leave a message according to the voice prompt of server and then hang up after leaving the message 1 Set Visit account number of voice message via phone interface In the Idle press the M...

Страница 177: ...e phone keyboard or the Enter soft key to enter the Message interface In the Message interface Press the Down key on the phone keyboard to select the voice message Press the OK key on the phone keyboard or the Enter soft key to enter the Voice Message interface Select the Voice Message Setting ...

Страница 178: ...o switch the input methods Press the Down key on the phone keyboard to set account 2 input the Visit account number of voice message For example 99 press 123 soft key to switch the input methods Press the Down key on the phone keyboard to set account 3 input voice message visit account number For example 100 press 123 soft key to switch the input methods ...

Страница 179: ...interface 2 Check voice message Press the Message key or the Connect soft key to call the Visit account number of voice message Check voice message according to voice prompt Set the Visit account number of voice message firstly before check voice message The LED light of Message will darken after all the voice messages checked Check voice message via phone interface ...

Страница 180: ...n the Idle press the Menu soft key In the main menu interface Press the Down key on the phone keyboard to select message Press the OK key on the phone keyboard or the Enter soft key to enter the Message interface In the Message interface press the Down key on the phone keyboard to select the Voice message press the OK key on the phone keyboard or the Enter soft key to enter the Voice Message inter...

Страница 181: ...essage interface Select the account you will check press the OK key on the phone keyboard or the Connect soft key to check the voice message Process the relevant operations according to voice prompt Press the key or the Back soft key to cancel and return to new voice messages interface ...

Страница 182: ...rface 1 Book Local Phone Book 1 Open IE 2 Input the IP address and press the Enter key 3 Input the user name and password password admin case sensitive 4 Open Website 5 Click the Phone Book 6 Select the Local Phone Book ...

Страница 183: ...2 Phone Book Remote Phone Book 1 Open IE 2 Input the IP address and press the Enter key 3 Input the user name and password Password admin case sensitive 4 Open website ...

Страница 184: ...elect the Remote Phone Book 3 Phone Book Call log 1 Open IE 2 Input the IP address and press the Enter key 3 Input the user name and password Password admin case sensitive 4 Open website 5 Click the Phone Book 6 Select Call logDŽ ...

Страница 185: ...hone Dial Plan Remake Rule 1 Open IE 2 Input the IP address and press the Enter key 3 Input the user name and password Password admin case sensitive 4 Open website 5 Click Phone 6 Select Dial Plan 7 ClickDŽ ...

Страница 186: ...tting Dial Plan Dial Now 1 Open IE 2 Input the IP address and press the Enter key 3 Input the user name and password Password admin case sensitive 4 Open website 5 Click Phone 6 Select Dial Plan 7 Click Dial NowDŽ ...

Страница 187: ...6 Phone Setting Time Lang 1 Open IE 2 Input the IP address and press the Enter key 3 Input the user name and password Password admin case sensitive 4 Open website 5 Click Phone 6 Select Time LangDŽ ...

Страница 188: ...7 Phone Basic Setting 1 Open IE 2 Input the IP address and press the Enter key 3 Input the user name and password Password admin case sensitive 4 Open website ...

Страница 189: ... Select Basic SettingDŽ 8 Phone Call Feature 1 Open IE 2 Input the IP address and press the Enter key 3 Input the user name and password Password admin case sensitive 4 Open website 5 Click Phone 6 Select Call Feature ...

Страница 190: ...9 Phone Voice 1 Open IE 2 Input the IP address and press the Enter key ...

Страница 191: ...d Password admin case sensitive 4 Open website 5 Click Phone 6 Select VoiceDŽ 10 Phone Key Display 1 Open IE 2 Input the IP address and press the Enter key 3 Input the user name and password Password admin case sensitive 4 Open website ...

Страница 192: ...Click Phone 6 Select Key Display 11 Phone Ring tones 1 Open IE 2 Input the IP address and press the Enter key 3 Input the user name and password Password admin case sensitive 4 Open website 5 Click Phone ...

Страница 193: ...6 Select Ring Tones 12 Phone Tones 1 Open IE 2 Input the IP address and press the Enter key 3 Input the user name and password Password admin case sensitive 4 Open website 5 Click Phone 6 Select Tones ...

Страница 194: ...13 Status Basic 1 Open IE 2 Input the IP address and press the Enter key 3 Input the user name and password Password admin case sensitive 4 Open website 5 Click Status 6 Select Basic ...

Страница 195: ...14 Account Basic 1 Open IE 2 Input the IP address and press the Enter key 3 Input the user name and password Password admin case sensitive 4 Open website 5 Click Account 6 Select Basic ...

Страница 196: ...15 Account Advanced 1 Open IE 2 Input the IP address and press the Enter key 3 Input the user name and password Password admin case sensitive 4 Open website 5 Click Account 6 Select Advanced ...

Страница 197: ...16 Network Basic 1 Open IE 2 Input the IP address and press the Enter key 3 Input the user name and password Password admin case ...

Страница 198: ...tive 4 Open website 5 Click Network 6 Click Basic 17 Network Advanced 1 Open IE 2 Input the IP address and press the Enter key 3 Input the user name and password Password admin case sensitive 4 Open website ...

Страница 199: ...Network 6 Select Advanced 18 Upgrade Basic 1 Open IE 2 Input the IP address and press the Enter key 3 Input the user name and password Password admin case sensitive 4 Open website 5 Click Upgrade 6 Select Basic ...

Страница 200: ...19 Upgrade Advanced 1 Open IE 2 Input the IP address and press the Enter key 3 Input the user name and password Password admin case sensitive 4 Open website 5 Click Upgrade 6 Select Advanced ...

Страница 201: ...20 AUTOP AUTOP Setting ...

Страница 202: ...urate AUTOP Enable PNP Config click Provision Now then the phone can download updated file from the relevant area and upgrade at once Enable PNP Config configurate according to the following PNP AUTOP Mode map the phone can download updated file from the relevant area and upgrade ...

Страница 203: ... Map 2 DHCP The phone will automatically test DHCP server when it gets IP address if the phone gets IP address by the means of DHCP DHCP Option Configuration Suppose that define 128 to be the Upgrade firmware version DHCP configurated to be 128 click Provision Now ...

Страница 204: ...pgrade at once DHCP configurated to be 128 according to the following DHCP AUTOP Mode map the phone can download Custom Option from the DHCP server and upgrade automatically Notes The above rules are defined in the phone software user do not need to do any setting ...

Страница 205: ...graded file from specified server URL Input the server address which will upgrade support TFTP FTP HTTP HTTP format ftp 192 168 0 100 Manual Update Server Configuration URL configurated to be tftp 192 168 10 199 r0000000000 conf and click Provision Now then the phone can download the ...

Страница 206: ... to the following Update Server AUTO the phone can download the relevant updated file from TFTP server and upgrade automatically The configuration parameters manual of the phone specified update server AUTOP Mode can not select Disable in this way the phone can check new updated files Manual Update Server AUTOP Mode Configuration ...

Страница 207: ... Mode Disable The phone can not check new upgraded files Power On The phone will check new upgraded files when it is power on Repeatedly The phone will check new upgraded files repeatedly Schedule AUTOP Mode Configuration ...

Страница 208: ... Power On Repeatedly The phone will check new upgraded files repeatedly or when it is power on Power On Repeatedly AUTOP Mode Configuration ...

Страница 209: ...23 Security Basic 1 Open IE 2 Input the IP address and press the Enter key 3 Input the user name and password Password admin case sensitive 4 Open website 5 Click Security 6 Select Basic ...

Страница 210: ...24 Security Advanced 1 Open IE 2 Input the IP address and press the Enter key 3 Input the user name and password Password admin case sensitive 4 Open website 5 Click Security 6 Select Advanced ...

Страница 211: ......

Отзывы: