


16. Media
22
18
Fig 49
Fig 48
Fig 50
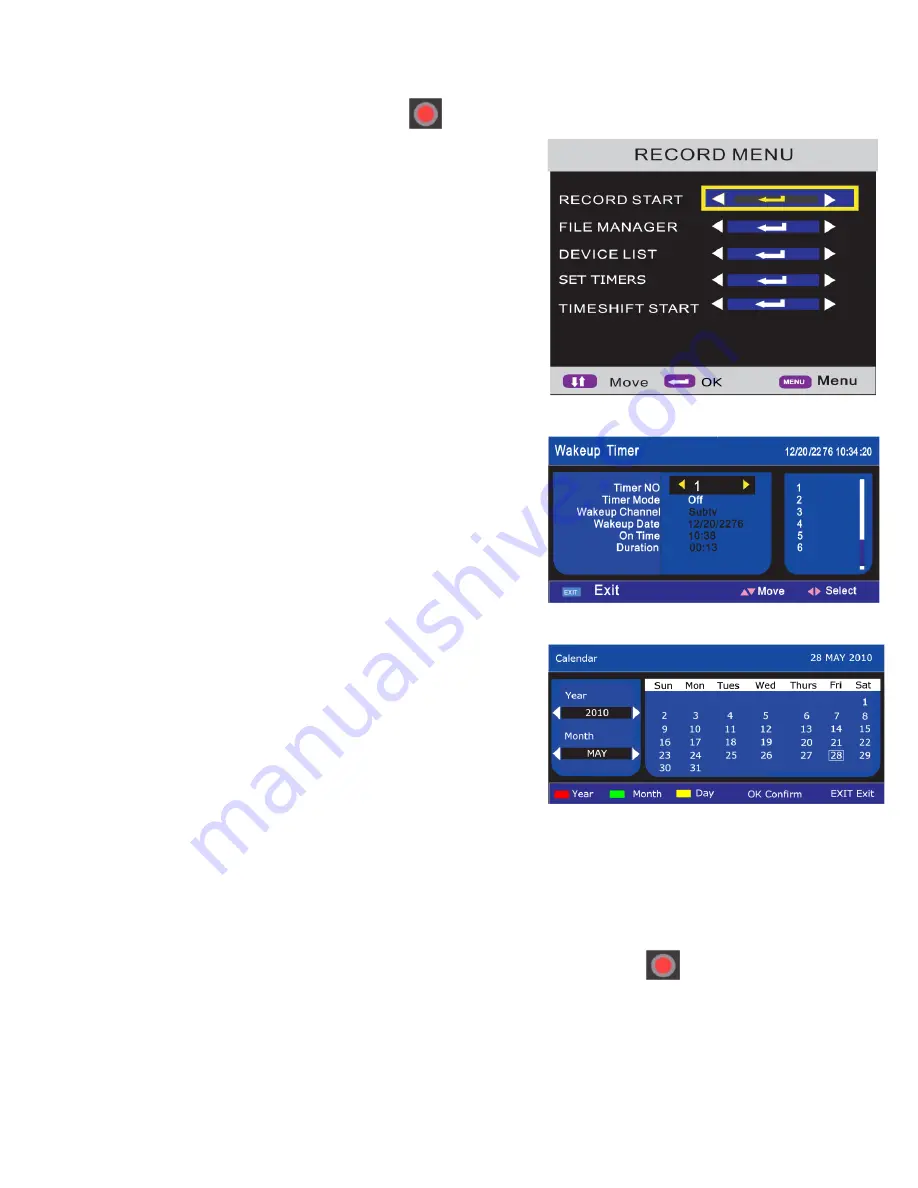
Timer Recording
In DVB mode “only”, press the “Record” button , the
“Record Menu” fig 48 will be shown. Use the
▲
/
▼
buttons to
select “Set Timers” and press OK. Fig 49 will be displayed. Use
the
▲
/
▼
buttons to select the various features and
◄
/
►
to enter
Sub menu’s.
Timer No
. You may set up to 8 timer settings, you may NOT
have more than one setting for one time, and NO timers must
overlap.
Timer mode.
There are 4 settings :- Once, Daily, Weekly and
Off.
Wakeup Channel.
Use the
►
button to enter the sub menu and
use the
▲
/
▼
buttons to select the required station. Press OK to
confirm.
Wakeup Date
. To set the Date, press the
►
button and fig 50 will
be displayed. Using the
◄
/
►
/
▲
/
▼
buttons you can navigate
around the calendar. Set the date as required.
To change the Year and Month, press the coloured buttons as
described at the bottom of the display and use the
◄
/
►
buttons to
change the details. Press OK to confirm and the menu will revert
to the Main menu.
On Time.
To set the “On Time” Use the
◄
/
►
buttons to select
each digit, and the “Numeric buttons” on the remote control to
change the values.
Duration.
As with the On Time, set the time in the same way.
When the time is reached, the TV will change channel
automatically and proceed to record. You may stop the recording
by pressing the “Stop” button and confirming that the recording
should be stopped
22
EPG Recording “Electronic Programme Guide”
To use the EPG to set the recording time, press the “EPG” button. Fig 29 (page 17) will be displayed. Use the
▲
/
▼
/
►
/
◄
buttons to select the programme you wish to record. Press the “Blue” button, the item highlighted
will now turn blue.
To “unselect” the programme, press the blue button again.
Instant Recording.
If you are watching a programme you wish to record, press the “Record” button . The Record Menu “Fig
45” will be displayed. The “Record Start” item will be highlighted. Press OK and the recording will start. A box
in the top left of the screen will display “Recording”. You may see a message “Device speed not enough ,
Record anyway ?” If using a Hard drive, you may select YES. In playback there may be some flickering of
picture or sound. Most USB Memory sticks have sufficient speed, but limited capacity.


