aksr securityprobe 5esv Скачать руководство пользователя страница 46


securityProbe 5ESV Manual 

Updated until firmware 404m 

- 46 - 


3) Notifications 

If  you  setup  a  notification  you  can  define  the  action  to  take  when  the  sensor  gives  a  reading 
beyond your previously set thresholds. This allows you to determine how you will be notified that 
a  sensors  reading  has  reached  the  specified  parameters  (high  warning,  critical  etc)  that  we 
looked at in the previous section. 


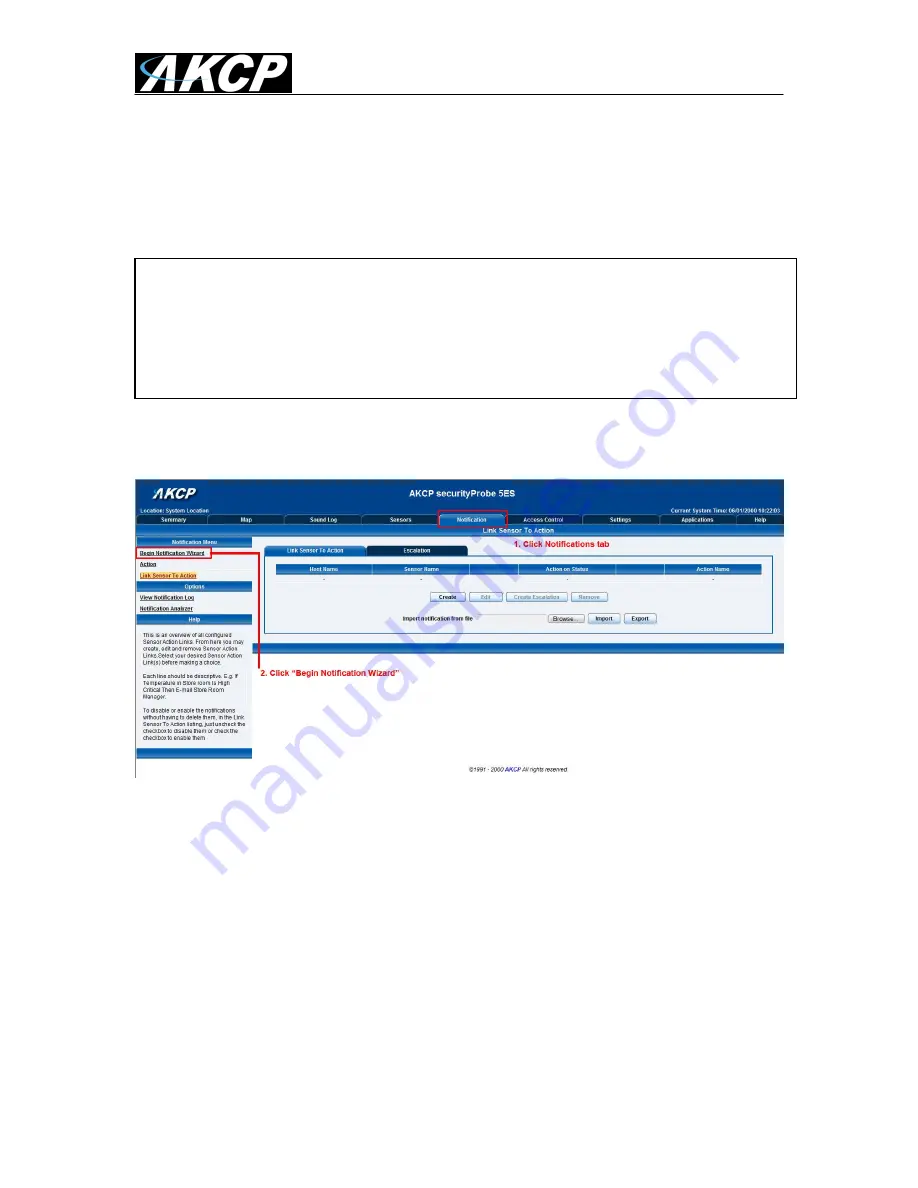
1. Adding a notification 

a) 

First click on the “notification wizard” 


b) 

You will now have the notification wizard page displayed, shown on the next page. 

This tutorial provides you the information needed to setup a notification. 

To get to the starting point of this tutorial: 


Login as administrator 


Click the “Notifications” tab 


Содержание securityprobe 5esv

Страница 1: ...www AKCP com SecurityProbe 5ESV User Manual Help Version updated till firmware 404m Copyright 2012 AKCess Pro Co Ltd...

Страница 2: ...g the IP address 3 Firmware upgrade 4 Multi User Groups and Management 5 Services and Security 6 Setting up a sensor i Notification thresholds ii Advanced sensor settings 7 Expansion Ports 3 Notificat...

Страница 3: ...e the user with a step by step guide on how to configure and set up their unit It utilizes screen shots in an effort to make things simpler for the user to follow It is split up into sections that for...

Страница 4: ...king various operations A The LEDs will indicate the progress of an upgrade The red LEDs will move from left to right to indicate activity and the green LEDs will indicate overall progress of the upgr...

Страница 5: ...ports and connections The functions of these are as follows 1 Safe Mode button DOES NOT RESET THE UNIT The black tact switch button is used to perform the following functions A A single press will an...

Страница 6: ...7 5V DC plug We recommend you using a 7 0 9 V 2 5 A power supply 8 Ethernet Port This RJ45 port is used to connect your unit to the network 9 External ground The EXT GND can be used to external ground...

Страница 7: ...net card or LAN socket 3 Power socket for the unit to connect to a Connect the unit via the Ethernet port of the unit to your computers LAN or Ethernet port with a CAT5 crossover cable b Open a web br...

Страница 8: ...thernet network from the list on the left frame of the page Please Note Even though the screen shots included in this manual will display AKCP securityProbe 5ES there are no differences between the se...

Страница 9: ...securityProbe 5ESV Manual Updated until firmware 404m 9 Note The unit ships with DHCP disabled If you wish to use a DHCP server to obtain the IP address then see the Using DHCP section of the FAQ...

Страница 10: ...est the unit This can also be used as a diagnostic tool in order to check whether your unit is connected to the network After hitting enter you will get an MS DOS prompt window that will show the ping...

Страница 11: ...he download navigate back to the web based interface units IP address This manual will refer to the DEFAULT IP address 192 168 0 1 you need to substitute this for your own IP address if you have chang...

Страница 12: ...k on the Upgrade button this will reboot the unit into safe mode or upgrade mode Click OK After reboot you will be redirected to the safe mode web interface This can take some time so please be patien...

Страница 13: ...of the update process is working properly The second half of the update will begin in roughly 7 to 10 minutes This will show the upgrade process bar and the percentage that has completed You will noti...

Страница 14: ...OFF your device 2 Connect your securityProbe via crossover cable directly to your computer s network interface card 3 Reconfigure your network interface card s TCP IP settings IP Address 192 168 0 2...

Страница 15: ...the Settings page then System Administrator then User Group Management as shown in the screen shot below Note The following screen shots may appear small and hard to read Please use the zoom feature i...

Страница 16: ...group named System Guest and entered our description Now check the objects within the web interface that this group will be able to Modify and View Then click the Finish button to save your group Now...

Страница 17: ...5ESV Manual Updated until firmware 404m 17 If you wish to modify your group settings highlight the group you wish to modify by clicking on it then click on the Properties button as shown in the scree...

Страница 18: ...new Users to your groups as shown above Now enter your User details as shown above In our example we have entered Bob Smith as our Guest into our System Guest group We have also added the option so th...

Страница 19: ...d until firmware 404m 19 Now as you can see the new user has been entered into our list of Users To modify a users setting first highlight the user by clicking on it then click the Properties button a...

Страница 20: ...aking the unit more secure as shown in the screen capture above Closing or changing ports disabling HTTP and enabling HTTPS You can also close or change the ports used to access the units web interfac...

Страница 21: ...which is the standard security technology for establishing the encrypted link between the securityProbe in our case and the web browser This link ensures that all data passed between the securityProbe...

Страница 22: ...re logged into the units web interface to Acknowledge alarms which is normally reserved only for the Administrator When the unit boots up it will announce the IP address that it has been configured wi...

Страница 23: ...rature sensor however this basic set up process is applicable to all of our sensors If you require information on specific functions of a particular sensor then please download the manual for that sen...

Страница 24: ...ors are connected their status view the system log and also view footage from any connected cameras We will now go through some of the tools the web based interface provides for getting feedback from...

Страница 25: ...shold label you can drag this marker to re configure the thresholds After dragging the marker click save In the next screen shot you can see that this marker has been moved to make a new threshold and...

Страница 26: ...5ESV Manual Updated until firmware 404m 26 Now your page will look something like below after taking the sensor offline To bring a sensor back online select your sensor type from the drop down menu a...

Страница 27: ...l Updated until firmware 404m 27 Advanced sensor settings By clicking on the Advanced Settings tab you will then see the advanced settings for the sensor Advanced mode functions Units changes units fr...

Страница 28: ...raps and events logged The Rearm parameter prevents this by forcing the temperature to drop by the Rearm value before changing the state back to normal In this example if Rearm is set to 2 then the se...

Страница 29: ...data point on the graph is one data point collected from the sensor But for the monthly and yearly graph in order to display more data into the same size as the daily graph some consolidation on the d...

Страница 30: ...tyle You can keep the sensors Display Style in the web interface as the Basic Style which will be the slide bar type or you can change it to the Gauge Style type When switching to the Gauge Style type...

Страница 31: ...securityProbe 5ESV Manual Updated until firmware 404m 31 You will now see the new display where you can set the sensors threshold levels as shown above...

Страница 32: ...ge feature for this sensor you can set the rate in a percentage from 1 to 50 over a period of time from 1 to 20 minutes You can set the direction to Up Down or Both and you can set the Status when the...

Страница 33: ...3 Graphing Sensor Data In order to save the data from the sensors on the securityProbe 5ESV you will need to enable the Graphing feature on the unit You need to change the Enable Graph to the On posit...

Страница 34: ...securityProbe 5ESV Manual Updated until firmware 404m 34 After clicking on the Click Here to View Graph link shown in the screen shot on the previous page you will then see the graphs for the sensor...

Страница 35: ...securityProbe 5ESV Manual Updated until firmware 404m 35 You can download the sensor data to a text file by clicking on the Download Data button shown in the screen shot above...

Страница 36: ...ated until firmware 404m 36 Which will display the pop up box as shown in the screen shot above You can also set the Graph Options by clicking on that button then Enabling the graphing page URL s as s...

Страница 37: ...k URL for each sensor What this feature does is allow you to add a Hyperlink to a sensor then this link will be displayed in the securityProbe 5ESV s mapping feature for that sensor see the screen sho...

Страница 38: ...ensor status If the status of the sensor changes very rapidly then it will report how many times the sensor status changed instead of having 36 separate entries in the syslog entry For example this wi...

Страница 39: ...ng between the hours of 7 PM 9 AM Monday Friday only You can see in this picture we have selected the Do Not Report option for the hours in which we do not wish to receive any notifications or have an...

Страница 40: ...f time that can be entered is between 0 and 65535 seconds which equals approximately 18 hours Continuous Time to Report High Warning As above but delays notification for High Warning Continuous Time t...

Страница 41: ...value is set to 3 seconds Using internal Mic as a sound detection sensor The internal microphone or an external plugged into the line in jack can be used as a sound detector a First navigate to the co...

Страница 42: ...ityProbe 5ESV Manual Updated until firmware 404m 42 b When you have clicked on the advanced settings tab you will see the advanced options presented to you Now lets look at what each of these settings...

Страница 43: ...umber of emails traps and events would be logged The Rearm parameter prevents this by forcing the signal level to drop by the Rearm value before changing the state back to normal In this example if Re...

Страница 44: ...Opto isolated sixteen dry contact expansion module In this section we will go through the basic setup of the sensor If you require information on specific functions of a particular sensor or expansio...

Страница 45: ...ame of the expansion module you can also disable it by clicking on the Enable Disable button Once you have clicked on the Dual sensors tab you will be directed to the familiar looking notification thr...

Страница 46: ...tified that a sensors reading has reached the specified parameters high warning critical etc that we looked at in the previous section 1 Adding a notification a First click on the notification wizard...

Страница 47: ...irmware 404m 47 Please Note We will now go through setting up a few different ways of notification step by step To learn what the other types of notifications do refer to the separate notification man...

Страница 48: ...on is correct you can press the Add Trap Destination button After clicking this you have the option of inputting another trap or clicking on Next Now you can enter the following parameters These param...

Страница 49: ...n these screens you can select the parameters for when to send the SNMP trap notification In our example we have selected to bind the SNMP trap to the temperature sensor we have connected on port 1 Th...

Страница 50: ...ated the parameters for the SNMP trap we need to make it active To do this go back to the notifications tab and it should look like the following e Select the sensor and SNMP trap parameters as before...

Страница 51: ...ted until firmware 404m 51 Note To remove this trap and make it inactive highlight the notification and click remove You can repeat this process to set up multiple SNMP traps for different sensors or...

Страница 52: ...you can input the e mail name and message Press the Customize button and the fields will re write in a format that will allow for an automated e mail that will display the sensor information This tut...

Страница 53: ...address for your e mail account Once this is correct click next d Now as with the SNMP trap you can select how many times to attempt to resend the e mail and the time elapsed between each attempt Clic...

Страница 54: ...urityProbe 5ESV Manual Updated until firmware 404m 54 Click on Finish You will now be taken back to the main Notification tab f Click on create g Create the notification link as before Then click fini...

Страница 55: ...High Critical and an E mail notification that will activate on a High Warning 4 SMS notification Now we will set up a notification so that you will be sent an SMS message This message can be sent via...

Страница 56: ...t of notification types select SMS and click next You will then be presented with this b You can now either add multiple numbers or click next In our case we will click next c Now we will set up the m...

Страница 57: ...eading and the status high low warning etc these macros are common to all sensor notifications d You will now see that the SMS message has changed its format to include the Macro script e Next we will...

Страница 58: ...Updated until firmware 404m 58 f You will now be able to select the number of times you wish the SMS to be resent and the interval between sending them g Again we now select the sensor to which to bi...

Страница 59: ...e will use this notification for a low critical Then select the notification name we assigned in this case we chose SMS 1 Click Finish to finalize this h Now we will add the SMS notification to our ac...

Страница 60: ...s the SNMP trap E mail and SMS For the purposes of this tutorial we will not cover the set up of every type of notification However with this information you should be able to follow the procedure for...

Страница 61: ...l camera and we are connecting it to port number V4 a Once you are logged in you will be taken to the default summary page b You may or may not see the live image from the camera already If not then c...

Страница 62: ...s stage you will begin opening up multiple windows which my obscure valuable information displayed on the summary page To prevent this from happening each window can be dragged to a new position to ac...

Страница 63: ...need to go to the Settings page then the Enable Cameras page You can then press the Check Video Signal button to scan the HD Digital ports on the unit for connected cameras After the camera or cameras...

Страница 64: ...e unit will now show the check in the Enabled box as shown in the screen shot above You can then check to make sure the video stream is working by clicking on the Preview button If the image appears u...

Страница 65: ...then change the Image Size of the streaming video from your cameras to either 320 x 240 or 640 x 480 The streaming video Image Size will be displayed on the Summery page as shown in pages 61 and 62 ab...

Страница 66: ...from the drop down list as shown in the screen shot above If the cameras is an AKCP branded camera you will choose the AKCP PT Camera if it is another third party Pelco D type camera you will select...

Страница 67: ...a a First click on the PTZ Control button b Now we can pan and tilt the camera by way of the pan tilt arrows This tutorial provides you the information needed to setup an MMS Notification To get to th...

Страница 68: ...m 68 1 2 3 4 Helpful Hint You can also pan and tilt the camera by placing your mouse on the video image and clicking the position in which you would like the camera to face This is useful when you wan...

Страница 69: ...tomated camera movement This will make the camera automatically pan or tilt at preset intervals This tutorial provides you the information needed to setup automated camera movements To get to the star...

Страница 70: ...securityProbe 5ESV Manual Updated until firmware 404m 70 b After clicking on the add button you will be met with the following pages...

Страница 71: ...s movement so that it covers the area you require too monitor In this example we have added three different positions After clicking Save Action click on Run Continuous This will start the script runn...

Страница 72: ...will direct you on how to do this For this tutorial we will assume this is done a Select ActiveX as the mode of display Some users may need to install active x If so follow the on screen instructions...

Страница 73: ...securityProbe 5ESV Manual Updated until firmware 404m 73 b Click Record and the camera record window will now open...

Страница 74: ...securityProbe 5ESV Manual Updated until firmware 404m 74 c Now we need to set up the capture parameters Click on Setup Record Test 1 2...

Страница 75: ...anual Updated until firmware 404m 75 d To begin capture simply click on Record Note If you wish to record and run the automated camera movement sat the same time start the automated camera movements f...

Страница 76: ...the temperature sensor reading is at High Critical a Once this is done you can add it to the active notifications so your page should now look like this As you can see from the screen shot above we ha...

Страница 77: ...der to trigger a response This has triggered the picture log notification c Viewing the logged pictures Form here you can see there is a series of images These have been taken at the preset time inter...

Страница 78: ...mitations to its capabilities For instance the software motion detection will not work when the camera is set in automated mode or is being moved via the web based interface a First navigate to the co...

Страница 79: ...ual Updated until firmware 404m 79 b Once on this page you need to select the camera connected to the relevant port In our example our camera is on port 4 c After selecting the camera your window will...

Страница 80: ...by clicking on the grid over the picture you can select which areas are to be ignored by the motion detection This is useful if for example you are monitoring the view from a window and there is a tr...

Страница 81: ...ons 1 Adding a map a First we need to add a picture file to be used as the map This can be a blueprint of your office a 3D picture of your office site being monitored or a photo of the wiring closet y...

Страница 82: ...04m 82 c In this tutorial we are going to use a 3D map of a town center we are monitoring d Choose to have the map as a top level map e You will now have the option to finish or to continue adding you...

Страница 83: ...404m 83 f You will now be taken to the map page where it will display your map To continue adding the sensors click next g After clicking next you will be directed to click the Unlock button You can n...

Страница 84: ...securityProbe 5ESV Manual Updated until firmware 404m 84 i After you have positioned the sensors in the correct location of your map click on Unlock...

Страница 85: ...Monitoring via the map interface Now we are going to look at how to monitor the sensor status and use the map interface a To see further information regarding a sensor you can click on its icon First...

Страница 86: ...n to filter your sensor information which is displayed within the summary page To enter the filter menu select Sensor Filters from the dropdown tab on the left of the page Once you have clicked the ta...

Страница 87: ...are 404m 87 Altering your page reload interval can be achieved by using these options shown below Once you have selected your preferred filter options your new settings will be displayed in the Sensor...

Страница 88: ...Syslog filter tab found on the summary page Once you have clicked the tab you will be able to select your filter results by altering various fields of information contained within syslog filter windo...

Страница 89: ...ware 404m 89 Altering your reaload interval can be achieved by using the options shown below Once you have selected your preferred filter options your new settings will be displayed in the System log...

Страница 90: ...securityProbe 5ESV Manual Updated until firmware 404m 90...

Страница 91: ...e 192 168 0 300 This will then allow you to log into your routers administration interface You can find how to go about doing this for your router on www portforward com For an example of how to do th...

Страница 92: ...nsors connected to my unit in the web interface any longer What could be the problem 16 I just noticed this Mega SPI Error in my securityProbe s web interface What is the problem How do I clear this 1...

Страница 93: ...he total number of sensors that can be connected to the SEC 5ESV 30 Can I add my own SD flash card to the unit If so how large can I use and what is then stored on the SD card 31 I noticed you have a...

Страница 94: ...s not lit then you have no network connection present If this is the case then ensure the following 1 If connected directly to a PC ensure a good quality crossover cable is being used 2 Ensure a stand...

Страница 95: ...securityProbe 5ESV Manual Updated until firmware 404m 95 LED patterns in Safe mode then...

Страница 96: ...Board init 4th LED Serial port 5th LED Ethernet 6th LED NOR Flash 7th LED NAND Flash 8th LED Root file system mounted Starting init process After the root file system is mounted all green LEDs will be...

Страница 97: ...ddress The unit ships with this disabled Therefore to turn it on you need to log into the web interface and navigate to the Ethernet settings by way of clicking the security tab Ethernet Network and t...

Страница 98: ...o notify you when a sensor reading has hit a certain preset critical threshold There are many ways you can be notified They are as follows SNMP Trap This form of notification sends out a signal to you...

Страница 99: ...d with the internal external microphone Siren and strobe will activate a siren and strobe light Mobile access Gives you the function of viewing the camera attached to your security probe via your mobi...

Страница 100: ...nPhone exe Next follow these steps 1 Initiate connection from OpenPhone PC to securityProbe a Open the program by double clicking openphone exe b Click the Make Call button enter the IP address of the...

Страница 101: ...eath the mainboard and has the sensor ports This error can cause the sensors to not be visable as well The first thing to try is to re flash the unit with the latest firmware on our web site then powe...

Страница 102: ...problem condition of the LED s etc 2 What you did to determine the unit has this problem 3 Was there anything done to the unit prior to having the problem 4 Did the unit always have this problem if no...

Страница 103: ...connectors Can I use BNC to USB adapters We will offer another option so you can order the 5ESV unit with the RG 6 BNC or previous Digital UMC or PTDC Digital camera inputs instead of the HD Digital...

Страница 104: ...as the X20 or X60 dry contact inputs For example my SEC 5ES X20 or my SEC 5ESV X60 No since all the units with the extra X20 and X60 dry contact inputs use the same iMX25 processor they use the same f...

Отзывы: