background image

English - 67

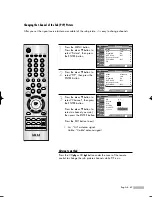
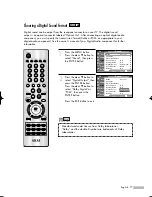
Changing the Channel of the Sub (PIP) Picture

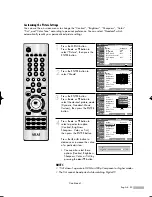
After you set the signal source (antenna or cable) of the sub picture, it is easy to change channels.

1

Press the MENU button.
Press the 

or 

button to

select “Picture”, then press
the ENTER button.

2

Press the 

or 

button to

select “PIP”, then press the
ENTER button.

3

Press the 

or 

button to

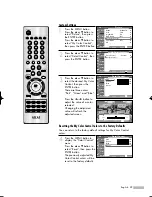
select “Channel”, then press
the ENTER button.

Press the 

or 

button to

select a channel you want,
then press the ENTER button.

Press the EXIT button to exit.

Alternate method

Press the CH 

or CH 

button under the cover of the remote

control to change the sub picture channels while PIP is on.

Picture

Mode

: Standard

Size

: 16:9

Digital NR

: On

DCE Demo

: Off

My Color Control

Film Mode

: Off

PIP

Move

Enter

Return

Input

Picture

Sound

Channel

Setup

Guide

Picture

Mode

: Standard

Size

: 16:9

Digital NR

: On

DCE Demo

: Off

My Color Control

Film Mode

: Off

PIP

Move

Enter

Return

Input

Picture

Sound

Channel

Setup

Guide

PIP

PIP

: On

Source

: TV

Size
Position
Air/CATV

: Cable

Channel

: Cable 3

Move

Enter

Return

Input

Picture

Sound

Channel

Setup

Guide

Cable 11

• Air : “Air” antenna signal

Cable : “Cable” antenna signal

BP68-00548A-00Eng(052~071)  9/12/05  9:40 AM  Page 67

Содержание PT50DL14

Страница 1: ...Owner s Instructions PT50DL14...

Страница 2: ......

Страница 3: ...parties In particular this product is licensed under the following US patents 5 991 715 5 740 317 4 972 484 5 214 678 5 323 396 5 539 829 5 606 618 5 530 655 5 777 992 6 289 308 5 610 985 5 481 643 5...

Страница 4: ...w to insert the CableCARD A digital set top box which used to be provided by the cable service provider is no longer needed with Digital Cable Ready TVs and CableCARDs When CableCARD is inserted into...

Страница 5: ...iginally encoded for broadcast This is a big advantage for DTV over analog TV there is no noise ghosting static or scratchy audio 3 How can I connect an antenna in my townhouse co operative apartment...

Страница 6: ...ARD 22 Connecting a Camcorder 23 Connecting a DVD Player 24 Connecting to Y PB PR 24 Connecting to Audio and Video Jacks 24 Connecting a DTV Set Top Box 25 Connecting to Y PB PR 25 Connecting to DVI D...

Страница 7: ...und Control 72 Auto Volume 74 Choosing a Multi Channel Sound MTS track 75 Choosing a Multi Channel Sound MTS track 76 Choosing a Digital Sound Format 77 Selecting the Internal Mute 78 Setting the On O...

Страница 8: ...AKAI...

Страница 9: ...Your New Wide TV...

Страница 10: ...f time sit as far back from the screen as possible Your New Wide TV English 10 When installing the product make sure to keep it away from the wall more than 10cm 4inches for ventilation purposes Poor...

Страница 11: ...Fine tuning control for the sharpest picture possible A built in multi channel sound decoder for stereo and bilingual listening Built in dual channel speakers A special sleep timer Picture in Picture...

Страница 12: ...ish 12 Press to switch between viewing TV programs and signals from connected components Press to see the on screen menu Press to raise or lower the volume and to select items when using the on screen...

Страница 13: ...is not properly shut Check if the ventilation hole on the rear of the set is blocked because if the inner temperature is too high the power will shut off Lamp may be defective Please contact a certifi...

Страница 14: ...O AUDIO INPUT jacks Connect video audio signals from external sources such as VCR or DVD players Refer to page 24 VIDEO AUDIO OUTPUT jacks Sends video audio signals from the TV to an external source s...

Страница 15: ...e box DVD etc 12 PRE CH Tunes to the previous channel 13 SLEEP Press to select a preset time interval for automatic shut off 14 CH LIST Displays the channel list 15 SOURCE Each time the button is pres...

Страница 16: ...ew batteries in the remote control If you won t be using the remote control for a long time remove the batteries and store them in a cool dry place 1 Slide the back cover all the way out to open the b...

Страница 17: ...Connections...

Страница 18: ...nas If you do not have a cable system you will need to connect an antenna to your TV Antennas with 75 ohm Round Leads If your antenna looks like this it has 75 ohm round leads 1 Plug the antenna lead...

Страница 19: ...le without a Cable Box 1 Plug the incoming cable into the ANT 1 IN CABLE on the rear panel of your TV Cable with a Cable Box that Descrambles All Channels 1 Find the cable connected to the ANTENNA OUT...

Страница 20: ...inal of the splitter and the IN terminal of the Cable box 3 Connect a coaxial cable between the ANTENNA OUT terminal of the Cable box and the B IN terminal of the RF A B switch 4 Connect another cable...

Страница 21: ...jacks on the VCR 2 Connect a coaxial cable between the Antenna out terminal i e OUT to TV on the VCR and the ANT 1 IN CABLE on the TV 3 Connect a video cable between the S VIDEO IN jack on the TV and...

Страница 22: ...screen If the channel information does not already exist the message Updating Channel List is displayed during channel information configuration 2 When channel information configuration is finished t...

Страница 23: ...acks on the TV and the AUDIO OUT jacks on the camcorder If you have a mono Camcorder connect L mono to the Camcorder audio out using only one audio cable 3 Connect a video cable between the VIDEO IN o...

Страница 24: ...Y PB PR IN jacks on the TV and VIDEO Y PB PR or Y CB CR OUT jacks on the DVD player Connecting to Audio and Video Jacks 1 Connect a set of audio cables between the AUDIO IN 1 or 2 jacks on the TV and...

Страница 25: ...the Set Top Box Connecting to DVI Digital Visual Interface 1 Connect a set of audio cables between the DVI AUDIO L R IN jacks on the TV and the AUDIO OUT jacks on the Set Top Box 2 Connect an HDMI DVI...

Страница 26: ...ble between the HDMI DVI IN jack on the TV and the HDMI OUT jack on the Set Top Box NOTE Make sure the HDMI DVI source s power is on or you will be unable to select it in the TV menu s source list Con...

Страница 27: ...format using a glass conductor See page 77 to set the digital output format Dolby Digital or PCM appropriate to your digital audio component Connecting to an Analog Amplifier 1 The AV OUT AUDIO L R te...

Страница 28: ...AKAI...

Страница 29: ...Operation...

Страница 30: ...x menu groups Input Picture Sound Channel Setup and Guide 2 Press the or button to select an item you want in the menu Press the or ENTER button to display change or use the selected items Use the ENT...

Страница 31: ...r Fran ais then press the ENTER button Press the EXIT button to exit Setup Language English Time V Chip Caption MenuTransparency Medium Blue Screen Off Color Weakness More Move Enter Return Input Pict...

Страница 32: ...s the ENTER button 3 Press the or button to select Auto Program then press the ENTER button NOTE All available DTV and analog channels are automatically stored in memory Selecting the Video Signal Sou...

Страница 33: ...Cable and Air Cable are not available STD HRC and IRC identify various types of cable TV systems Contact your local cable company to identify the type of cable system that exists in your particular ar...

Страница 34: ...the CH or CH button to switch to the appropriate channel then repeat above Press the EXIT button to exit Channel Antenna Air Auto Program Add Delete Favorite Channels Name FineTune Signal Strength LNA...

Страница 35: ...l press 7 then then 1 For channel 7 2 analog press 7 then then 2 Using the Previous Channel Press the PRE CH button The TV changes to the last channel you were watching Press the CH or CH button to ch...

Страница 36: ...ode listed on next page for your brand of VCR Cable box or DVD player Make sure you enter 3 digits of the code even if the first digit is a 0 If more than one code listed try the first one 5 Press the...

Страница 37: ...English 37 Remote Control Codes VCR Codes DVD Codes Cable Box Codes...

Страница 38: ...ENTER button Press the EXIT button to exit Option 1 Setting the Clock Manually You can set the month day year hour and minute directly by pressing the number buttons on the remote control Setup Langua...

Страница 39: ...the or button to select Yes or No then press the ENTER button Press the EXIT button to exit When you set up Auto Time the set time may not be correct depending on the broadcasting station and signal I...

Страница 40: ...to exit Setup Language English Time V Chip Caption MenuTransparency Medium Blue Screen Off Color Weakness More Move Enter Return Input Picture Sound Channel Setup Guide Time 1 1 2005 12 00 am Clock S...

Страница 41: ...od Press the SLEEP button on the remote control repeatedly until the appropriate time interval appears any of the preset values from 30 min to 180 min Time 1 1 2005 12 00 am Clock SleepTimer Off OnTim...

Страница 42: ...te method Press the SOURCE button on the remote control repeatedly to select an external signal source AV1 When you connect equipment to the TV you can choose between the following sets of jacks AV1 A...

Страница 43: ...net TV Recv Interactive TV Recv VOD Video On Demand STB TV Press the ENTER button Set other signal sources AV2 AV3 S Video1 S Video2 S Video3 Component1 Component2 HDMI using the same method as listed...

Страница 44: ...AKAI...

Страница 45: ...Channel Control...

Страница 46: ...s the ENTER button and a check mark will appear Press the ENTER button again to deselect the selected channel and the check mark will disappear Press the EXIT button to exit NOTES Only memorized chann...

Страница 47: ...s in this sequence A Z 0 9 blank 4 Press the button to switch to the next field which will be selected Select a second letter or digit pressing or button as above Repeat the process to select the last...

Страница 48: ...ting press the button to select Reset then press the ENTER button 5 Press the EXIT button to exit NOTE Only analog TV channels can be fine tuned Channel Antenna Cable Auto Program Add Delete Favorite...

Страница 49: ...elect Signal Strength then press the ENTER button If the signal strength meter indicates that the signal is weak physically adjust your antenna to increase the signal strength Continue to adjust the a...

Страница 50: ...nly when antenna is set to Air The settings will be stored separately in each channel If the picture is noisy with the LNA set to On select Off The LNA setting must be made separately for each channel...

Страница 51: ...Picture Control...

Страница 52: ...light in the room Choose Standard for the standard factory settings Choose Movie when viewing the movie Choose Custom if you want to adjust the settings according to personal preference see Customizi...

Страница 53: ...picture settings Picture Mode Standard Size 16 9 Digital NR On DCE Demo Off My Color Control Film Mode Off PIP Move Enter Return Input Picture Sound Channel Setup Guide Mode Mode Standard Contrast 90...

Страница 54: ...previously adjusted settings will be reset to the factory defaults Resetting the Picture Settings to the Factory Defaults Mode Mode Dynamic Contrast 100 Brightness 45 Sharpness 75 Color 65 Tint G 50...

Страница 55: ...to select one of the picture size settings 16 9 Sets the picture to 16 9 wide mode Zoom1 Magnifies the size of the picture on screen Zoom2 Magnifies the size of the picture more than Zoom1 4 3 Sets t...

Страница 56: ...NTER button 3 Press the or button to select Off or On then press the ENTER button Press the EXIT button to exit Picture Mode Standard Size 16 9 Digital NR On DCE Demo Off My Color Control Film Mode Of...

Страница 57: ...ress the ENTER button Press the EXIT button to exit Alternate method Press the DCE button on the remote control repeatedly to select one of the settings On Switches on the DCE Demo mode Off Switches o...

Страница 58: ...ide while the selected mode is shown on the right side Press the ENTER button to accept the selected mode Press the EXIT button to exit Blue Emphasizes Clear Blues Green Emphasizes Mild Greens Pink Em...

Страница 59: ...to the factory default settings for My Color Control colors 4 Press the MENU button to display the Detail Control menu Press the or button to select Reset then press the ENTER button The previously ad...

Страница 60: ...ss the or button to adjust the value of a color selected Press the EXIT button to exit 0 Color Weakness Adjust Move Return Red Setup Language English Time V Chip Caption MenuTransparency Medium Blue S...

Страница 61: ...ess the ENTER button Press the EXIT button to exit NOTE Film mode is supported in 480i only Picture Mode Standard Size 16 9 Digital NR On DCE Demo Off My Color Control Film Mode Off PIP Move Enter Ret...

Страница 62: ...button on the remote control repeatedly to activate or deactivate the PIP NOTES This feature doesn t function when the V Chip is active If you turn the TV off while watching and turn it on again then...

Страница 63: ...nal signal then press the ENTER button Press the EXIT button to exit NOTE For more information about external signals see Viewing an External Signal Source See page 42 and the PIP Settings See page 10...

Страница 64: ...to select a size you want then press the ENTER button Press the EXIT button to exit Picture Mode Standard Size 16 9 Digital NR On DCE Demo Off My Color Control Film Mode Off PIP Move Enter Return Inpu...

Страница 65: ...en press the ENTER button Press the EXIT button to exit Picture Mode Standard Size 16 9 Digital NR On DCE Demo Off My Color Control Film Mode Off PIP Move Enter Return Input Picture Sound Channel Setu...

Страница 66: ...ton to select Air or Cable then press the ENTER button Press the EXIT button to exit Picture Mode Standard Size 16 9 Digital NR On DCE Demo Off My Color Control Film Mode Off PIP Move Enter Return Inp...

Страница 67: ...n Press the EXIT button to exit Alternate method Press the CH or CH button under the cover of the remote control to change the sub picture channels while PIP is on Picture Mode Standard Size 16 9 Digi...

Страница 68: ...e or button to select Main or Sub then press the ENTER button Press the EXIT button to exit Sound Mode Custom Equalizer Multi Track Options Auto Volume Off Internal Mute Off Digital Output Dolby Digit...

Страница 69: ...h 69 Freezing the Picture Press the STILL button to freeze a moving picture Normal sound will still be heard Press again to cancel NOTE In the PIP mode the main and sub pictures are stilled at the sam...

Страница 70: ...ss the ENTER button 3 Press the or button to select On or Off then press the ENTER button Press the EXIT button to exit Setup Language English Time V Chip Caption MenuTransparency Medium Blue Screen O...

Страница 71: ...Sound Control...

Страница 72: ...nd settings can be adjusted to suit your personal preference Alternatively you can use one of the automatic settings See next page 1 Press the MENU button Press the or button to select Sound then pres...

Страница 73: ...utton to exit Choose Standard for the standard factory settings Choose Music when watching music videos or concerts Choose Movie when watching movies Choose Speech when watching a show that is mostly...

Страница 74: ...e ENTER button 3 Press the or button to select Off or On then press the ENTER button Press the EXIT button to exit Sound Mode Custom Equalizer Multi Track Options Auto Volume Off Internal Mute Off Dig...

Страница 75: ...nch you want then press the ENTER button Press the EXIT button to exit Alternate method Press the MTS button on the remote control You can listen in a language other than the favorite language by pres...

Страница 76: ...oose Mono for channels that are broadcasting in mono or if you are having difficulty receiving a stereo signal Choose Stereo for channels that are broadcasting in stereo Choose SAP to listen to the Se...

Страница 77: ...ss the or button to select Digital Output then press the ENTER button Press the or button to select Dolby Digital or PCM then press the ENTER button Press the EXIT button to exit Sound Mode Custom Equ...

Страница 78: ...L and Mute buttons do not operate when the Internal Mute is set to On When Internal Mute is on only the Multi Track Options and Melody menu are available Sound Mode Custom Equalizer Multi Track Option...

Страница 79: ...n to select On or Off then press the ENTER button Press the EXIT button to exit Sound Mode Custom Equalizer Multi Track Options Auto Volume Off Internal Mute Off Digital Output Dolby Digital Sound Sel...

Страница 80: ...AKAI...

Страница 81: ...Special Features...

Страница 82: ...hen press the ENTER button Press the EXIT button to exit Setup Language English Time V Chip Caption MenuTransparency Medium Blue Screen Off Color Weakness More Move Enter Return Input Picture Sound Ch...

Страница 83: ...on Press the or button to select level then press the ENTER button Press the EXIT button to exit Setup Language English Time V Chip Caption MenuTransparency Medium Blue Screen Off Color Weakness More...

Страница 84: ...to enter your new 4 digit pin number Re enter your new pin number to confirm Press the EXIT button to exit Setup Language English Time V Chip Caption MenuTransparency Medium Blue Screen Off Color Wea...

Страница 85: ...the V Chip feature press the ENTER button so that the V Chip Lock field is On Pressing the or button will alternate between On and Off Press the ENTER button Press the EXIT button to exit Setup Langua...

Страница 86: ...ur current 4 digit pin number The default pin number for a new TV set is 0000 The V Chip menu is displayed 3 Press the or button to select TV Parental Guidelines then press the ENTER button Setup Lang...

Страница 87: ...NOTES These categories consist of two separate groups TV Y and TV Y7 young children through age 7 and TV G through TV MA everybody else The restrictions for these two groups work independently If a h...

Страница 88: ...tton to select MPAA Rating then press the ENTER button 4 You can independently lock the movie ratings The locked movie ratings are indicated by the symbol Press the ENTER buttons to activate the appro...

Страница 89: ...udience including children from ages two six TV FCC Content Category V Violence S Sexual content L Offensive language D Dialog sexual innuendo FV Fantasy or cartoon violence MPAA Rating System Movies...

Страница 90: ...a new TV set is 0000 The V Chip menu is displayed 3 Press the or button to select Canadian English then press the ENTER button V Chip V Chip Lock Off TV Parental Guidelines MPAA Rating Canadian Englis...

Страница 91: ...intended for children under age 8 C8 Programming generally considered acceptable for children 8 years and over to watch on their own G General programming suitable for all audiences PG Parental Guidan...

Страница 92: ...a new TV set is 0000 The V Chip menu is displayed 3 Press the or button to select Canadian French then press the ENTER button V Chip V Chip Lock Off TV Parental Guidelines MPAA Rating Canadian English...

Страница 93: ...eos and variety programming G General 8 ans 8 General Not recommended for young children 13 ans Programming may not be suitable for children under the age of 13 16 ans Programming is not suitable for...

Страница 94: ...ct Caption then press the ENTER button 3 Press the ENTER button to select Caption Press the or button to select On then press the ENTER button Setup Language English Time V Chip Caption MenuTransparen...

Страница 95: ...program CC3 Secondary Synchronous Caption Service Alternate program related caption data typically second language captions CC4 Special Non Synchronous Use Captions Similar to CC2 Text1 First Text Se...

Страница 96: ...ss the ENTER button NOTE Caption Options are available only when Service1 Service6 can be selected in Mode Setup Language English Time V Chip Caption MenuTransparency Medium Blue Screen Off Color Weak...

Страница 97: ...ou can change the color of the letter The default is White Background Color This option consists of Default White Black Red Green Blue Yellow Magenta and Cyan You can change the background color of th...

Страница 98: ...ation on Status Pairing Network Setup of the CableCARD provided by the service provider in CableCARD menu 1 Press the MENU button Press the or button to select Setup then press the ENTER button 2 Pres...

Страница 99: ...leCARDTM Setup then press the ENTER button 3 Press the ENTER button to select CableCARDTM Reset Setup Language English Time V Chip Caption MenuTransparency Medium Blue Screen Off Color Weakness More M...

Страница 100: ...ect CableCARDTM Setup then press the ENTER button 3 Press the ENTER button to select Channel List Reorganization Setup Language English Time V Chip Caption MenuTransparency Medium Blue Screen Off Colo...

Страница 101: ...display a list of channels Guide Channel List Edit Channel List Favorite Channel List Move Enter Return Input Picture Sound Channel Setup Guide Channel List All 2 3 Exit Edit Favorite 29 37 45 30 38...

Страница 102: ...he selected channel and the check mark will disappear Press the CH or CH button to display the previous or next channel list page Channel List Edit 2 3 Page Move Delete Return Exit Favorite Red button...

Страница 103: ...Game mode in the Edit name If you display an OSD in Game mode the screen shakes slightly NOTES Game mode is only available for AV1 AV2 AV3 S Video1 S Video2 S Video3 Component1 and Component2 For Com...

Страница 104: ...AKAI...

Страница 105: ...Appendix...

Страница 106: ...ter Caution 1 Replace with the correct code numbered lamp to avoid damage to the TV 2 Turn the power off and wait for 30 minutes before replacing the lamp as it will be hot 3 Do not touch the glass pa...

Страница 107: ...y using a screwdriver 4 Separate the Lamp from the engine by holding the handle and pulling it out 5 To reinstall the Lamp follow these steps in reverse order NOTES Be sure the replacement Lamp is the...

Страница 108: ...e program is broadcasted in color Adjust the picture settings Adjust the antenna Check all wire connections If you are using a VCR check the tracking Unplug the TV for 30 seconds then try operating it...

Страница 109: ...The visual quality is of an SD grade The HD caption that appears when switching channels or when pressing the Information button on the remote control means the selected channel is simply a digital c...

Страница 110: ...not put heavy objects on top of the cabinet This DLP TV projects the image onto a large screen by applying an optical system If you place the TV set face down it might cause a problem because dirt or...

Страница 111: ......

Страница 112: ...BP68 00548A 00...

Отзывы: