


– 13 –
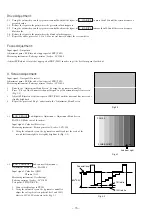
1-1. H POS Horizontal Positioning Adjustment / Adjustment Menu Screen :
PAGE 1-1
Input signal : Crosshatch
Measuring instrument : Pattern generator / Leader : LCG-404
•
Using the volume keys on the jig remote controller, adjust the dot mark
in the centre on the crosshatch screen to the exact centre position
allocating an equal number of squares on both left and right sides of the
dot. (Fig. 1-1)
•
Connect CONN ASSY,1P H-SIZE (8Z-JBR-654-01) to CON604 when
H-POS is out of specification.
1-2. V POS Vertical Positioning Adjustment / Adjustment Menu Screen :
PAGE 1-2
Input signal : Crosshatch
Measuring instrument : Pattern generator / Leader : LCG-404
•
Using the volume keys on the jig remote controller, adjust the dot
mark in the centre of crosshatch screen to the exact vertical centre
position by allocating an equal number of squares on both top and
bottom of the dot. (Fig. 1-2)
1-3. V SIZE Vertical Size Adjustment / Adjustment Menu Screen : PAGE 1-3
Input signal : Crosshatch
Measuring instrument : Pattern generator / Leader : LCG-404
•
Using the volume keys on the jig remote controller, adjust the vertical
number of squares on the crosshatch screen to 13 or 14. (Fig. 1-3)
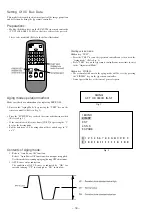
1. Menu Screen Adjustment
• Operate after inputting the following initial figures when replacing EEP ROM.
• Check the condition and adjust the area where the general repair is carried out.
PAGE 1
1 H POS
20
8~9
8~9
Center
Fig.1-1
PAGE 1
3 V SIZE
18
13~14
squares
Fig.1-3


